Agent Repository
Agent Repository is a central place where agents are stored and maintained that allows developers and other users to commit and retrieve agents, collaborate on different projects, etc.
Agent Repository has a folder-like structure to make it easier to logically organize your agents.
Another important feature of the Agent Repository is that it acts as a version control management system, allowing you to keep all the versions of your agents, with various options available to manage and monitor your agents. You can check in your agent in the repository and can keep a track of your versions and changes in the agent. The version control system records the changes you make to your agents, so it lets you save a snapshot of your agents at any time you want.
Along with version management, there are several other useful options like scheduling an agent, deploying an agent, executing an agent, jobs and run management, server, and cluster deployments which makes it a one-stop solution for managing and monitoring your agents from anywhere you want.
The Agent Repository can be accessed via the ACC Web Portal and Sequentum Enterprise Editor.
ACC Web Portal
Repository
Agent Repository in the ACC Web Portal offers a feature-rich web-based interface that allows you to view, organize and maintain your agents, as well as deploy, schedule, run and monitor them via a web browser.
Navigate to Agents -> Repository in order to access Agent Repository.
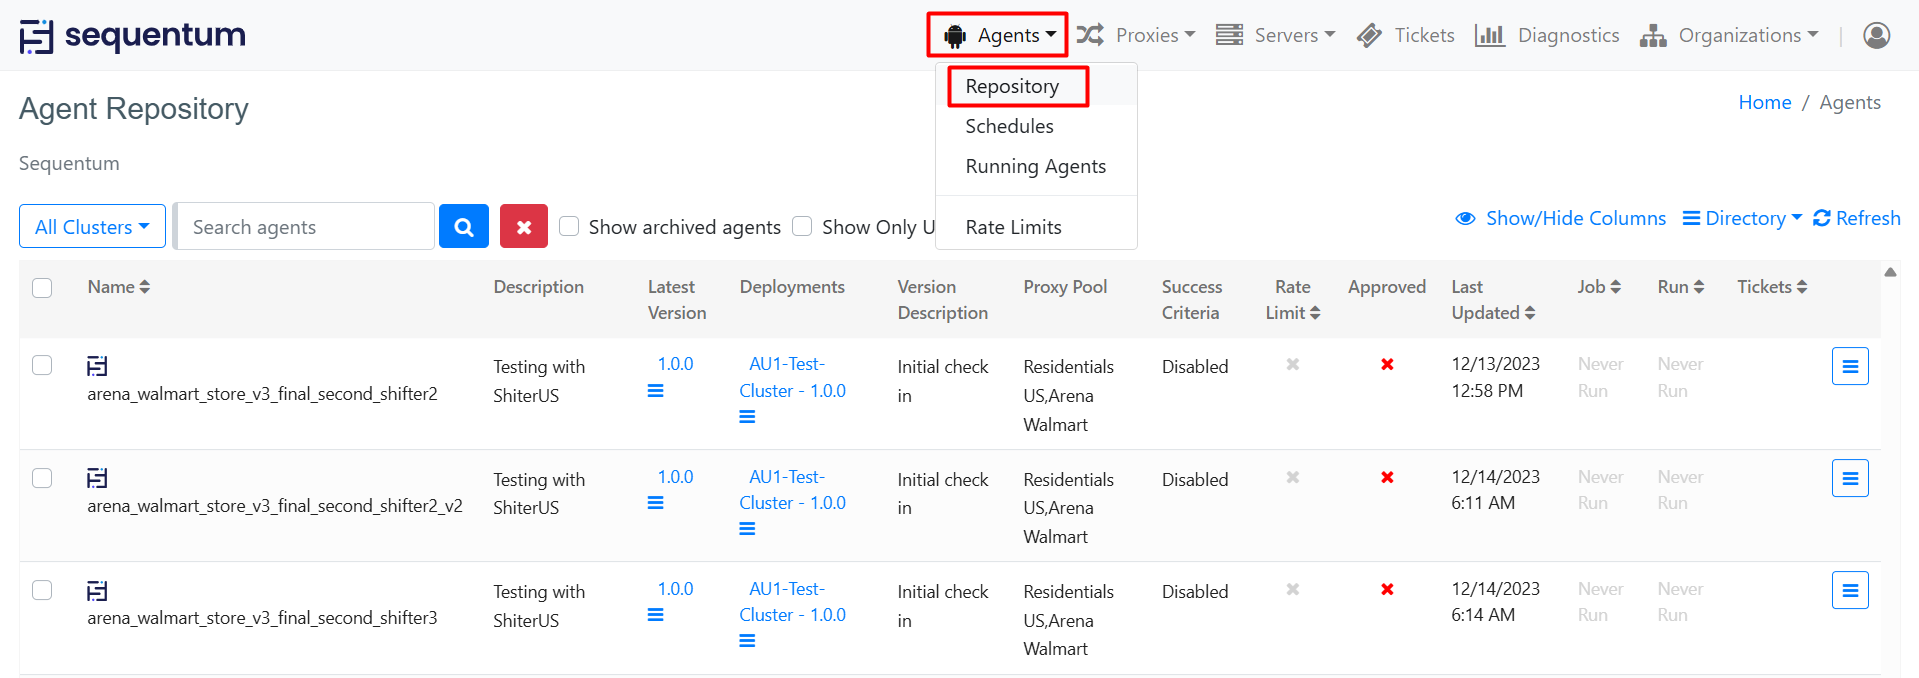
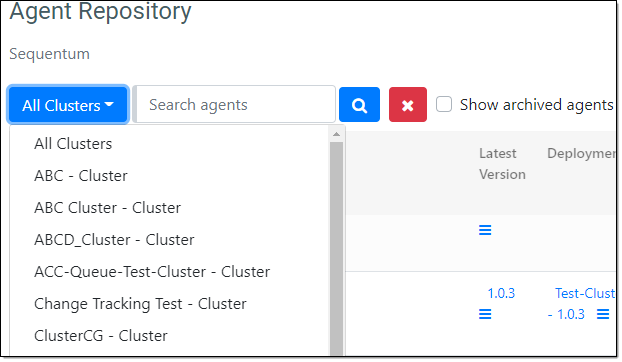
There is an option to filter agents by selecting a cluster/server from the drop-down list, or you can search agent in the repository by typing an agent name into the 'Search agents' text box.
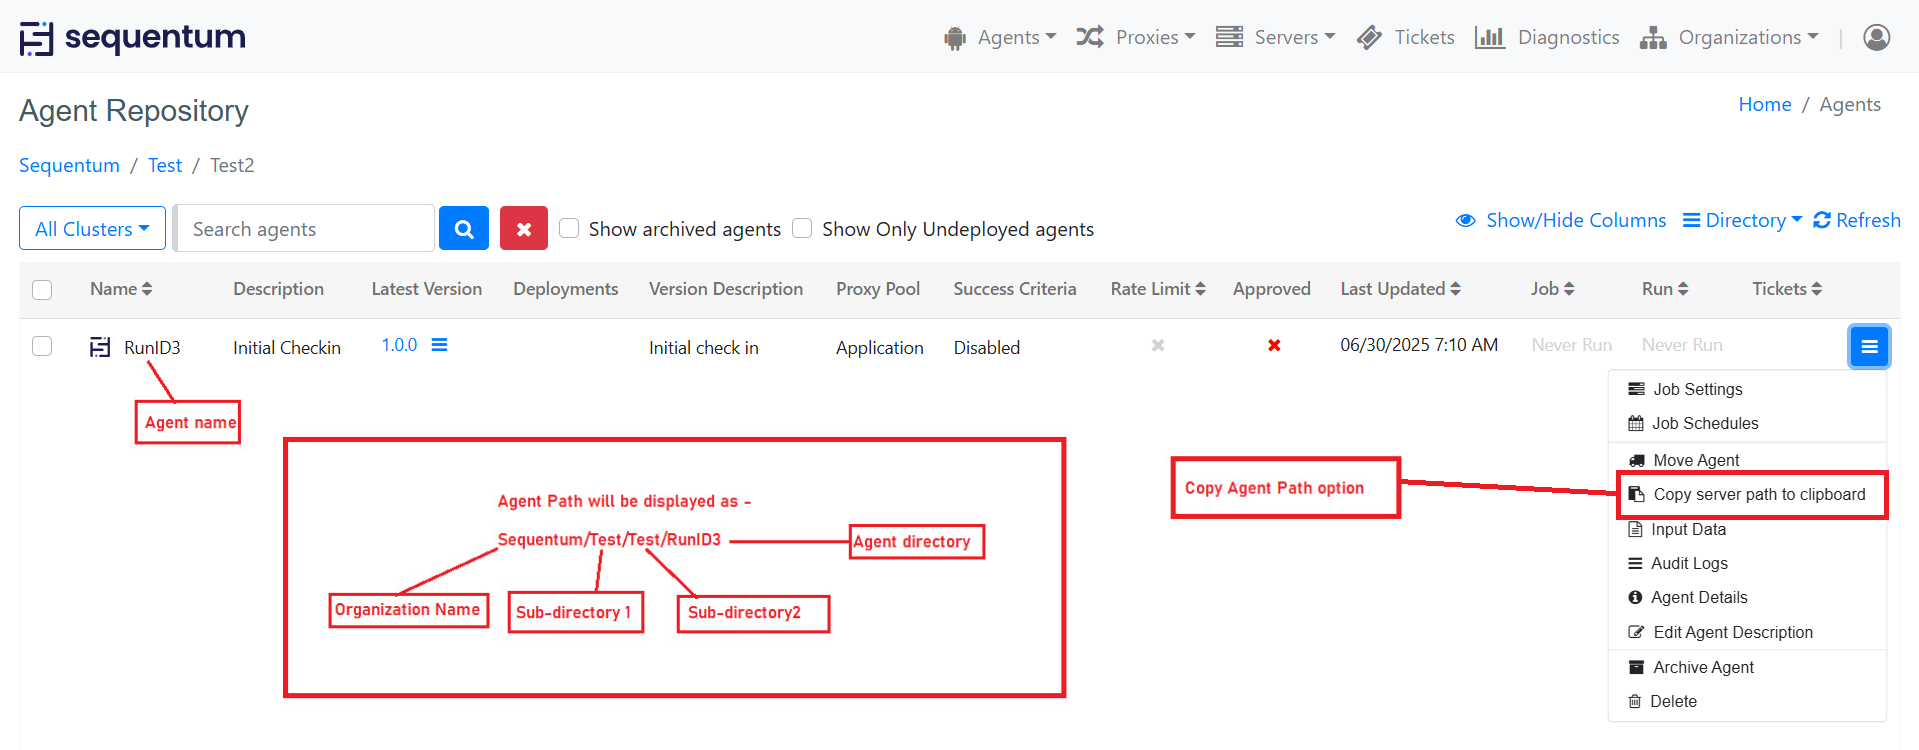
Agent navigation path retrieved via the search agents
There is also an option for the navigation path of the agent therefore both the parts directory and sub-directory path will open separately and display proper navigation when either clicked on the directory link or sub-directory link. When we click on the directory name it will open the directory and when we click on the sub-directory, it will open the sub-directory.
Then, you should be able to see a list of all agents, directories, shared folders and configs.
Sorting
A versatile sorting feature that enables arranging data using both text (alphanumerical) and date values.
Name: Sort by Alphanumeric Order.
Rate Limit: Sort by the Status of Rate Limit (Enabled/Disabled).
Last Updated: Sort by the Latest or the Oldest Dates.
Job: Sort by the Status of Jobs.
Run: Sort by the Status of Runs.
Tickets: Sort by the Combination of Agents Handling Tickets
Show/Hide Columns
This feature allows you to customize the columns displayed on the Agent Repository page, giving you control over what column you want to see. You can hide or display specific columns based on your preferences.

When you will click on “Show/Hide Columns” option , a window will open for the choose column menu as shown below -
In the Column Filter window, you will see a list of all available columns with checkboxes. To display a column, check the corresponding checkbox. To hide a column, uncheck the checkbox. After selecting your desired columns, be sure to save your changes by clicking on "Save" button in the Column Filter window. Once you save your changes, the Agent Repository page will update to display only the columns you selected.
Show Only Undeployed agents
This feature allows users to filter and display only those agents that are currently not deployed on the cluster. By selecting this checkbox, users can effortlessly identify agents that are available for deployment or agents that need attention, simplifying decision-making and resource allocation. With this enhancement, users can maintain a more efficient and organized approach to agent deployment and cluster management, ultimately improving the operational efficiency of the system.

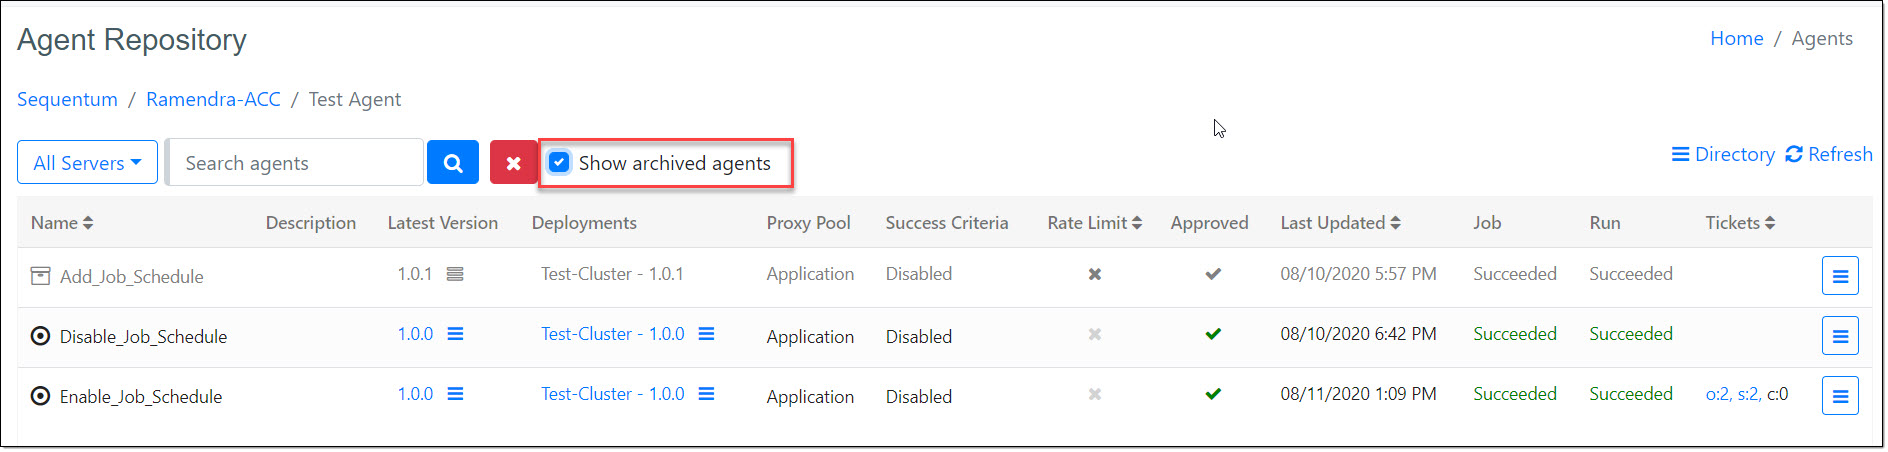
Show Archived Agents
The "Show Archived Agents" Checkbox is a user-friendly feature that enhances the functionality of the Agent Repository page. This checkbox provides users with the ability to reveal agents that have been previously archived, allowing for a comprehensive view of the agent history. When selected, it displays archived agents alongside active ones, providing valuable insights into past configurations, settings, and historical data.

Count of agents
We can get the information about the agents within a directory by hovering over the directory name. This feature allows us to quickly assess the number of agents contained within a specific directory.
The information provided includes the Total number of agents, Scheduled agents, and Non-scheduled agents.


The agent count displayed is dynamic and updates in real-time as agents are added or removed from the directory.
Pagination
Pagination is a feature implemented within the Agent Control Center (ACC) that serves to improve the loading performance of the Agent Repository page. It is automatically applied to both existing and newly added directories within the Agent Repository, similar to how it functions on the ACC Tickets page.
The decision to activate pagination on the ACC Agent Repository page is contingent on the presence of more than 20 agents, mirroring the behavior of the ACC Tickets page. Importantly, the pagination count is solely determined by the number of agents and is not influenced by the quantity of sub-directories, configuration files, or shared directories present. The elements on the page are arranged in the following default order:
Sub-Directories
Configuration Files
Schemas
Shared Directories
Agents, after which pagination comes into play.
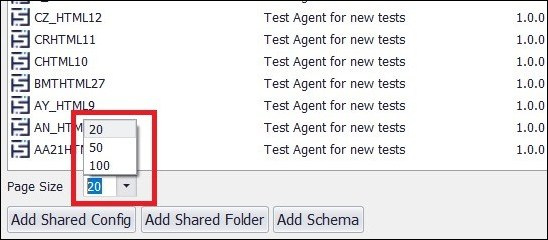
Additionally, users have the flexibility to set their preferred number of agents displayed per page by utilizing a maximum page size filter, offering options of 20, 50, or 100 agents per page. The default setting is 20 agents per page.
Refresh
Please note that the Agent Repository page does not refresh automatically in real-time and some information about agents, e.g. Job Status, Run Status, etc. may change often. So, you should consider using the 'Refresh' button to refresh the Agent Repository page and get the latest details.

Privileges
Authorization to directories and any objects inside of these directories can be controlled with Privileges. Privileges control if a user can modify a directory or an object inside of that directory.
A privilege is the right to perform a particular action or to perform an action on an object of a particular type. Objects include Agents, Config files, Shared Folders, etc. Actions include Full Control, Read Only, Delete, etc.
Privileges also control a user’s access to a ticketing system, whether or not a user receives email notifications, etc. For example, a user can receive an email notification when an agent ran successfully or when it failed.
Only Admins and Super Admins can grant or revoke privileges.
Disable all emails
In the Directory Privileges settings, an additional option "Disable all emails" has been introduced. Enabling this option for a particular directory will halt all email deliveries associated with that directory. It can be done for specific user role or individual user for whom you wish to disable email . This could involve searching for the list of roles or users.
Directories
As mentioned earlier, Agent Repository has a folder-like structure to make it easier to logically organize your agents. Folders are called Directories in Agent Repository. You can create as many directories and sub-directories as you wish to organize your agents in a way that is meaningful for and searchable by the entire team.
A number of actions can be performed on a current directory and sub-directories, including creating new sub-directory, edit, delete, setting directory privileges, creating a new config, etc.
Click the 'Directory' action button at the top of the agent list or click the action button next to a sub-directory to access the context menu.
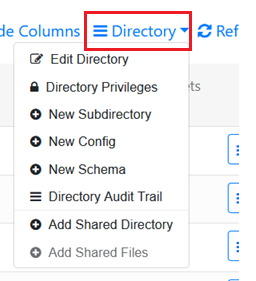
Edit Directory or Edit: Edit a current directory or sub-directory settings.
Directory Privileges or Privileges: Edit a current directory or sub-directory privileges.
New Subdirectory: Create a new sub-directory inside of a current directory.
New Config: Create a new config. To add a new config, click the 'New Config' option from the Directory Context menu.
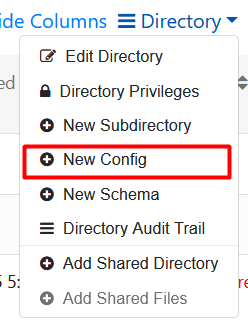
In the ‘Edit Config’ pop up window, enter the Name of the Config file, Description and Configuration details. Then, click the 'Save' button to add the New Config file.
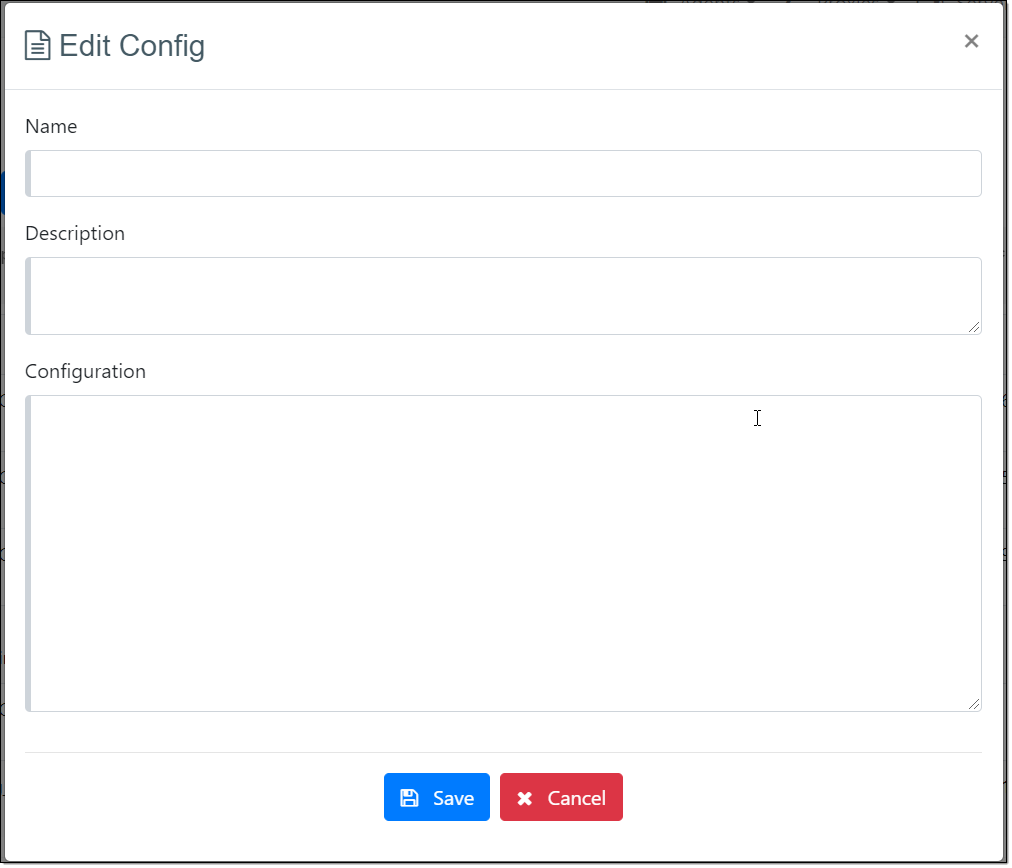
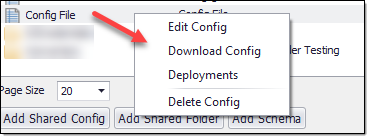
The following are the different actions that can be performed on the config file by selecting an appropriate option from the context menu.
⦁ Edit: Edit a current config file
⦁ Deploy to Cluster: Click on this option to deploy the config file to the Cluster
⦁ Delete: Delete Config Files
⦁ Audit Logs: Demonstrate the sequence of activities or operations performed within the selected Config
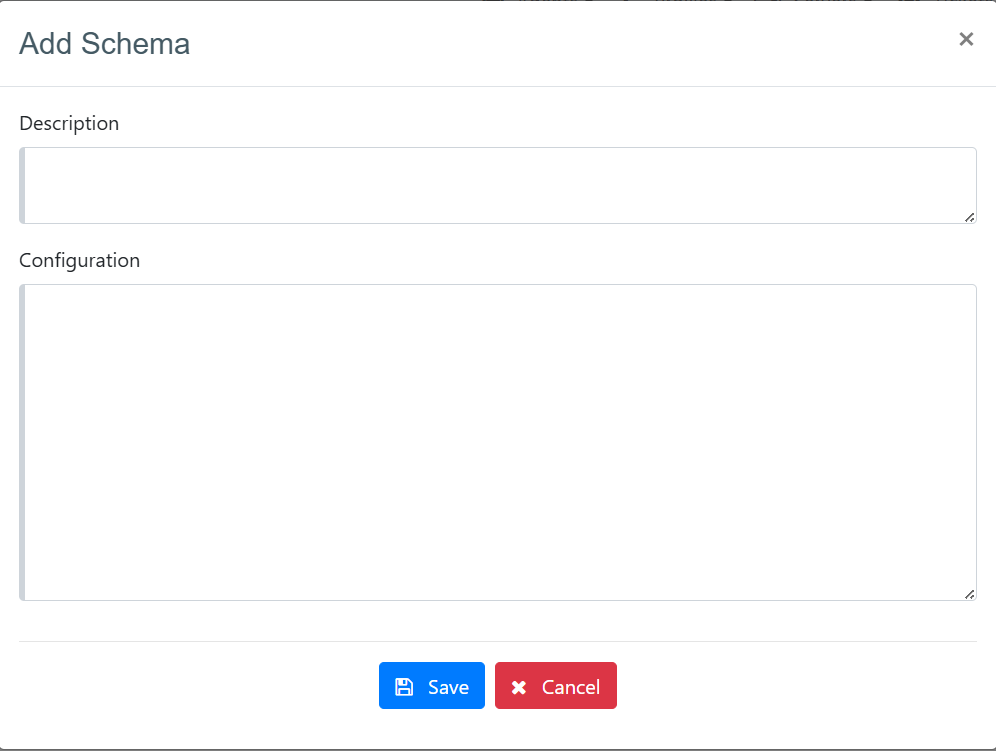
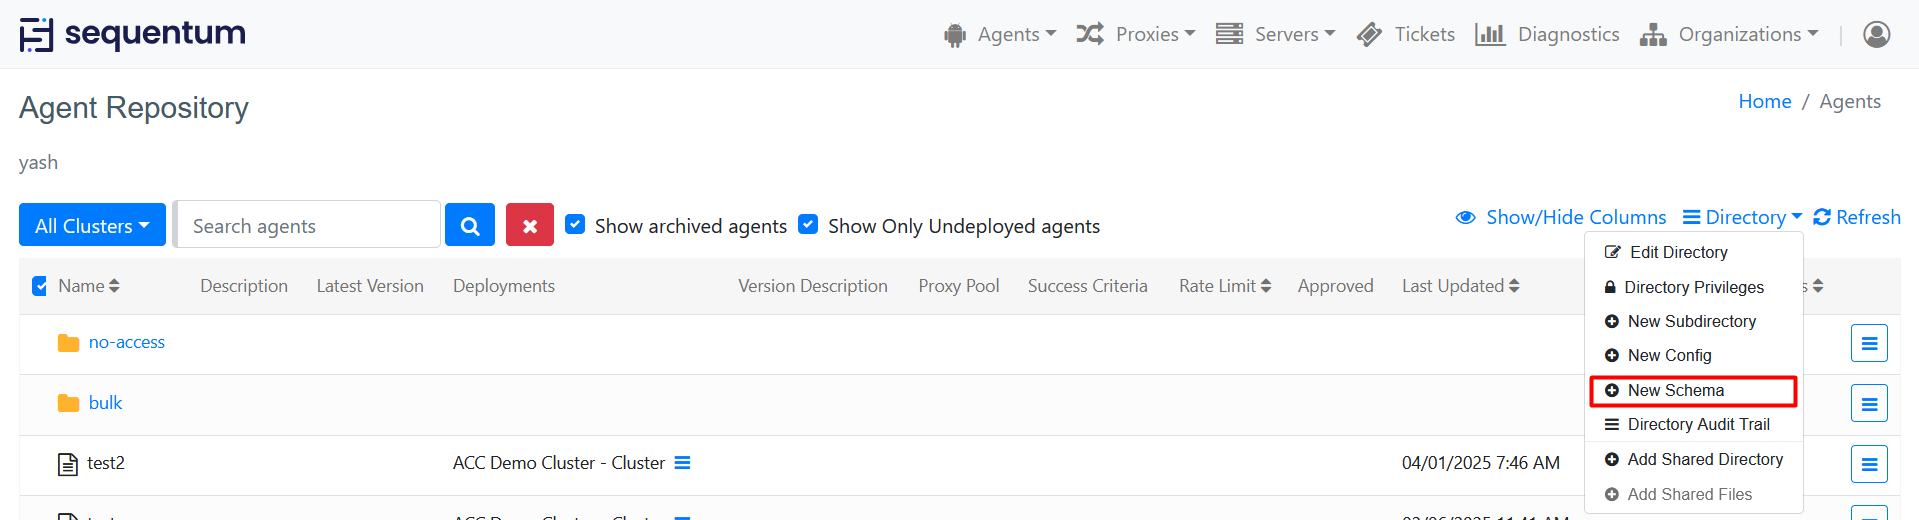
New Schema: Creates a new schema. To add a new schema, click the 'New Schema' option from the Directory Context menu.
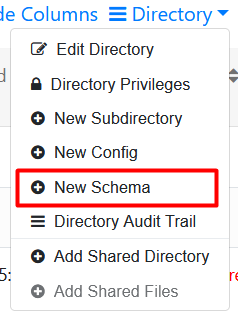
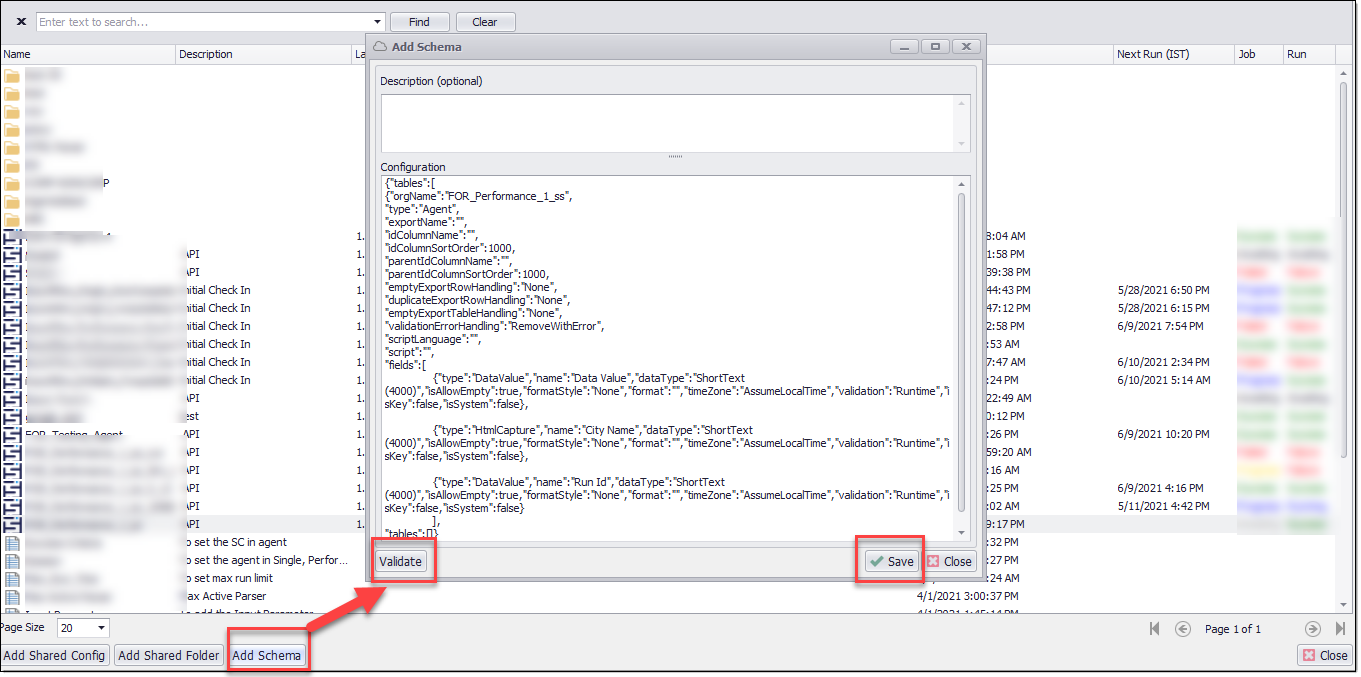
In the ‘Add Schema’ pop up window, enter the Description and Configuration details. Then, click the 'Save' button to add the New Schema. But make sure configuration should be in proper JSON format.
Directory Audit Trail: Demonstrate the sequence of activities or operations performed within the directory or sub-directory by the user.
Delete: Delete a directory and ALL agents it contains.
Audit logs: Demonstrate the sequence of activities or operations performed within the selected directory or sub-directory by the user.
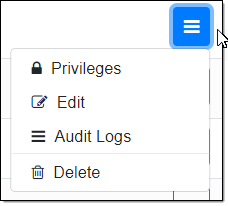
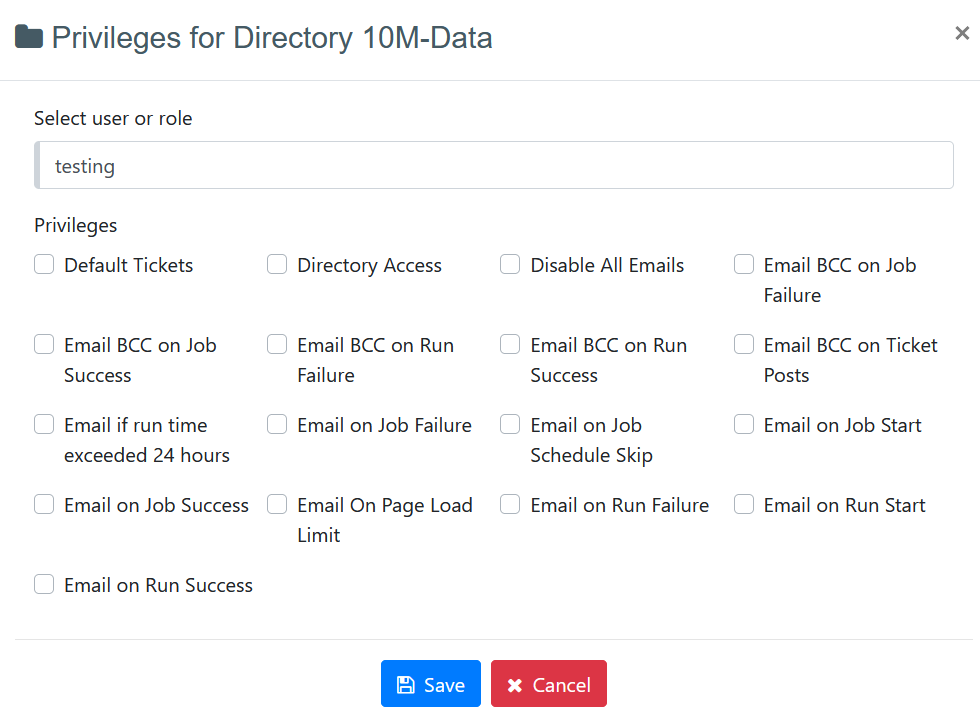
Privileges: Privileges allows you to dictate the privileges for a user or role by selecting them. Privileges include access to Default tickets, Directory access, Email BCC on Job Failure, Email BCC on Job Success, Email BCC on Run Failure, Email BCC on run success, Email BCC on ticket posts, Email on Job failure, Email on Job start, Email on Job success, Email on page load limit, Email on Run failure, Email on Run start, Email on Run success,Email on Job Schedule Skip, Email if run time exceeded 24 hours.
Note: You can select any or all or none privileges for a user or Role from this list.
Edit: In order to Edit Directory, use Edit from the Context Menu options. Here you find the option to edit all details like Directory Name, Environment, Default Support user, Default Consumer user, Default Log level, Script access, High CPU action, Run history retention, Ticket retention, Log retention.
Please note that Default log levels can be set to None/Low/Medium/ High,
Script access to Full/None,
High CPU action to Default, None, Raise ticket, Stop agent and Stop session.
Create New Sub-Directory
To create a new sub-directory inside of a current directory, use a New Subdirectory action command. In a pop-up screen enter a Directory name which is a mandatory field.
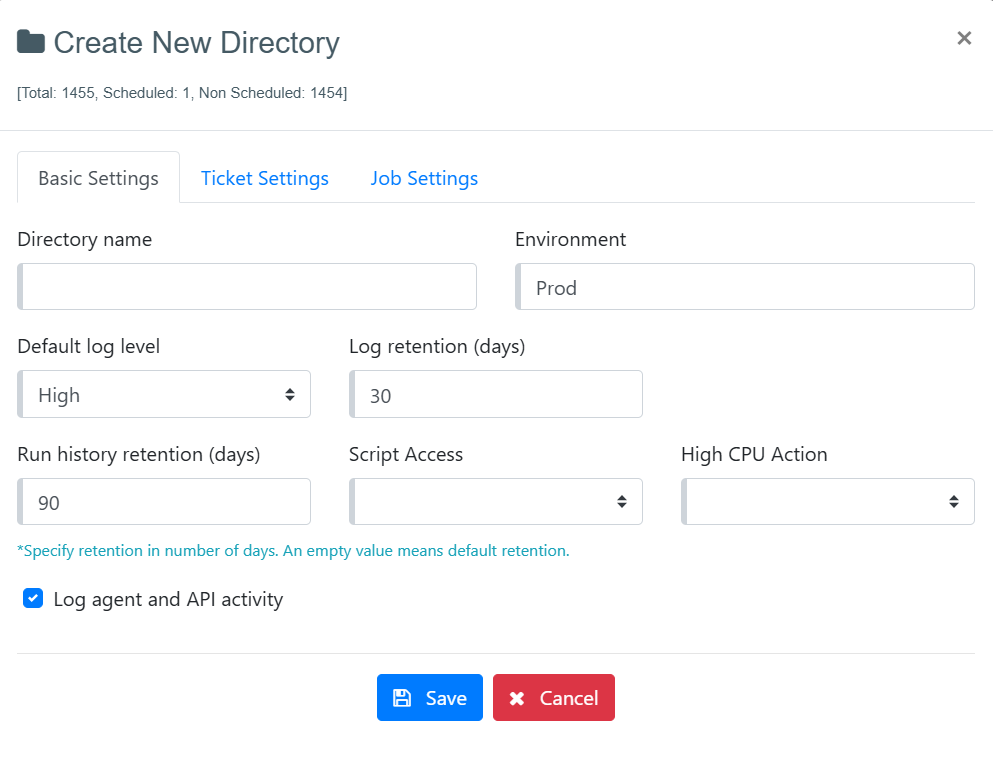
The rest of the fields and checkboxes on this screen are optional.
Directory Name: Shows the name of the Directory.
Environment: By default "Prod" is set as a production environment.
Default support user: Set a default support user for this directory by selecting from the drop-down list. If you set a support user, then all failure tickets will automatically assign to the default support user. Support users are those who analyze and respond to the tickets.
Default consumer user: Set a default consumer user for this directory by selecting from the drop-down list. Consumer users are users for which tickets are created to report the issues.
Default log level: By default log level is set as "High" but a user can also change the log level to None, Low or Medium.
Script Access: This feature allows the access control on the scripts being used in the agent, it may be C# or python scripts. The default value for the script access is "Full" which means all the scripts i.e. what we have today in the agents are accessible and will be used during the agent execution. The second option is "None", with this option none of the scripts will be accessible for the agents either it is an Export script or a simple script used for calculations i.e. no scripting at all, except Regular Expressions. If your agent is using any script and you are enabled "Script Access = None" then there are high chances that your agent will not produce the desired results.
High CPU Action: This demonstrates the action to be taken when the CPU usage is High of the running agent. A user can set this with these options- Default, None, Raise Ticket, Stop Agent, Stop Session. By Default High CPU Action is set to “Default”.
Run history retention: A user can specify retention days to run the history of agents, else it will take the default value of retention.
Ticket retention: A user can specify retention days to log of Tickets, else it will take the default value of retention.
Log retention: A user can specify retention days to log of agents, else it will take the default value of retention.
Run failure tickets: If you check the “Run failure tickets” checkbox, then it will automatically create a ticket when any of the agents runs in this directory get failed.
Job failure tickets: If you check the “Job failure tickets” checkbox, then it will automatically create a ticket when any of the agent jobs in this directory gets failed.
Log agent and API activity: If you check the “Log agent and API activity” checkbox, then it will create a log of agent and API activity.
Edit Directory
To edit a current directory or sub-directory settings, use an Edit Directory or Edit action command. The Edit Directory pop-up screen looks exactly the same as the Create New Directory pop-up screen. Please read the Create New Sub-Directory section for more details.
Directory Privileges
To set and edit directory privileges use Directory Privileges or Privileges action command.
In the pop-up screen select a user or role from a drop-down list.
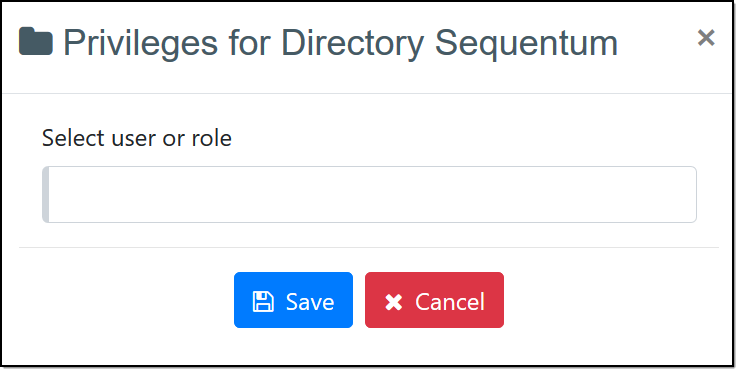
Once selected, you will see a list of Privileges as shown below. Select the privileges you wish to assign to a selected user or role.
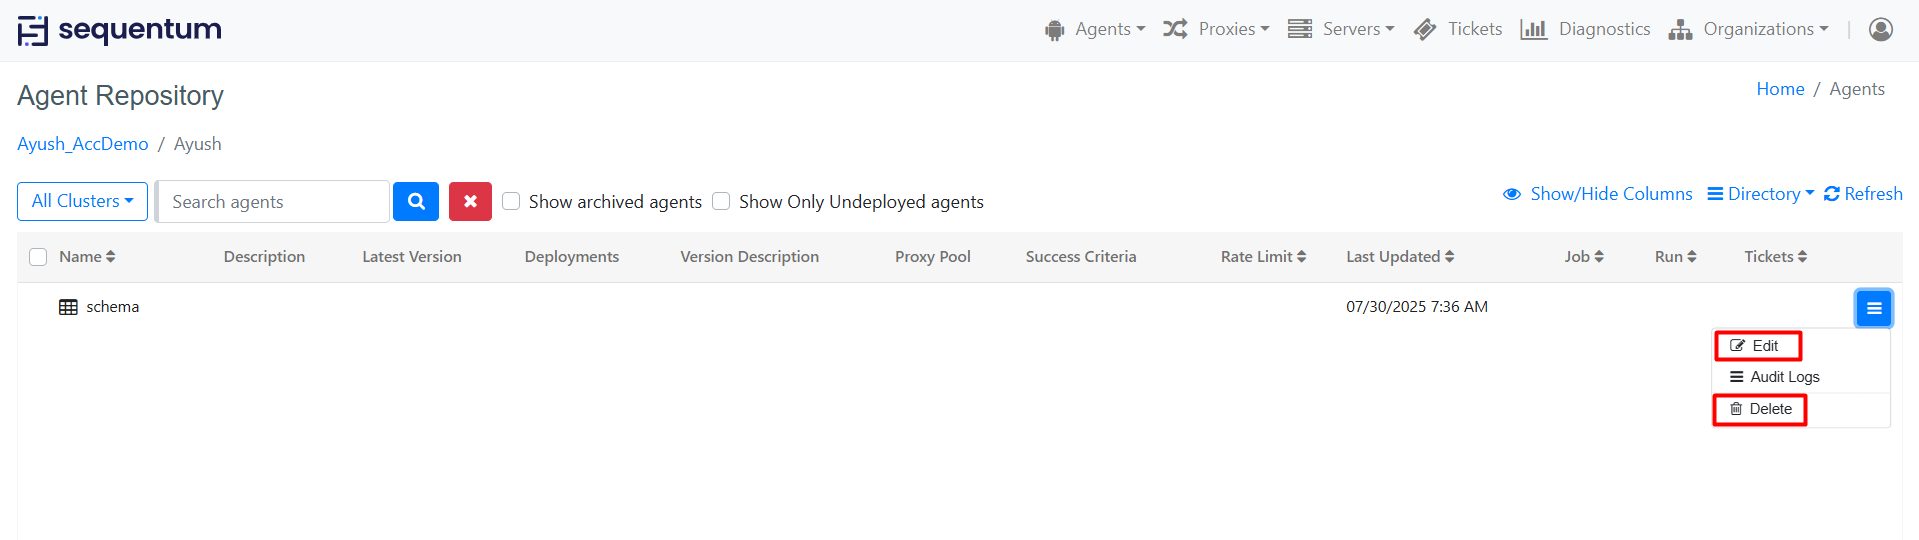
Agent Details
To check complete details about an agent, use the context menu associated with each agent row on the Agent repository page and select "Agent Details". This will display complete details about the agent, such as the latest check-in description, proxy used, success criteria used in the agent for deciding the execution status, export targets like CSV/Excel/Parquet, etc., data distribution such as AWS S3, Azure, FTP/sFTP, etc. and Data Validation rules applied on the agent such as empty row handling, duplication row handling, empty table handling and validation error handling which decides to remove or fail the agent basis the data type applied on the agent and also the allow/disallow empty data for an export column.
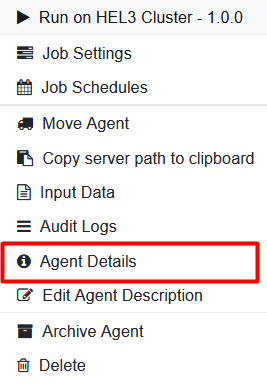
When you click on the Agent Details link, it will open a new page with all the agent details mentioned above.
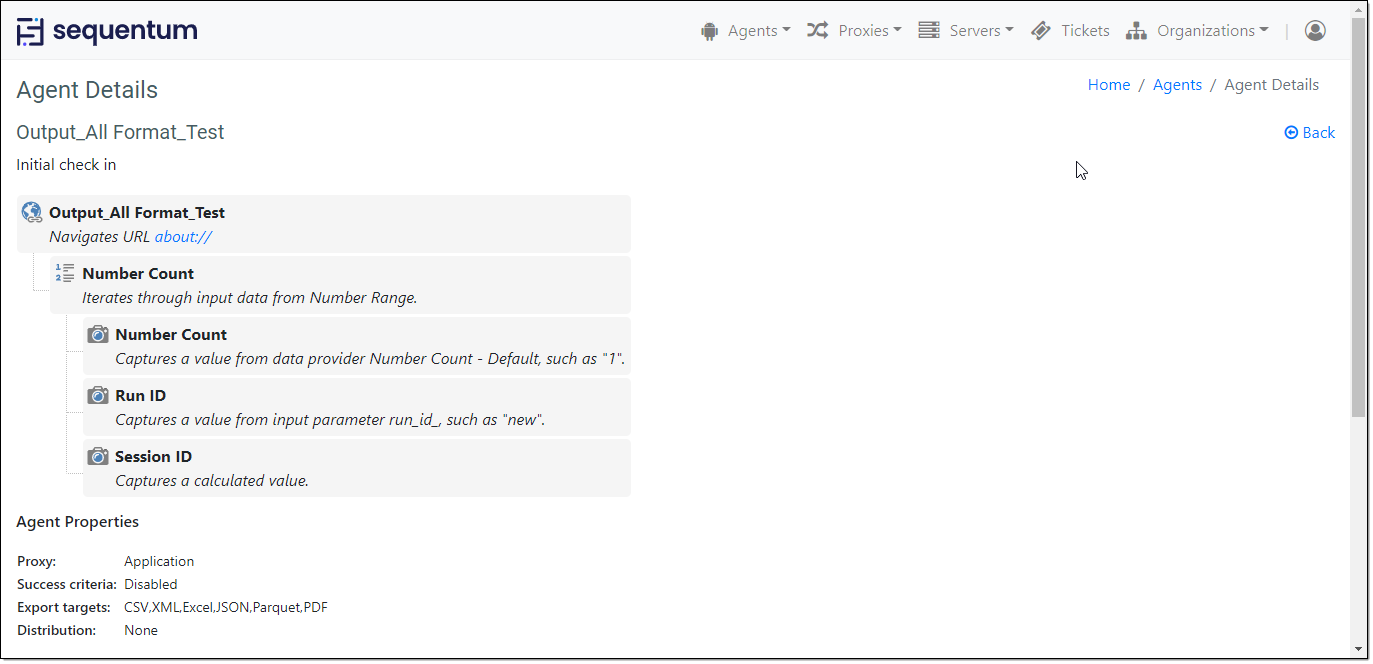
Agent details page
Context Menu
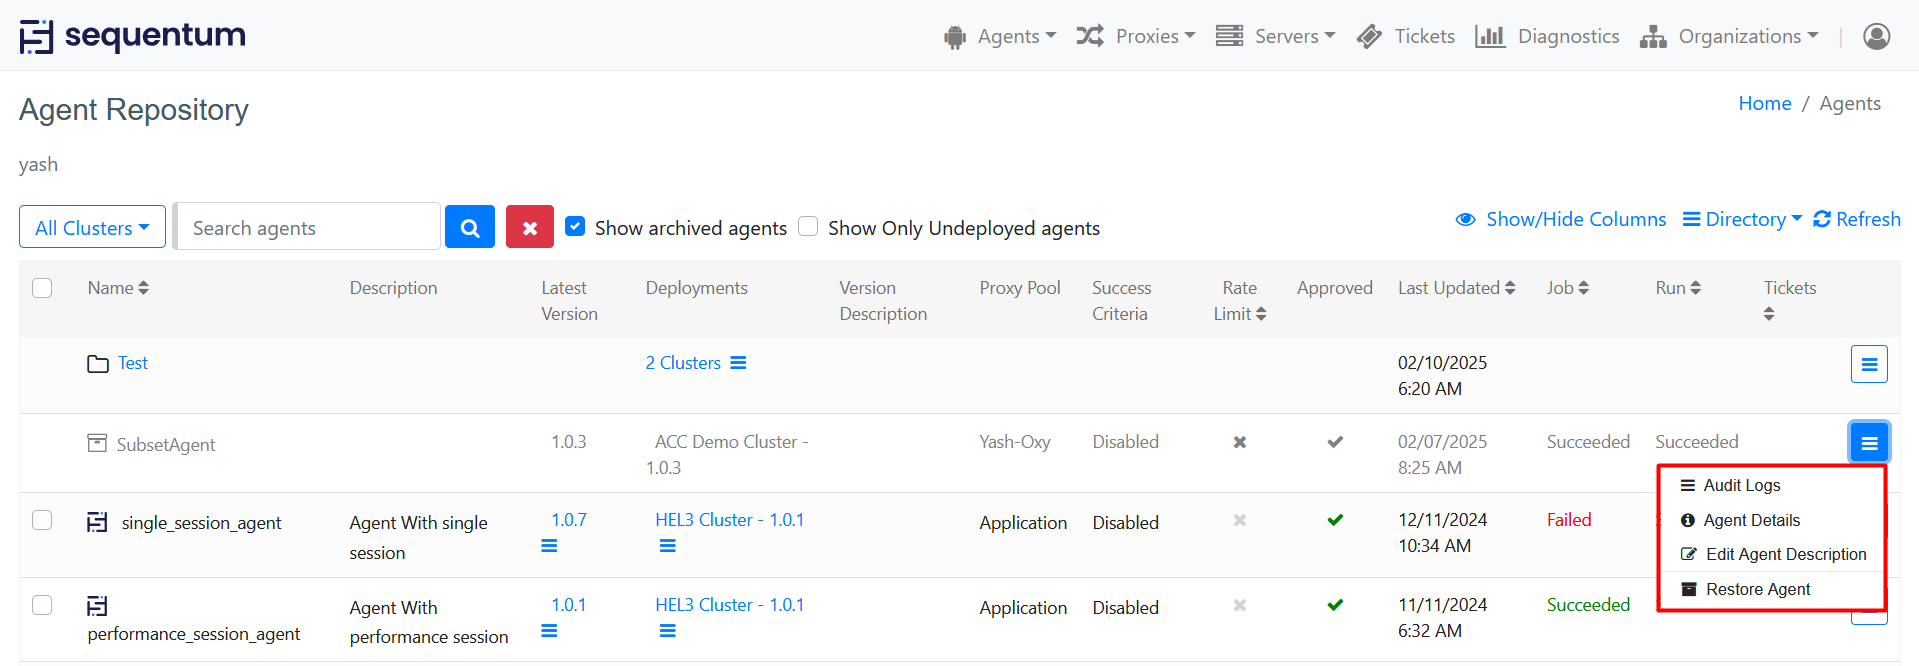
There is a number of different actions that can be performed on agents by selecting an appropriate option from the context menu. Click on the action icon located at the right-hand side of each row of the Agent Repository to expand the context menu. Various menu options give you the flexibility to run, manage and monitor your agents and their status.
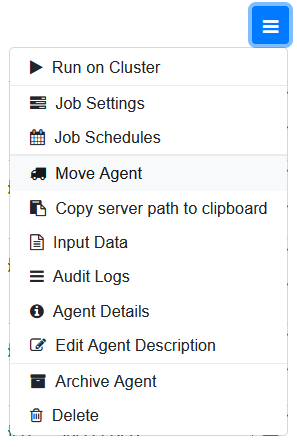
The availability of different context menu items may vary depending on your privileges, the status of the agent, whether the agent has been deployed or not, whether the agent has been deployed to a cluster, etc.
Run on Cluster
This command allows you to run your agent on a cluster once it has been deployed to a cluster. This menu option will not be available if an agent has not been deployed to a cluster yet.

Run on Cluster
You can see a cluster name an agent has been deployed to and an agent version number.
If agent is deployed on multiple clusters, it will only display "Run on Cluster."

Job Settings
This command allows users to configure Job settings of the agent. Please refer to Jobs for more information.
Job Schedules
A user can see all schedules set for the agent and also do modifications such as adding schedules, edit, delete, etc. Please refer to Jobs for more information.

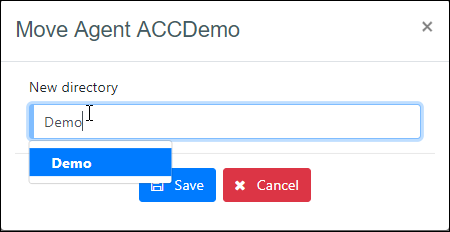
Move Agent
This command allows the user to move the agent from the current directory to another one.

Move Agent
Click the Move Agent option and it will open a new pop-up form giving you an option to enter and select the name of the directory you want to move your agent to.
Copy server path to clipboard
You can copy the agent path from the agent context menu option 'Copy server path to clipboard'. The copied path is exactly the same path of the agent on the deployed servers. You can navigate to the agent directory using the copied path on the deployed servers.
If you rename the organization/sub-directory on ACC, the same will be updated on the ACC however the same will not be renamed on the deployed servers. Although the agents will work fine after changing the org name or changing the directory name on ACC whether the agent is deployed on a single server or multiple servers cluster. The changed name on ACC will be referenced on the server with the initial/original name of the Directory added on the server.
Example - If you rename your organization name or rename any existing sub-directory e.g. "Sequentum" Organization name is renamed to "Sequentum_Test" then the changed name will only reflect on the ACC however the same does not get changed on the deployed servers. You can navigate to the associated path on the server using the Copy server path to clipboard context menu which allows you to copy the exact path on the server which is associated with the changed name on ACC. On the server, the Sequentum directory name will remain the same although the same will shown as "Sequentum_Test" on ACC after renaming.
Note: Please note that the Copy server path to clipboard menu option only provides the path shown on ACC and does not provide the complete path containing the local path of the connected server. A cluster on ACC can have multiple servers connected to it and the servers can have different local paths like one server can be connected to ACC with a local path as C:\AgentControlCenter and another server with a local path as D:\AgentControlCenter. So you will need to append the Server local path along to the data copied by using the Copy server path to clipboard menu to be able to navigate to the exact associated path on the server.
Input Data
A user can use this command to add inputs files in the agent. It can be either done by Upload file or Create CSV File option. These input files can also be modified with the Edit Content command in the Context menu associated with each row, also a user can disable, download, or deleted the input files.
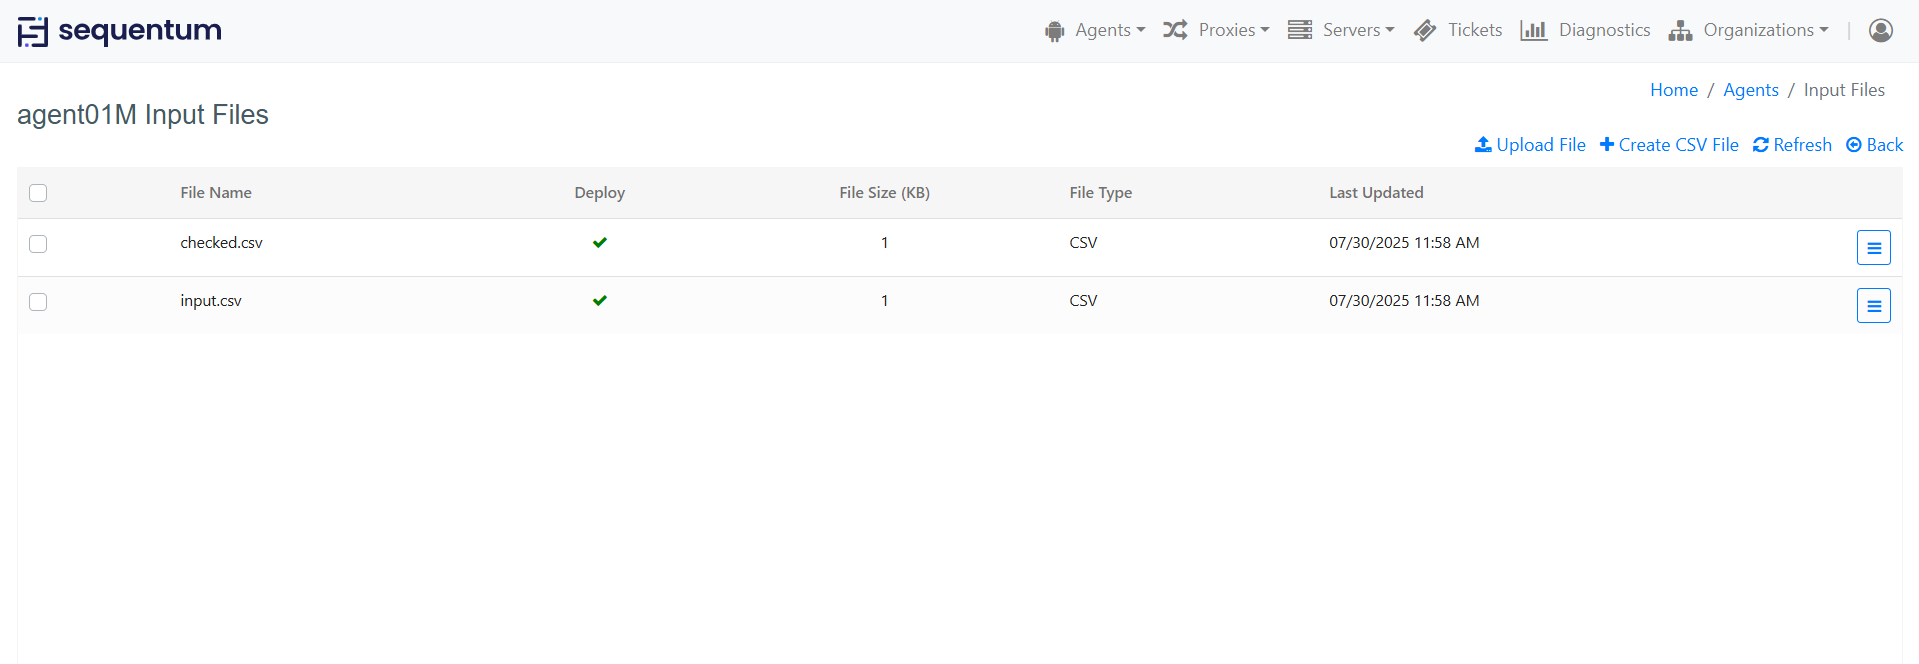
ACC allows a maximum of 300 MB input file size that can be uploaded as an agent input file. However, multiple input files can be uploaded to Input Data.
Delete Multiple input files
A checkbox feature on the input files page allows users to select multiple input files for deletion or disabling with a single click. This streamlines the process of managing input files, enhancing efficiency and ease of use. Users can simply tick the checkboxes next to the desired files and execute the chosen action in bulk.

Archive Agent
We have an Archive option on the agent context menu for the agent which is no longer needed to be scheduled to run.
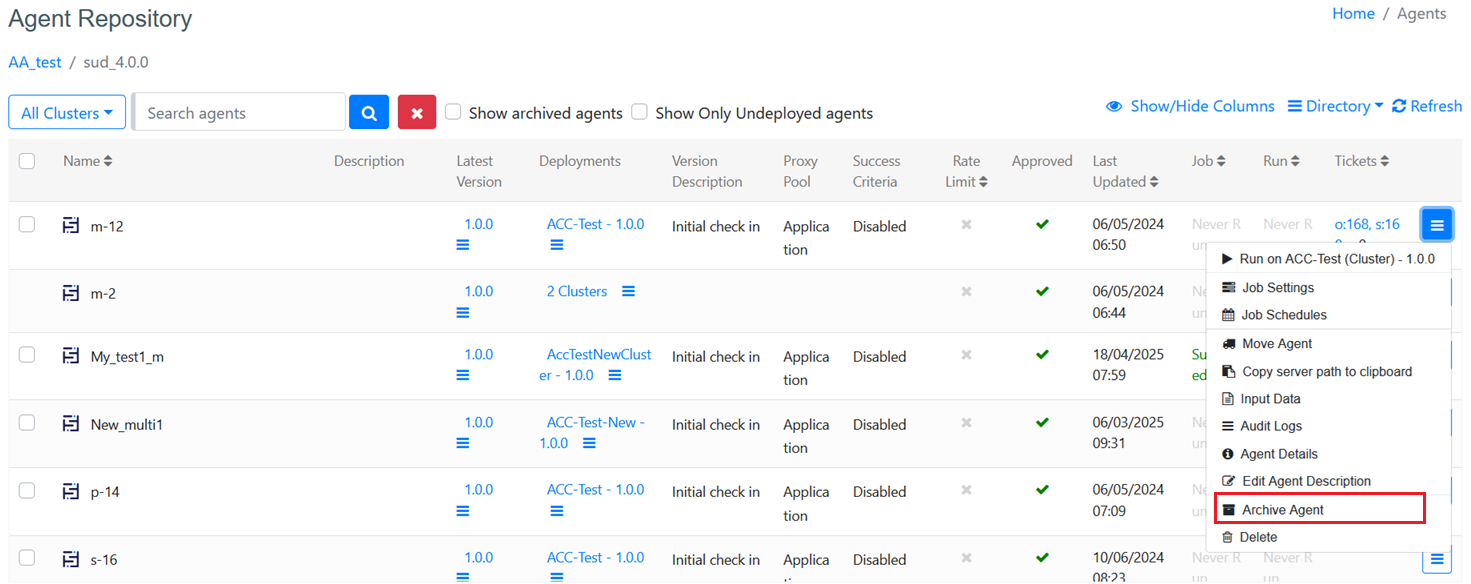
Archive option available in the agent context menu allows you to archive your inactive agents which are not scheduled to run any further and which may or may not be used again in the future but you still want to keep those agents to be stored securely in your repository for a longer period of time.
When you choose to archive your agent then your agent will not be shown on the repository page until you choose to "Show archived agents" besides the agent filter panel to show your archived agents on the agent repository page. The archived agents are displayed as disabled on the agent repository page.
When you choose to archive an agent the following changes will be applied to your archived agent:
All the associated schedules will get disabled automatically.
You will only be able to download the latest version of the archived agent by clicking on the latest version number of an agent under the Latest Version column.
3. Additionally, the archived agent context menu will have only 4 options
Audit Logs
Agent Details
Edit Agent Description
Restore Agent: This option allows you to restore your archived agent and make it active again for further execution. The agent’s inactive options get restored and the agent starts getting displayed as other active agents in your repository. However re-storage agent does not activate your previously disabled schedule and you will either enable it manually or you can add new schedules.
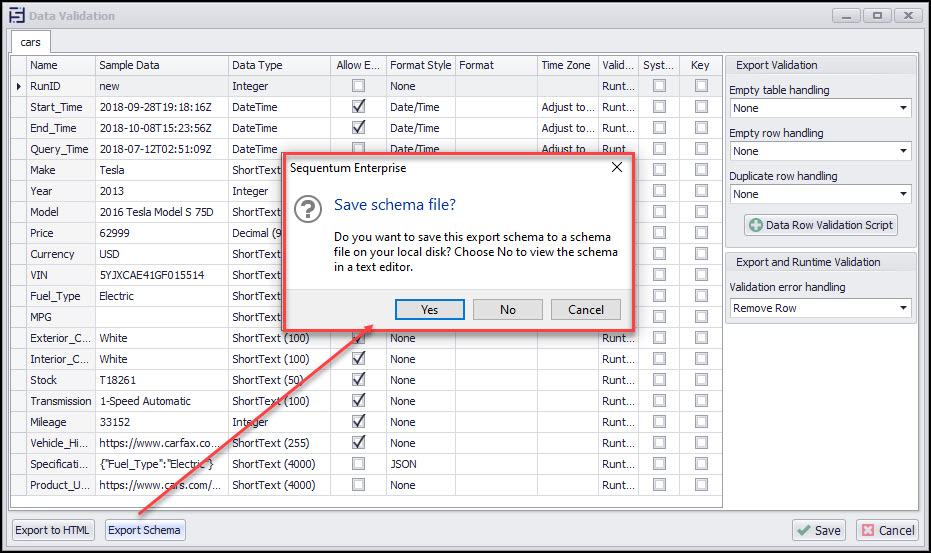
Data Validation Schema
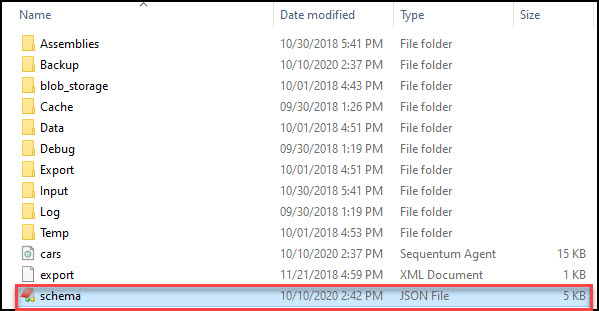
A schema can be created on the Data Validation screen using the settings on that screen. Under the Data tab,click on Validation Rules and then click on the Export Schema button to save the schema file in the agent root folder.

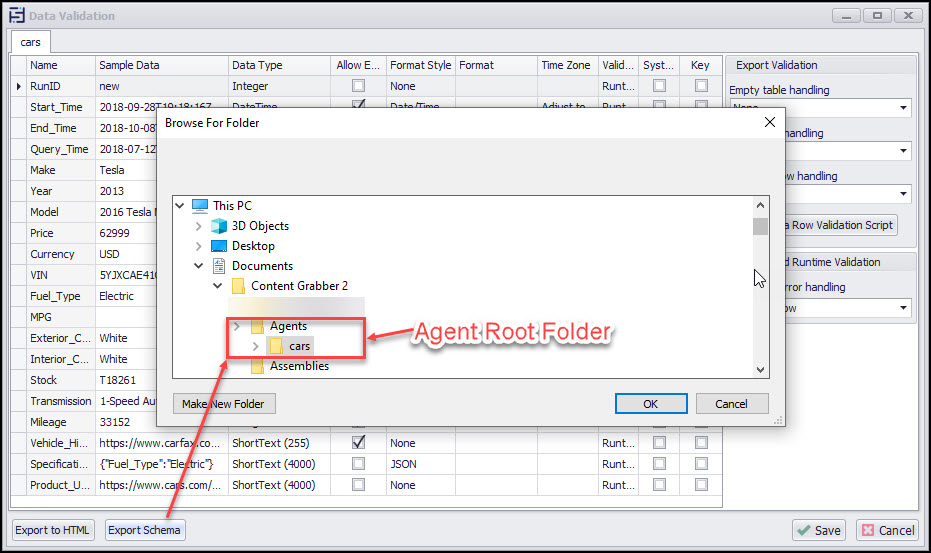
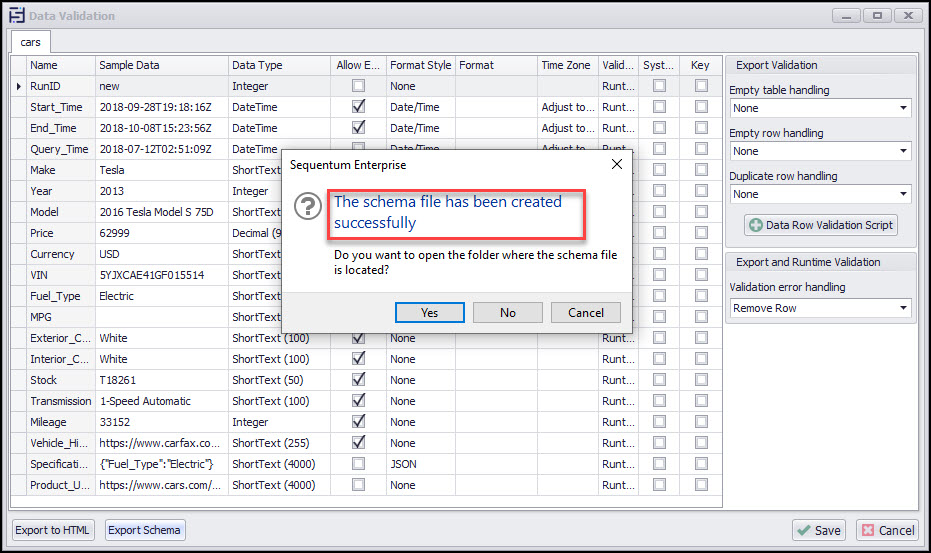
A schema file can be added to a specific agent folder which then will apply to that agent only. It can also be added to a Shared folder which then will apply to all agents using that Shared folder.
Add Schema through ACC Web
Add Schema through ACC Desktop
Schema file can be edited and deleted through ACC Web and ACC Desktop however, the schema can be downloaded through ACC Desktop.

If a schema exists in a Shared folder, new agents using that Shared folder will automatically have the correct capture commands and settings to conform to the schema.
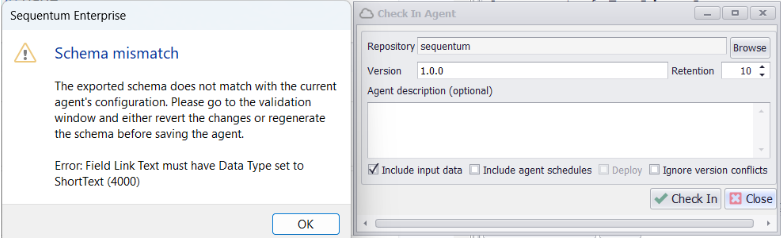
If an agent does not conform to a schema, a warning will be displayed when trying to save the agent.
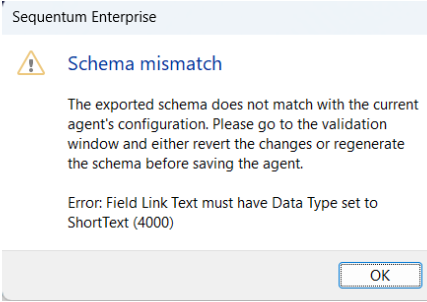
Sample example of a schema mismatch error
To save the agent after getting a schema mismatch error, we have to :
1. Either export the changed schema of the agent
Or
2. We have to revert the changes made in the agent after exporting the schema.
If a schema file has already been exported to the agent folder and the agent is later modified, then on opening the Data Validation window, all modified fields will be highlighted in a different color to indicate the changes.
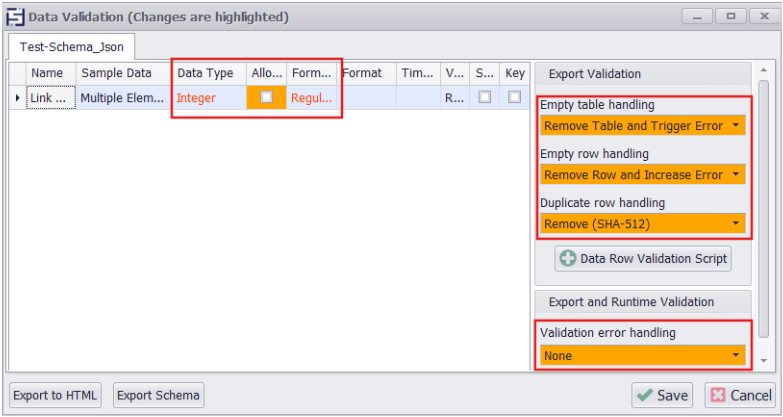
Changes highlighted in color
A schema can be uploaded to ACC on the ACC Repository screen using Sequentum Enterprise Desktop. The uploaded schema will use the Export Schema of the current agent by default.
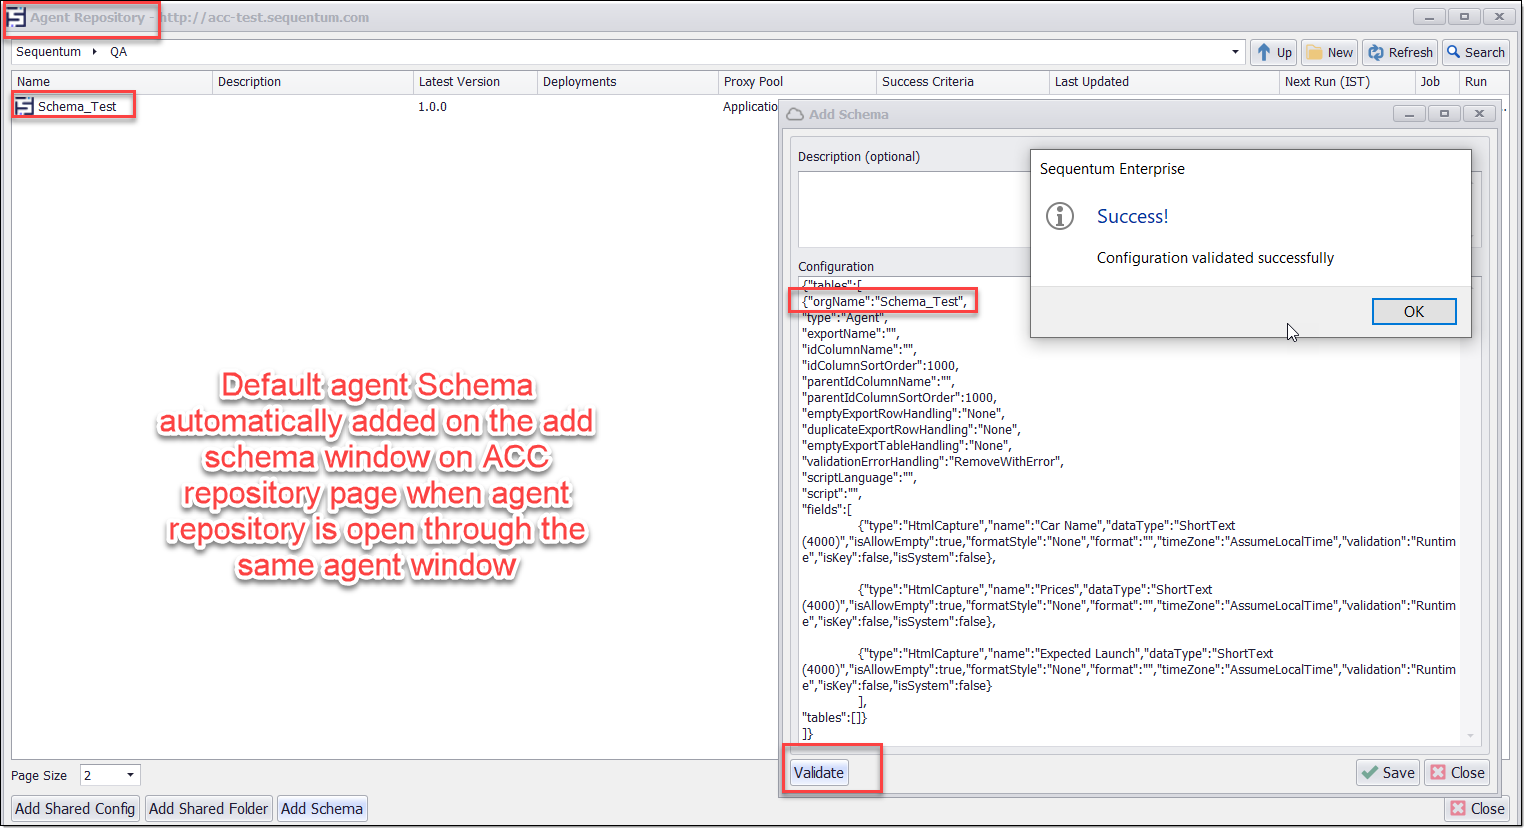
A schema in ACC will apply to all agents in the directory where the schema is located.
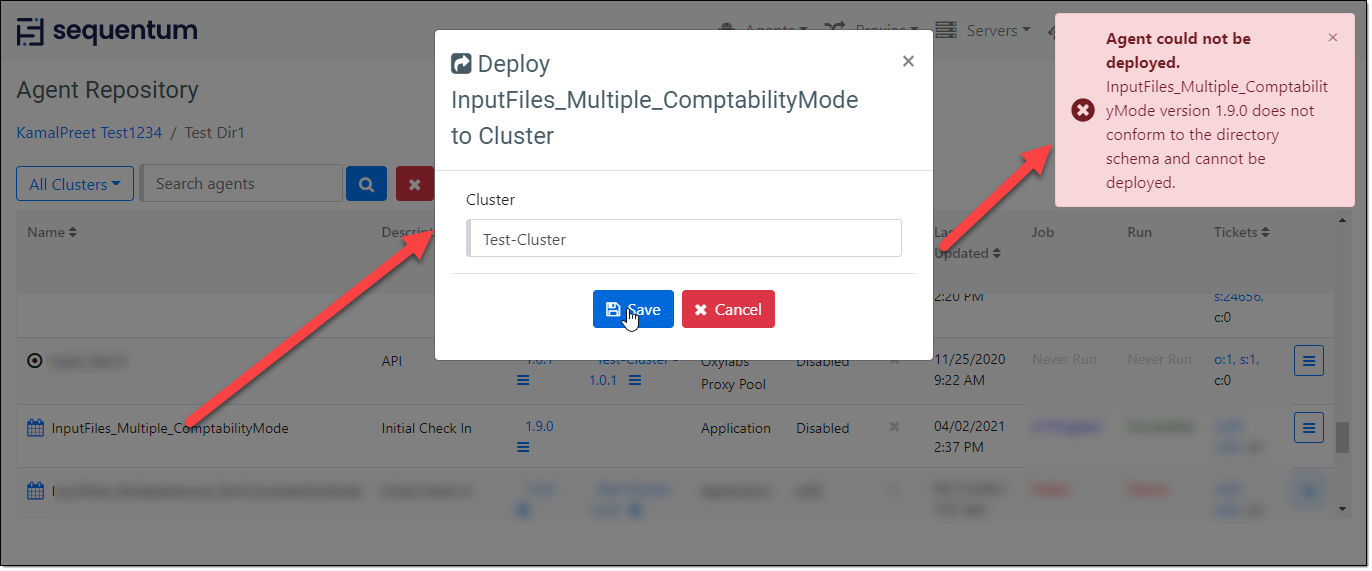
An error will occur when checking in an agent that does not conform to the ACC schema.
Sample error message on schema mismatch
An agent that does not conform to a schema in ACC will have a version number colored in red.
When adding or changing a schema in ACC, only the latest version and all deployed versions of all agents will be validated. All other versions will be marked as unknown and have their version number colored yellow. A version will always be validated when deployed if its status is marked unknown.
An error will occur when deploying an agent that does not conform to the ACC schema, and it's not possible to ignore the schema.
Error deploying agent through ACC Web
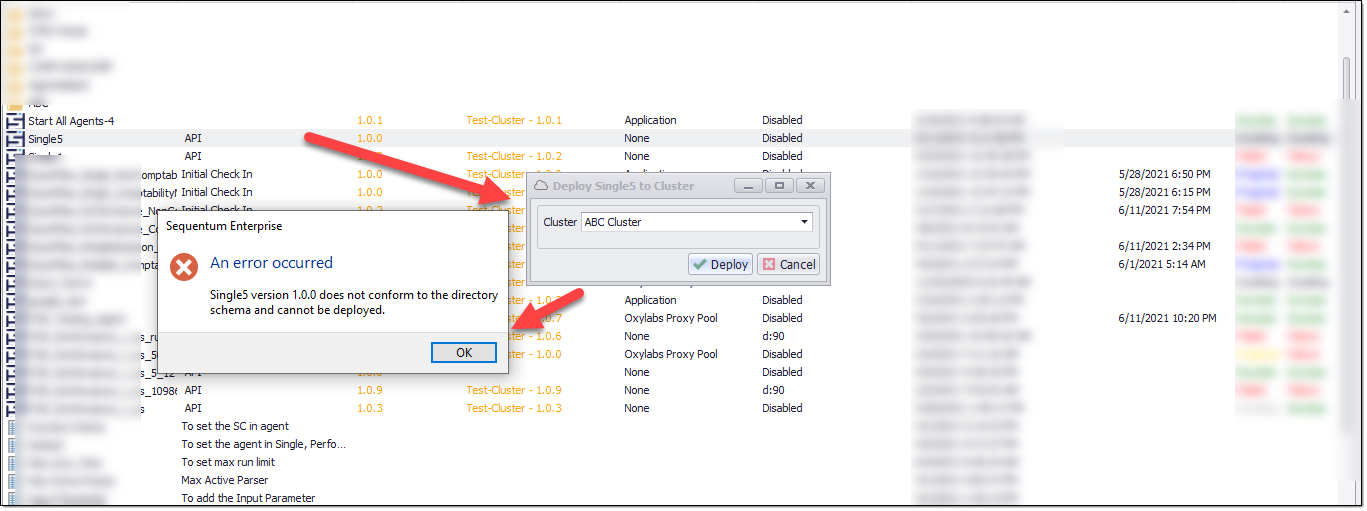
Error deploying agent through ACC Desktop
Schema validation never occurs at runtime. This is to keep complexity low and runtime performance high.
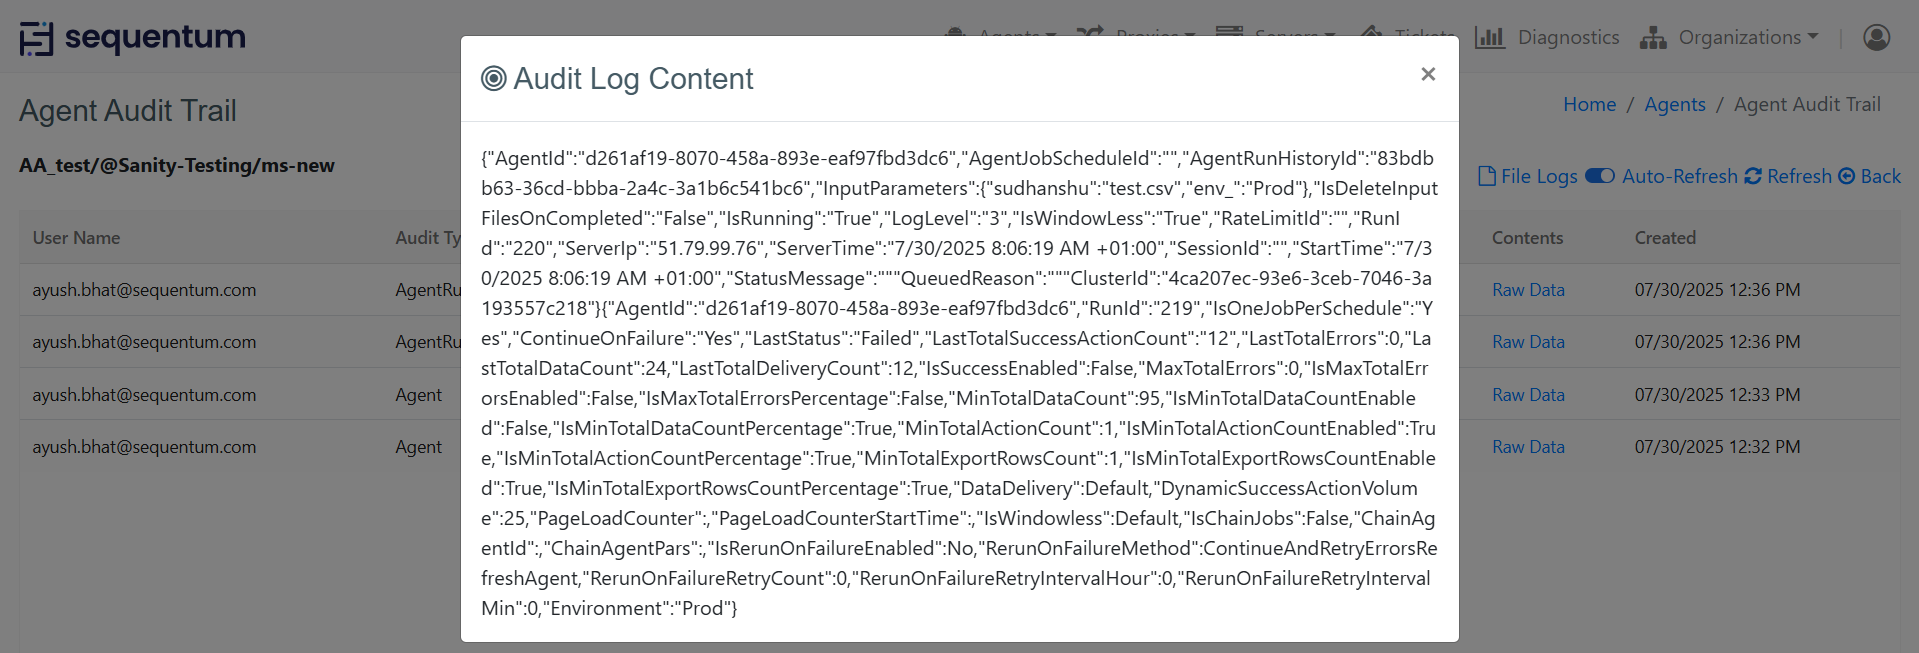
Audit Logs
Often, it is useful to know who did what and when to a particular agent. Audit Logs is kept for all the agents in Agent Repository. Audit Logs is a chronological record of system activities to enable the reconstruction and examination of the sequence of events and/or changes in an agent.
For example, you will be able to see who and when created and modified an agent, who and when deployed it, who and when added a job or schedule, etc.
Use the 'Audit Logs' command from the context menu to open the Agent Audit Trail page.
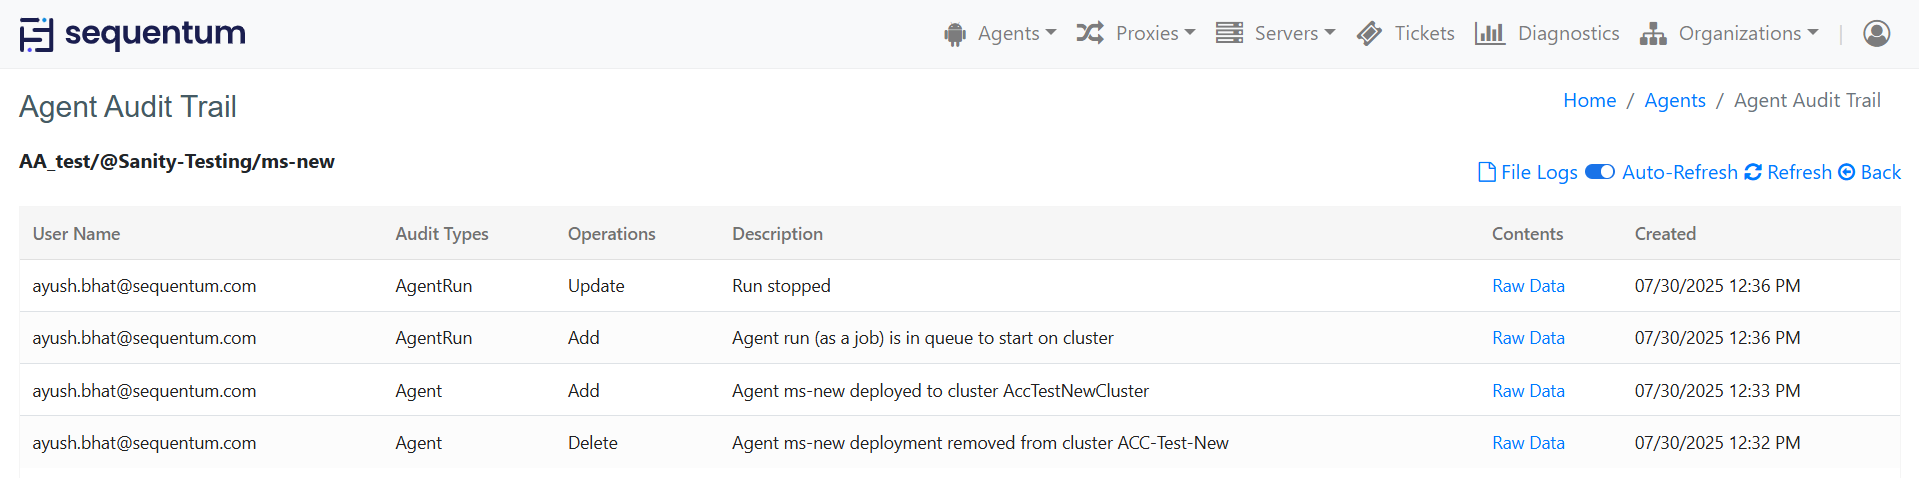
On the above screen, you will see the actions, changes and event have been performed on an agent. Additionally, when you click on the Raw Data link for any audit row, it will open a pop-up screen that will show you the Audit Log Content for that particular audit row. These log details are stored in the database.
On the other hand, click on the “File Logs” link displayed on the top right side of the "Agent Audit Trail" page to check logs stored in the file system.
To know more information about agent audit logs, please read the Audit Trail article.
Delete
The Delete command allows the user to delete agents from the repository, including all the associated deployments, schedules, execution histories, etc. So, you need to be very cautious before using the Delete command because you will not be able to undo this operation. It is recommended that take a back up of your agent before deleting it from the repository. An alert frame is still popped-up before doing the permanent delete.
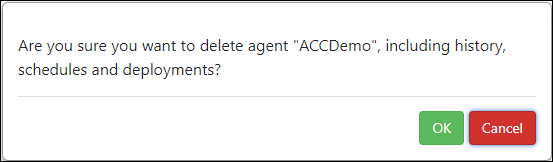
WARNING
This operation will delete an agent, including all the associated deployments, schedules, execution histories, etc. You will not be able to undo this operation.
Fail Latest Job
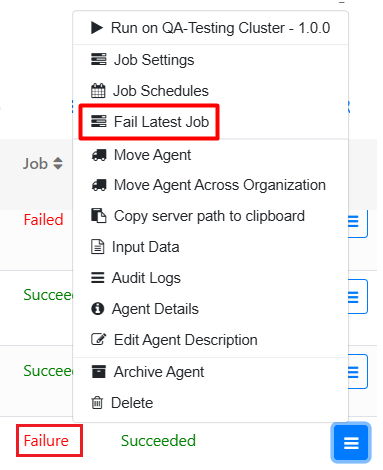
This command allows you to select “Fail Latest Job” from the agent’s context menu which redirects you to the Job History page, where the job status can be manually set as Failed or Succeeded.
Deployments
A user can deploy agents to a cluster. Please note that you need to set up your servers or/and clusters before. Then only be able to deploy your agents. Check Servers & Clusters for more information about servers and clusters, how to set them up, and the differences between them.
Deploy to Cluster
This command allows you to deploy your agent to a cluster. This menu option will be available in the Latest Version of the agent.
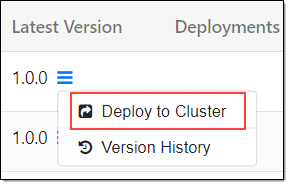
Deploy to Cluster
Read Cluster Deployment or more information on how to deploy agents.
Deploy Latest Version to Cluster
A user can deploy the latest version of the agent available in the agent repository but yet not deployed to the cluster by using the same command "Deploy to Cluster". You can see an agent version number you are going to deploy.
Read Cluster Deployment for more information on how to deploy agents.
Download Agent from the Agent Repository page
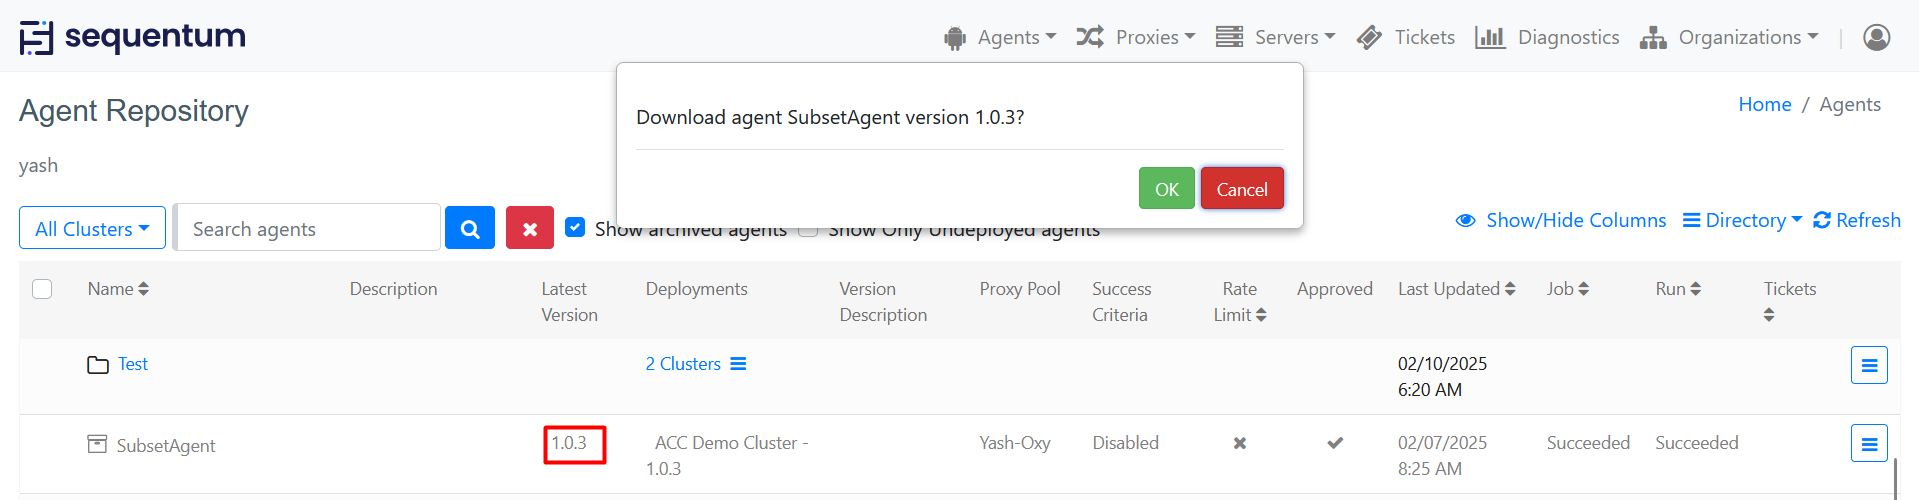
Users can download the latest version of the agent using the version link available under the Latest Version column on the Agent Repository page.
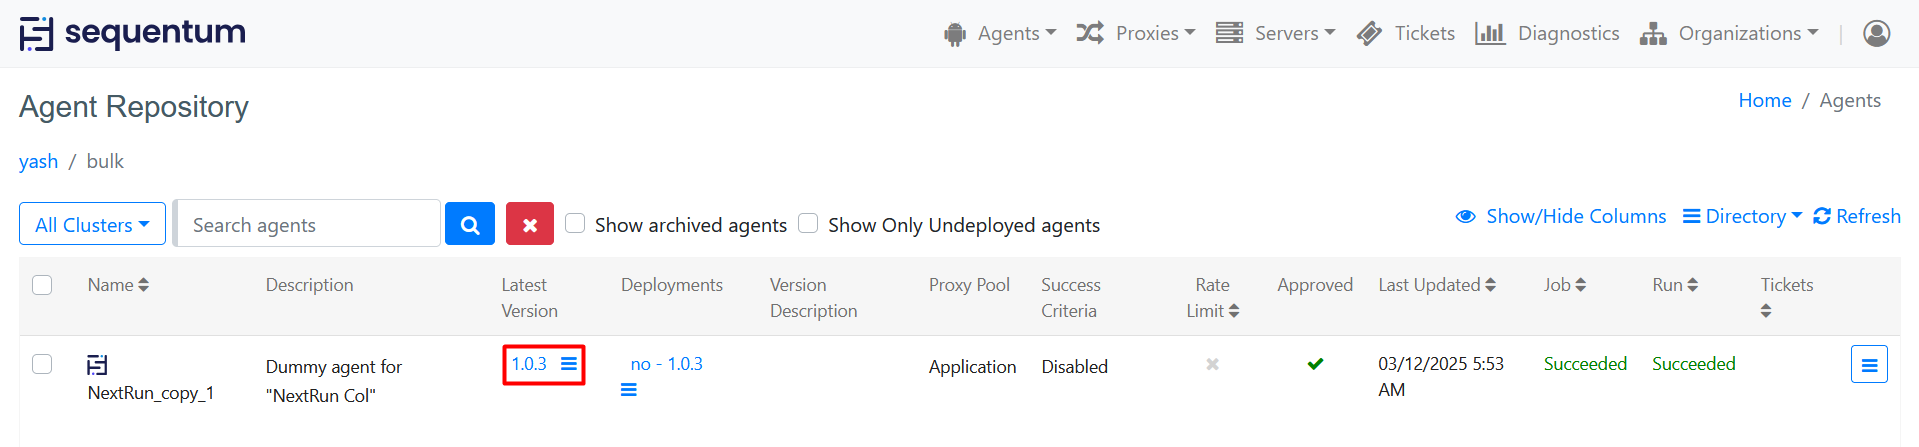
Additionally, the users can also download the deployed version of the agent using the version link available under the Deployments column under the Agent Repository page.
Apart from the links to download the agent from the Version History page these additional version links are provided on the Agent Repository page to minimize the navigation in order to download an agent.
This command allows you to download the deployed version of the agent on the cluster.
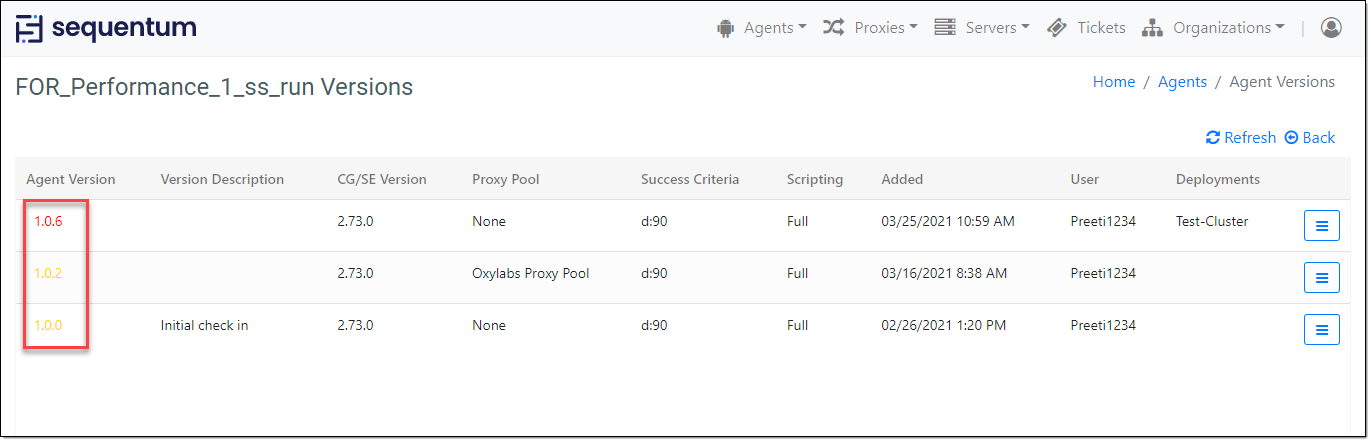
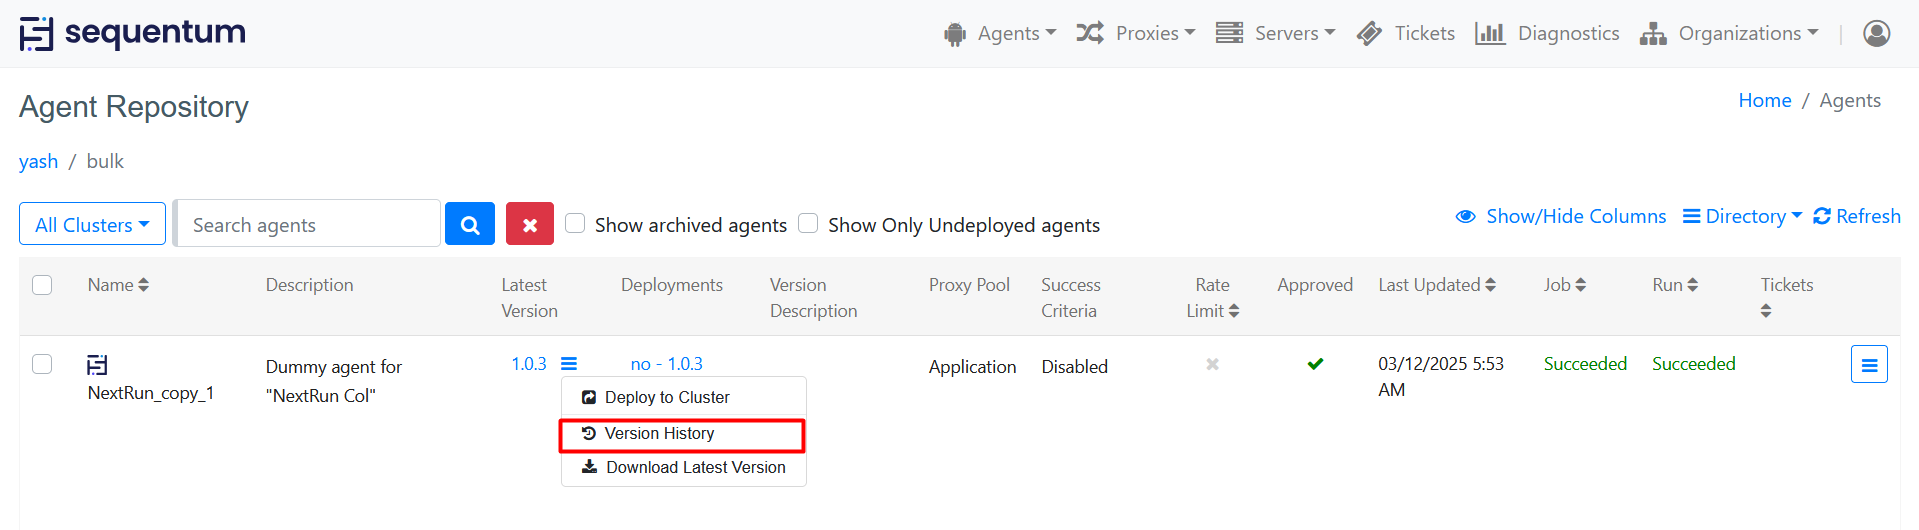
Version History
A user can see all the checked-in versions of an agent with the Version History option. The page displays the previously checked-in versions of the agent, description of changes, the Sequentum Enterprise version, a date when each version was added into the agent repository, its deployment status, and the username who added that version.
Deploy Older Version to Cluster
If there is any requirement where an older version of the agent needs to be deployed then the same can also be achieved.
Agents -> Repository -> Version History
Version History page displays the existing versions of the agent, Version description, Sequentum Enterprise Version, "Added date and time" and User.

Click on the Context Menu of the selected version for menu details:
Deploy to Cluster - Click on this option to deploy the selected version on the cluster.
Download Version - A user can download the agent(scgx) of the selected version on their local machine. Storing this version will override the existing version.
Delete - A user can delete a version from the agent repository with this option. A version can only be deleted if there is no current reference to it. (i.e that version of that agent is not currently deployed on any cluster). Please note that a User with Admin privilege can only be able to delete agent versions.
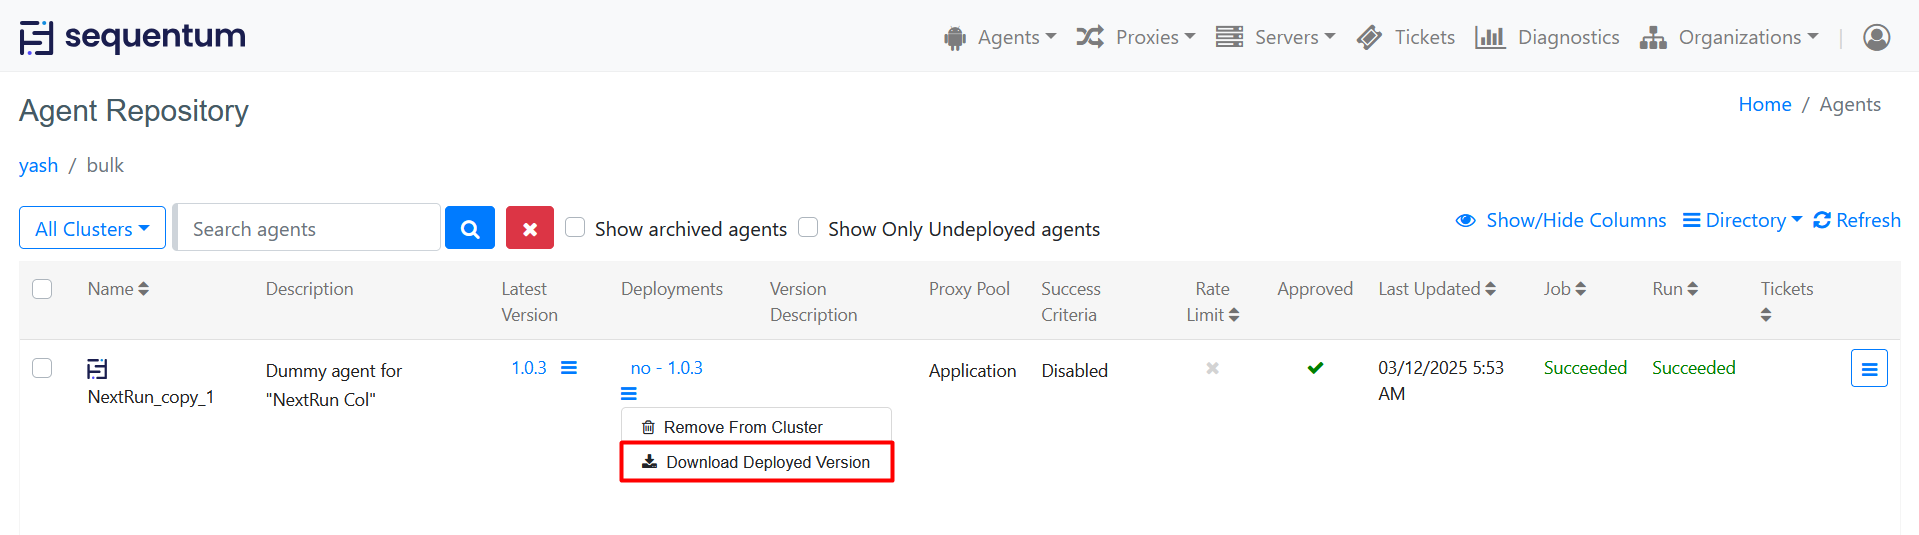
Remove from Cluster
This command allows you to remove an agent from a cluster. For more information please read Cluster Deployments.
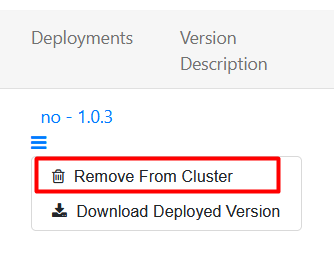
This command will not remove an agent from Agent Repository. If you wish to remove an agent from Agent Repository, use Delete option in the Context Menu.
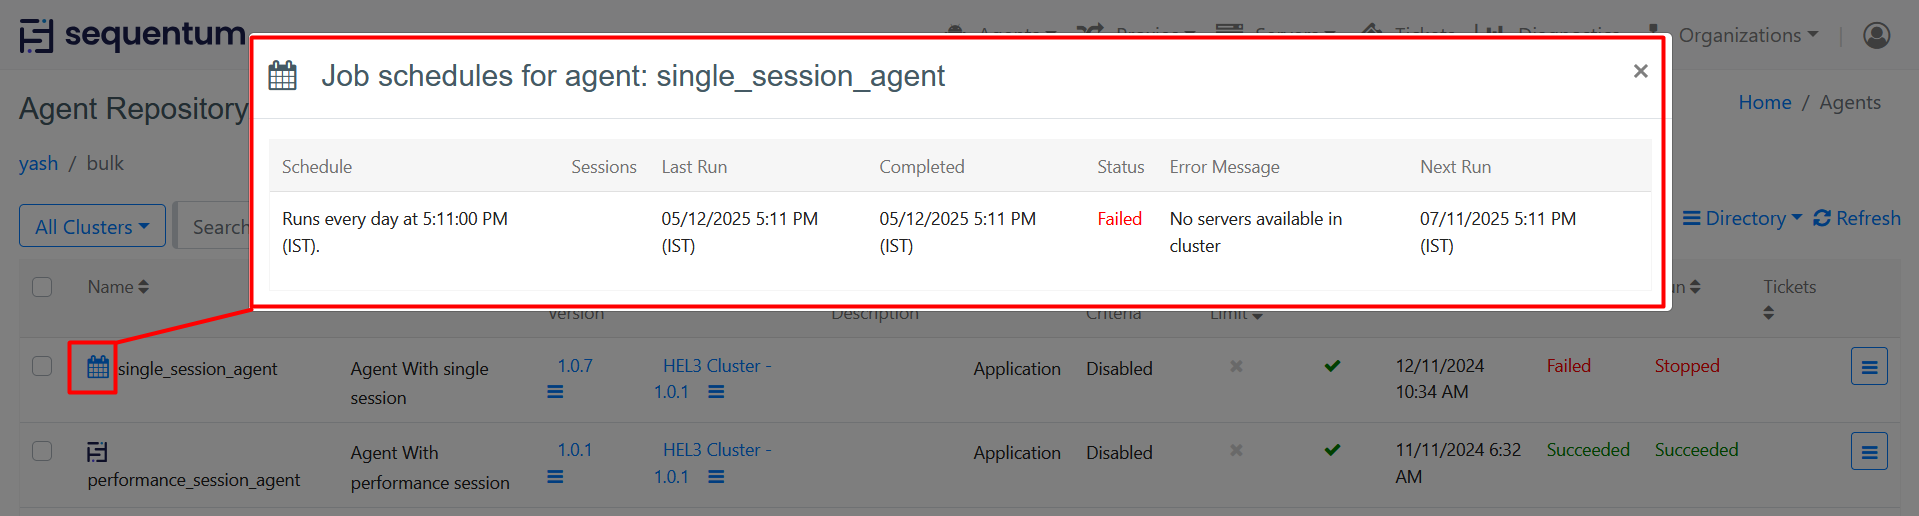
Schedule Indicator
We have an indicator on the Agent Repository page for each of the agents through which we can identify the Scheduled and Non-Scheduled agent. This indicator icon will be displayed for the agent, if any schedule is added else it will be displayed as default icon.
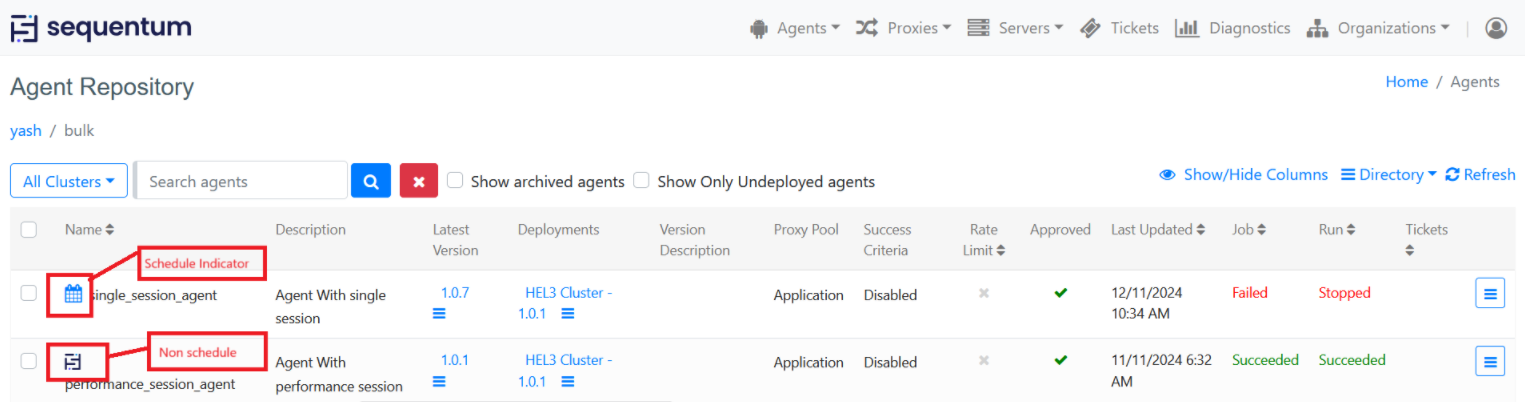
We can get all the information of schedule by clicking on this indicator.
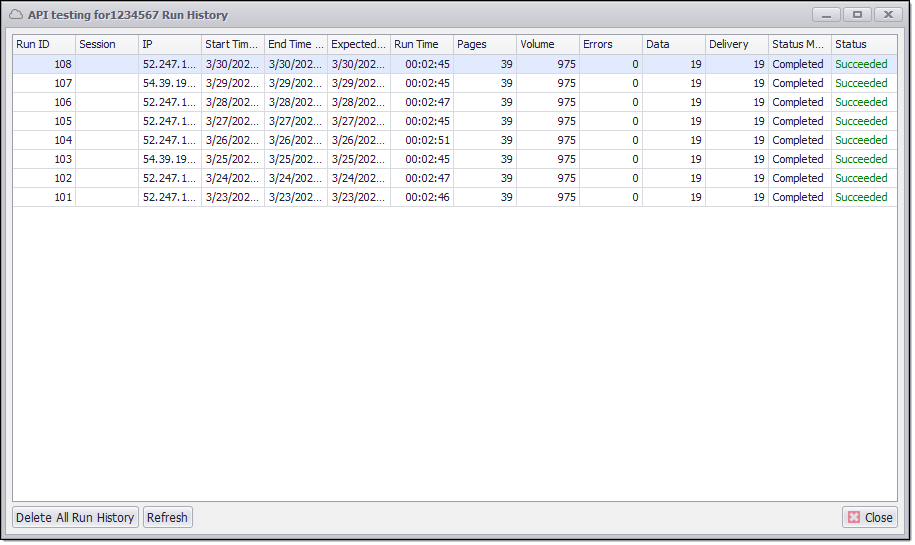
Run History
This command allows you to view Run History of the agent. Run history page displays the complete run history of the agent job schedule.
Agent Run History
You can navigate to the Run history page via below option:
Agents→Repository→Run status (Showing under Run column)
By clicking the 'Run History' you should see the Run History of the selected Agent.
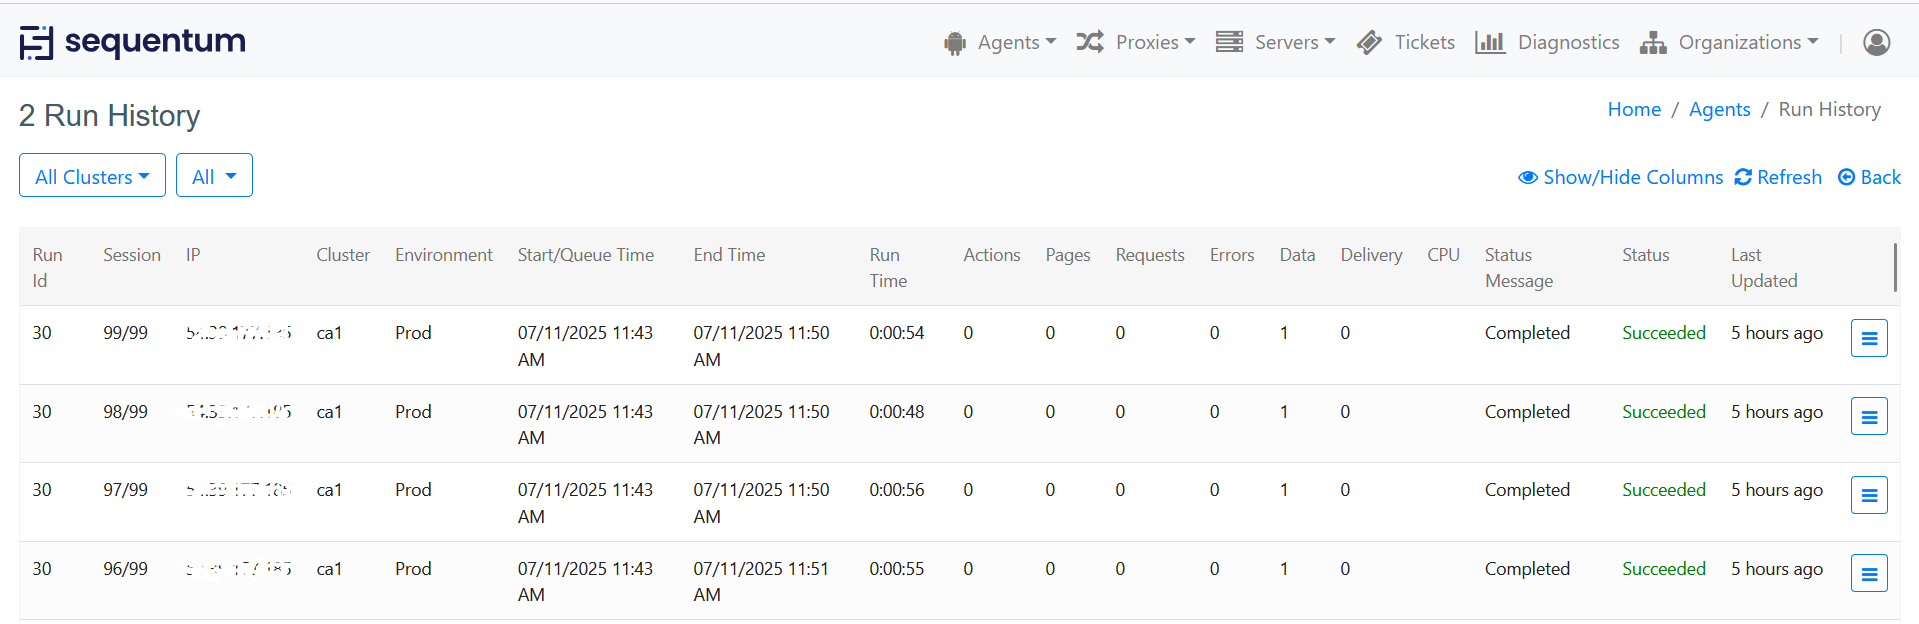
The agent Run History report contains the following columns:
RunId: This column shows an increasing number for each row w.r.t the agent run.
Session: This column shows sessions of agent run.
IP: This column shows server IP associated with the cluster on which the agent executes.
Cluster: This column displays the name of the cluster where the agent was executed.
Environment: This column displays the environment (e.g., Dev, QA, Prod) in which the agent was run.
Start/Queue Time: This column displays the date and time at which the run started executing on the cluster.
End Time: This column displays the date and time at which the run finished its execution on the cluster.
Run Time: This column displays the total execution time of the run.
Actions: The successfully executed action commands.
Pages: Actual page loads. This is all pages that are loaded into the main-frame of the browser or pages loaded by the HTML/JSON/XML parser.
Requests: All requests made to the target web server, including HTML, images, styles, script, etc. For HTML/JSON/XML parsers there's one request per page load.
Errors: All action errors. Note that a page load error that's retired and then successful does not result in an error, but the error counts as a page load if a page was actually loaded.
Data: The number of records that have been extracted
Delivery: Actual count of the data rows delivered to the destination endpoint.
Status Message: This column describes the agent run status.
Status: This column shows the run status as Failure or Succeeded.
Last Updated: This column shows the date and time of the last executed run.
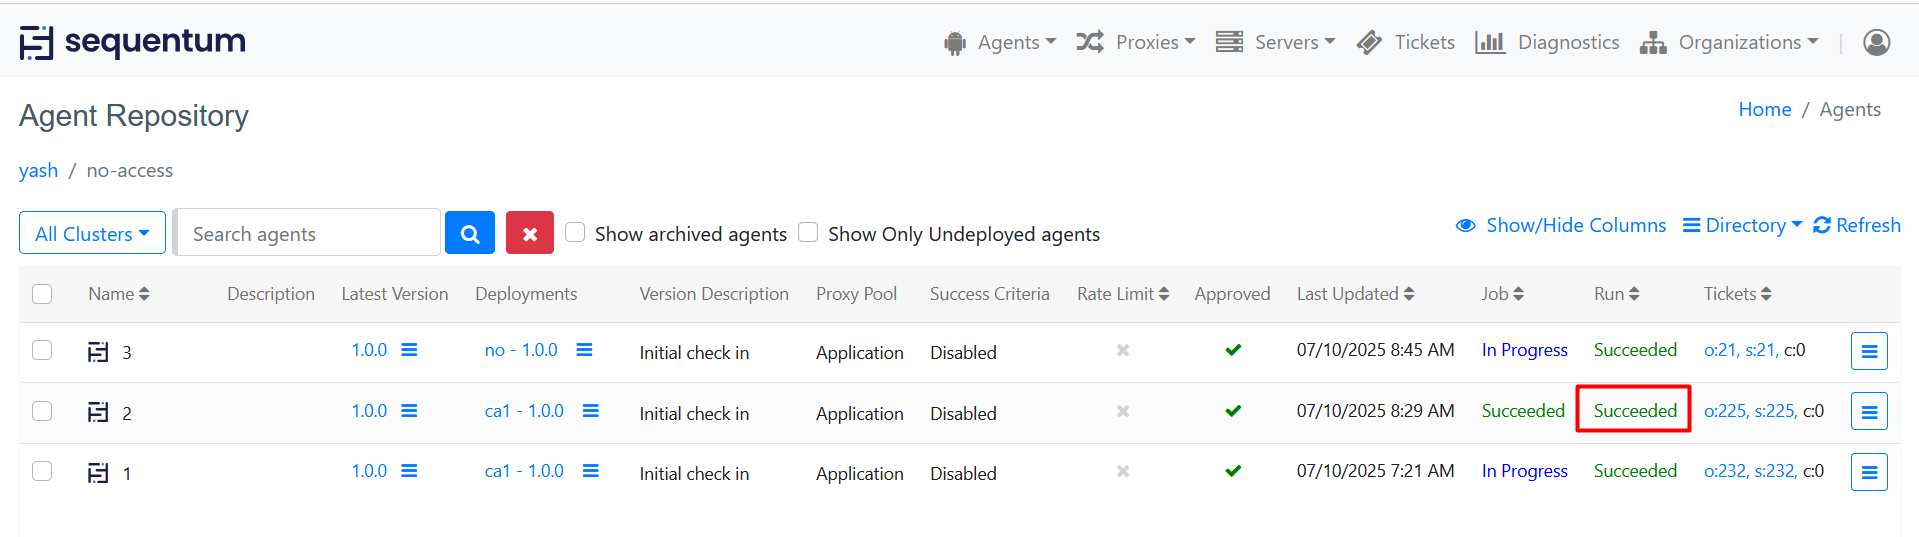
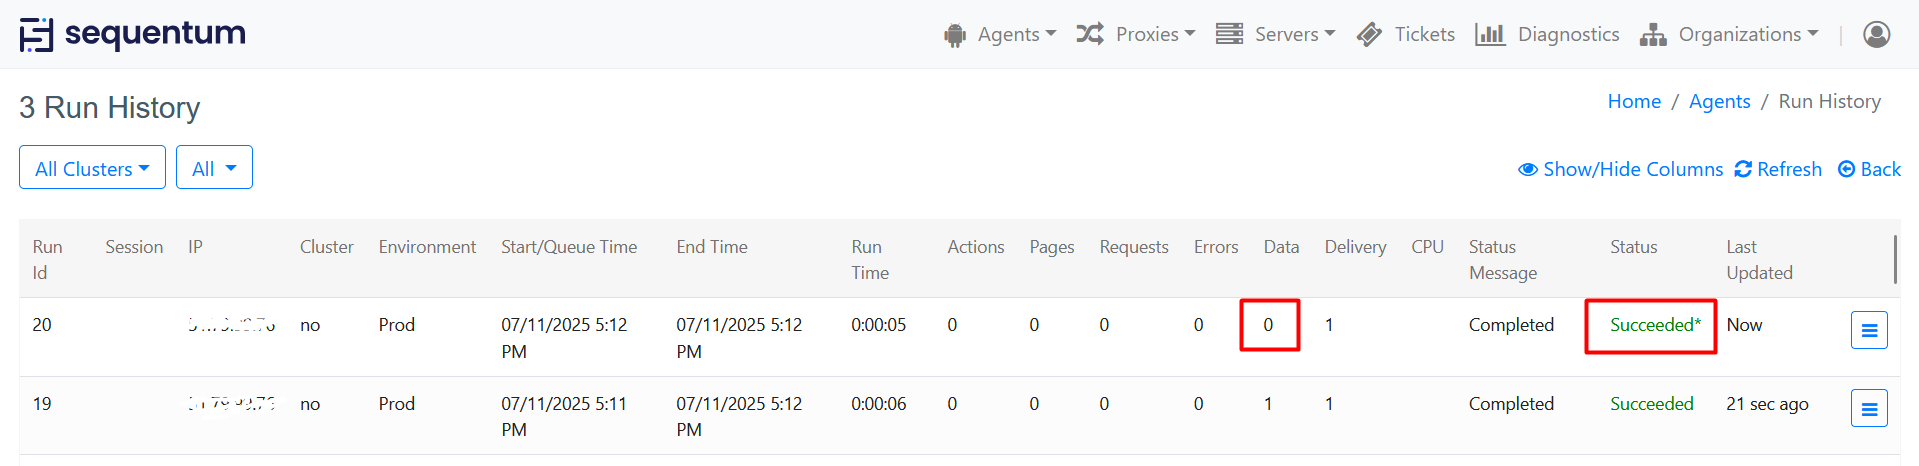
Asterisk (*) Display with Succeeded : In the run history page, an asterisk (*) will now appear next to "succeeded" in the run status if the run completes successfully but the data count is zero. This visual indicator helps quickly identify runs that succeeded without producing any data.
Run History Context Menu
For each row, under the run history page, there are several context menu options that can be used to manage the agent execution, check logs, download export data, and manage agent run status.
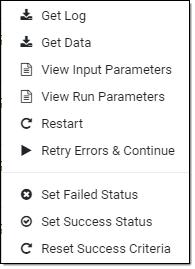
Get Log: Click on this option and it will open a new window with log contents of the agent run.
Get Data: Click on this option and it will download your export data in a compressed zip format allowing you again to view the output data without having to go to the server for checking the export data.
View Input Parameter: Click on this option to view the parameter named values that get their value assignments when an agent starts.
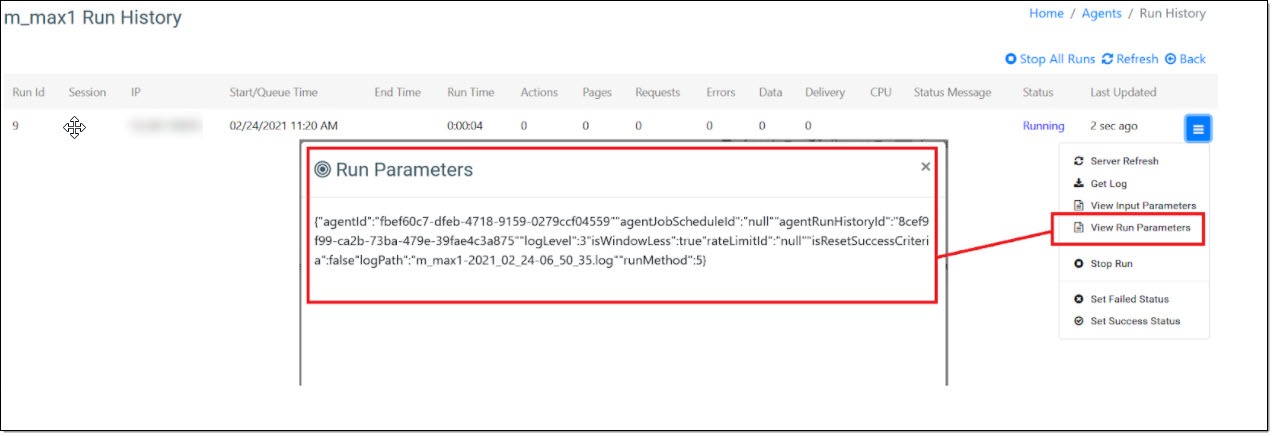
View Run Parameter: We have an option "View Run Parameter" added in the context menu of Run History to view all the run parameters.
Restart: Click on this option if you want to restart your agent.
Retry Errors & Continue: This is a useful option in case your agent encountered any failures and you want to only retry the failures/errors and don't want to start the restart again. Click on this option and the agent will retry the errors and will continue the agent execution for the failures.
Set Failed Status: Use this option to set the run status to failed which allows the users to stop the agent execution.
Set Success Status: Use this option to set the run status to success if it failed for the last execution and the next run execution is getting blocked due to the failed run status.
Schedules
Once your agent is successfully deployed to a cluster, you can schedule it to run automatically on a regular basis.
Please read the following article for more details:
Running Agents
Click on Agents -> Running Agents tab to see all the running agents for an Organization. A user with Admin privilege is only allowed to see the running agents in an organization. However, Super Admin privilege can see the running agents across the organizations.
Running Agents page is the central place where we can see the execution-related information for all the agents like agents that are in Running, Queued, or in starting mode.
Recently we have introduced the filter option on the Running Agents page so that the users can prioritize the search results on the basis of Organization Name, Server Name, Agent Name, and Status. This filter option is available on the Running Agents page.
In case when the search results are huge then it becomes quite tough to move one page to another through pagination to search the specific result.
In this feature, we will provide the drop-down list for Organization Name, Server Name, and Status box and by default current organization name and Running status will be displayed in the Organization and Status Box and the rest of the fields will blank by default.
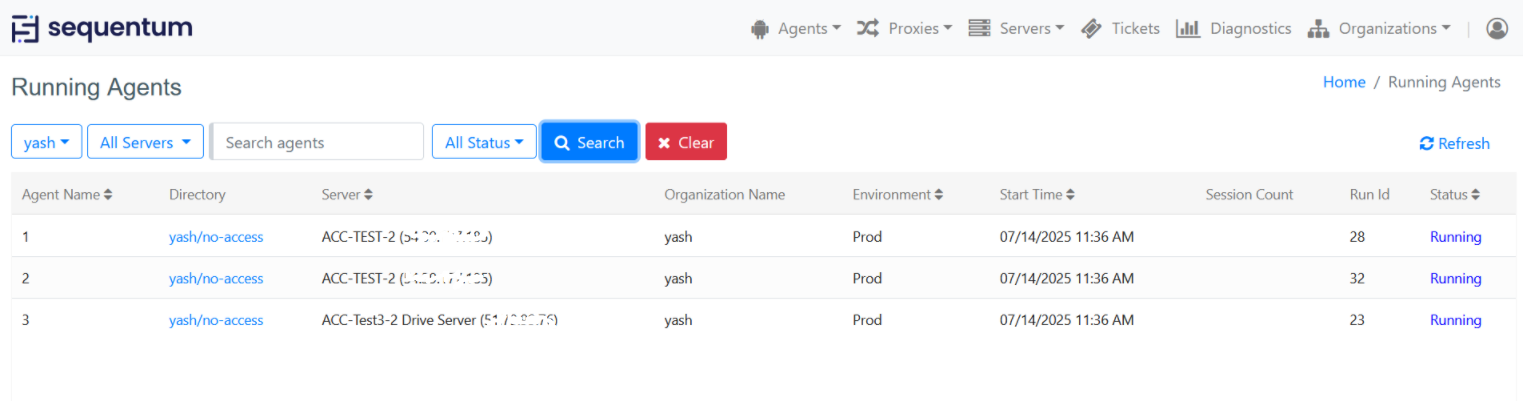
We have an option to navigate the Run History page from Running Agents page . We can achieve this by clicking on the link "Running" under the Header name "Status".

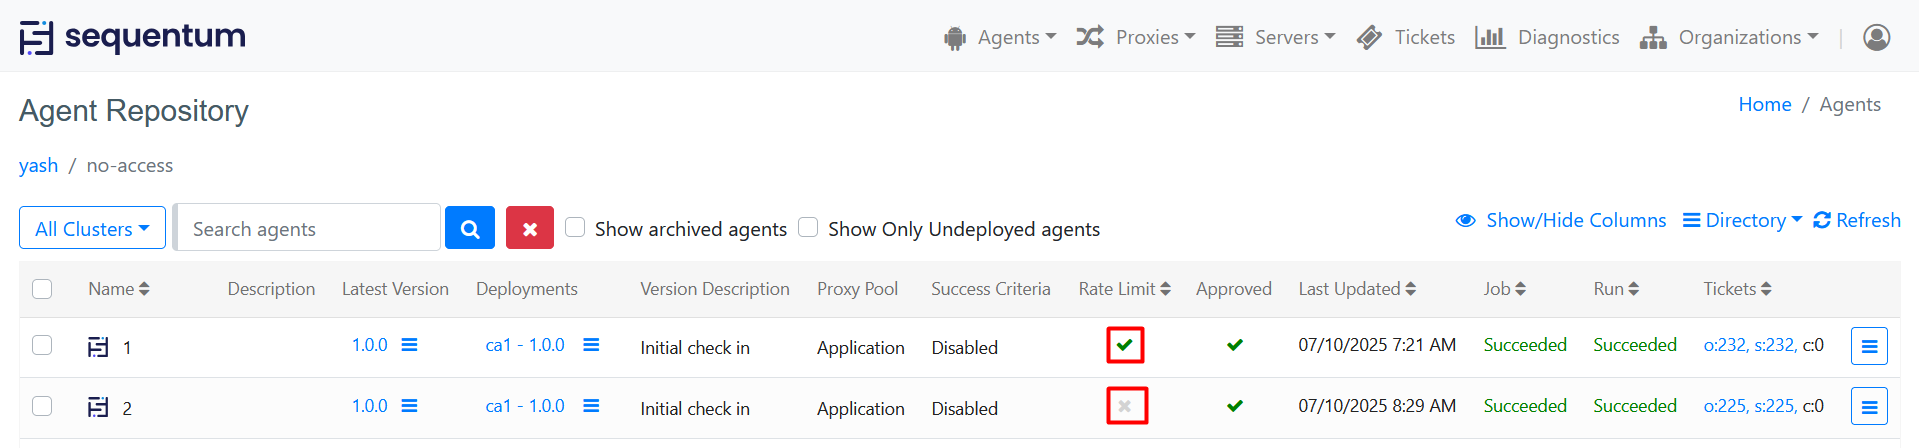
Rate Limits
Rate limits can be used to control how hard agents are allowed to hit a target website. For example, a rate limit can be added for a certain website and be configured to allow a maximum number of page loads over a given time period. The rate limit is then assigned to all agents targeting this website, and the agents will stop once the maximum number of allowed page loads is reached.
A rate limit can be assigned to an agent by clicking on the check or cross icon in the Rate Limit column in the agent repository.
Please read the following article for more details:
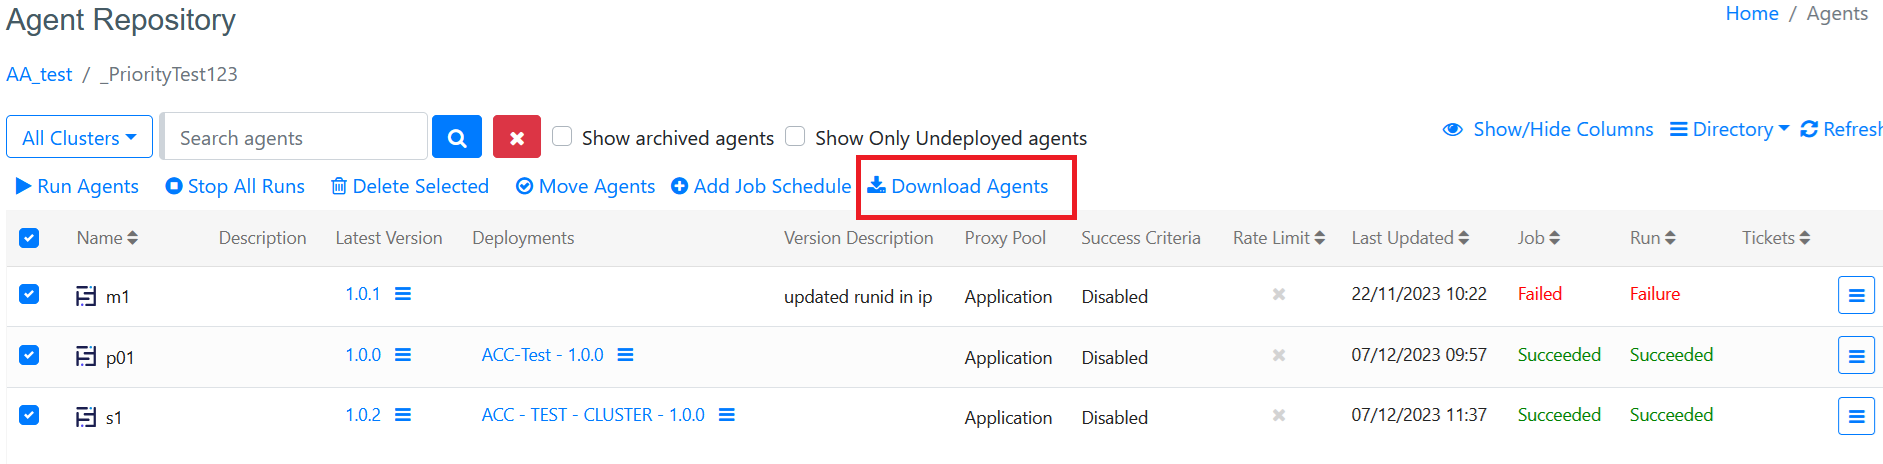
Download agents in Bulk
To download multiple agents from the Agent Repository page, start by navigating to the repository. Here, you'll find a list of agents with checkboxes next to each one. Simply tick the checkboxes beside the agents you wish to download. If you want to select all agents at once, click the main checkbox at the top of the list.
Once you’ve made your selections, click the Download Agents button that appears. Before the download begins, a confirmation prompt will appear to confirm your choices. This step helps prevent any unintended downloads. Click OK to proceed, and only the latest version of each selected agent will be downloaded to your computer.
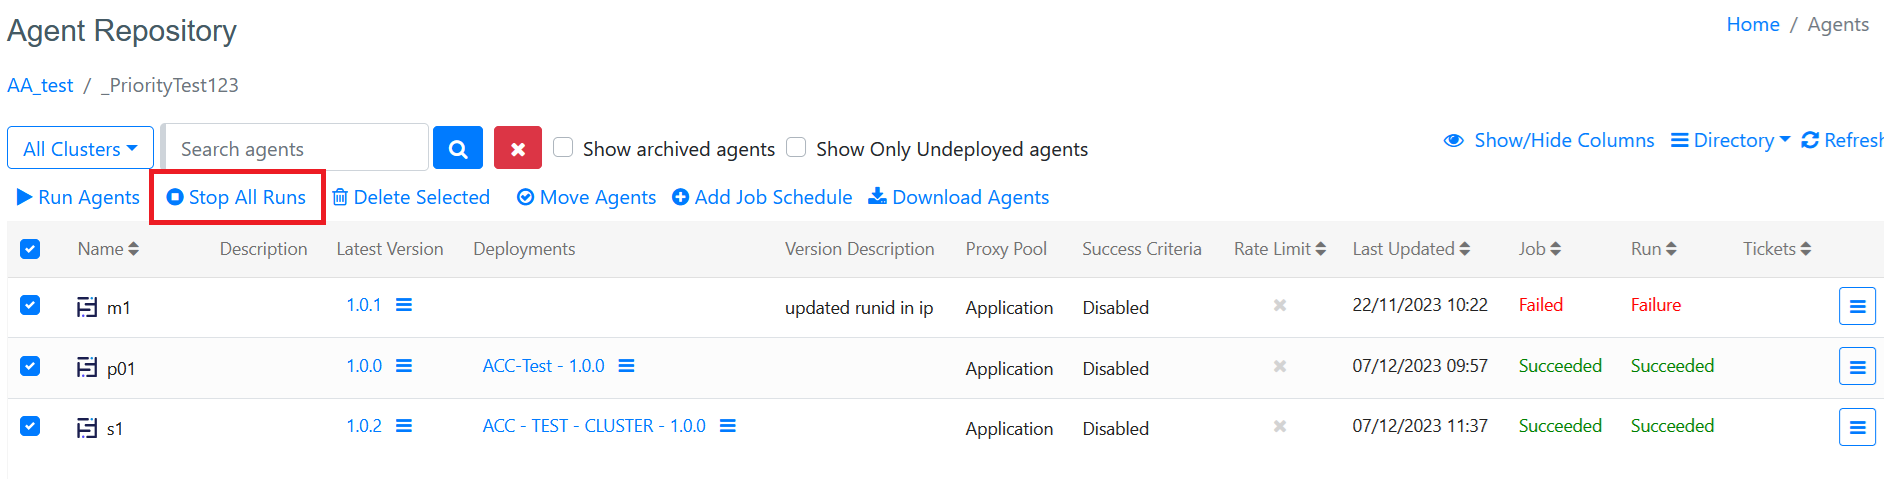
Stopping Multiple Agent Runs
To stop multiple agent runs efficiently, start by accessing the Agent Repository page. Here, you’ll see a list of agents, each with a checkbox next to it. Select the checkboxes for the agents you want to stop, or use the main checkbox at the top to select all agents in the directory.
After making your selections, click the Stop All Runs button that becomes available. A confirmation prompt will appear to verify your action and help prevent accidental interruptions. Confirm your choice to stop the runs of all selected agents at once.
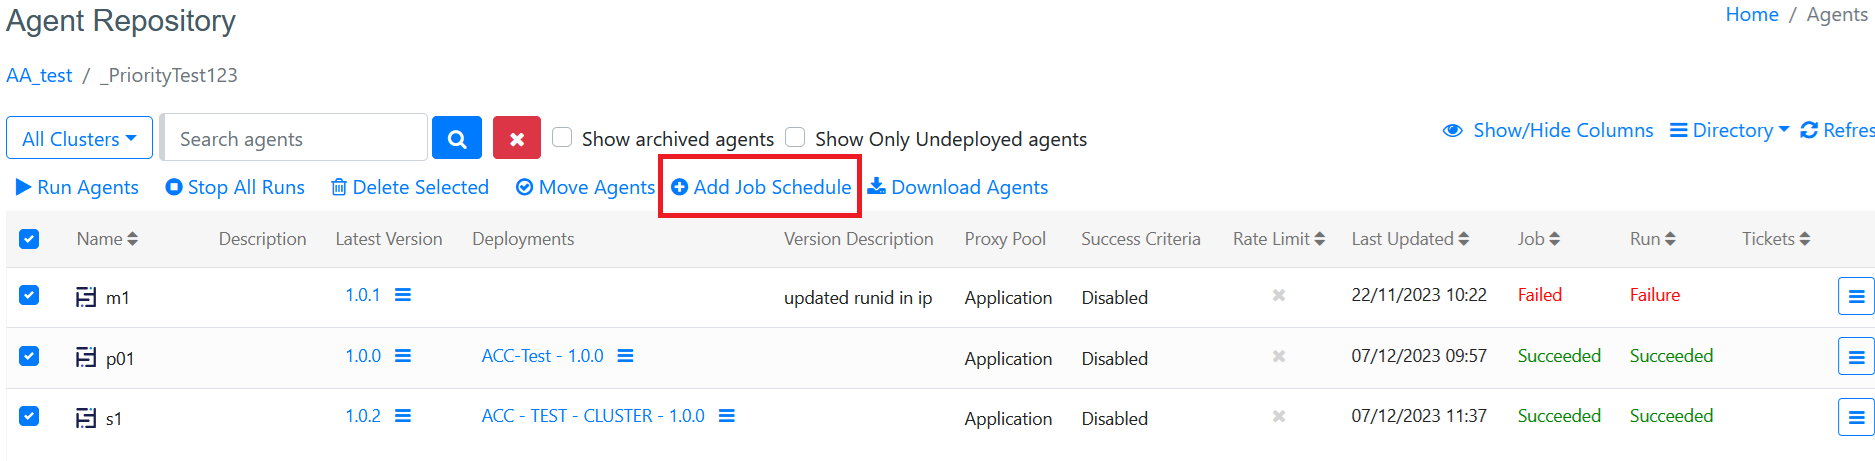
Scheduling Multiple Agents
To schedule the execution of multiple agents at once, begin by navigating to the Agent Repository page. Here, you’ll find a list of agents with checkboxes beside each one. Tick the checkboxes next to the agents you wish to schedule, or use the main checkbox at the top to select all agents in the directory.
Once you’ve made your selections, an Add Job Schedule option will appear. Click this to open the "Add Job Schedule" window. This window functions just like the scheduling interface accessed through the agent context menu. You’ll have access to all scheduling options available, except for session support. Note that for multiple agents, session support is not provided, and all agents will run within a single session. The session ID field will display ‘No Session Support’ for all selected agents.
Before finalizing, a confirmation prompt will appear to ensure the scheduling details are correct and to prevent any unintended actions. Confirm your choices to apply the schedule to all selected agents.
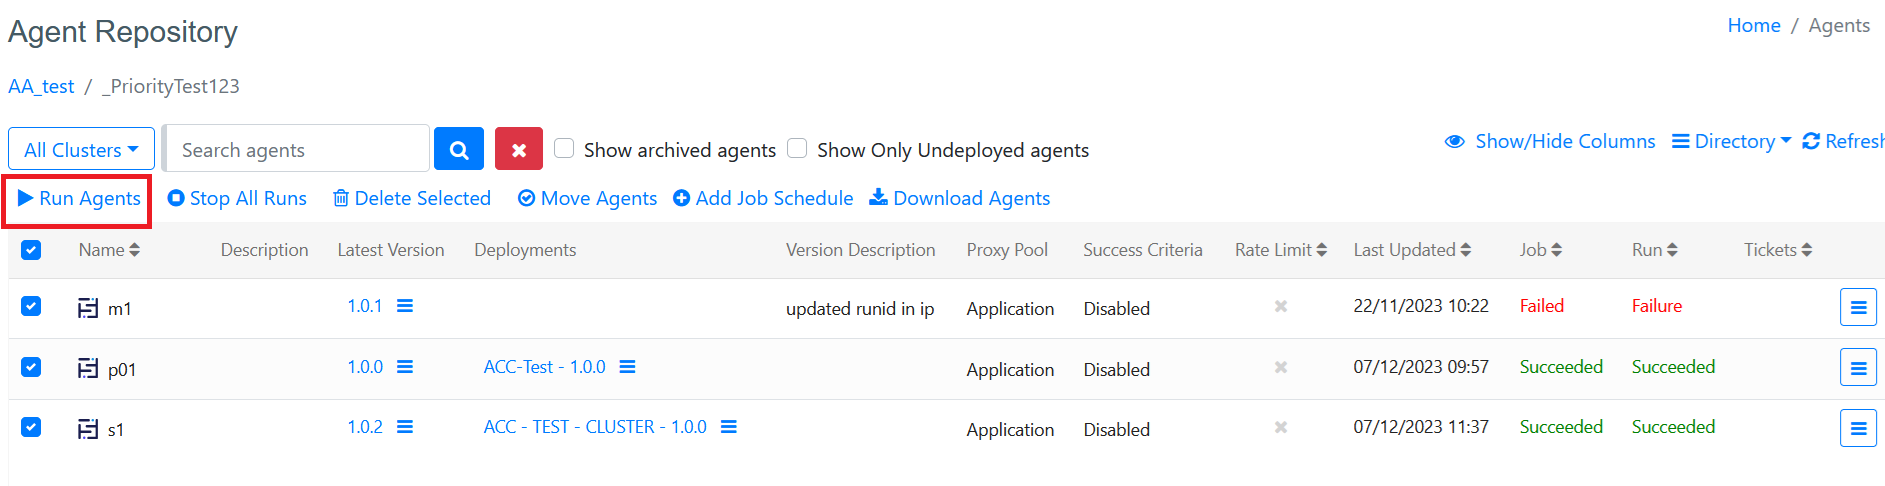
Executing Multiple Agent Runs
To execute multiple agent runs simultaneously, start by visiting the Agent Repository page. Here, you can select agents by ticking the checkboxes next to each one. If you wish to select all agents in the directory, simply check the main checkbox at the top of the list.
After selecting the desired agents, the Run Agents option will appear. Click on this option to initiate the execution of all selected agents. A confirmation prompt will appear to ensure that you want to proceed, helping to prevent accidental executions. Confirm your choice to start the execution process.
Please note that when executing multiple agents, they will all be treated as part of a single session, regardless of their individual session settings.
Sequentum Enterprise Editor
Repository
Agent Repository in the Sequentum Enterprise Editor offers a feature-rich web-based interface that allows you to view, organize and maintain your agents, as well as deploy, schedule, run and monitor them via a web browser.
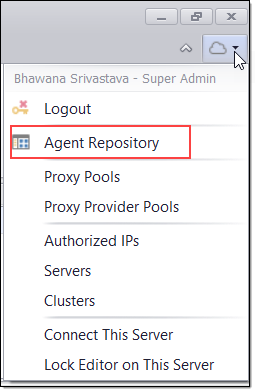
To access Agent Repository click the cloud icon in the right top corner of the Sequentum Enterprise and select Agent Repository command from the context menu. You must be logged in, otherwise, you will not see the cloud icon and will not be able to access Agent Repository.
Accessing Agent Repository in Sequentum Enterprise
Then, you will see Agent Repository in a new window that contains a list of all the Directories, Agents, Shared Folders, Configs, etc.
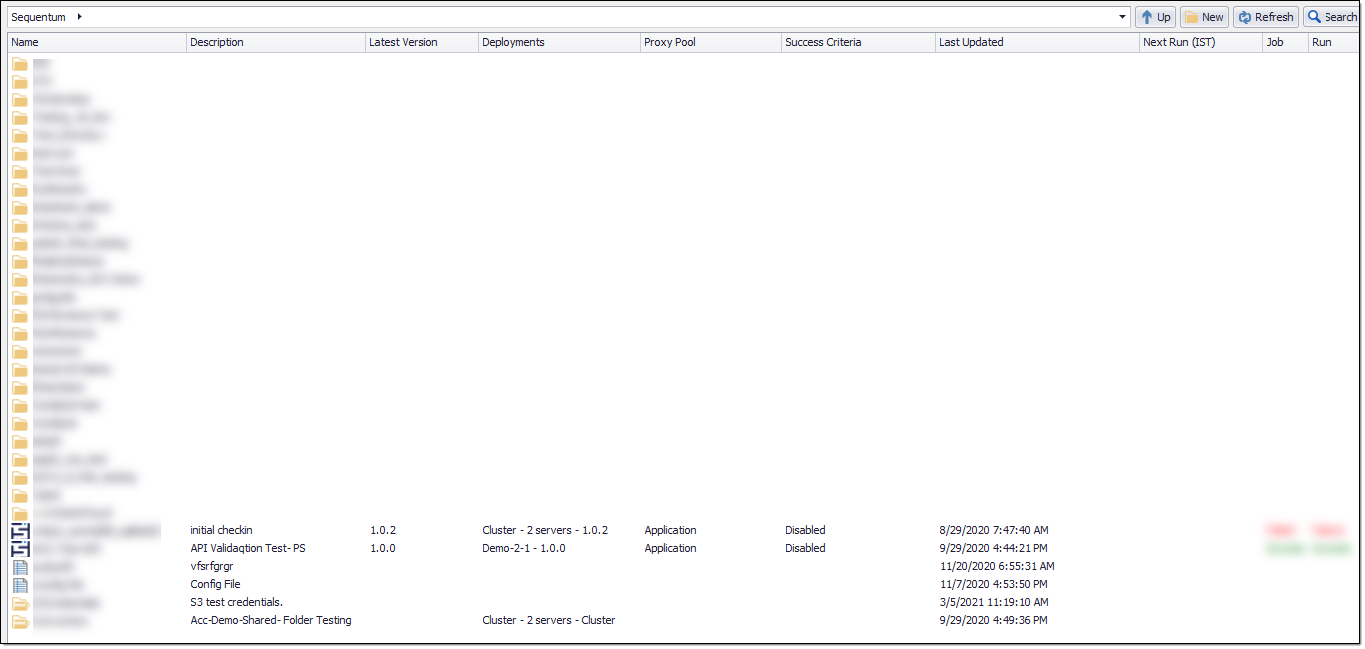
Agent Repository in Sequentum Enterprise
You can navigate through Agent Repository as you would navigate through directories and files in a standard file system.
Pagination
Pagination is a method of dividing web content into discrete pages, thus presenting content in a limited and digestible manner. In ACC, we have followed the pagination on the basis of the number of agents on the agent repository page. We can select the number of agents from the drop-down list of page sizes like 20, 50, or 100.
Search
You can use the search agents option on the ACC Desktop repository window by typing the agent name into the 'Search agents' text box. The Search button is available at the top right corner of the Agent repository page on ACC Desktop.

Click on the Search button and it will open the Search Bar as shown below and you can use the search text box and Find button to search your agent in the repository.

You can also search the agents by entering some character in the box but this time you can get a list of agents that matches the entered text in the search text box.
Create New Directory
To create a new directory in Agent Repository, click the 'New' button at the top right side of the window.

A pop-up window will display starting with a root directory named as Sequentum in which you can create sub-directories.
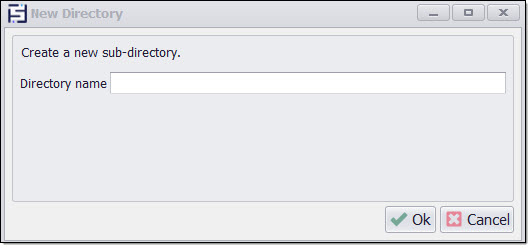
Enter a directory name and click the Ok button.
Context Menu
There is a number of different actions that can be performed on agents by selecting an appropriate option from the multi-level context menu. Right click on an agent to expand the context menu. Various menu options give you the flexibility to deploy, run, manage and monitor your agents and their status.

Sample Context Menu
The availability of different context menu items may vary depending on your privileges, the status of the agent, whether the agent has been deployed or not, whether the agent has been deployed to a single server or a cluster, etc.
Version Control
One of the important features of the Agent Repository is that it acts as a version control management system, allowing you to keeps all the versions of your agents, with various options available to manage and monitor your agents. You can check-in your agent in the repository and can keep a track of your versions and changes in the agent. The version control system records the changes you make to your agents, so it lets you save a snapshot of your agents at any time you want.
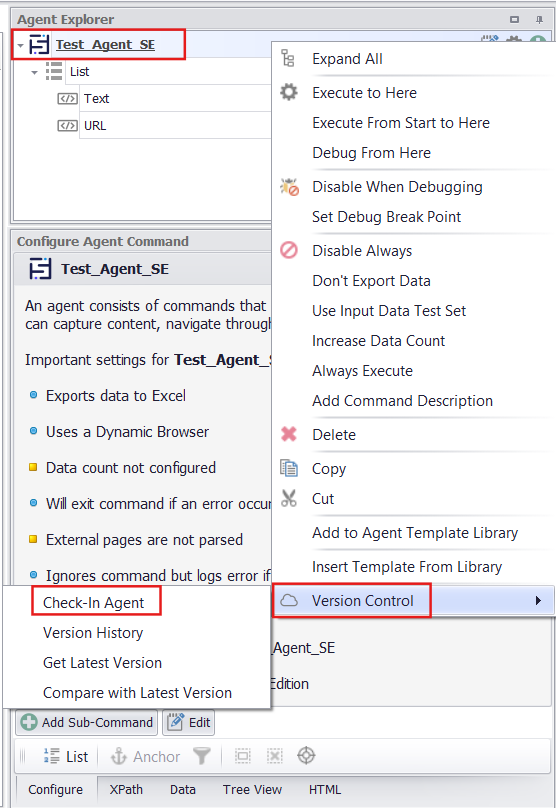
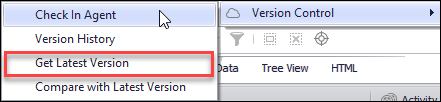
In order to store an agent in the Agent Repository, right-click on the agent, hover down to the cloud icon called 'Version Control', and a down drop menu will appear which allows you perform the following actions: check-in agent, view version history, get the latest version, compare with the latest version.
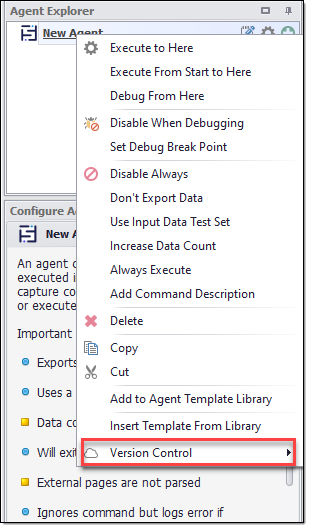
Version Control menu
Check-In Agent
To add a new agent or a new version of your existing agent to the Agent Repository use the Check-In Agent option which is displayed only when you are logged to the Agent Control Center.
Once you are logged in to the Agent Control Center you can use the below 3 options in Sequentum Enterprise Desktop to check in your agent:
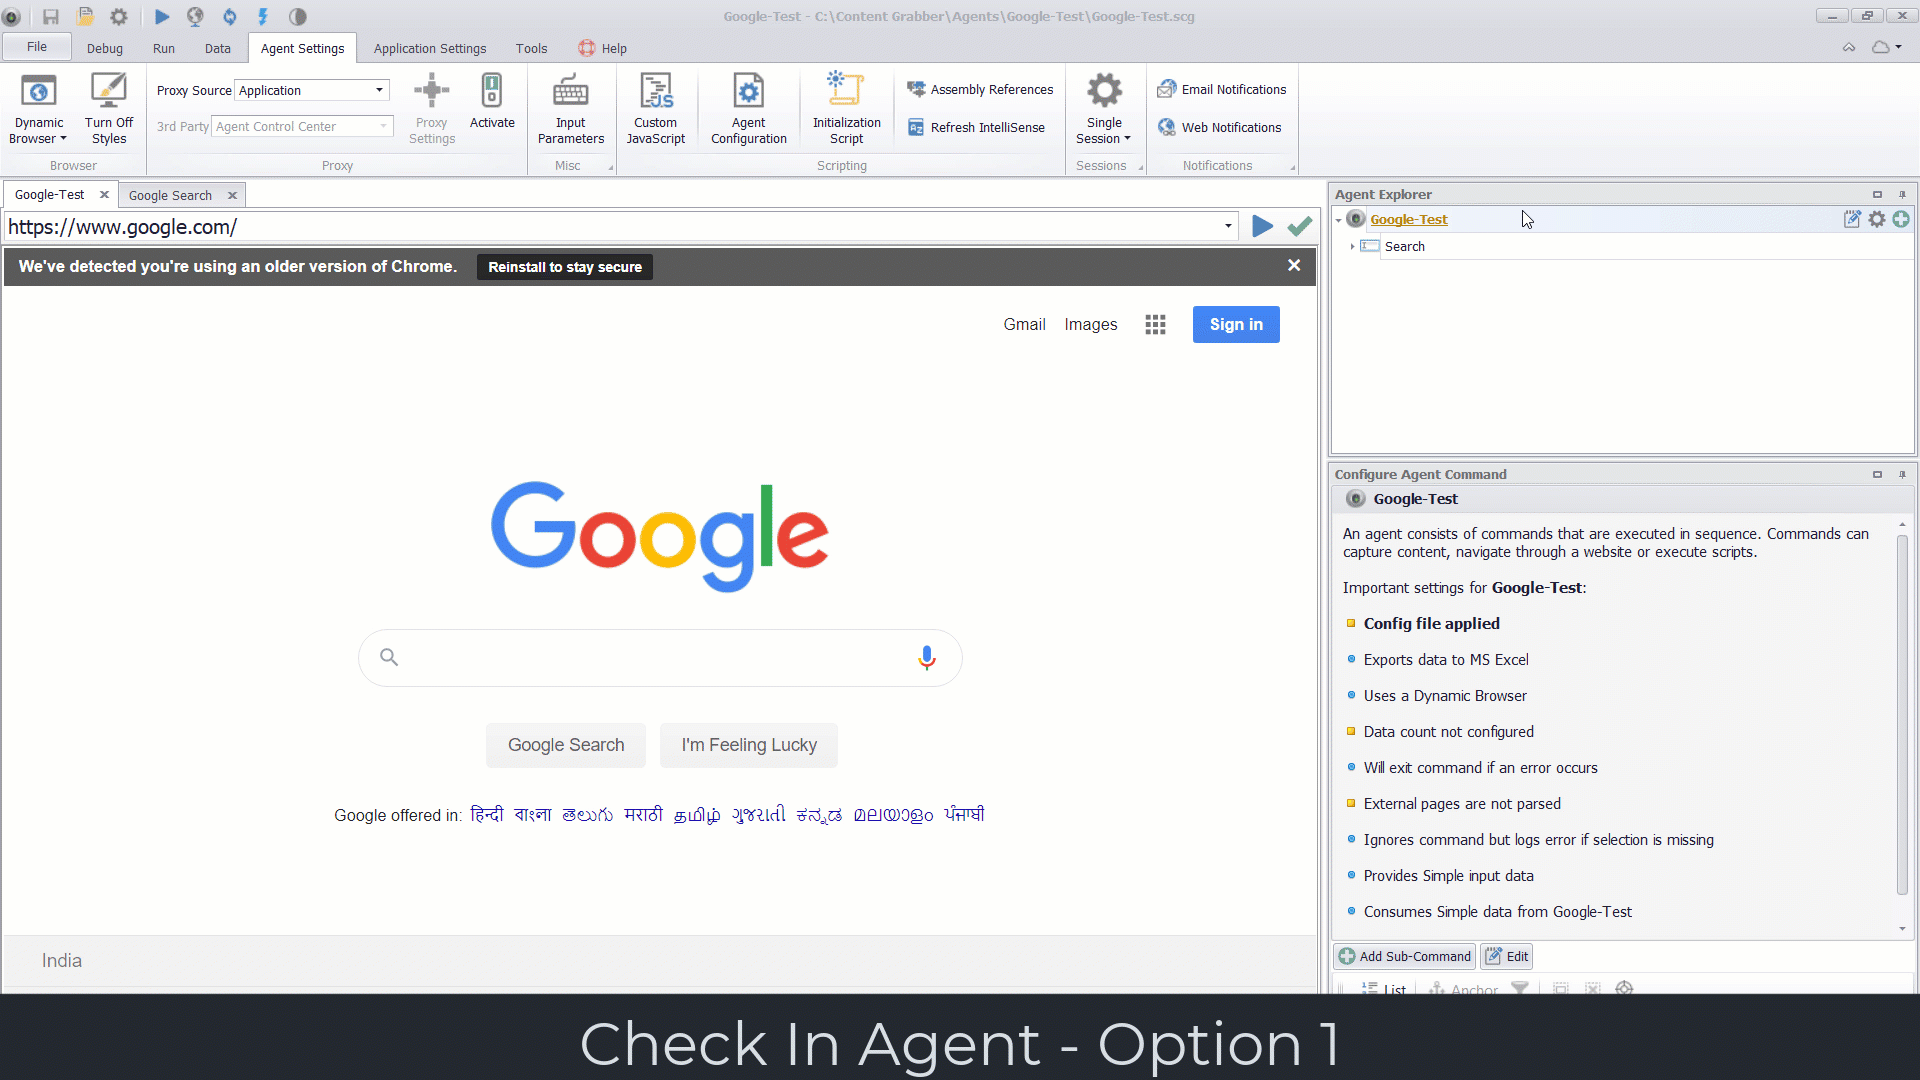
The first way is to right-click on the agent, hover down to the cloud icon called Version Control, and then select the 'Check-In Agent' option from the down drop menu.
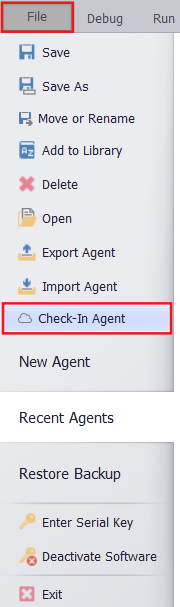
The second way to check-in the agent is through the File menu i.e. File->Check-In Agent.
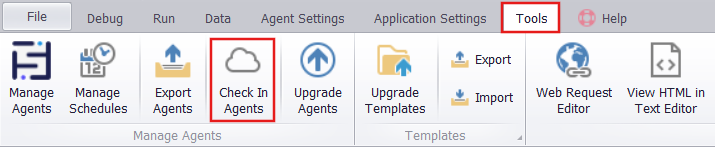
The third way to check-in the agent is through the Tools menu i.e. Tools->Check-In Agents, This option allows you to check in multiple agents at once. Simply enable the checkboxes for the desired agents and click the Check-In button.
Note: You must be login to the Agent Control Center using the Cloud icon on the top right corner to be able to see the Check-In Agent options under the Tools menu and the File menu.
Check-In Agent Options
A new 'Check-In Agent' pop-up window will open which allows you to select an agent repository directory, add an agent/version description, and a number of other settings.

Check-In Agent pop up window
You will see the following fields and settings in the 'Check-In Agent' pop-up window:
Repository - When checking in an agent to the agent repository, a repository directory must be specified as to where to store the agent.
Version - Version shows the latest version of the agent in the repository and the current version of the agent that is being checked in. The standard practice is to increase the least significant number if making small changes and the more significant numbers when making larger changes.
Retention - Retention specifies how many records/versions of the agent are stored in the database for a particular agent that will be shown on the version history page. By default, this field is set to 10.
Agent / Version Description - The version description and list of changes and bug fixes can be specified here.
Include Input Data - Input data are additional files that are provided in the agent folder. If the agent is using a data list to iterate through a CSV/Excel file, then this field needs to be checked so that the agent can access the input agent when it is checked out of the agent repository. By default, this field is checked.
Include Agent Schedule - This option will include the agent schedule in the version of the agent. If this option is checked, and then the agent is deployed, the schedule will be on the server in which the agent was deployed. By default this field is unchecked.
Deploy - Deploying an agent will automatically deploy the latest version of the agent to the server which is configured as the default deployment. By default this field is unchecked.
Ignore Version Conflicts - When checking in an agent that is not built from the latest version, a small warning prompt will appear saying that there might be a version conflict when checking in this version.
Selecting this option will allow the user to check in an earlier version of an agent which overrides all the changes made in the latest version. For example, a user version is 1.0.5, the latest version in the repository is 1.0.6. The user makes a small change and decides to check in version 1.0.7. If this option is selected and version 1.0.7 is checked into the agent repository, the changes made in 1.0.6 will not be reflected in 1.0.7. By default this option is unchecked.
Ignore Export Schema - This option will ignore the schema file that is applied in our agent. By default this option is Unchecked.
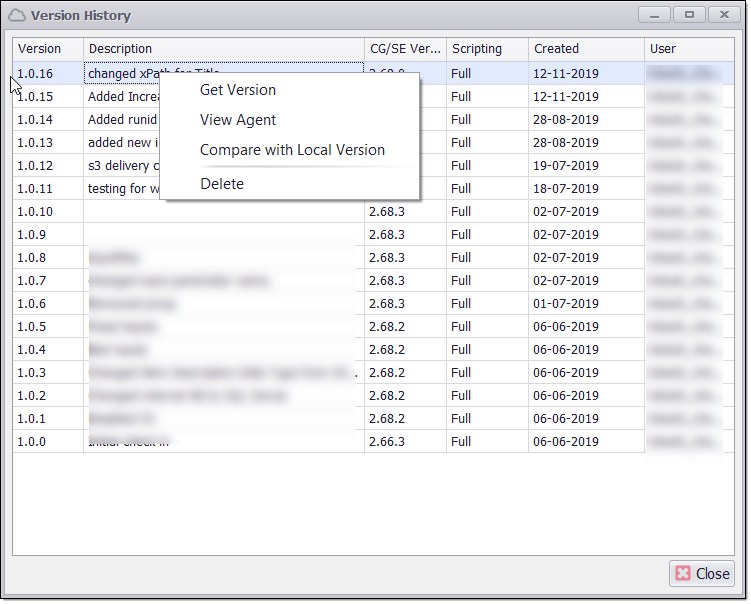
View Versions / Version History
Version History shows the previously checked-in versions of the agent up to the number of retention specified when checking in an agent. It includes a description of changes along with each version, a date when each version was checked into the agent repository, whether that version is ready for production, and the username of the individual who checked in that version.
Version History of the Agent
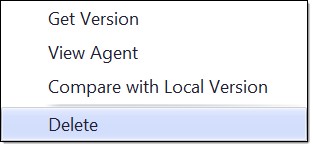
If you right click on any of the versions, you will see a context menu with the following commands:
Get Version - Saves the selected version of the agent locally. If another version of the agent already exists, the previous version will be overridden.
View Agent - View agent allows the user to get an overview of the agent, its fields, and how the agent is structured.

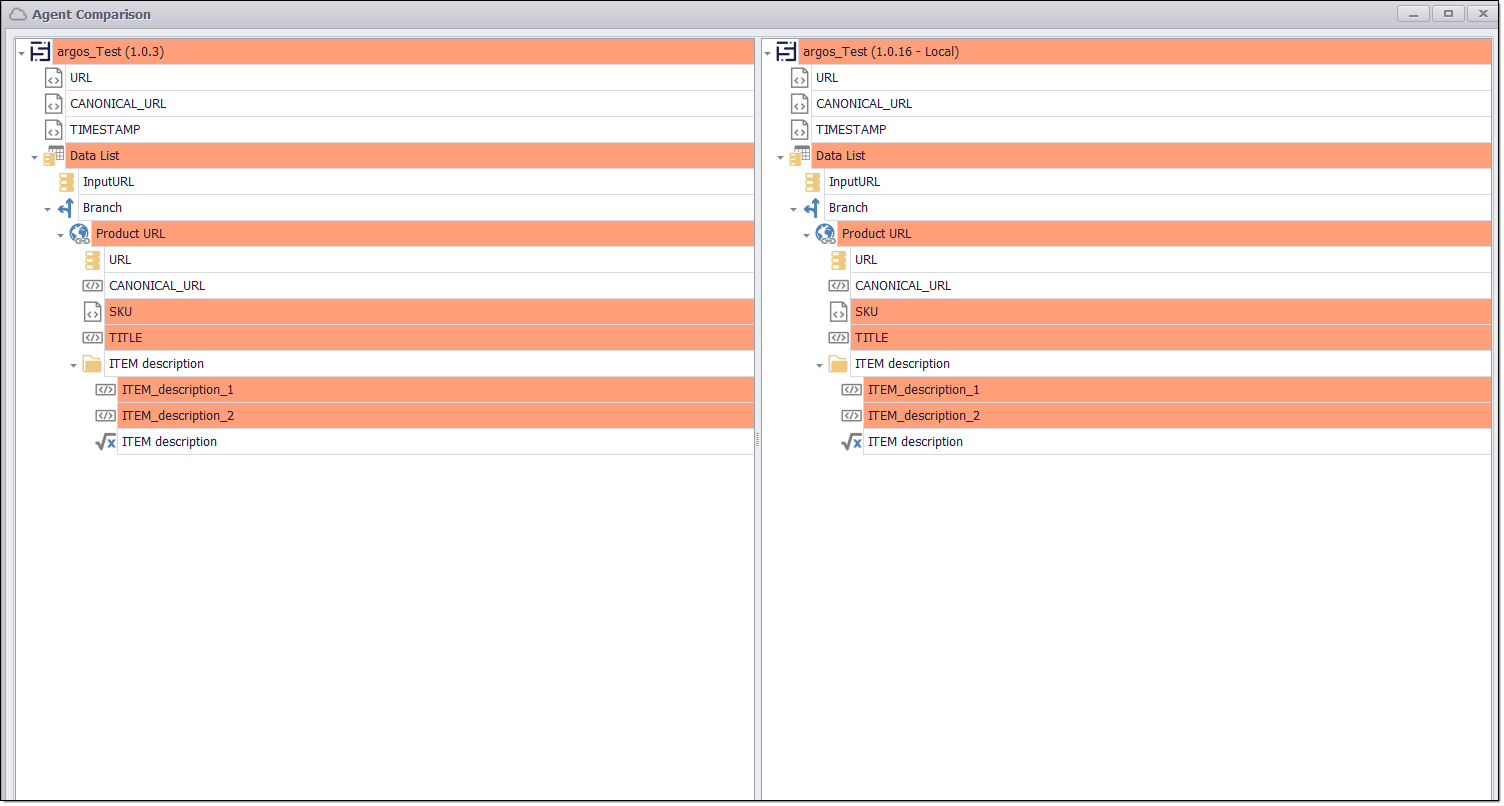
Compare with Local Version - This option compares the version that was selected with the current local version. The fields that are highlighted are the fields that have been changed.
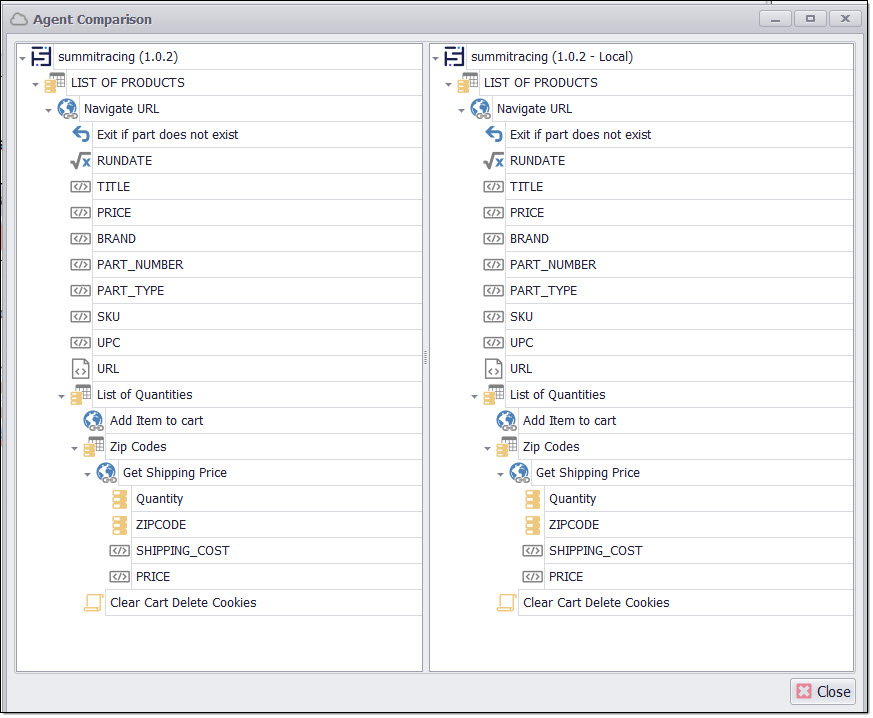
Comparison Between Selected And Local Version
Delete - Deletes a version from the agent repository. A version can only be deleted if there is no current reference to it. (i.e that version of that agent is not currently deployed on any of the servers)
WARNING
This process is permanent, and the version cannot be recovered if it is not saved locally.
Version 1.0.1 Has Been Deleted
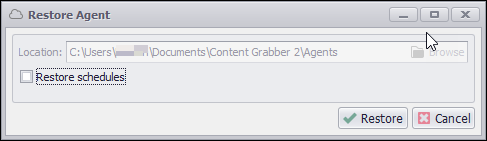
Get Latest Version - Retrieves the latest checked-in version of the agent locally. If another version of the agent already exists on your local, then the previous version will be overridden.
You can restore the agent to your preferred location on your local and you can also restore the schedules if the agent was checked in with a schedule.
Compare with Latest Version - This option compares the latest version of the agent and the version currently available on your or the version currently open in Sequentum Enterprise.

The fields that are highlighted in red are the fields that have been changed.
Directories
To make modifications in the directories, do right click on a specific directory and you can see a list of action commands like Rename, Move, Download, Deploy to Cluster and Delete.
Rename- If you want to change the directory name then click on Rename and update the name of the directory.
Move - You can move a directory from one location to another. Browse the path wherever you want to place the directory and click on the Move button.
Download - Download directory on your local system.
Deploy to Cluster - This will deploy all contents of the directory on Cluster.
Delete - It will delete the directory.
Add Shared Config
Configuration files are basically initialization files with a basic structure composed of sections, properties, and values. They are simple text files that contain key or property and every key has a name and a value.
Agent properties can be set with configuration files and used to apply to a single/current agent or multiple agents.
To apply configuration file on multiple agents, select the directory path where the agents are stored and click on Add Shared Config shown at the bottom left side of the agent repository window. The displayed window will show Name, Description, and Configuration. Add details and Save the file.
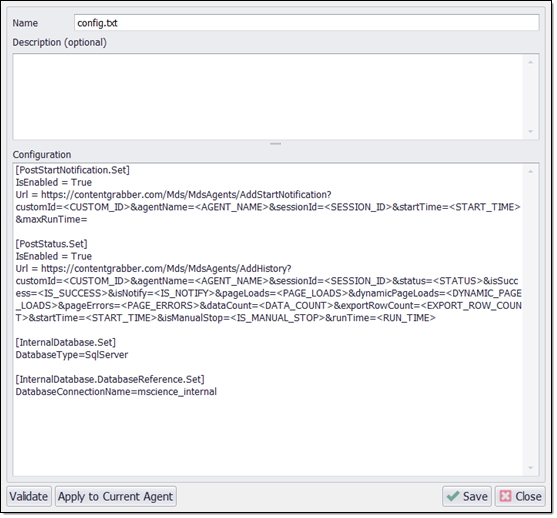
At the bottom left side of the config window, there are options to Validate and Apply to Current Agent. You can ratify the configuration by clicking on Validate. “Apply to current agent” will ask if you want to apply the configuration to all current agents placed in the present directory.
To share the config file with one or more servers, do right click on the config file. It will show a list of commands to edit, delete, download and deployments. Select Deployments and from the displayed window and click on Add Server or Cluster. Select server or cluster from the drop-down list and check on Deploy config to server. Click on Save and it will deploy the config file within the directory of that specific server.
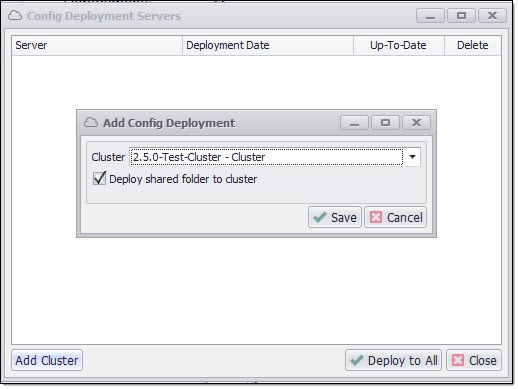
The deployment can also be deleted by right-clicking on a specific server and then delete.
To deploy the config file on each server, click on Deploy to All. It will apply to each and every agent placed in the directory of all servers.
Add Shared Folder
A shared folder is a shared resource that is made accessible to multiple users. In the agent repository, files from your local system can be shared through the shared folder and these files are accessible by multiple agents.
To create a Shared Folder, locate a path in the agent repository where a shared folder needs to be created. Click on Add Shared Folder at the bottom left side of the displayed window. Browse the file from your local system and add a description of that file in the Description box which is optional. Click on Save to add the folder in the repository.
To deploy the Shared Folder on the cluster, right click on the folder and select Deployments.
Info:
Please note that once the Shared Folder is added using the Sequentum Enterprise Desktop you can perform the Cluster Deployment/Delete actions directly from the Agent Control Center Web portal as well.
The Assemblies Shared Folder will be accessed via the Parent Folder only when the same is deployed through the Agent Control Center.
For example if the agents are added in Sequentum/Demo Directory on the Agent Repository page, then the Assemblies shared folder should also be added inside the Demo folder only and not under the Sequentum folder as the Demo folder here is parent Folder and Sequentum folder is the root folder. And incase an agent that is added in the Sequentum root folder also uses an Assembly file then the same Assembly shared folder needs to added under the Sequentum root folder as well.
Additionally by default an Assemblies folder is created inside the Users>%USERPROFILE%>Documents>Sequentum Enterprise>Assemblies folder so all the common Assembly files can be put inside same Assemblies folder and the all the agents inside the C:\Users\%USERPROFILE%\Documents\Sequentum Enterprise\Agents folder will be able to access the Assembly files automatically.
Once the Shared Folder is deployed to the cluster it will will get deployed inside the Shared folder at the same location on the servers available in the cluster following the shared folder path on the agent repository page.
Audit Log
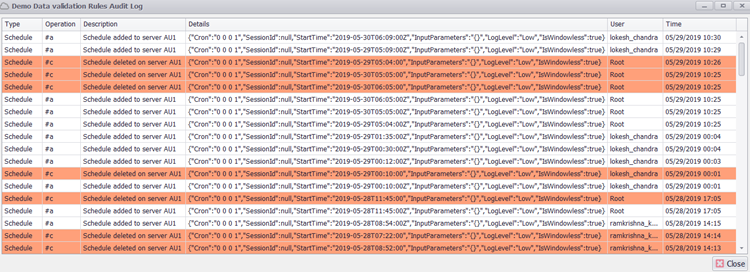
An audit log helps to monitor data and keep track of internal use of operations or we can say audit log is a chronological record or set of records that provide evidence of a sequence of activities that have affected at any time specific operation, procedure, or event.
To Know the audit log of any specific agent, right click on agent and select Audit Log. It will display a window where you get to know the details of operation performed, its type, description, the user who performed the operation and its timestamp.
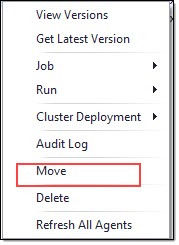
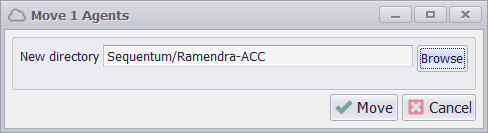
Move
An agent can be moved from one directory to another. Just select the specific agent and right click on it. It will display a command menu, select Move and browse the directory path where you need to move that agent. Click on Move and it will place the agent from current directory to the new directory path.
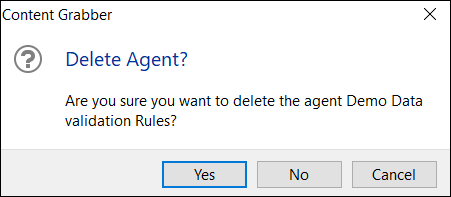
Delete
This menu option deletes the agent from the repository. By deleting the agent from the repository, it will delete all the associated deployments, schedules, and execution histories, so you need to be very cautious before using this option and you must take a back up of your agent somewhere before deleting. An alert frame is still popped-up before doing the permanent delete.
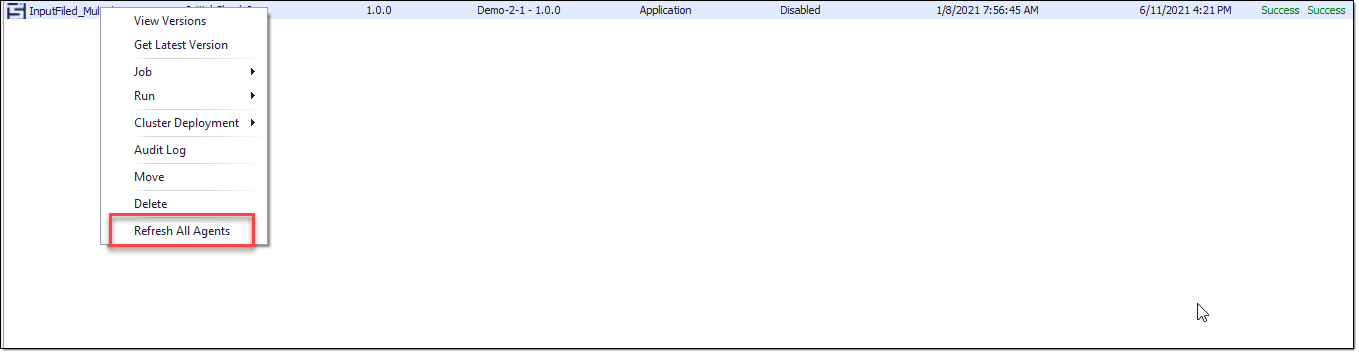
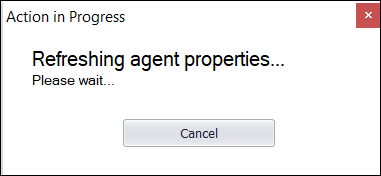
Refresh All Agents
To know the real-time update of the agents in the repository, select a directory where the agents are stored. Right click on an agent and select Refresh All Agents from the commands menu. It will refresh the properties of all agents and we can see updated details in the repository.
Run
An agent can directly be executed with this option. This option only works if the agent is deployed on the cluster.

Run History
This command will display a historical view of the agent run. Run history page shows the complete run history of agent job schedules.