
Rate Limits
Rate limits can be used to control how hard agents are allowed to hit a target website. For example, a rate limit can be added for a certain website and be configured to allow a maximum number of page loads over a given time period. The rate limit is then assigned to all agents targeting this website, and the agents will stop once the maximum number of allowed page loads is reached.
Note:
AgentControlCenter is set with a default session limit of 10 and you cannot run more than 10 sessions of an agent in ACC. This is by default applied to all the agents added to run on the AgentControlCenter. If you try to run an agent on ACC with more than 10 sessions it will not let you start your agent and give you an error message as below:
Error starting agent. Exceeded the default 10 allowed concurrent sessions for agent <AGENT_NAME>.
Similarly, if you run more than 10 sessions via Job Schedule then also the agent will fail with an error message as below:
Exceeded the default 10 allowed concurrent sessions for agent <AGENT_NAME>.
If you want to run more than 10 sessions of an agent then you will need to create a Rate Limit by adding the Session Limit to your desired number (The Session limit value cannot be less than 1 or greater than 99) and then you will need to apply this Rate Limit to the agent in order to override the default value 10.
Agents stopped by a rate limit will get the status Stopped and must be restarted or continued manually. A directory privilege Email on Rate Limit can be added to a user, and the user will then receive an email when an agent reaches a rate limit.
Rate limits can be viewed by users with the Admin role, but only added or edited by users with the Super Admin or Server Admin roles.
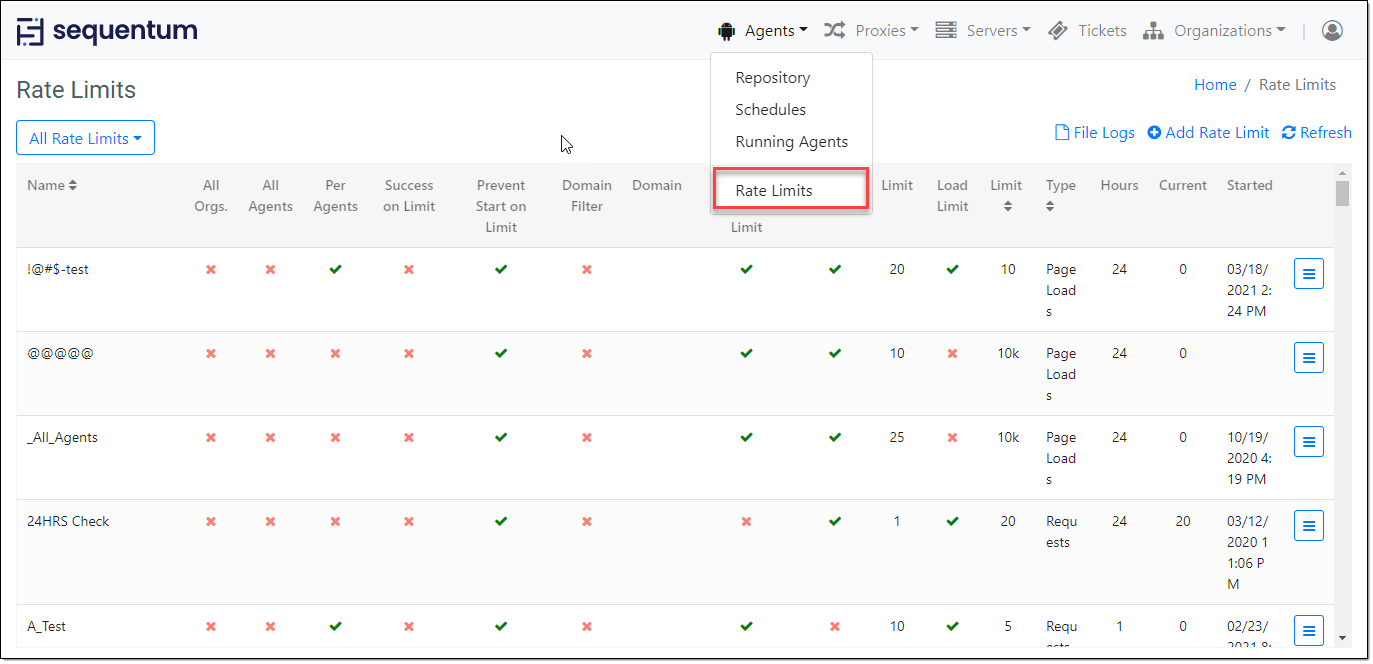
Rate limits allow you to control the maximum number of page loads or web requests, but also the maximum number of concurrent agent sessions.
Types of Rate Limits –
Session Limit – This is a type of rate limit, which can be set on the basis of maximum sessions that an agent can run at the same-time i.e. it limits the number of running sessions for an agent, If the number of session exceeds in the input then execution will not be started and it will throw an error of Sessions Exceeds.
Load Limit – This is a type of rate limit, which can be set on the basis of page loads and as well as request load for a particular time (HH:MM) duration for an agent, a failure ticket will be generated if the agent exceeds the set page load limit or request limit.
The option Ticket on limit will create a failure ticket if the load limit or the session limit is reached. The ticket will be sent to users via an email with the Email on Rate Limit privilege. A user can enable or disable the ticket generation due to the rate limit.
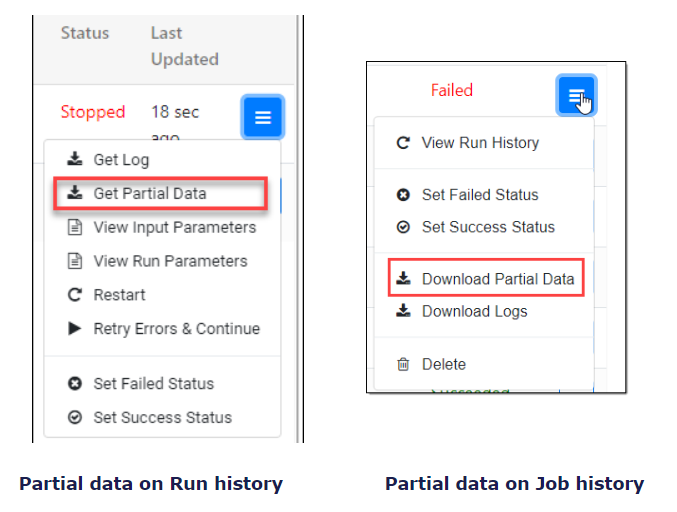
However, if the agent is stopped after collecting some data due to the rate limit applied to that agent then a user has the flexibility to access its Partial data from its Job history and Run history.
The option Prevent start on limit will prevent agents from starting if the load limit or session limit is reached. If this option is not set, the agents will start, but an email will be sent to users with the Email on Rate Limit privilege.
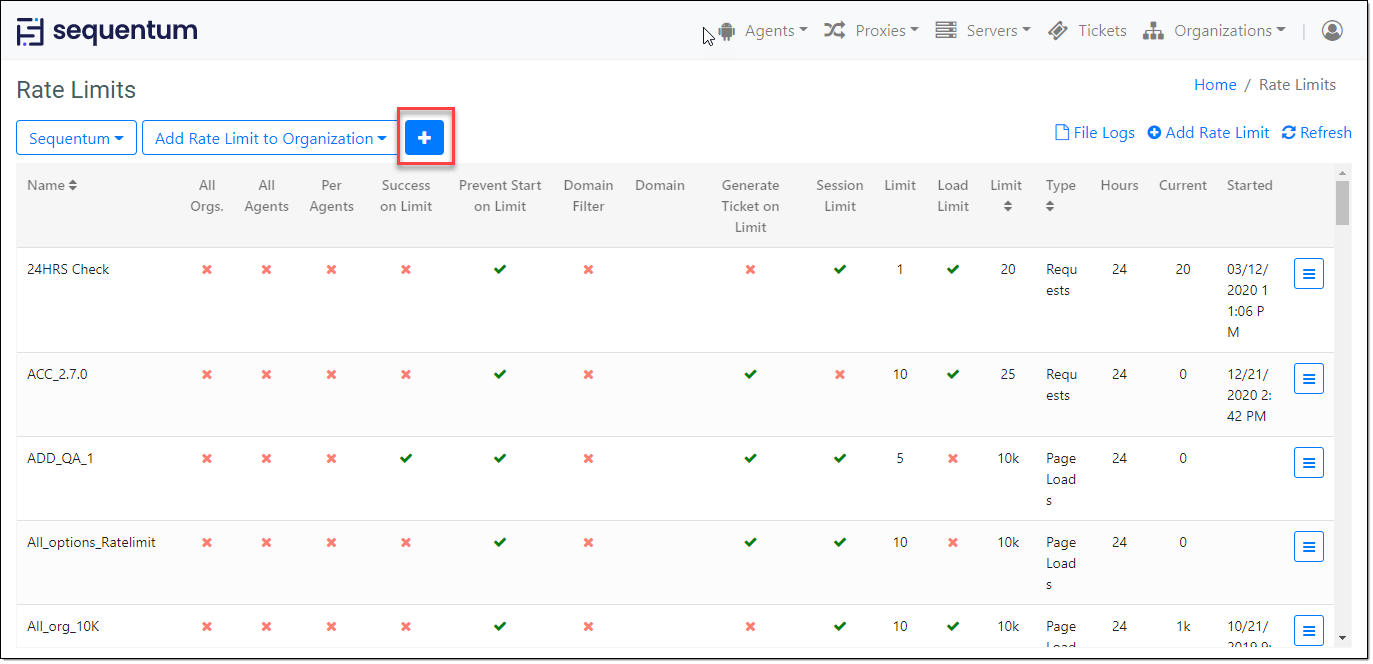
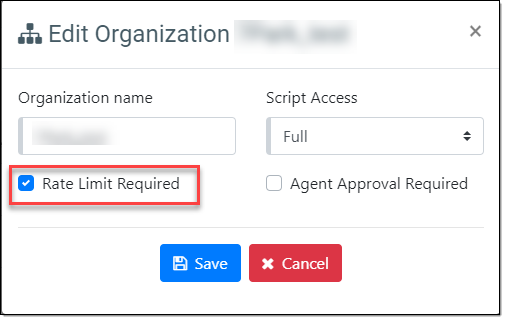
A rate limit can be added to one or more organizations, or it can have a global scope where it's shared by all organizations. Set the option All organizations to give the rate limit a global scope.
A rate limit can be added to one or more agents, or it can be added to all the agents for an organization. Set the option All agents to add the rate limit in all agents for an organization. This option can also give a global scope where the rate limit is shared with All organizations.
The option Per agent gives a scope to add the rate limit privately to an agent. This allows users to add the same rate limit to multiple agents.
The option Success on limit can be used to set the run status as Succeeded however the agents will get stopped when the load limit is reached. The ticket will be sent to users via an email with the Email on Rate Limit privilege.
To add a rate limit to an organization, first, select the organization from the Organization drop-down, and then select the rate limit from the Rate Limit drop-down. The Rate Limit drop-down will only show rate limits that don't have a global scope. Click the + button to add the rate limit to the organization.
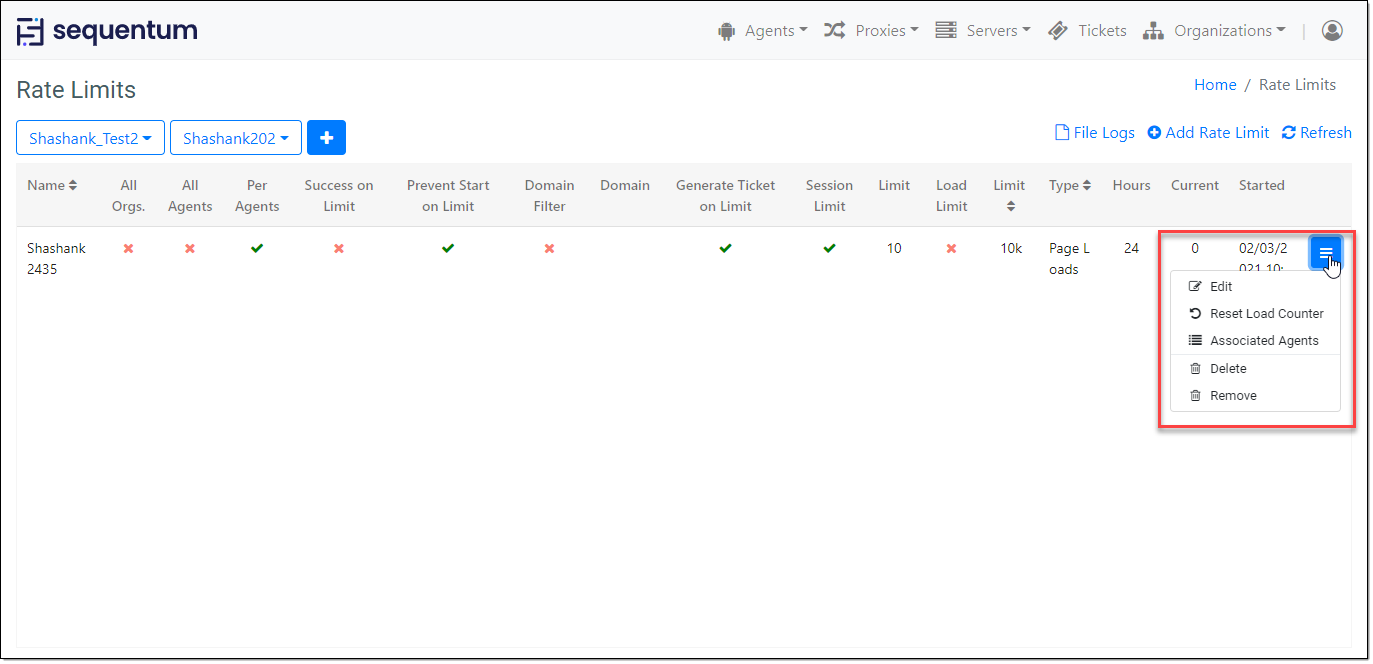
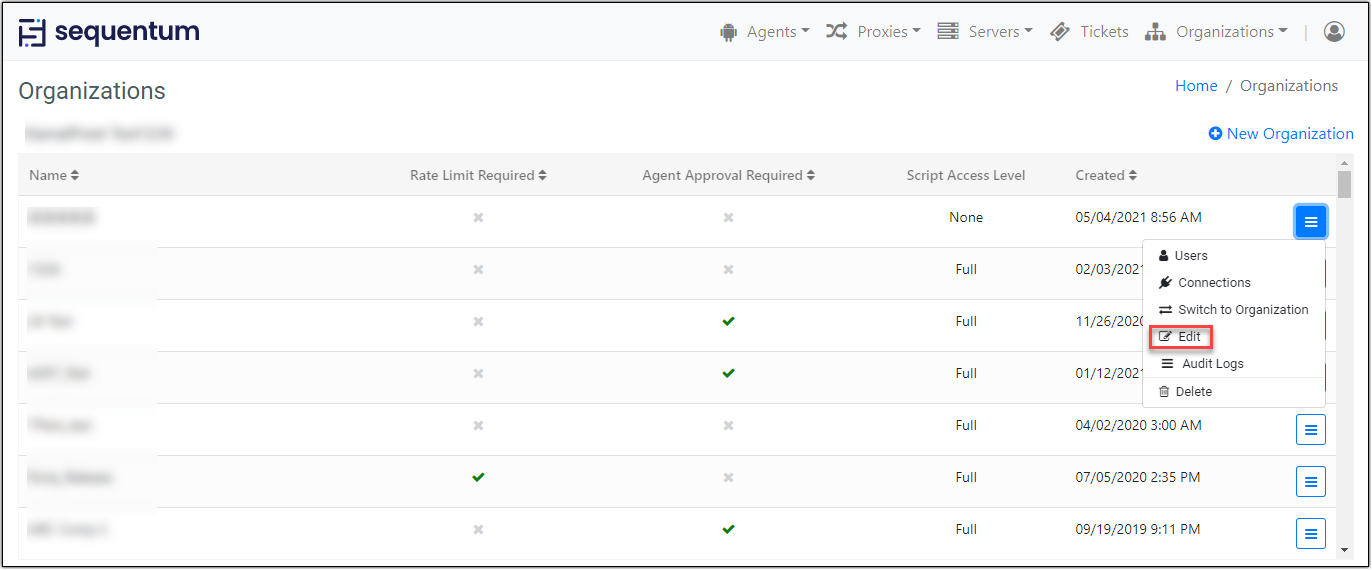
To do modification to the rate limit, click on the context menu for the selected rate limit.
Edit- A user can edit the rate limit and the changes will get applied automatically to all associated agents and organizations.
Reset load counter- Load counter displays in the 'Current' column. This will show the count of current page load/requests used by the agents. With reset load counter option, a user can again initiate a page loads limit from start i.e. the counter will again start from zero.
Delete- A user can delete the rate limit and it will get removed automatically to all associated agents and organizations.
Audit Logs - A user can check what changes have been done, who did that, and when with audit logs option. Audit logs contain details about user activities. For more details please read the Audit Trail article.
Associated Agents - This option from the context menu of the Rate Limit can be used to find out how many agents are attached with this rate Limit. If there are X number of agents that are using the same Rate Limit then we will come to know through this option that these X agents are associated with this Rate limit.
On the "Associated Agents" window, details like Agent Name, Organization Name, and Agent Full Path for the associated agents are displayed.
An organization can be configured to require rate limits for all agents. You can still check-in agents to an organization that requires rate limits for all agents, but the agents will not start without an assigned rate limit.
A rate limit is assigned to an agent by following the above-displayed steps in the Agent Repository.
Agent Approval Required: This feature allows users to approve/disapprove their agents. If an agent is disapproved, all job schedules added will get disabled by default and cannot be enabled before the agent is approved.
A disapproved agent can still be run manually allowing users to check their agent execution and data before approving the agent to run through the Job Schedules. With the Agent Approval feature enabled new agents checked-in will be disapproved by default so you need to approve them specifically. Existing agents will be approved by default.
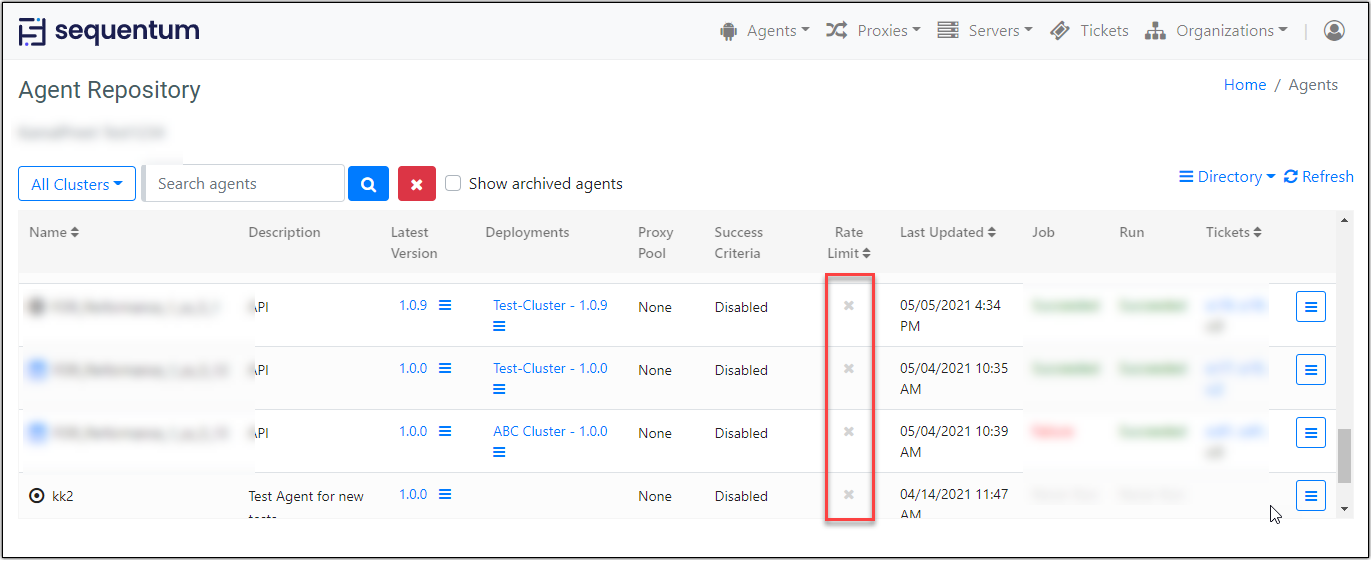
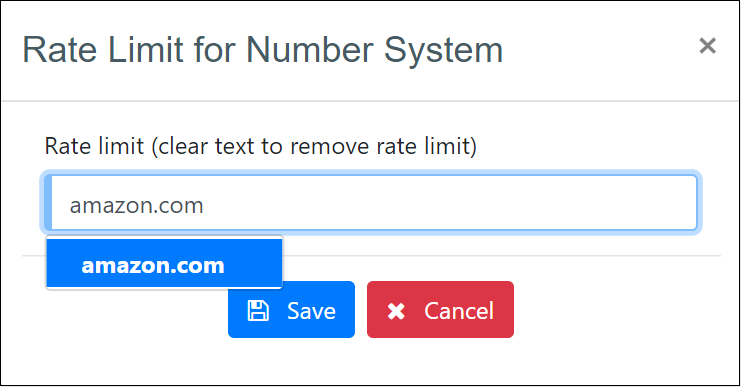
A popup will appear when you click on the check or cross icon allowing you to select a rate limit or remove an existing rate limit. The Rate Limit drop-down will contain all rate limits with a global scope and all rate limits assigned to your organization.
Only users with the Admin role can assign rate limits to agents.