
Jobs
Agents can be run as single runs or as job runs. A job run consists of multiple agent runs that are tracked as a single entity. A job run will not complete before all agent runs associated with the job have completed, and a job run is only completed successfully if all agent runs have completed successfully.
Jobs usually start agent runs using job schedules. A job can consist of one or more job schedules and the job will not complete before all schedules have completed. Each job schedule can start multiple agents runs, and a job schedule is not completed before all agent runs have completed.
Jobs can also be started directly from the Agent Repository page. If a job is started with performance sessions, the job will not complete before all sessions have completed, and exported data from all sessions will be combined into a single data file. If you start an agent as a single run with performance sessions, each session will be considered an individual run and each session will export its own data.
Only one job can be configured for each agent, and one agent can only have one active job run.
Jobs can be configured in the ACC Web Portal or in the Sequentum Enterprise Editor.
Managing Jobs in ACC Web Portal
Once you deployed your agent to a cluster, you can create Jobs and Job Schedules, configure Job Settings, view Job History, etc.
The 'Jobs' which you can find at the dashboard actually refer to the running, failed, scheduled and succeeded jobs. From here you will see if a job has run successfully or has failed and what is the 'Last Run/Next Run/Started/Completed' time.
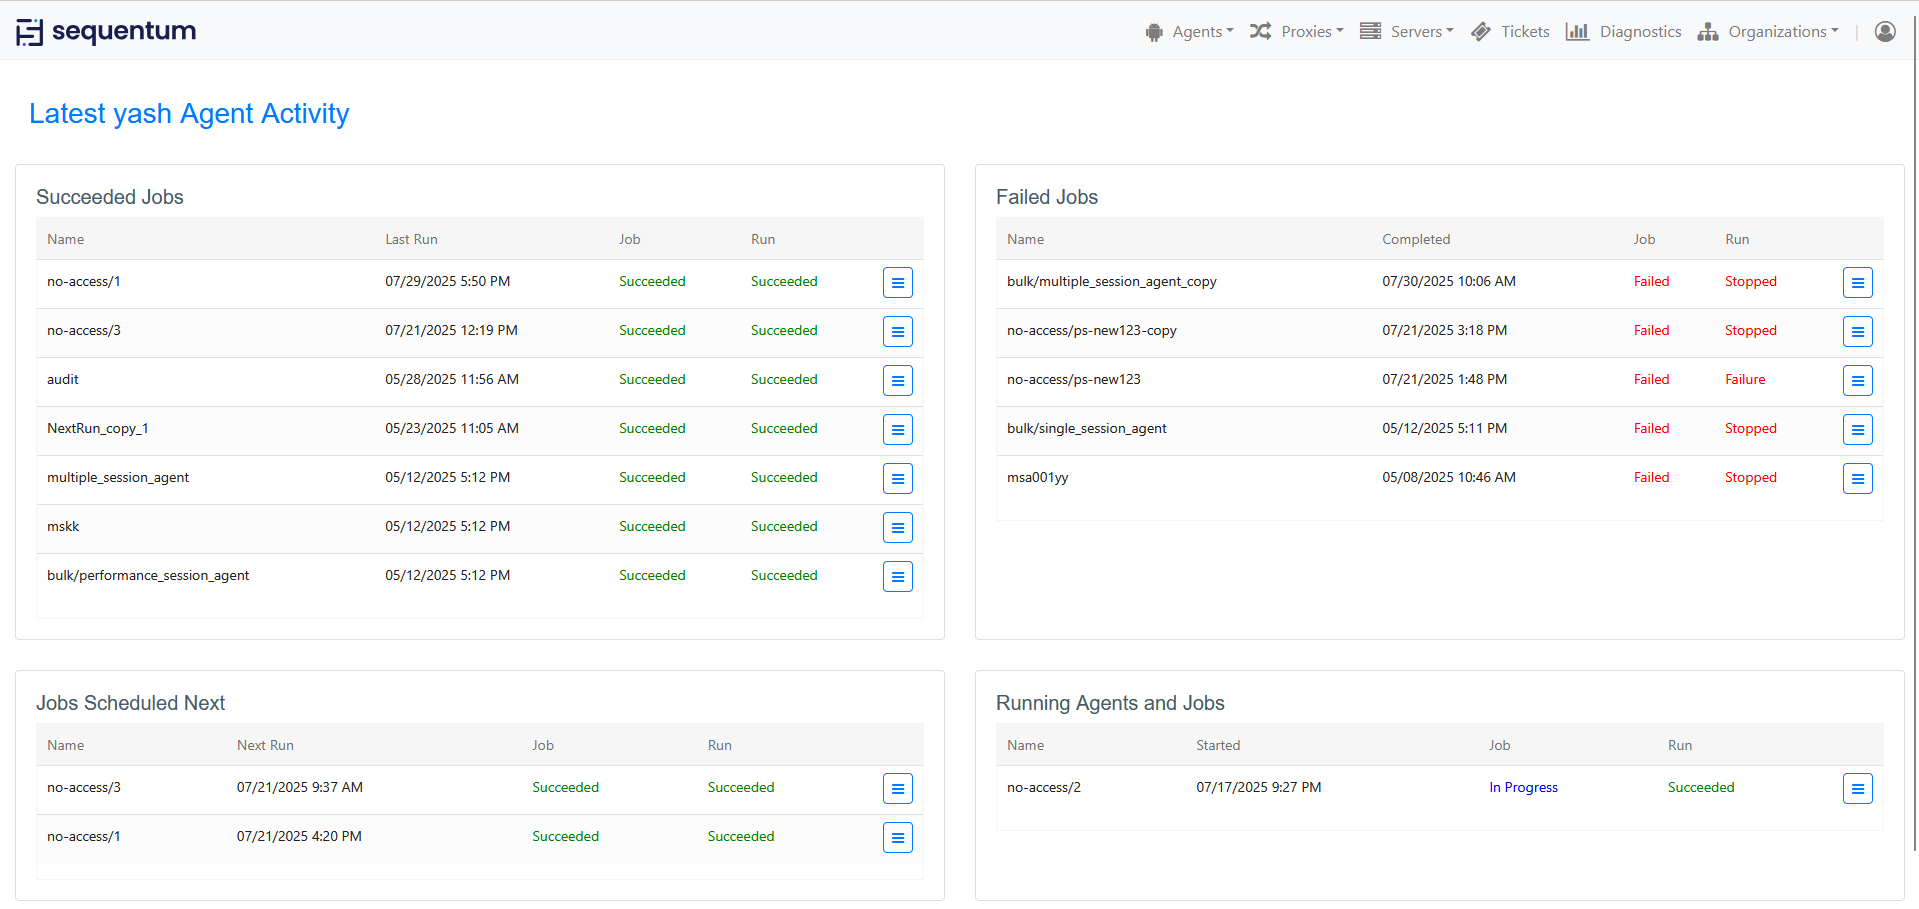
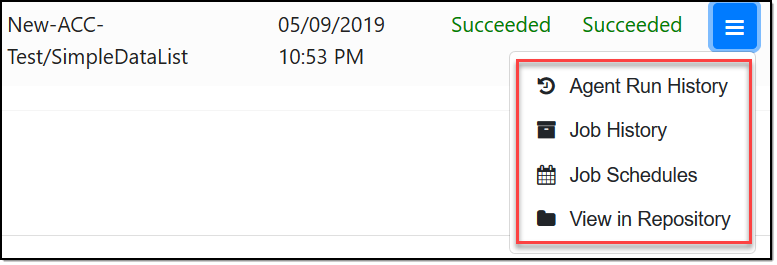
You can click the icon that comes at the end of each job to check out the 'Agent Run History', 'Job History' and 'Job Schedules'. The button of 'View in Repository' provides you with the key info of the selected job, such as the version of the Agent, the Server/Cluster that the job is associated to, the Proxy Pool bundled with the job, whether Success Criteria is enabled, Rate limit applied or not, when was it Last updated, status of Job and Run, what are the Tickets created for the job.
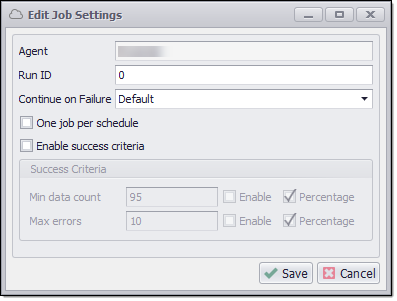
Job Settings
To configure an agent job with the proper setting, select a specific agent from the directory and click on the action menu on the right side of the window. From the drop-down list, click on Job Settings and it will display a window from where you can set up a job. Job settings for an agent are environment-specific. When you click on each environment, you will see the job settings configured for that particular environment.
Environment - In the Environment dropdown, you can select the environment (Prod, Dev, or QA) where you want to modify the job settings. After making the changes, click "Save" to apply the settings for the selected environment.
Run ID - This is a unique identifier in the form of integer value which will show the number of job execution. It will increase as per the number of times the run will get executed. You can set it from job settings if you need to run the agent for a specific Run ID.
Continue on failure- You can select Yes, No or Default from drop-down options required for a particular job.
One Job per schedule - If you check on one job per schedule, then it will execute one job for each schedule. Basically, it comes into consideration when multiple schedules are set for an agent, then it will execute each schedule as a separate job. If it is unchecked, then it will consider overall/multiple schedules as one job.
Windowless- This is used for running agents with or without headers. There are many websites that have better performance on windowless mode than windowed mode e.g. Flex applications. There are also few websites that have better performance on Windowed mode. ACC provides its users with a facility to run their jobs with windowed or windowless mode. By default, its value is "Windowless = true".
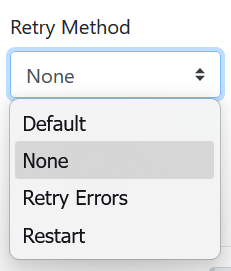
Retry Method- The Retry Method setting allows users to control how a job behaves after a run failure. At both Directory and Agent levels, users can select either Retry Errors (resume from failure point) or Restart (start the run from the beginning), with both options being mutually exclusive. Users can also define the number of attempts and the interval between each retry or restart. Agent settings inherit Directory configurations when set to Default, but can override them if needed. New agents will have this option set to None by default.
Schedule Limit - The Schedule Limit setting allows user to control the maximum number of schedules that can be created for an agent within a specific environment (Prod/QA/Dev). When enabled, users can define a numeric limit, and the system will prevent adding new schedules once the limit (including disabled schedules) is reached. This validation applies to both UI actions and API requests. By default, this setting is disabled, allowing unlimited schedules.
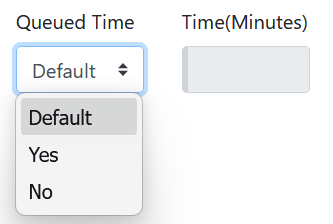
Queued Time -This feature enhances load balancing by automatically reassigning agent runs to another server in the cluster if they remain in a queued state beyond a defined time. This setting can be controlled at Organization, Directory, or Agent level. It follows rules like minimum wait time and respects preferred/ignored servers. Additionally, agent logs capture server reassignment details, including the original server, time elapsed, and the new server name and IP.

Enable Success Criteria
For setting success criteria, check to enable success criteria and then enter the value in “Min data count”, “Max errors”, "Min. Action count", and "Min. Export rows". If you check on the Percentage of success criteria options, then it will take the value as a percentage and compare the current job with the last executed successful job. If the success criteria meet the set criteria, then the job status will be "Succeeded", else "Failed".
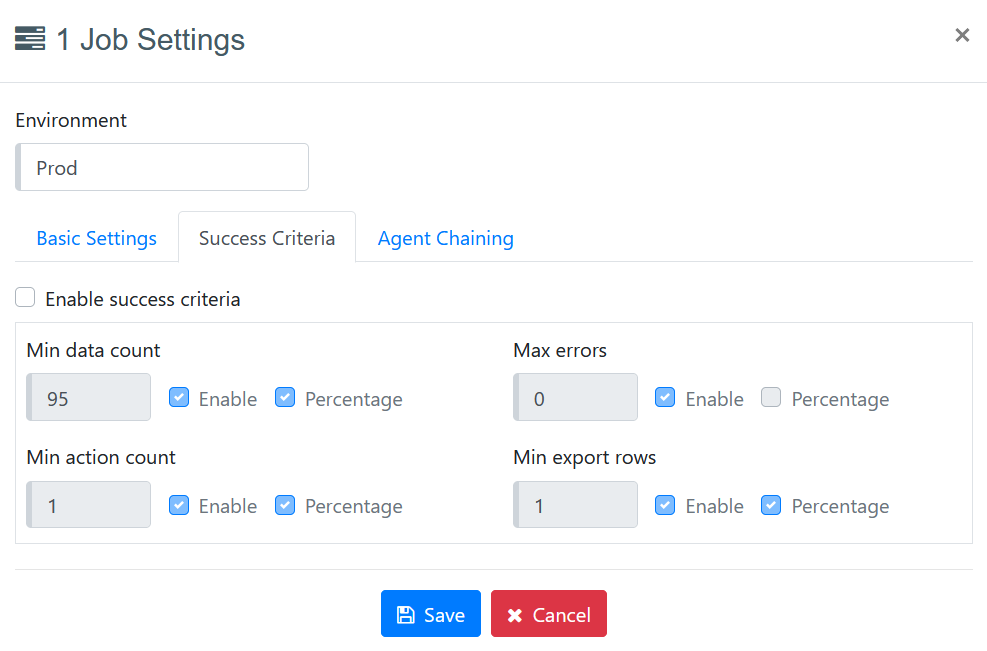
Min Data Count: The Min data count is compared with the value stored in the Data column. If the percentage option is enabled, Min data count will be compared with the last successful job. If one job per schedule option is disabled, the total data count of all scheduled runs will be considered as the min data count of all the runs that are treated as one single job. And if it is enabled the data count of one scheduled run will be considered as Min Data count of one job.
Max errors: The Max errors count is compared with the value stored in the Errors column. If the percentage option is enabled, Max errors will be compared with the last successful job. If one job per schedule option is disabled, the total error count of all scheduled runs will be considered as the max errors count of all the runs that are treated as one single job. And if it is enabled the error count of one scheduled run will be considered as the max errors count of one job.
Min. Action count: The Min action count is compared with the value stored in the Actions column. If the percentage option is enabled, the Min action count will be compared with the last successful job. If one job per schedule option is disabled, the total action count of all scheduled runs will be considered as the Min action count of all the runs that are treated as one single job. And if it is enabled, the action count of one scheduled run will be considered as Min action count of one job.
Min. Export rows: The Min export rows are compared with the value stored in the Delivery column. If the percentage option is enabled, Min export rows will be compared with the last successful job. If one job per schedule option is disabled, the total export rows count of all scheduled runs will be considered as the Min export rows of all the runs that are treated as one single job. And if it is enabled the export rows of one scheduled run will be considered as Min export rows of one job.
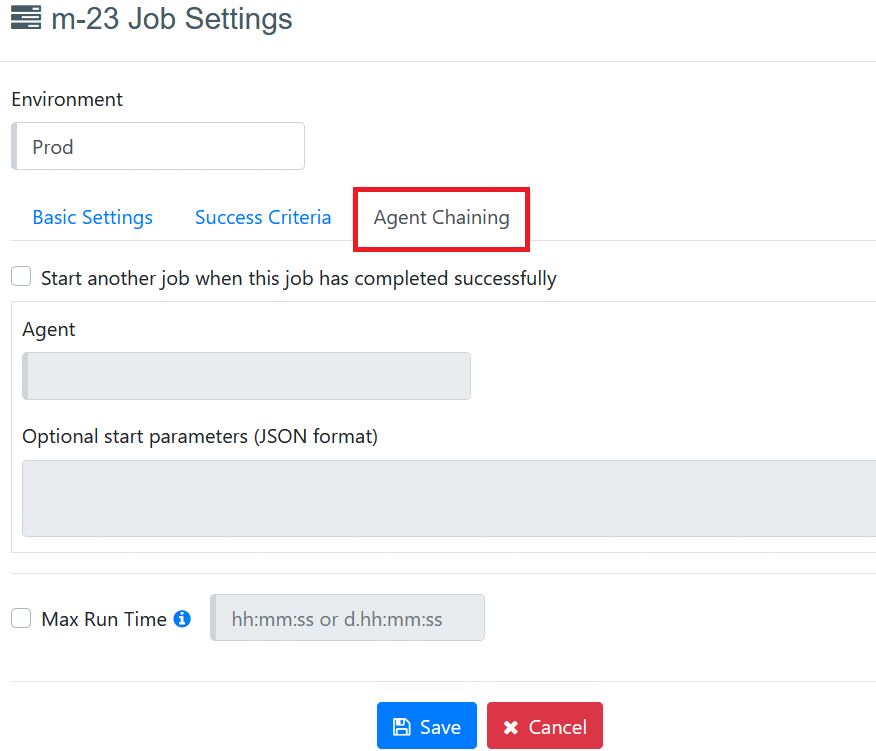
Agent Chaining “Start another Job when this job has completed successfully” (Agent Chaining)- This feature allows users to execute a specific agent after the completion of the first agent. This is a very useful feature in the case when the output result of one agent is an input list for another agent. This feature is available in the job settings window, select the agent from the list which you want to execute after the first agent. The selected agent will only be executed if the first one is completed successfully. For agent chaining, the parent and child agents must be deployed on the same cluster and when the agent runs, the environment will be same as parent.
Agent – Shows the list of all agents available in that Directory. This Job automatically starts its run after the current job completes successfully.
Optional start parameters (JSON format) - can be used to change the settings of the job, these are optional and should be written in JSON format as shown below.
{
"logLevel": 3,
"isProductionRun": true,
"isWindowless": false,
"isSynchronous": true
}
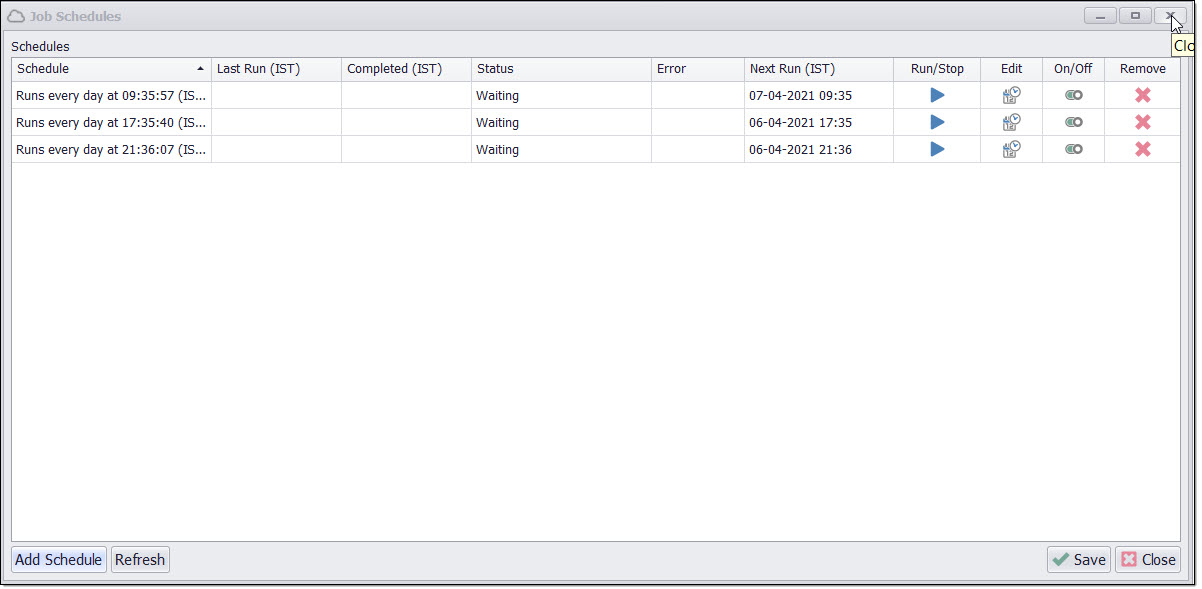
Job Schedules
A job can include one or more job schedules that start agent runs on a schedule. All schedules in a job must complete before the job is completed, and the job is only completed successfully if all its job schedules are completed successfully.
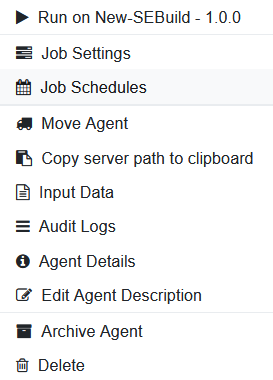
To view and add job schedules for an agent, select Job Schedules from the agent context menu in the Agent Repository.
The Job Schedules page will show status information for all schedules.
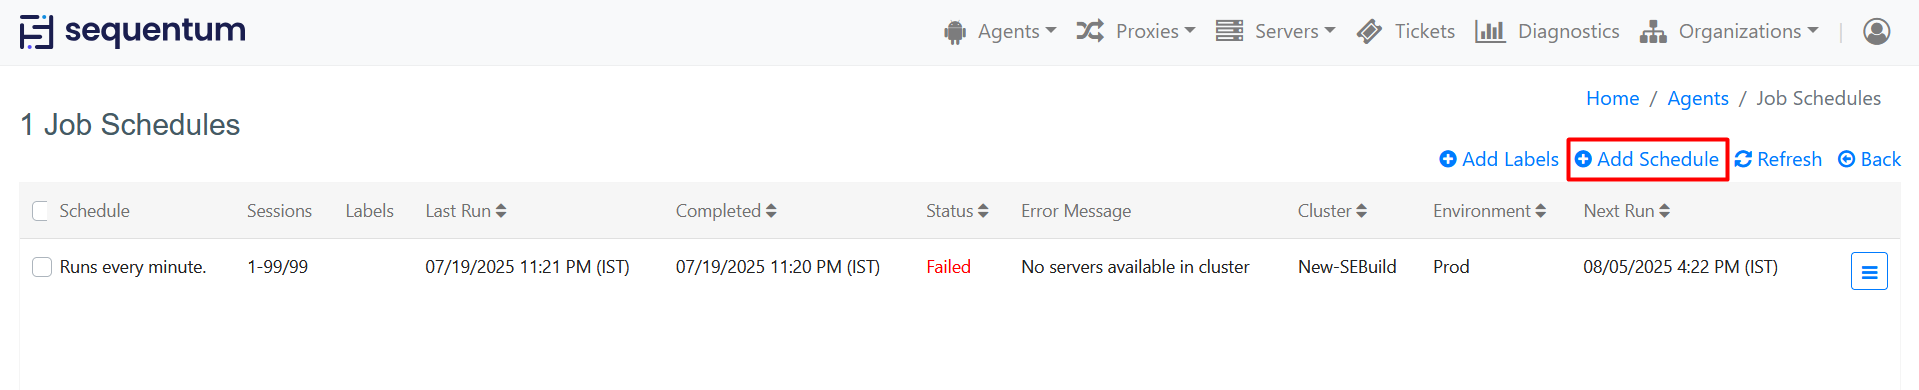
Click Add Schedule to add a new job schedule.
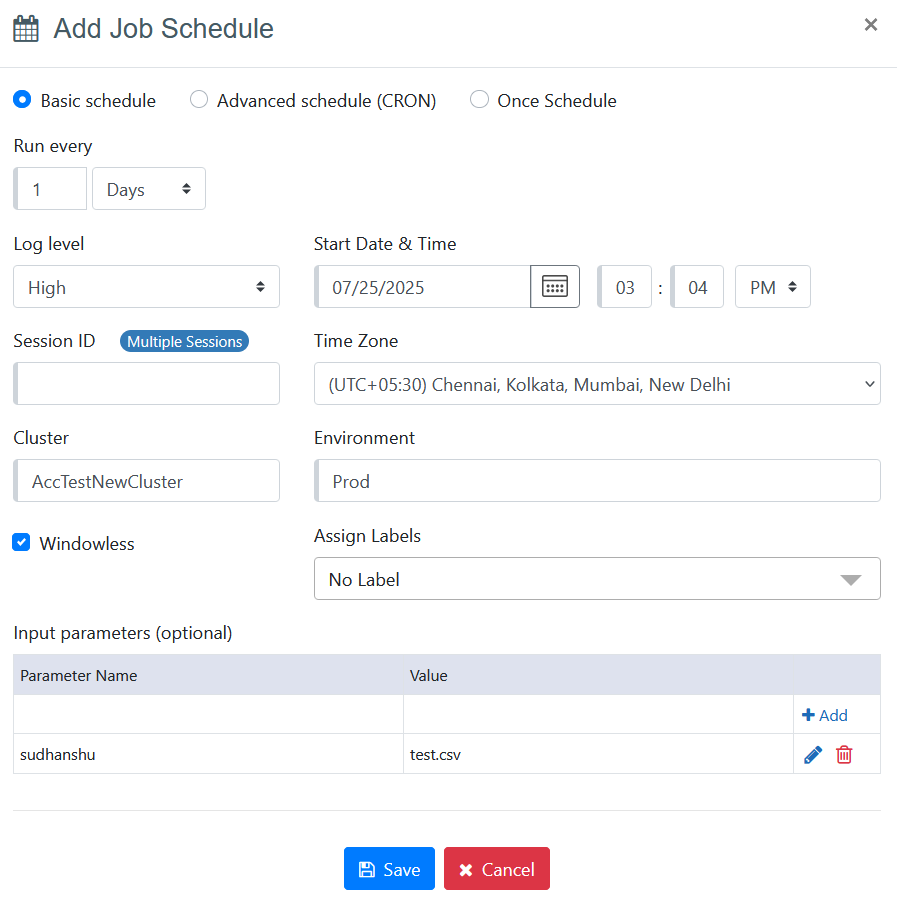
A basic schedule can run an agent every specified number of days, hours, minutes or seconds. Start time and time zone specify the first time an agent will run.
A CRON expression can be used to add a more complex schedule. Please see CRON expressions for more information. CRON expressions cannot contain time zone information, so if a CRON expression specifies a specific run time, you can use the Time zone field to specify the time zone for that run time. A CRON schedule will start on or after the time specified by the Start time field.
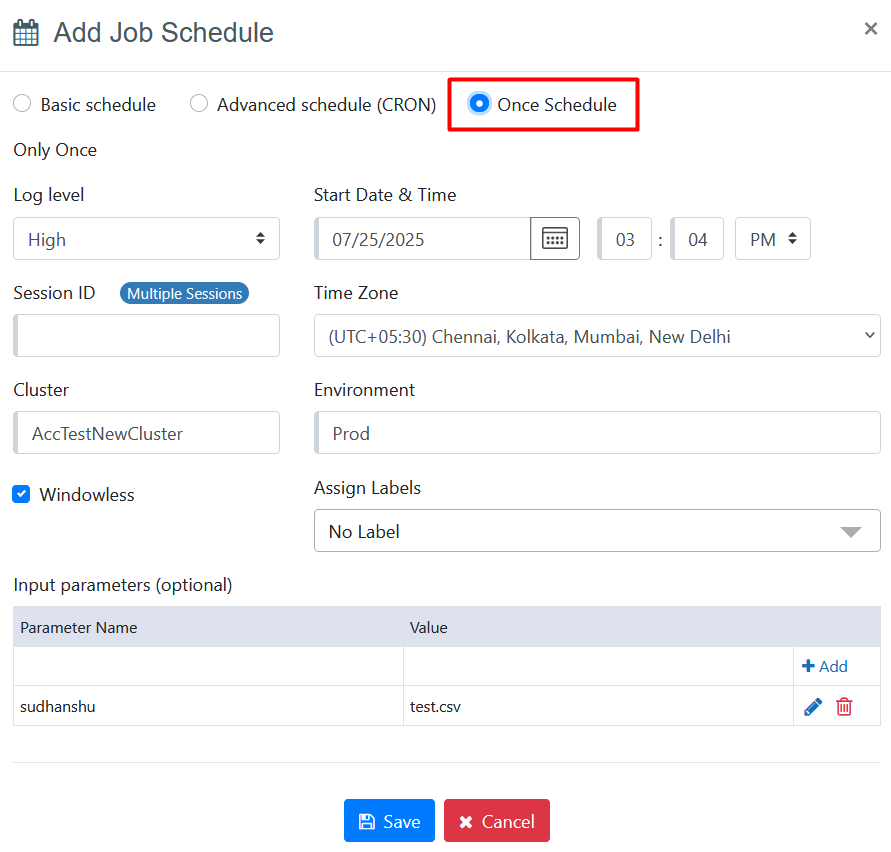
ONCE schedule option can be used to schedule the job to run once, and only once, at a specified date and time in the future. Start time and time zone specify the time and Date when an agent will run.
Log level is the log level used when the agent is run. The log level can be High, Medium, Low or None.
Session ID can be used to start multiple instances of the same agent. The Session ID field is disabled if the agent does not support sessions. See Performance Sessions for more information.
Note: The Session ID field also indicates which session type the agent is configured for—Performance Session, Single Session, or Multiple Session. However, this information is shown only when the agent is deployed on a cluster that has available servers.
In the case of multiple clusters, the session information is not displayed until a cluster is selected from the dropdown. Even after selecting a cluster, if that cluster has no available servers, the system still does not show which session type the agent is configured for.
In summary, the session configuration details are only visible when the agent is deployed on a cluster with available servers.
Input parameters can be used to provide input data for the agent. See Input Parameters for more information.
Cluster: The Cluster dropdown displays the list of clusters where the agent is deployed. If the agent is deployed to only one cluster, the column will automatically show the cluster name without requiring any selection from the list.
Environment: This column shows you the environment in which the agent job will get scheduled. By default 'Prod' will be selected and displayed while adding schedules.
Schedule Timing Validation:
The ACC prevents overlapping schedules within the same cluster and environment at the same time.
The following combinations are allowed:
Same cluster, different environment.
Same environment, different cluster.
If a conflict is detected, the following error message is displayed:
"A schedule already exists for this time in the selected cluster and environment."
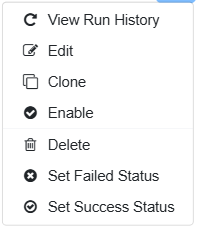
Job Schedules Context Menu has the following options:
You can navigate to the job Schedule context Menu via below option:
Agents→Schedules→Context Menu→Job Schedules→Click Context Menu of Job Schedules.
Run: Job starts its Run when clicking on the Run option.
View Run History: Shows the Run history of the Job.
Edit: Edit feature enables the option to edit the Job Schedule.
Clone: This feature allows users to create multiple schedules with similar parameters.
This is a very useful feature in the case when the user wants to create many schedules with similar parameters.
Disable: This feature allows you to disable the particular schedule of the Job.
Delete: Deletes the particular schedule.
Set Failed Status: This feature sets the schedule run status as failed and Error message displays 'Manually set to failed'.
Set Success Status: This feature sets the schedule run status as succeeded and Error message displays 'Manually set to succeeded'.
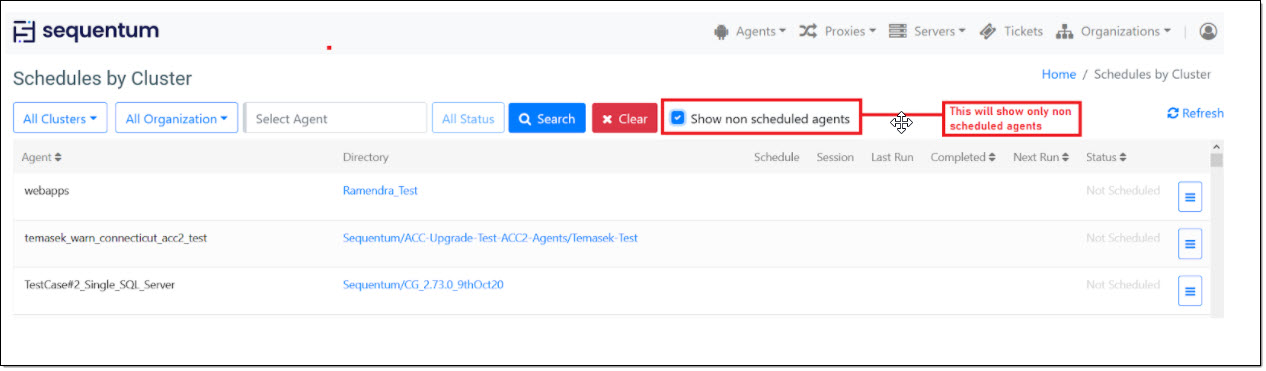
View All Schedules on a Cluster
A user with the Super Admin / Admin role can view all schedules on a cluster by selecting Schedules from the Agents menu, and then selecting a cluster from the Cluster drop down.
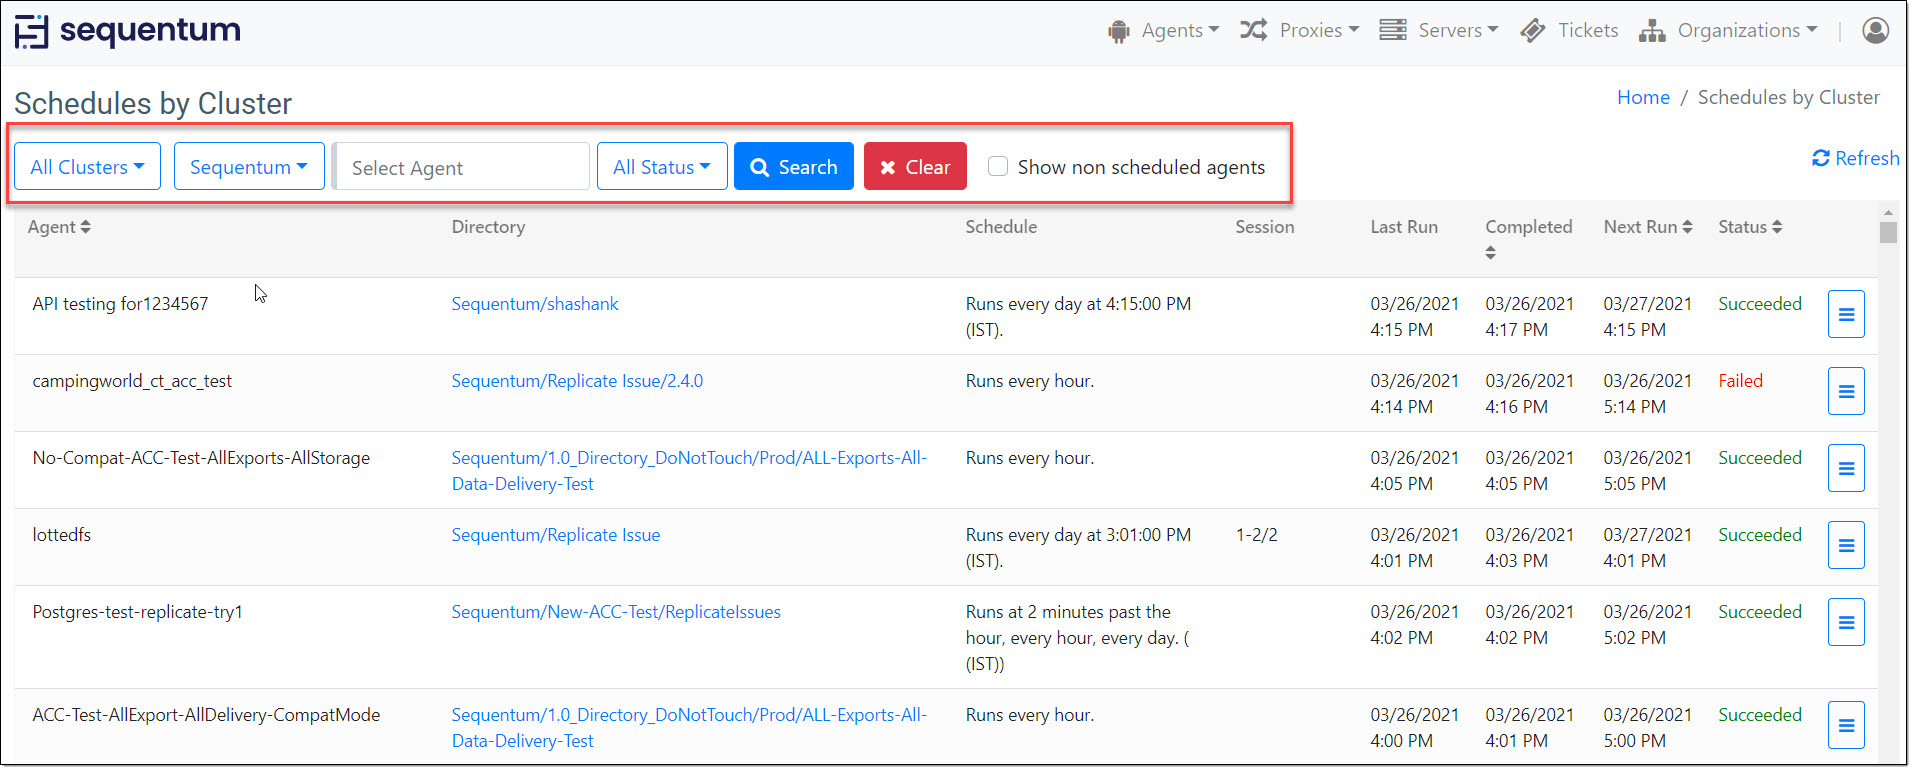
Schedules page is also the central place where we can see the schedules related details for all the agents.
Job Schedules filter allows users to filter out the schedules added on a specific cluster or on all clusters. The default filter selection is set to All Clusters to show all the Job Schedules added in the current Organization in which the user is logged in.
Users can filter the Job Schedules for all the agents in a directory or a specific agent schedule in a specific directory. The job schedule filter panel allows users to filter their search results on the basis of Organization Name, Agent name and the Agent Status.
Job Schedule Filters:
To help users find a specific schedule(s), the schedule page includes a series of useful schedule filter fields.
Cluster Filter: Users can get the schedule for all the Clusters or any specific cluster with the help of Cluster filter.
Organization Filter: Organization selection criteria will restrict the search results to get scheduled only from the selected organization. All organization selection will display schedules from all organizations.
Agent Search Filter: This filter is mainly dependent on the Cluster Filter selection and the Org Filter selection.Any text entered in the agent box is matched with the agents that are related to the organization selected in the Organization filter.
Status: Selecting a status will limit the search result to include schedules having the selected status only. All Status is the default value which displays schedules having any status. Users can get the desired results on the basis of the different status like Failed, Succeeded, Running and Waiting.
Search Button: Once you have finished setting up your filters, click the Search button to execute the search and the filtered search results will be listed on the schedule page.
Clear Button: The Clear button, clears the details entered for all filter fields and resets them to the default values.
Non scheduled agents: We have an option on the Schedules by Cluster page to list down all the agents which does not have any job schedules added to it. We can get this by enabling “Show non scheduled agents” option .
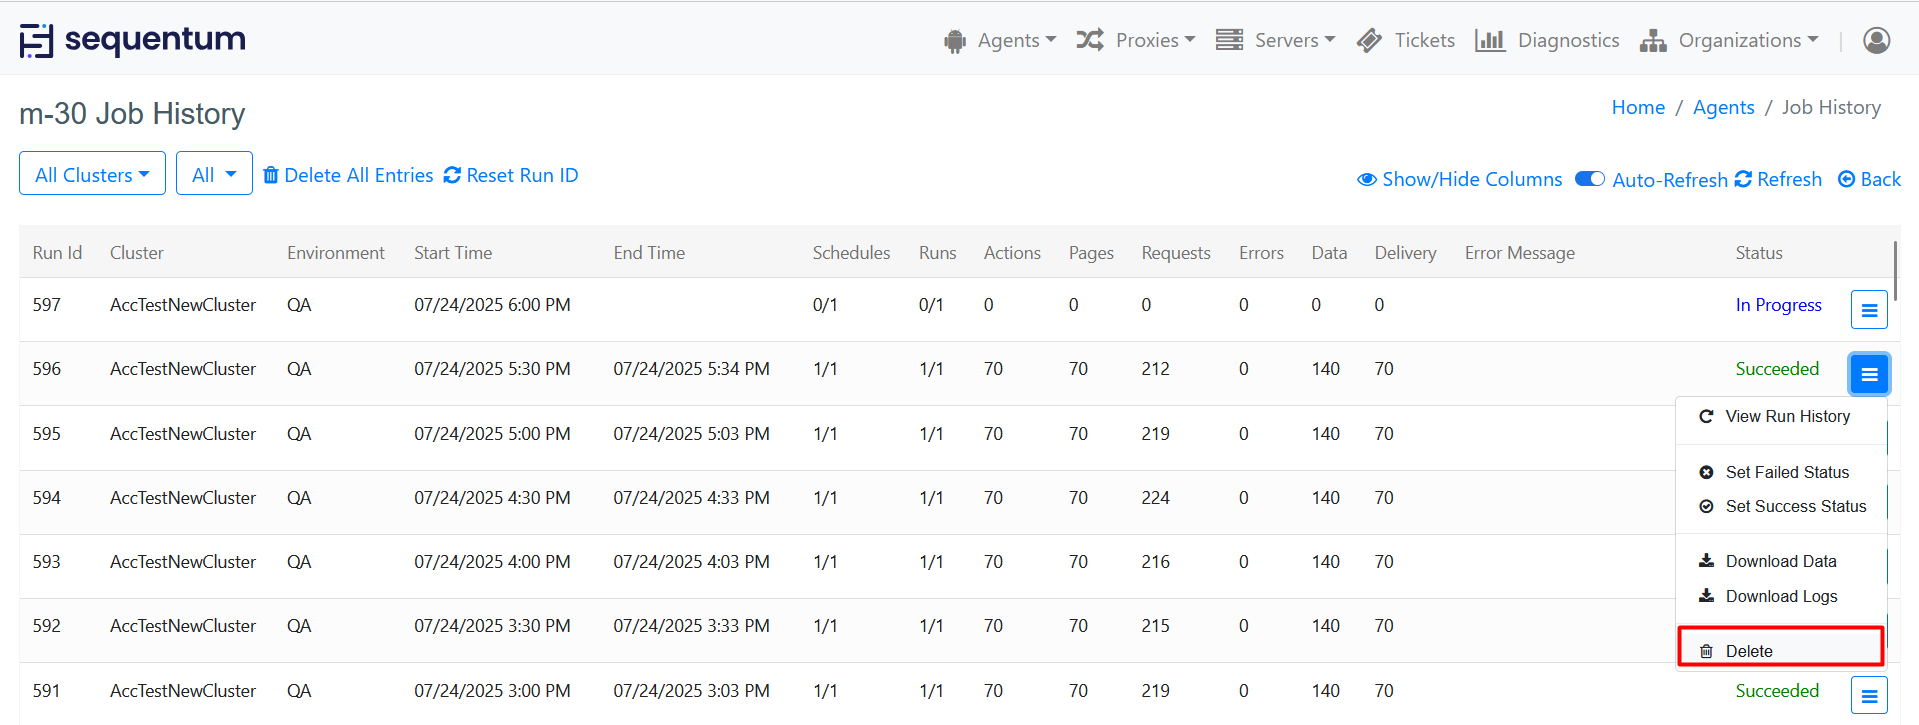
Job history
The job history page displays the execution history of the jobs that were scheduled to run on a cluster. You can navigate to the job history page via below option:
Agents→Schedules→Context Menu→Job History
The values displayed under each column of the job history page is explained as below:
RunId: This column shows an increasing number for each row w.r.t the jobs executed.
Cluster: This column shows you the cluster name where this agent job is executed.
Environment: This column shows you the environment in which the agent job is executed
Start Time: This column displays the date and time at which the job started executing on the cluster.
End Time: This column displays the date and time at which the job finished its execution on the cluster.
Schedules: This column displays the count of job schedules that got executed. This column will display 1/1 for each row if the Job Settings is set with "one job per schedule" and will display the count of all the schedules that got executed again the job schedules for a particular agent.
Runs: This column displays the count of runs that got executed for a particular job schedule.
Actions: The successfully executed action commands.
Pages: Actual page loads. This is all pages that are loaded into the main frame of the browser or pages loaded by the HTML/JSON/XML parser.
Requests: All requests made to the target web server, including HTML, images, styles, script, etc. For HTML/JSON/XML parsers there's one request per page load.
Errors: All action errors. Note that a page load error that's retired and then successful does not result in an error, but the error counts as a page load if a page was actually loaded.
Data: The number of records that have been extracted by the agent. This count can be different if the "Increase Data Count" property is manually configured else the count will be based on the increased count on each extracted content element.
Delivery: Actual count of the data rows delivered to the destination endpoint.
Error Message: This column displays the error message of job failure.
Status: This column displays the execution status of the job which can be In Progress, Succeeded, Failed.
Additionally, you can navigate to the run history page by going to View Run History link available under the action menu for each row under the job history page.
Also, you can manually set the job status to failed or success which allows the users to stop the job execution or continue the job execution basis the last job execution status.
A user can Download Data by selecting this option from the Action menu of each row under the job history page. Partial data can also be downloaded with the option 'Download Partial Data' in case of Failed status.
Download Logs - A user can also download logs from Job history and Run history page to check the execution log that provides time-based information of the actions performed by the agent.
NOTE - The Download/Get log feature depends on the size of the log file. A log file can only be viewed on web browser if the file size is less than 5 MB. The file can't be downloaded by the user in this case. If the logs file is more than say 5 MB size then it can only be downloaded and cannot be viewed on web browser.
Delete option can be used to delete the job from the Job History page.
Delete All Entries : The Delete All Entries feature allows users to remove all job history entries associated with a particular agent. This action is irreversible and will permanently delete all records from the job history page. A confirmation dialog box will appear to ensure you want to proceed with deleting all entries. Confirm your action by clicking "Yes" and "Cancel". If you select a specific environment from the Environment dropdown and click "Delete All Entries," only the entries for that selected environment will be deleted. However, if "All" is selected (which is the default), then entries for all environments will be deleted.
Reset Run ID : The Reset Run ID feature allows users to reset the Run ID associated with jobs performed by the agent. This can be useful in scenarios where you want to start a new sequence of job identifiers or clear previous numbering inconsistencies. If you select a specific environment from the Environment dropdown and click "Reset Run ID," only the Run IDs for that selected environment will be reset. However, if "All" is selected (which is the default), then Run IDs for all environments will be reset.
If any job of the agent is 'In Progress,' the user will not be able to delete entries from the Job History. It is necessary to delete the Job History entries before resetting the Run ID.

Managing Jobs in Sequentum Enterprise (Desktop)
Agent Jobs can be managed/configured in Sequentum Enterprise Editor via the Job context menu. Simply right-click on an agent in the Agent Repository window to show the context menu.
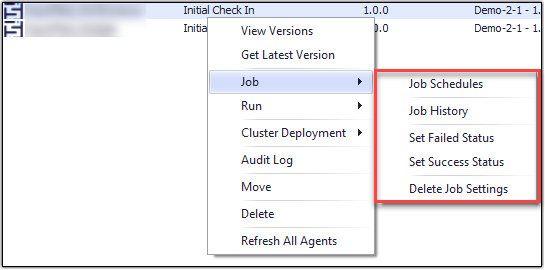
Job Settings
To access Job Settings configuration in Sequentum Enterprise Editor, use Job → Job Settings from the context menu. Refer to the section above on Job Settings for more details.
Job Schedules
To access Job Schedules in Sequentum Enterprise Editor, use Job → Job Schedules from the context menu. Refer to the section above on Job Schedules for more details.
Job History
To access Job History in Sequentum Enterprise Editor, use Job → Job History from the context menu. Refer to the section above on Job History for more details.
Set Failed Status
To set Job status as Failed in Sequentum Enterprise Editor, use Job → Set Failed Status from the context menu. A user can manually set the job status to Failed which allows the users to stop the job execution on the basis of last job execution status.
Set Success Status
To set Job status as Success in Sequentum Enterprise Editor, use Job → Set Success Status from the context menu. A user can manually set the job status to Success which allows the users to continue the job execution on the basis of last job execution status.
Delete Job Settings
To delete Job settings in Sequentum Enterprise Editor, use Job → Delete Job Settings from the context menu. A user can use this option to delete all job settings including all associated schedules and job history of the agent.