
Using Data Input
Sequentum Enterprise can take input data from a wide variety of data sources, such as databases and CSV files. Though you can use input data for many different purposes, its most common use is for loading URLs or inputting values for web forms.
We will explain each type of input data in this section:
Data Providers
You can assign a data provider to any Data List command and can load data from the following data sources:
Data List commands include the following:
A list command will iterate through all the data rows given by the data provider and execute each of the sub-commands once for each row.
Consuming Data
Consumer commands use the data that comes from the Data Provider. The consumer must be a sub-command of the command providing the data. Data consumers include the following types of commands:
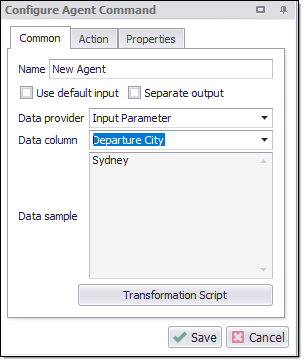
Most data providers are also data consumers and, consequently, many commands will retrieve data automatically. For example, an agent command will normally provide at least one start URL to itself - as shown in the figure.

You can choose the Data Provider on the Common tab of the Configure Agent Command panel. If multiple data columns are available, then you can choose a specific Data Column. The Default data column is simply the first data column that the data provider presents.
A data provider will often provide multiple data columns for data sets that correspond to a web form. An example would be an agent that searches for airfares, which would submit a list of departure and destination cities to a web form. The data provider would then provide two columns: one for departure city and one for the destination city.
Consuming Data in a Script
A script can consume data from a data provider as long as the script corresponds with a command that is a sub-command of the data provider. Most scripts provide easy access to input data from the script arguments. The following example retrieves the current data from the data column DepartureCity in the CityData data provider.
args.GetInputData("CityData").GetStringValue("DepartureCity");
See the Scripting article for more information.
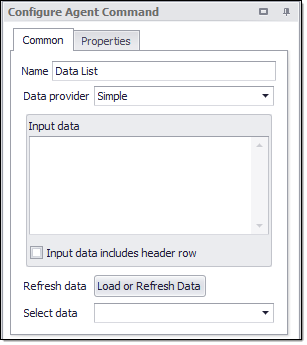
Simple Data Provider
Choosing Simple for the Data Provider will cause the agent to extract data from a CSV data set that the agent designer enters at design time. The agent contains the CSV data internally so that there is no dependency on external files.
The CSV data set may contain multiple rows, each having multiple comma-separated data values. The data follows the same formatting rules as standard CSV data. So, you should enclose a data value in double-quotes if it contains a comma or single quote, and use two double quotes to escape any double quotes in a data value.
The following example contains a header row, although a header row is not mandatory. If the data contains a header row, then you need to check the Input data includes header row box on the Data tab.
Departure City, Destination City
Sydney, Brisbane
Sydney, Melbourne
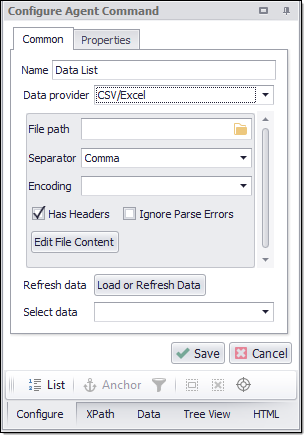
CSV Data Provider
Choosing CSV for the Data Provider is similar to the Simple data provider, but uses an external CSV file. We recommend that you choose the CSV Data Provider for large CSV files since the CSV data provider will perform much better than the Simple data provider for large quantities of data.
For a CSV provider, you can choose the value Separator and the text Encoding of the CSV file.
You can place CSV files anywhere on your computer, but we recommend you place them in the default input data folder for your agent. Later, if you want to export your agent, then you can include these files along with the export.
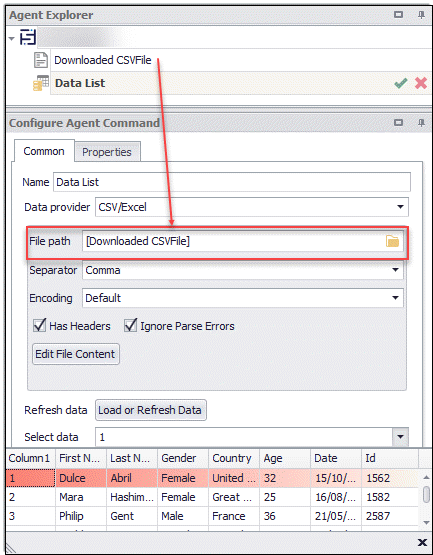
Using Capture Commands in CSV Data Provider
In the CSV Data Provider, you can add the CSV/Excel File path by putting the capture command name in a bracket [CAPTURE_COMMAND_NAME] to load the CSV/Excel file input data in the Data List command.
For example, if you want to load the downloaded CSV file directly in the data list command to use it as Data Input then you can add like this [COMMAND_NAME] and it will load the downloaded CSV file directly in the Data List command as shown in the screenshot below:
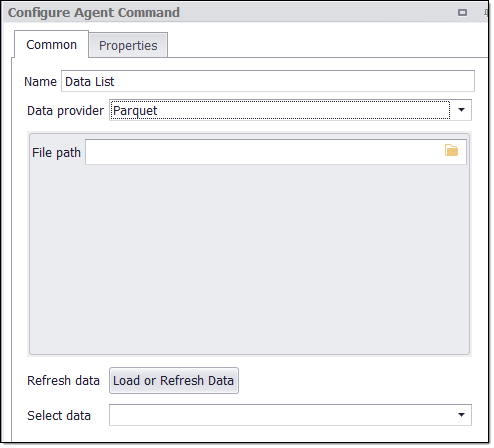
Parquet Data Provider
Similar to CSV Data Provider you can choose Parquet Data Provider. Parquet, an open-source file format for Hadoop. Parquet stores nested data structures in a flat columnar format. Compared to a traditional approach where data is stored in a row-oriented approach, parquet is more efficient in terms of storage and performance
Selection Data Provider
Choosing Selection for the Data Provider will extract data from elements on the web page. The data provider uses the selection XPath of the data provider command and then adds a relative XPath to find the web elements that you include in the selection. You can choose which HTML attributes of the web elements to include as data.
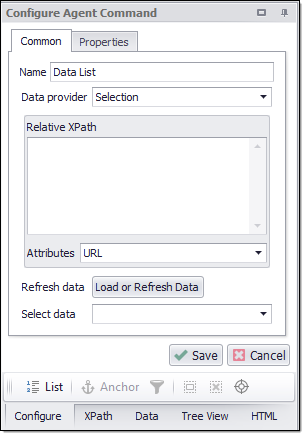
The choice of Selection for the Data Provider is almost exclusively for use with drop-down menus in web forms. A form field command selects the drop-down on the web page, and a relative XPath selects the option elements within that drop-down. The drop-down options then become available to the form field command, which can iterate through the options and ensure that the web form submission is done for each item in the drop-down. Although this is somewhat tedious, the benefit is more precise control over which options you want to submit with the web form.
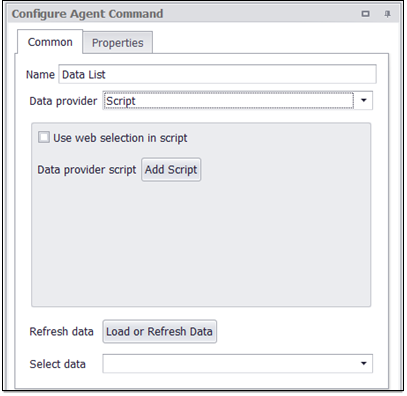
Script as Data Provider
When you want to provide data based on some calculation, this can be done using the Script option as the Data Provider. Press on the "Add Script" button to add your script which will return the list of input data.
Here is the sample script that is returning list of years starting from 2018 to 2025. You can write your own logic in this script section.
C#
Python
using System;
using System.Collections.Generic;
using System.Data;
using Sequentum.ContentGrabber.Api;
public class Script
{
public static CustomDataStorage ProvideData(DataProviderArguments args)
{
int[] years = {2018, 2019, 2020, 2021, 2022, 2023, 2024, 2025};
CustomDataStorage cds = new CustomDataStorage(years);
return cds;
}
}
import clr
import datetime
from Sequentum.ContentGrabber.Api import *
def ProvideData(args):
years = [2018, 2019, 2020, 2021, 2022, 2023, 2024, 2025]
return CustomDataStorage(years)
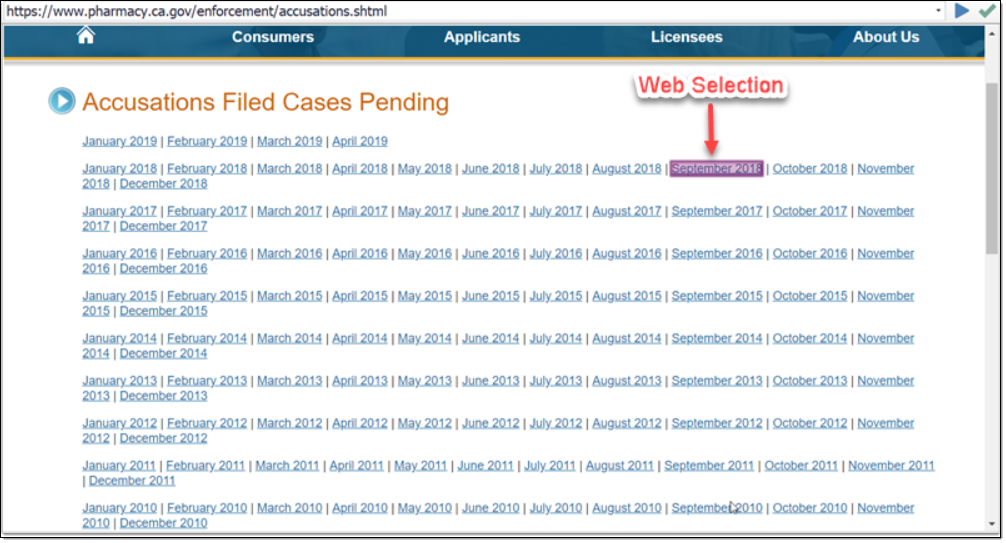
If you want Web Selection to be available in your script please check the checkbox "Use web selection in script". This option will make sure that whatever you have selected on the web page will be available in the script. You can use the selected web content value within the script using the property "Content" of the class DataProviderArguments using the object args.
To use Web Selection in your script select web content on the downloaded page as shown below.
Now select the type of Web Content. This can be one of the "HTML", "Clean HTML", "Styled HTML", "Inner HTML", "Text", "Formatted Text", "Tag Text", "URL". There are other options available against this option.
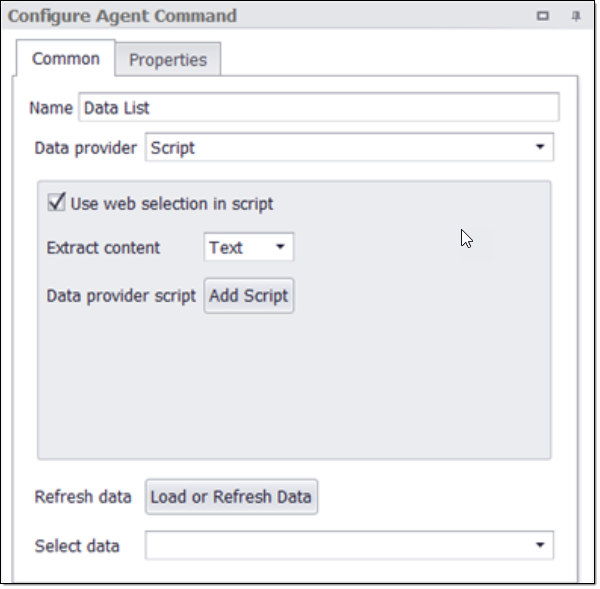
After selecting Web Element on the Web Page edit the script and use the selected value within the script as shown below. The "agrs.Content" returns the selected value in the script.
using System;
using System.Collections.Generic;
using System.Data;
using Sequentum.ContentGrabber.Api;
public class Script
{
public static CustomDataStorage ProvideData(DataProviderArguments args)
{
DateTime dt = Convert.ToDateTime(args.Content);
CustomDataStorage cds = new CustomDataStorage(dt);
return cds;
}
}
Reading ODS Files using script
You might want to use the .ods(Open Document Spreadsheets) files as an alternative option to MS Excel although not as good as excel still a good option because of being open-source. Also, there might be sites that have stored data in ods and you want to download it and read it via Sequentum Enterprise.
Although you might find it difficult to use C# or some paid software to read the OpenOffice ods files.
Let's make it easy for you to use some of the useful Python built-in libraries:
pandas_ods_reader
pandas
ezodf
and use Sequentum Enterprise Data List "Script" option to execute the python script using the C# transformation script.
Below is the sample code you can use to read a .ods file in the Sequentum Enterprise Data List command:
using System;
using System.Collections.Generic;
using System.Data;
using System.IO;
using Sequentum.ContentGrabber.Commands;
using System.Diagnostics;
using Sequentum.ContentGrabber.Api;
public class Script
{
//See help for a definition of DataProviderArguments.
public static CustomDataStorage ProvideData(DataProviderArguments args)
{
var inputfile = "INPUT_FILE_PATH";
var pyfile = "PYTHON_SCRIPT_FILE";
ProcessStartInfo start = new ProcessStartInfo();
start.FileName = "PATH_TO_PYTHON_EXE";
start.Arguments = string.Format( "\"{0}\" \"{1}\"",pyfile, inputfile);
start.UseShellExecute = false;// Do not use OS shell
start.CreateNoWindow = true; // We don't need new window
start.RedirectStandardOutput = true;// Any output, generated by application will be redirected back
start.RedirectStandardError = true; // Any error in standard output will be redirected back (for example exceptions)
string result="";
using (Process process = Process.Start(start))
{
using (StreamReader reader = process.StandardOutput)
{
string stderr = process.StandardError.ReadToEnd(); // Here are the exceptions from our Python script
result = reader.ReadToEnd(); // Here is the result of StdOut(for example: print "test")
}
}
result=result.Replace(Environment.NewLine,"^");
string [] list=result.Split('^');
DataTable dt= new DataTable();
string [] col_header=list[0].Split('|');
for(int i=0;i<col_header.Length;i++)
{
dt.Columns.Add(col_header[i]);
}
for(int i=0;i<list.Length-1;i++)
{
dt.Rows.Add();
string [] col_data=list[i+1].Split('|');
for(int j=0;j<col_data.Length;j++)
{
dt.Rows[i][j]=col_data[j];
}
}
return new CustomDataStorage(dt);
}
}
Sample python code to read .ods file is attached here.
Note: In order to execute the attached python script you will need to install the above-mentioned python libraries.
Simple Script
Similar to the Script option the "Simple Script" option enables you to you use the script as the input data source. The only difference is that "Simple Script" returns an array of strings instead of CustomDataStorage as in the case of "Script". Here is the sample code using the "Simple Script" option
C#
Python
using System;
using System.Collections.Generic;
using System.Data;
using Sequentum.ContentGrabber.Api;
public class Script
{
public static string[] ProvideSimpleData(SimpleDataProviderArguments args)
{
string[] months2018 = new string[] {"Jan 2018", "Feb 2018", "Mar 2018", "Apr 2018",
"May 2018", "Jun 2018", "Jul 2018",
"Aug 2018", "Aug 2018", "Sep 2018",
"Oct 2018", "Nov 2018", "Dec 2018"};
return months2018;
}
}
import clr
from Sequentum.ContentGrabber.Api import *
def ProvideSimpleData(args):
months2018 = ["Jan 2018", "Feb 2018", "Mar 2018", "Apr 2018",
"May 2018", "Jun 2018", "Jul 2018",
"Aug 2018", "Aug 2018", "Sep 2018",
"Oct 2018", "Nov 2018", "Dec 2018"]
return months2018
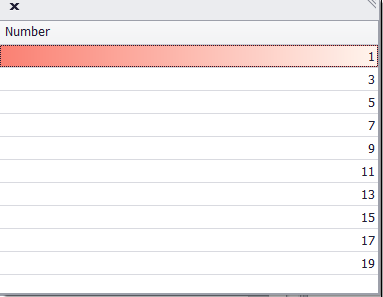
Number Range
The Number Range Data Provider can be used to provide a list of negative or positive numbers to the agent. The Start Number can be any positive or negative number. Similarly, the End Number can be any positive or negative number. The maximum number that you can set for the End Number could be 50847534. Similarly, the Start Number could be -50847534. The range of numbers could be in steps. You can set the next number in the range with a predefined step.
In the above settings, we have defined Start as 1 and End as 20. We have selected Step as 2. The first number in the range would be 1 and the number with step 2 would be 3 and it will keep on increasing the same way up until the End number. Below are the loaded values for this setting.
Using Capture Commands to Limit Data Count
In the Number Range Data Provider, you can choose to limit the End number value by enabling the Use Command checkbox option and selecting the desired capture command from the drop-down to limit the count.
For example, if you want to limit the count to say 5 by using a Capture command value then just enable the Use Command checkbox and it will list all the capture commands in the drop-down and you can choose the appropriate one to limit the count as shown in the screenshot below:
Date Range
You can also select a list of dates as the input data. The 'Date Range' Data Provider has the range of date as the list of input data. You can set the start and end of the Date Range using the "From" and "To" option available in the Date Range Setting. The start date can have the following options
Today
Days From Today
Weeks From Today
Months From Today
Specific Date
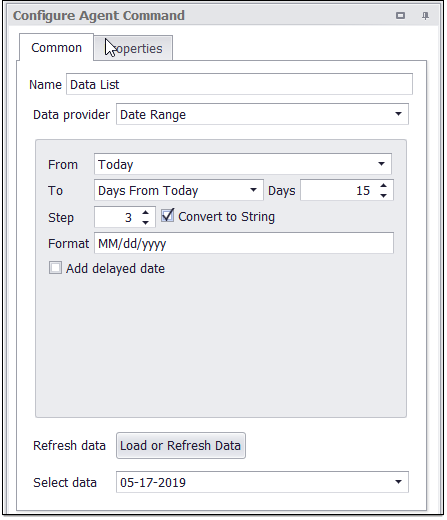
The same options are available for the "To" setting. You can increment the date range by steps predefined number of days.
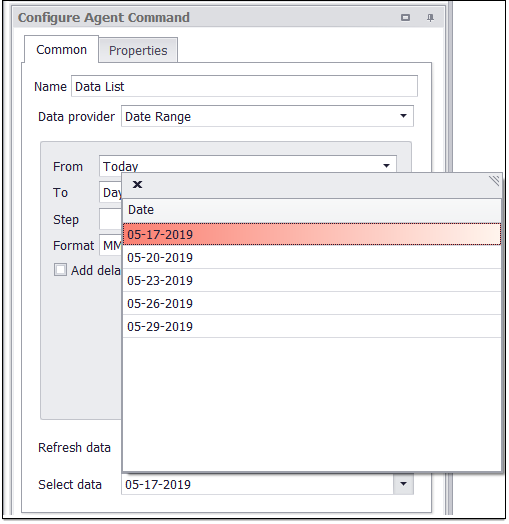
For the settings shown in the below image where we are using date to be incremented in the step of 3
The outcome of the setting looks like this. The date is increased in step of 3. So, the next date will be 3 days ahead of the start date.
If you select the "Convert to String" option while selecting the date range. The input date would be considered as the "String" type otherwise it would be treated as the "Date" type.
When the "Conver to String" option is enabled you can set the format of the date that would be appeared in the input data list. There are numbers of date formats that you can set for your input for example "DD/MM/YYYY", "MM/DD/YYYY", "YYYY/MM/DD" etc.
Delayed Date - When the delayed date option is selected, an additional column namely "Delayed Date" is created in the output result. Now the data list has two columns, one is for Date and another for Delayed Date. The delayed date is always with respect to the Date column. Suppose if you select delay as 1 day, the delayed date column will have the delayed date 1-day delay with respect to the date in the Date column. For example, we have set Delay as Days by 1 day. The outcome of this setting will look like below.
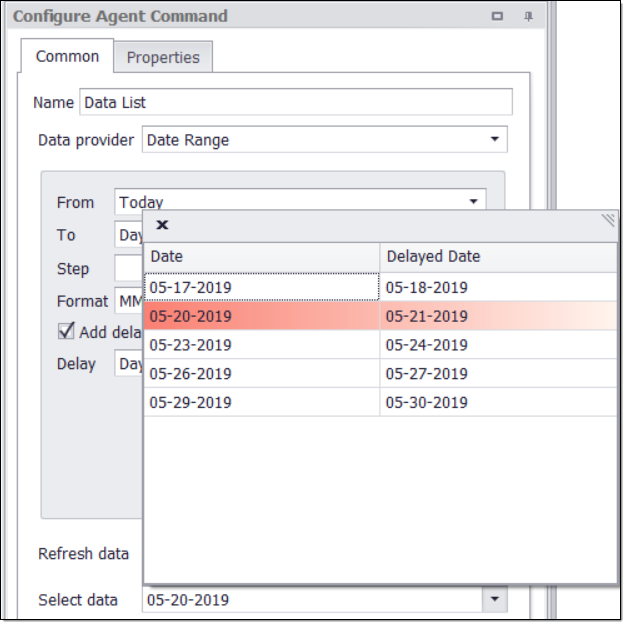
The Delayed date option is useful in case when we are extracting Flight information for the round trip. In this case, the Date can be set as the Start Date and the delayed date can be set as the return date for the flight booking.
Database Data Providers
Choose a Database for the Data Provider to work any of these database connections:
Named Connection
SQL Server
MySQL
Oracle
OleDB
ODBC
You can choose a list of inputs from different databases using the above options.
In Sequentum Enterprise, you can share database connections among all agents on a computer. We recommend that you read more about create new database connections.
A database data provider requires execution of a SQL Select statement on the database connection to retrieve the input data. The following example selects the two data columns, DepatureCity and DestinationCity, from a table City.
SELECT DepatureCity, DestinationCity FROM City
Named Connection Provider:
Choose a Named Connection for the Data Provider to work on any of the already created database named connections viz SQL Server, Oracle, MySQL, OleDB, Postgre etc. or create new "Named Connection" by clicking the "Manage Connection" option.
Connection: Specifies the database Named Connection name. It is used to select the already created Named Connection from the drop down list. e.g. Postgre_namedCon
SQL: It is used to define the database query to load the data from specified named connection database e.g. SELECT * FROM public."SWSER CustomDate"

Remote File Type: The option Remote File Type enables users to designate the specific remote file type. You can select CSV/Excel or Parquet as a Remote File Type. As soon as we select the Remote File Type, then we will get the further options visible and accessible.
Using Input Variable in Database Data Provider
You can pass an input variable to execute a SQL Select statement on the database connection to retrieve the input data in the database data provider.
The input variable can be passed to the Select query for the following Database Data Providers:
SQL Server
MySQL
Oracle
OleDB
ODBC and
Database NamedConnection (such as Postgre, Oracle, SQL Server, MySql)
For example, if you want to select all the records which have ID=1, then you can simply execute it like this below:
select * from test_table where ID=1
However, If you use the ID in where clause as an input variable so that you can pass multiple values to the ID then you can use it in the following way:
select * from test_table where ID={$Id}
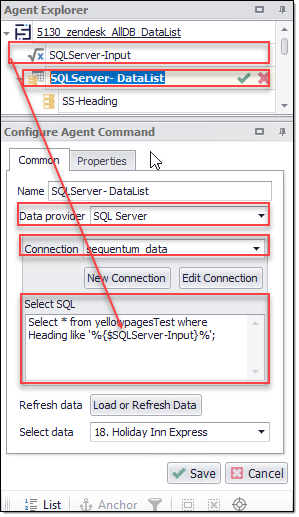
SQL Server Example
You can use the below SQL query which selects all the records for Heading where clause that is captured in the “SQLServer-Input” web content
Select * from yellowpagesTest where Heading like '%{$SQLServer-Input}%';
MySQL Example
SELECT Heading, Address, Phone
FROM datalistdb.yellow_pages_datalist where Heading like '%{$MySQL-Input}%' and Address !='';
PostgreSQL- NamedConnection Example
SELECT "Heading", "Address", "Phone"
FROM public."Yellow_Pages_DataList" where "Address" like '%{$PostgreSQL-Input}%';
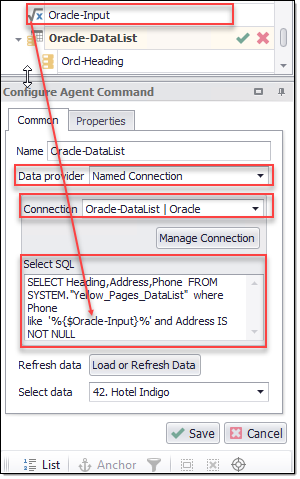
Oracle-NamedConnection Example
SELECT Heading,Address,Phone FROM SYSTEM."Yellow_Pages_DataList" where Phone
like '%{$Oracle-Input}%' and Address IS NOT NULL
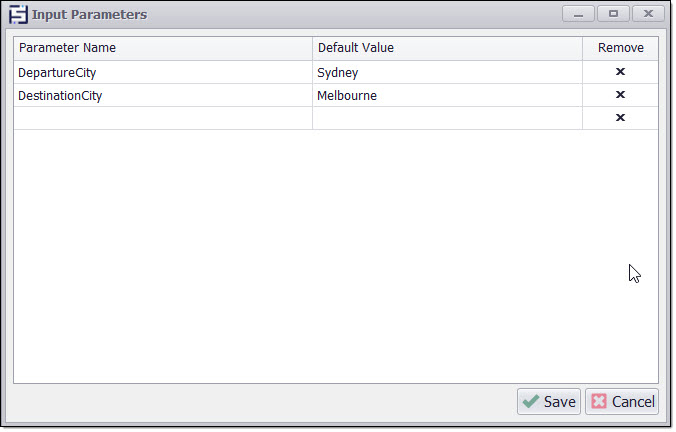
Input parameters
Input parameters are named values that get their value assignments when an agent starts. You can specify these as command-line parameters when running an agent from the command line, or specify them in a GUI window when running the agent from the Windows desktop. Any data consumer command within the agent can use these parameters.
You can configure input parameters to get value assignments at runtime by using one of these methods:
A GUI window
Command-line parameters
The Sequentum Enterprise API
Input Parameters with a GUI Window
When running an agent from the Sequentum Enterprise editor and the agent has any input parameters, then the Runtime Input Parameters window will automatically appear.
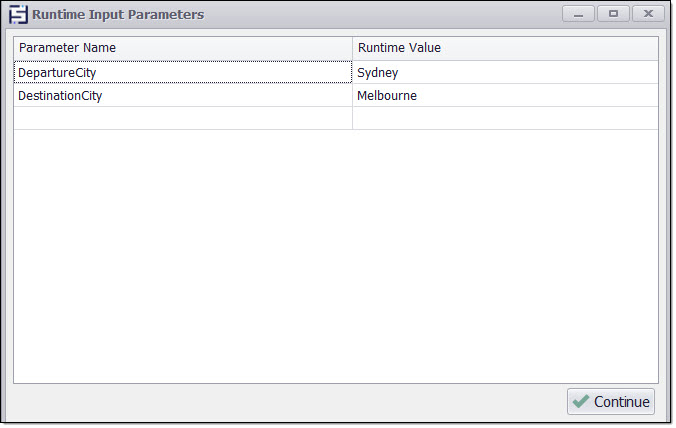
Runtime Input Parameters
The user running the agent can enter runtime values for the input parameters and can even add new parameters that are only defined during the current execution of the agent. An agent will always use the default input parameters when debugging. The Runtime Input Parameters window will not appear when starting a debugging session, so you will need to change the default values if you want to debug the agent with different input parameters.
Specifying Input Parameters on the Command Line
When running an agent from the command line, you can specify input parameters as command-line arguments. It's unnecessary to specify all of the input parameters. If you don't specify a parameter, the call to run the agent will use a default value for that parameter. See the topic Running Agent from the Command-Line for more information.
The following example runs an agent named Sequentum on the command line and then sets the input parameters DepartureCity and DestinationCity.
RunAgent.exe Sequentum -DepartureCity "Sydney" -DestinationCity "Melbourne"
Using Input Parameters
Any data consumer command, such as the following, can use input parameters.
Using Input Parameters
Using Input Parameters in a Script
Most scripts provide easy access to input parameters from the script arguments. See the topic Scripting for more information. The following example retrieves the input parameter DepartureCity:
args.GlobalData.GetString("DepartureCity");
Agent Data
Agent data is data that is currently being extracted by the agent. For example, data extracted by a capture command could be used as input to a form field command.
Agent data can be used by data consumer commands, but the data consumer must be a sub-command of the capture command which is extracting the data. Else, it must have the same parent command as the capture command.
Agent data is the data that the agent is currently extracting, and it can be put to use by other commands at runtime. If another command uses such data, then it must execute after the command that extracts the data. Otherwise, the data wouldn't be available. Also, the command using the data must be a sub-command or have the same parent command as the command that extracts the data.
Using Agent Data
Agent data can be used by any data consumer command. Data consumers include the following types of commands:
CAPTCHA Protection
Agent data is often used when resolving CAPTCHA images. You can automatically process a CAPTCHA page by using an OCR service to convert the CAPTCHA image into text and then use that text in a form field command to set the CAPTCHA input box.
A CAPTCHA page or section appears on some websites to protect access to a secure area of the website. A CAPTCHA image displays a sequence of numbers and characters that a website user must type into an input box in order to continue to the secure area. This process ensures the website user is a real human and not an automated agent. See the topicCAPTCHA Blocking for more information.
read_ods.py(692 Bytes)