
Data List
Data List command provides input data to sub-commands. The command (and all sub-command) will execute once for each input data value.
Example
Below screenshot shows the simplest example where the Data List command can be used.
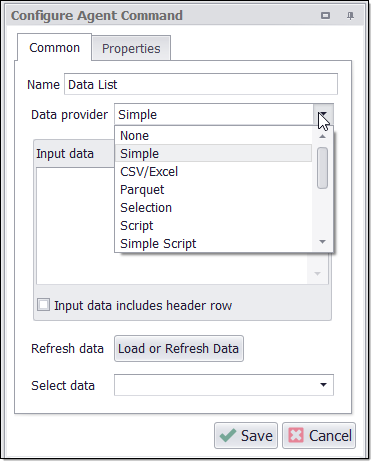
Data List command will iterate through a list of input values. The input values can be supplied in a number of different ways:
Simple: The simplest option is to enter input values manually directly into the Input Data text box.
File: Currently the following file types are supported: CSV, Excel, Parquet.
Script: you can write a .NET or Python script that generates your input values.
Web selection: You need to enter Relative XPath in order to select input values from a web page.
Number Range: You can specify a number range to use as your input values. For example, if you want input values to be sequential numbers from 1 to 10, you can just set Start = 1, End = 10, Step = 1, and you will get the following number range: 1, 2, 3, 4, 5, 6, 7, 8, 9, 10.
Date Range: You can specify a date range to use as your input values. For example, if you want input values to be sequential dates between January 1, 2019 and January 5, 2019, you can just set From = January 1, 2019, To = January 5, 2019, specify the desired date format, and you will get the following date range: 2019-01-01, 2019-01-02, 2019-01-03, 2019-01-04, 2019-01-05.
Database: You can load your input values from a database. Currently, there is native support for MS SQL Server, My SQL, and Oracle.
OleDB and ODBC: You can also use OleDB and ODBC data providers to work with other database types or data sources.
Named Connection Provider : To load input values from various databases (such as SQL Server, MySQL, and PostgreSQL) and different types of remote storage (such as AWS S3, Azure, Google Drive, Dropbox, Google Storage, and SharePoint), use the Named Connections in the Data List command's Data Provider.
Although in the Data Provider, there is no direct support of PostgreSQL, still the input data from PostgreSQL databases can be fetched using the Named Connection Data Provider.
Data List Methods
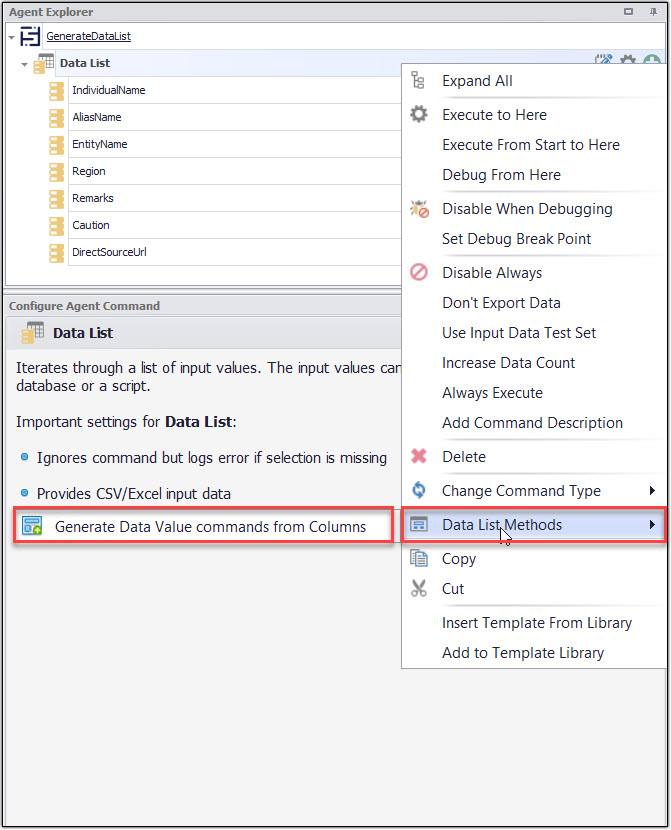
The Data List Methods provide a useful feature to generate the data value commands from the columns in your data list command. The Generate Data Value commands from columns will automatically generate the data value commands and will assign the column headers to the command names.
Command Properties
Command
Command Description: A custom description for the command. The default value is Empty.
Command Transformation Script: A script used to change command properties at run time. The default value is disabled.
Disabled: This property set to True allows user to disable the command. A disabled command will be ignored. The default value is set to False.
ID: This property indicates the internal unique ID of the command and is always auto- generated e.g. 58c8e4ac-e4c0-48f7-a63d-77064945380b.
Increase Data Count: This property indicates the data count every time this command is processed. The default value is set to False. Set it to TRUE if you want to get the count of the number of times a specific command is executed to get the data. The data count value is increased during data extraction, so it is used to measure agent progress and basis this increased data count, the agent decides the success criteria.
Name: This property specifies the name of the command.
Notify On Critical Error: A notification email is sent at the end of an agent run if the command encounters a critical error, and the agent has been configured to notify on critical errors. Critical errors include page load errors and missing required web selections. Default value is set to False.
Container
Always Execute: Set this property value as True, if you want the container is always executed if encountered on retry or continue. List Commands are only executed if they processes a single input. Always Execute can be used to always execute container commands when retrying, even when they have already been completed. Default Value is set to False.
Command Link: Links to another container command where processing will continue.The targeted container command will be executed, so it’s normally best to link to a group command that does nothing, so it’s clear what happens after the link.
Dependent Command: The action of the dependent command will come into effect only when the agent has a supporting parent container command, in which case, it will be executed before the parent container command is processed.
Repeat While Selection is Valid: Set this property to TRUE if you want to repeatedly process the command while the command selection is valid. The default value is set to False.
Data List
Data Missing Action: This property specifies the action to take when data is missing.
Optional: This property specifies to use of the optional command when data is missing.
Ignore Command when Data is Missing: This property specifies to ignore the command when data is missing.
Data Provider: The Default value is set to Simple. This property is used to provide the input data to the command and all sub-commands. You can assign a data provider to any Data List command and can load data from the different data sources such as Simple Provider, CSV Provider, Database Provider, Date Provider, Number Provider, Parquet Provider, Selection Provider etc.Data List commands include the following in which we can use this property: Agent, Data List, Navigate URL, Set Form Field.
The value under the ‘Data Provider ’ text area get set according to what specific ‘Provider Type’ value selected.
CSV Data Provider: Choosing CSV for the Data Provider is similar to the Simple data provider, but uses an external CSV file. We recommend that you choose the CSV Data Provider for large CSV files, since the CSV data provider will perform much better than the Simpledata provider for large quantities of data.For a CSV provider, you can choose the value Separator and the text Encoding of the CSV file.You can place CSV files anywhere on your computer, but we recommend you place them in the default input data folder for your agent. Later, if you want to export your agent, then you can include these files along with the export. The value under the ‘CSV Provider ’ text area reflects the same value which is specified in “File Name or Path” option.
Encoding: The File encoding used by the CSV file. We can set encoding like utf-8, BOM, ASCII, Unicode, Unicode BOM etc. .
File Name Or Path: Specifies file name or path where your input csv/excel file is placed .
Has Header Fields: Default value is set to True specifies whether the first data row contains column names.
Ignore Parse Errors: Ignores parse errors.
Value Separator: A character used to separate values in the CSV File. Default value is set to Comma. We can use other characters such as Tab, Semicolon, Pipe.
Database Provider: Choose a Database for the Data Provider to work any of these database connections: SQL Server, Oracle, MySQL, OleDB etc. .In Sequentum Enterprise, you can share database connections among all agents on a computer.
Date Provider: Choosing Date Range for the Data Provider specifies the date range .
Add Delayed Date: Adds a second date to the data provide. The second date will be delayed with a specified number of days, weeks or months.
Convert to Strings: Converts the dates to strings.
Date Format: Format of each date in the date range when converting dates to strings.
Days From End Date: Number of days, weeks or months from end date when end date is set to "Days From Today", "Weeks From Today" or "Months From Today".
Days From Start Date: Number of days, weeks or months from start date when start date is set to "Days From Today", "Weeks From Today" or "Months From Today".
Delay: Specifies of the second date is delayed by days, weeks or months.
Delay Days: Number of days, weeks or months the second date is delayed.
End Date: Last date in the date range.
Specific End Date: Specific last date in the date range.
Specific Start Date: Specific first date in the date range.
Start Date: First date in the date range.
Step: Steps between dates in the date range.
Design Row Index: This property specifies the index of the data row used at design time.
Discover More Data: Waits for asynchronous sub-commands to complete if no more cached data is available. Use this option if asynchronous sub-commands add more data to the data provider.
Hide Data in Editor: Hides the data in the Sequentum Enterprise editor. This can be used to hide sensitive data, such as passwords, in the Sequentum Enterprise editor.
Load More Data: Tries to load more data from the data source when no more cached data is available.
Named Connection Provider : To load input values from various databases (such as SQL Server, MySQL, and PostgreSQL) and different types of remote storage (such as AWS S3, Azure, Google Drive, Dropbox, Google Storage, and SharePoint), use the Named Connections in the Data List command's Data Provider.
Although in the Data Provider, there is no direct support of PostgreSQL, still the input data from PostgreSQL databases can be fetched using the Named Connection Data Provider.
The Remote Named Connections like AWS S3, Azure, Dropbox, Google Drive, Google Storage, SharePoint etc. can be used to read CSV, Excel and Parquet files. However, the Database Named Connections such as SQL Server, Snowflake, MySQL etc. can be used to query the database and fetch the required data.
Remote File Type: The option Remote File Type enables users to designate the specific remote file type. You can select CSV/Excel or Parquet as a Remote File Type. As soon as we select the Remote File Type, then we will get the further options visible and accessible.
Remote Folder Name: The option Remote Folder Name enables users to specify the folder name of the selected Remote Storage Named Connection in which the file is available so that the user can seamlessly access the file.
Remote File Name: The third option Remote File Name empowers users to define the exact file name which is available in the specified Remote Folder Name .
SQL: It is used to define the database query to load the data from specified named connection database e.g. SELECT * FROM public."SWSER CustomDate"
Number Provider: Choosing Number Range for the Data Provider specifies the number range which is used for any calculation or other purpose. To extract the Number range as a DataValue in a specific order with a specific interval we can use the Number Provider.
End Number: Specifies the last number in the number range. The default value is 1000.
Start Number: ItSpecifies the first number in the number range. The default value is 1.
Step: Specifies the steps between numbers in the number range. The default value is 1.
Use Max. Page Number Command: Use a command to capture the last number in the number range. By default, this is set to False and you can set it to True and assign a captured command value to limit the End number value for the Number Range Data Provider.
Parquet Provider: Specify to choose Parquet for the Data Provider.
File Name Or Path: Specifies the file name or path where your input parquet file is placed. The value under the ‘Parquet Provider ’ text area reflects the same value which is specified in the “File Name or Path” option.
Provide Data As List: The provided data is a list of values. This can be used to set multiple values in an HTML list box. The "Provide Data As List" property, when set to True, returns data as a single-row list instead of the default rows-and-columns format. By default, it is set to False, providing data in the standard structure. F
When using Data Provider as the Script type, and the "Provide Data As List" property is set to True under the DataList command, ensure the following implementation in the constructor of CustomDataStorage:CODEbool provideDataAsList = (args.Command as DataList).DataProvider.ProvideDataAsList; return new CustomDataStorage(dt, provideDataAsList);For more details about ProvideDataAsList feature, please refer to ProvideDataAsList Overview
Provider Type: This property specifies the type of data sources. The default value is “Simple”. You can use other data sources such as CSV, Parquet, Script, Number Range, etc.
Public Provider: If this is a Simple data provider.
Public Provider Name: The name of the data provider. The name of the command is used if this value is left empty.
Script Data Provider: Choose Script for the Data Provider for full customization of the agent input data. This option provides a .NET data table containing the input data, which may contain multiple data columns and rows. Sequentum Enterprise provides some standard .NET libraries which makes it easier to generate .NET data tables for a variety of input data. The value under the ‘Script Data Provider ’ text area reflects the same value which is selected in “Script Language” option
C# Script: Specifies C# script. Here we have example where are retrieving input values from a Database Table
using System;
using System.Collections.Generic;
using System.Data;
using Sequentum.ContentGrabber.Api;
public class Script
{
//See help for a definition of DataProviderArguments.
public static CustomDataStorage ProvideData(DataProviderArguments args)
{
//Place your code here.
//This example just returns an Empty DataTable
string query = "select * from test_table where ID=" + args.DataRow["Id"];
IConnection con = args.GetDatabaseConnection("myconnection");
if (con != null )
{
DataTable dt = con.ExecuteDataTable(query);
CustomDataStorage storage = new CustomDataStorage(dt);
return storage;
}
return new CustomDataStorage();
}
}Enabled: To use the Script we need to set this Property as True. The default value is set to False, which indicates that the script is disabled.
HtmlAttribute: An Html Attribute to extract from the selected web element. This attribute will be available in the script.
Library Assembly File: The name of a custom assembly file when "Use Default Library" is set to false.
Library Method Name: The method to execute when using the default script library.
Library Method Parameter: A custom parameter passed to the script library method.
Python Script: Specifies Python script.
Regex Script: Specifies Regex script.
Script Language: Specifies the scripting language which you want to use e.g C#, VB.NET , Python, Script Library, Regular Expressions.
Template Name: The template name of the referenced template.
Template Reference: Loads this script from a template when the agent is loaded.
Use Default Library: Uses the default script library when Script Language is set to Script Library.
Use Selection: The script is provided with the selected web element. The script will not be provided with the selected web element if this value is False.
Use Shared Library: Uses a script library that is shared among all agents.
Selection Provider: Choose Selection for the Data Provider. The value under the ‘Selection Provider ’ text area reflects the same value which is specified in the “HTML Attributes” option.
HTML Attributes: Specifies the number of HTML Attributes, which is reflected as “HTML Attribute#1”, “HTML Attribute#2” etc..
Relative Xpath: Specifies the relative Xpath.
Test Set Count: The Test Set Count refers to the number of data rows to be utilized for testing when working with a test set. By default, the Test Set Count is set to 1.
This setting allows users to control the size or quantity of data rows that are considered during the testing process. By adjusting the Test Set Count, users can specify how many data rows from the test set should be included in the testing phase. This flexibility enables targeted and efficient testing based on specific requirements or sample sizes.
The Test Set functionality is designed to operate exclusively in the QA and Dev environments. It is specifically programmed to automatically disable itself when running in the Prod environment.
This approach ensures that the Test Set is not active in the live production environment where real users interact with the system. This helps maintain the stability and reliability of the production environment, ensuring that it operates smoothly for end users.
Test Set Start Value: The Test Set Start Value represents the index of the initial data row to be used for testing when utilizing a test set. By default, the Test Set Start Value is set to 1.
This setting enables users to specify the starting point within the test set from which the testing process should begin. By adjusting the Test Set Start Value, users can determine the index of the first data row to be included in the testing phase. This feature provides flexibility in selecting a specific subset of data for testing purposes, allowing for targeted and controlled testing scenarios..
Use Test Set: Uses "Test Set Start Value" and "Test Set End Value" to limit the number of data rows provided. The default value is set to False.
Delete Custom Persistent Storage: Specifies whether or not to delete any custom persistent storage associated with this command after processing the command. By default, this should be set to "True" unless you want to use custom persistent storage outside of this command.
By default, it is set to 'True', but if you do not want CustomDataStorage to be deleted, you should change it to "False". This should only be used in very rare cases and you should clearly understand what you are doing. Otherwise, it may lead to performance issues and other unintended consequences. You should use Script to delete CustomDataStorage when it is no longer needed because it may not be deleted automatically depending on the structure of your agent.
It is useful in the following scenario when we create a Custom Data Storage in the data list command e.g. 'DataList_1' and we want to use the same CustomDataStorage in the next data list command e.g. 'DataList_2'. Then you need to set this property to "False".
Debug
Debug BreakPoint: Debugging will break at this command if the breakpoint is set. The default value is set to False.
Debug Disabled: A disabled command will be ignored during debugging. The default value is set to False.
Debug Error Option: This property specifies what action to take when an error occurs in the debugger. The default value is set to Notify which indicates that when an error occurs at debugging time, then it will be notified. If we want to ignore the error at debug time, then we need to set this property value as Ignore.
Debug Set: This property specifies the set of list elements to process when debugging.
ListCount:-Specifies the number of list items to use when debugging. A value of zero means all items are used.
ListStartIndex:-Specifies the index of the first item to use in a list when debugging.
Export
Data Validation Script: A script is used to validate a single row of export data.
Duplicate Export Row Handling: This property specifies what action to take when duplicate data export rows are detected. All child data of a removed row will be assigned to the existing duplicate row. The duplicate check can be performed on values extracted by Capture commands with the key property, or it can be performed on hash keys calculated from all values in an export data row. Default value is set to “None” .
None: This will not remove Duplicate rows.
Remove(SHA-512): This is used to remove Duplicate rows when an agent run in single session.
Remove(Key Values): This is used to remove Duplicate rows when an agent run in single session.
Remove(Key Values Across Sessions) : This is used to remove Duplicate rows when an agent run in Performance Sessions.
Empty Export Row Handling: This property specifies what action to take when an export data row is empty. If removing empty rows, all child data of an empty row will also be removed, even if the child data is not empty. Capture commands with the property “Act as System” are ignored when checking if a data row is empty. Default value is set to “None” .
None: This will not remove Empty rows.
Remove Row: Removes Empty rows.
Remove Row and Increase Error: Remove Empty rows and increase errors.
Trigger Export Failure: Export fails.
Empty Export Table Handling: This property specifies what action to take when an export data table is empty. Default value is set to “None”.
None: This will not remove Empty table.
Remove: Removes Empty table.
Remove Table and Trigger Error: Remove Empty table and trigger error message.
Trigger Export Failure: Export fails.
Export Empty Row If No Data: Default value is set to True indicates that exports a single empty data row if this container extracts no data. Parent and Sibling data will be lost if merged with an empty data set, so this option ensures that parent and sibling data is exported when this container extracts no data. This option only has an effect when “Export Method” is set to “Add Columns and Rows”. If we don’t want to export a single empty data row if the container extracts no data , then we need to set is False.
Export Enabled: Default value is set to True. A command with Export Enabled set to False will not save any data to data output. This includes all sub-commands if the command is a container command.
Export ID Name: This property specifies the name of the primary key column in the exported table (database table, spreadsheet, CSV file, XML Node), if this container generates a new table. The export name postfixed with “ID” is used if this property is empty. If multiple agents are exporting data to the same table, then you must set this option to the same value for all those agents.
Export ID Sort Order: This property specifies the sort order of the primary key column in the exported table (database table, spreadsheet, CSV file, XML Node), if this container generates a new table. Default value is set to 1000.
Export Keys: This property specifies how keys are exported for this container. This property applies only if the agent is configured to export to file.
Default: Default indicates that Primary key exported for the container.
None: Indicates that no any key will be exported.
Primary: This option allows users to export Primary key only.
Parent: This option allows users to export Parent key only.
Both: This option allows users to export both Primary and Parent keys.
In addition, there is another 'Export Keys' property available under Data->Export Target->Export Keys. This must be set to either "Row Counter" or "Always"
Export Method: This property specifies how to export data from this container. Default value is set to “Add Columns and Rows” which allows users to add columns and rows. There are different ways in which we can extract data:-
Separate Output: This property allows users to export data in separate file.
Add Columns And Rows: This property is used to add columns and rows.
Add Columns Only: This property is used to add columns only.
Add Columns and Merge Rows: This property is used to add columns and merge rows.
Convert Rows Into Columns: This property allows users to convert rows into columns
Export Name: This property specifies the name of the exported table (database table, spreadsheet, CSV file, XML Node), if this container generates a new table. The command name is used if this property is empty. If multiple agents are exporting data to the same table, then you must set this option to the same value for all those agents.
Export Parent ID Name: Specifies the name of the parent key column in the exported table (database table, spreadsheet, CSV file, XML Node), if this container generates a new table. The parent ID column name is used if this property is empty. If multiple agents are exporting data to the same table, then you must set this option to the same value for all those agents.
Export Parent Sort Order: Specifies the sort order of the parent key column in the exported table (database table, spreadsheet, CSV file, XML Node), if this container generates a new table. Default Value is 1000.
Export Rows to Columns Name Command: When "Export Method" is set to "Convert Rows Into Columns" this command provides the names for the new columns.
Export Rows to Columns Value Command: When "Export Method" is set to "Convert Rows Into Columns" this command provides the values for the new columns.
Export Validation Error Handling: Specifies what action to take when data validation fails on an export data row. Default value is set to “ Remove Row and Increase error”.
Remove Row and Increase Error: Remove Row and increase error when data validation fails.
None: This will not remove any row when data validation fails.
Remove Row: Removes row when data validation fails.
Trigger Failure: Trigger Export fails when data validation fails.
History Table Name: Specifies the name of the database table containing historical data if this container generates a new table and the agent is configured to store historical data in separate database tables. The command name appended with "History" is used if this property is empty. If multiple agents are exporting data to the same table, then you must set this option to the same value for all those agents.
Plural Export Name: Specifies the plural name of the exported table if this container generates a new table. The "Export Table Name" with the added character "s" is used if this property is empty. This property can be used to control the name of XML nodes when exporting to XML.
Row Count Container: Data exported by this container command will be used for row count and pagination when using the API. The container command must export to a separate data table. The Agent command is used as Row Count Container by default.
List
Process in Sessions: This property specifies that list will be split and processed in multiple sessions if the agent supports session ranges and a proper session range is specified. The input list associated with the Agent command (start command) will be divided by default, but you can specify any list command in an agent by setting the Process in Sessions property as TRUE on the list command. You can only set this option on one command in an agent. Default value is set to False.
Templates
Template Name: The template path of the referenced template.
Use Template Reference: Loads this container from a template when the agent is loaded. Default value is False.
Web Element List
Editor Index: Specifies the index of the list element to use in the editor.
Web Selection
Selection: The selection XPaths of the web elements associated with this command.
Paths: List of selection XPaths.
Path: The selection XPath.
Select Hidden Elements: Selects visible and disabled elements when true. Otherwise selects only visible and enabled web elements.
Selection Missing Option: Specifies what happens if this selection does not exist in the current page.
Default: Specifies if this selection does not exist in the current page then logs error.
Ignore Command but Execute Sub-Commands: Specifies if this selection does not exist in the current page then it ignores the current command , but executes sub-commands of the command.
Ignore Command: Specifies if this selection does not exist in the current page then it ignores the current command as well as sub-commands.
Log Error and Ignore Command: Specifies if this selection does not exist in the current page then it ignores the current command as well as sub-commands and logs an error message.
Log Warning and Ignore Command: Specifies if this selection does not exist in the current page then it ignores the current command as well as sub-commands and logs a warning message. Note: Warning message will be logged if , Log level is set to either ‘Low’ or ‘High’.
Log PageLoad Error and Ignore Command: Specifies if this selection does not exist in the current page then it ignores the current command as well as sub-commands and logs a Page Load error.