
Agent Command
The Agent command is the first command that executes in an agent; all other commands are sub-commands. So, only one Agent command can exist in an agent. The Agent command loads the start URL, which is the first point of data extraction, and also contains all common agent properties (including data export configuration).
The Agent command uses a data provider that provides one or more start URLs, and the command will execute once for each of these URLs.
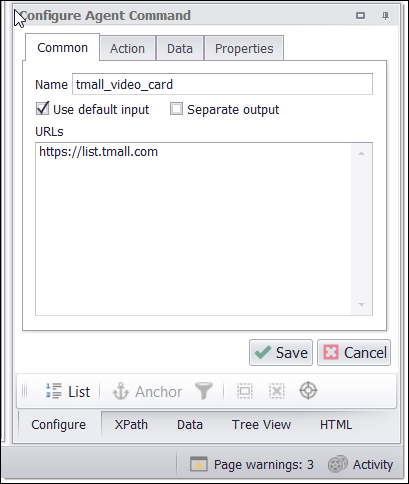
The figure below shows the Configure Agent Command in Sequentum Enterprise Editor in which the Agent command uses a simple data provider to load a single static start URL.
NOTE: The Agent command derives from the Navigate URL command, which loads one or more URLs.
Command Configuration
The configuration screen for the Agent command has four tabs: Common, Action, Data, and Properties. See the Sequentum Enterprise Command Reference topic to learn about the Properties of the Agent command. In the Common tab, you can edit the command name and (optionally) customize the data provider properties.
CSV Data: If you leave a check in the Use Default Input box, the command will provide simple CSV data and use that data as input. Simple CSV data consists of values that you enter directly into the command, so no external CSV is necessary.
You can uncheck the Use Default Input box and choose the Data Provider that will provide the start URLs. The default data provider is a simple data provider that provides a list of static URLs. You can populate the data provider directly by entering the start URLs in the URLs input box.
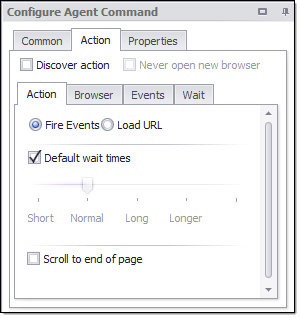
Use the Action tab to control how the web browser loads the start URLs. See Action Configuration for more information.
Use the Data tab to set the data provider that provides the start URLs. Read more in Using Data Input.
Configuration of an Action Command
Explore the options and properties that you can configure for a command by taking these simple steps:
Clicking once on a web element in the browser panel.
Locate the New Command drop-down in the Configure Agent Command.
Choose a command from the drop-down.
Explore the tabs: Common, Action, Data, and Properties.
In the Common tab, uncheck the Use default input box to reveal more options.
In the Action tab, uncheck the Discover Action box to reveal more options.
In many web-scraping scenarios, the default functionality will be quite sufficient. Should you find the need for more flexibility and control, you can learn how to configure all aspects and properties in the Action Configuration section.
Action Configuration
By default, all action commands are set to Discover action settings (the Discover action checkbox on the Action tab is checked). The action settings will automatically be configured when you execute the command the first time. The default action settings are usually quite sufficient, so you will rarely need to worry about the Action configuration tab at all. However, you can fine-tune the action settings to achieve better performance, and you may need to adjust the action settings to get the command working correctly.
After choosing a New Command type from the drop-down in the Configure Agent Command panel, click the Action tab.
By default, all-action commands are set to automatically discover action settings when you execute the command for the first time. The settings are usually suitable for most scenarios, so you will rarely need to worry about the Action configuration tab at all. After some experience, you may want to fine-tune these settings to achieve better performance, and sometimes it may be necessary to adjust the action settings to get the command to function according to your precise requirements.
There are several configuration tabs that are available for Action commands in the Configure Agent Command panel, including:
Action - Specifies the type of action, which can be a Fire Event, URL, or No Action. Not all action types are available for all action commands.
Browser - Specifies the web browser in which the new content should load.
Events - For action set to Fire Events only, this is a list of events that will fire on the chosen web element.
Wait - Specifies the browser activities for which the command will wait before the action is complete.
Action
Action commands can execute one of two types, or no action at all:
Fire Events - The command fires events, such as a mouse click, on the selected web element.
Load URL - The command loads a new page into the web browser using a direct URL.
No Action - The command does not execute an action. This is only relevant for form fields that may execute an action when an input value is assigned but often execute no action at all.

This action command will fire events
Wait Times
An action command uses Wait Time values to determine how long it should wait for activities, such as how long it should wait for a new page to start loading. If you decrease the Wait Time values, the agent will run faster, but it may not work correctly if the website is slow. If the website is very slow you may need to increase the Wait Time values to make sure the agent works correctly.
If the option Default wait times is checked, the command will use the same Wait Time values as the parent action command.
Scroll to End of Page
Some web pages load additional content when you scroll the page - either downward or to the right. To extract all content from such pages, you need to include an action that scrolls down to the end of the page, so all content is available to the agent.
When you set the option Scroll to the end of the page, you will be able to limit the number of times the command scrolls to the end of a page to load new content. This can be important since some pages will continue loading new content for a single page until Sequentum Enterprise finally runs out of memory.
Browser
An action command often loads new content. With the Browser action type, you can configure how content loads into a new web browser, the current web browser, or the parent web browser. You can also specify a different browser mode, as we explain below.
This Navigate Link command will open a web page in a new web browser

Uncheck the Discover Action box and then click the Browser tab to view these for the Target Browser:
New. The action command loads content into a new web browser, and all sub-commands will operate in the new browser. To use this option, the action command must load a completely new page. Asynchronous actions, such as AJAX calls, cannot load content into a new web browser.
Current. The action command loads content into the current web browser, and all sub-commands will operate in the new browser. Asynchronous actions, such as AJAX calls, can only load content into the current web browser.
Parent. Some older websites may require child browsers to load content into the parent browser in order to function correctly, so this option should only be chosen in such cases. If an action command loads content into a new web browser, that new web browser becomes a child browser of the current web browser, and actions in the child browser can direct content into the parent browser. To use this option, the action command must load a completely new page.
Browser Mode
If you leave the default for the Target Browser (New), you can choose the browser mode:
Default - The new web browser will be exactly the same type as the parent browser.
Web Browser- The browser functions as a standard web browser, and it will download images and execute JavaScript.
HTML Parser - the command does not start a new browser. Instead, the web page simply downloads and runs through a HTML parser. The HTML parser does not execute JavaScript and does not load frames, so it is faster and more reliable than a web browser. However, the parser does not work on websites that rely on JavaScript, and the parser may also be unable to submit some web forms (even when they don't rely on JavaScript).
JSON Parser - the command does not start a new browser. Instead, it parses JSON content returned by a web server and lets you easily extract content elements from the JSON content.
XML Parser - the command does not start a new browser. Instead, it parses XML content returned by a web server and lets you easily extract content elements from the XML content.
Note:
You must reopen the browser tab for any change in this setting to take effect.
Events
If a command action type is set to fire events, then you can specify the events that should be fired on the selected web element.
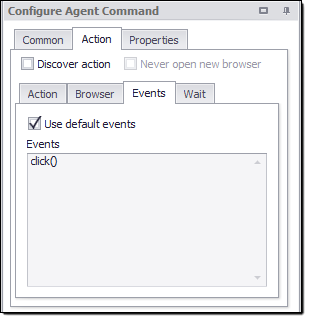
The Events tab
In most cases, you can check the Use default events checkbox, which will fire all appropriate events that the web element supports. In special cases, you may want to remove some of the default events. For example, an action may try to open a drop-down box for an input form field.
Firing the focus or click event on the input form field may cause the drop-down box to open, but the blur event may cause the drop-down box to close. In that case, firing all the default events would open the drop-down box but quickly close it again. To prevent this, uncheck the Use default events box and remove the blur event from the list.
Supported Events and Functions
Sequentum Enterprise supports all the default events for the chosen web element and some custom events and functions. The following list includes only the most common events and is not a complete list of all available events. Please see a JavaScript reference guide for all available events.
Event Name | Description |
|---|---|
mousedown | Emulates the press of a mouse button onto the chosen web element without releasing the button. |
mouseup | Following a mousedown event, emulates releasing a mouse button onto the chosen web element. |
click | In immediate succession, emulates a press and a release of the left mouse button on the chosen web element. |
rightclick | In immediate succession, emulates a press and a release of the right mouse button on the chosen web element. |
keydown | Emulates pressing a key in relation to the chosen web element without releasing it. |
keyup | Emulates releasing a key in relation to the chosen web element. |
keypress | In immediate succession, emulates a press and a release of a key in relation to the chosen web element. |
focus | Emulates bringing input focus to the chosen web element. |
blur | Emulates removing input focus to the chosen web element. |
change | Emulates changing the input value of the chosen web element. |
contextmenu | Opens the context menu on the chosen web element. |
The following list includes custom functions that can be used along with the standard events:
Function | Description |
|---|---|
exec(JavaScript) | Executes a JavaScript on the selected web element. Example 1: exec($(element).unbind('blur')) This example removes all blur events from the chosen web element. This example requires JQuery to be available on the web page, but the exec function works on non-JQuery JavaScript as well. Example 2: exec(element.click()) This example fires the click event on the selected web element. Example 3: exec(window.history.back()) This example moved the current page back to the previous page. The variable element is always defined as the selected web element. |
unbind(Event) | Removes all events of type Event from the selected web element. This function requires JQuery to be available on the web page. Example: unbind(blur) This example is equivalent to calling exec($(element).unbind('blur')) or exec($(element).off('blur')) |
click() | Fires the following 3 events using the left mouse button: mousedown mouseup click |
rightclick() | Fires the following 3 events using the right mouse button: mousedown mouseup click |
simulateclick() | This function simulates a left mouse click. The function is different from click, since it scrolls the selected web element into view and then simulates a real mouse click in the browser window.
|
simulaterightclick() | This function simulates a right mouse click. The function is different from rightclick, since it scrolls the selected web element into view and then simulates a real mouse click in the browser window. |
simulatemousemove() | This function scrolls the selected web element into view and then simulates a real mouse move in the browser window. |
simulatemousemoves() | This function scrolls the selected web element into view and then simulates a series of real mouse moves from the edge of the selected web element to a random location within the selected web element. |
delay(milliseconds) | Pauses execution of the command for a specific number of milliseconds. Example: delay(2000) This example inserts a delay of 2 seconds. Important note: The activity timeouts include any event delay. So, if you have a single activity that waits 500 milliseconds, and all events take longer than 500 milliseconds to fire, then the action will time out before all the events have had time to fire. |
removeCgAttributes() | Sequentum Enterprise adds custom attributes to DOM elements in order to keep track of these elements. Very rarely, this causes issues with the target website. This function simply removes these attributes before the action. |
setinputtext() setinputtext(text) | This function inserts text into the chosen form field and is only compatible with Form Field commands. If the form field is a select box, the function selects the option with the text attribute equal to the specified text. If this function call contains no text, the function inserts the input data for the Form Field command. Example: sendinputtext(hotels) Typically, a Form Field command sets the value of the chosen form field and then fires the specifies events. This function gives you the ability to fire events before setting the value of a form field. NOTE: Often, this function is used when the corresponding Form Field command property Set Value is set to false. |
simulateentertext() simulateentertext(text) | This function simulates entering text into the chosen form field and is only compatible with Form Field commands. The function is different from setinputtext, since it simulates entering text by focusing the form field and then sending key events to the browser. If this function call contains no text, the function inserts the input data for the Form Field command. Example: simulateentertext(hotels) Typically, a Form Field command sets the value of the chosen form field and then fires the specifies events. This function gives you the ability to fire events before setting the value of a form field. NOTE: Often, this function is used when the corresponding Form Field command property Set Value is set to false. |
keycode(keycode) | Fires keydown, keyup and keypress with the specified key code. |
simulatekeycode(keycode) | This function simulates entering a key into the chosen form field and is only compatible with Form Field commands. The function is different from keycode, since it simulates entering a key by focusing the form field and then sending the key event to the browser. Example: simulatekeycode(13) The above example emulates pressing the enter key. |
simulatebackspace(count) | This function simulates entering a specified number of backspace keys into the chosen form field and is only compatible with Form Field commands. This function can be used to clear existing text in a form field. Example: simulatebackspace(5) The above example simulates entering the backspace key 5 times. |
key(key) | Fires keydown, keyup and keypress with the specified key. The key can be a character or one of the following: enter paste left right up down If a key is a character, it can be preceded by one of the following: ctrl+ shift+ alt+ Examples: key(a) key(ctrl+a) key(paste) key(enter) if a string enclosed in double quotes is specified, the keydown, keyup and keypress events are fired for each character in the string. Example: key("hotel") |
scroll()
scroll(percentage) | This function scrolls downward on the page containing the chosen web element, to ensure adequate coverage for pages that load content dynamically. Often, the function call is used along with the option Repeat Link Action, which will repeat a downward scroll to the bottom-until the scroll no longer loads new content. Example 1: scroll() This example will scroll all the way to the bottom of the content. Optionally, you can specify the amount to scroll in terms of pixels. Example 2: scroll(50) This example will scroll 50 pixels down through the content. |
scrolls(scrollCount) | This function scrolls downward a specified number of times on the page containing the chosen web element, to ensure adequate coverage for pages that load content dynamically. |
windowscroll()
windowscroll (percentage) | This function scrolls down to the bottom of the page containing the chosen web element, to ensure adequate coverage for pages that load content dynamically. If the web browser contains multiple frames, you should choose a web element within the frame to which you want to scroll. The chosen web element has no other influence on this function. Often, the function call is used along with the option Repeat Link Action, which will repeat a downward scroll to the bottom - until the scroll no longer loads new content. The Scroll to End of Page action option combines the windowscroll event with the action option Repeat Link Action, so this option can be used as an alternative to the windowscroll function. Example 1: windowscroll() This example will scroll all the way to the bottom of the web page. Optionally, you can specify the amount to scroll in terms of pixels. Example 2: windowscroll(50) This example will scroll 50 pixels down the web page. |
windowscrolls(scrollCount) | This function scrolls down a specified number of times, to the bottom of the page containing the chosen web element, to ensure adequate coverage for pages that load content dynamically. |
Back() | Move back to the previous page by calling the JavaScript function window.history.back() |
If the action command is a Form Field, then the input value is available for all event functions by using the variable [input]. For example, you can call the function sendtext to set the input value of a form field:
sendtext([input])
Or, the input value could be set using JQuery:
exec($(element).val('[input]'))
If you set a form field value using any of these event functions, you may want to uncheck the form field box Set Value, so that the form field value cannot be set automatically, but rather only by an event function.
Query Selectors & Google's Geolocation Search
JavaScript query selectors can be used to fire events on other web elements than the action web element. Query selectors must be specified before the event name and must be enclosed in double quotes.
Example:
"#search".focus
The above event configuration fires the focus event on a web element with the ID search.
One important application for query selectors are websites using Google's Geolocation Search. The following event configuration is required to select a drop-down item in Google's Geolocation Search plugin.
"#search".focus
mouseover
"#search".blur
where search is the ID of the input field used by Google's Geolocation Search. This input field is custom defined, so you may need to use different query selectors for different websites. For example, if the Geolocation Search uses an input field with name city, the event configuration would look like this:
"input[name='city']".focus
mouseover
"input[name='city']".blur
Wait
Typically, you have no concern about the sequence of complex activities during the loading of a web page, since you simply wait for the content that you want to see. The most critical content on a web page will likely load far in advance of the time that you actually get around to view a specific part of the web page. Usually, all features function correctly as you fill in web forms or click links.
However, it's very different from web-scraping agents, since these agents are very fast. An agent will attempt to process a web page as quickly as possible and continue onto the next page. A web-scraping agent is so fast that it could easily start processing a page before all of the essential content loads. So, it's important that you configure an action command to wait for all important browser activities to complete and all the content loads before web page processing begins.
When an action command executes, it waits for certain activities to complete in the web browser. For example, if a command executes a click on a link, it may wait for a page to load or an AJAX call to complete. Some actions may result in a very complex set of activities. An action may load a new page that then uses AJAX to load additional dynamic content onto the page.
Discovering Activities
Action commands automatically discover web browser activities. After a command fires the action events, it will monitor all activity in the web browser and wait for critical activities to complete. Once no new activities have started for a little while, it will consider the action to be complete.
You can specify which activities an action command should wait for. The command can wait for activities in the main web page and in sub-pages that are loaded in web frames.
Page load activities can be optional or required. An error will be reported if a page load activity is required, but no page load occurs. If Wait for page load is set to None, the command will not wait for any page load to occur, which is slightly faster than setting Wait for page load to Optional.
An AJAX activity occurs when a web page loads content from the web server asynchronously. A Script activity occurs when a JavaScript file is loaded by the web page asynchronously. AJAX and Script activities are always optional, which means no error will be reported if a command is configured to wait for AJAX, but no AJAX activities occur.

Wait configuration panel.
Complex Website Activities
Some websites have very complex activities. For example, many travel websites that provide hotel and flight search functionality will load a waiting page and after a while load the actual search result. An action command will often complete the action after the waiting page is loaded since it doesn't know that more content will be loaded later. If the website redirects from the waiting page to the search result page, then the Wait option Delayed redirect can often be used successfully, but sometimes websites use other techniques and it can be very difficult for the action command to tell when an action has completed.
Sometimes it's possible to determine that a website action has completed when a specific URL has been loaded. This URL could be from a full page load, a frame page load, or an asynchronous AJAX call. A Wait for Content sub-command can be used to wait for a URL that matches a Regular Expression.
Sometimes the only reliable way to determine when an action has completed is to wait for certain web content to appear on the web page. A Wait for Content sub-command can be used to wait for web content.
Wait Timeouts
Action commands will wait for browser activities for a certain period of time before the wait times out, and the command either considers the action completed or reports the timeout as a page load error. The default timeout values are usually appropriate, but there will sometimes be situations where some timeout values should be modified. For example, timeout values may need to be increased for a very slow website in order for the agent to work properly, or timeout values could be decreased for a very fast website in order to increase agent performance.
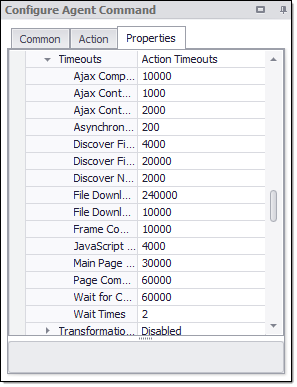
Action timeouts.
Browser Activity Screen
This feature shows all browser activities that occur after the current action executes. You can use this information to determine potential issues with the configuration of the action. Use the Activity button on the Sequentum Enterprise status bar to open the Browser Activity screen, as shown in the figure below:

The Activity button on the status bar
Critical activities have dark coloring and other activities have light coloring. A blue row appears in the sequence at the point where the command recognizes completion of the action. Activities that occur after the action completes may not necessarily indicate a problem. If the agent does not work as you expect, then you may need to reconfigure your action in such a way that it waits for some or all of those activities.
Methods to get the Default value of SE Properties
The following list includes the Default value of Sequentum Enterprise Agent Properties using the GetDefault() method with the help of the below library:
using Sequentum.ContentGrabber.CommandsHttpVersion.GetDefault() | This will return Version20. Example: args.Agent.HttpVersion.GetDefault().ToString(); |
UserAgent.GetDefault() | This will return the User Agent of the current Chromium version Example: args.Agent.UserAgent.GetDefault(); |
ParseNoscript.GetDefault() | This will return Always. Example: args.Agent.ParseNoscript.GetDefault().ToString(); |
ClearStorageMethod.GetDefault() | This will returnAllCookiesAndStorage. Example: args.Agent.ClearStorageMethod.GetDefault().ToString(); |
LoadBrowserImages.GetDefault() | This will return Always. Example: args.Agent.LoadBrowserImages.GetDefault().ToString(); |
LoadStyleSheets.GetDefault() | This will return Always. Example: args.Agent.LoadStyleSheets.GetDefault().ToString(); |
Command Properties
Action
URL Action: The action configuration for the agent command.
Activities: Specifies how this action should wait for the browser activities to complete.
Wait for Content: The default value is set to Optional. Waits for web selections and URLs specified by this property value required, optional, no wait.
Wait for External Sub-Page AJAX: The default value is set to False. Specifies if the command should wait for one or more AJAX requests to complete on sub-pages from different domains than the main page.
Wait for External Sub-Page Load: The default value is set to No Wait or Parse. Specifies if the command should wait for one or more page loads to occur that originate from different domains than the main page.
Wait for External Sub-Page Scripts: The default value is set to False. Specifies if the command should wait for one or more async scripts loads to complete on subpages from different domains than the main page.
Wait for Internal Sub-Page AJAX: The default value is set to True. Specifies if the command should wait for one or more AJAX requests to complete on sub-pages from the same domain as the main page.
Wait for Internal Sub-Page Load: The default value is set to Optional. Specifies if the command should wait for one or more page loads to occur in browser frames. Will only wait for pages from the same domain as the main page.
Wait for Internal Sub-Page Scripts: The default value is set to False. Specifies if the command should wait for one or more async scripts loads to complete on subpages from the same domain as the main page.
Wait for Main Page AJAX: The default value is set to True. Specifies if the command should wait for one or more AJAX requests to complete on the main page in the browser.
Wait for Main Page Load: The default value is set to Required. Specifies if the command should wait for one or more full page loads to occur in the browser.
Wait for Main Page Redirect: The default value is set to False. Specifies if the command should wait for the main page to redirect to another page.
Wait for Main Page Scripts: The default value is set to False. Specifies if the command should wait for one or more async scripts loads to complete on the main page in the browser.
Wait URL Regex: The action will not complete before a URL matching the specified Regular Expression has been loaded. This option is turned on by setting the option "Wait for URL" to a value other than None.
Wait XPaths: Waits for any of the specified XPaths to exist on the main page. Multiple Xpaths should be specified on separate lines. This option is turned on by setting the option "Wait for XPaths" to a value other than None.
Add Force Refresh Header: Adds an "If-Modified-Since" header to the web request to make sure the web page is not retrieved from cache. The default value is set to false.
Block Known Ad Servers: The web page will not load content from known ad servers, such as "ad.doubleclick.ne"”. This speeds up processing slightly.
Block Popup: Default value is set to False. This property set to True allows the user to blocks any popup opened by the action.
Browser Mode: This property specifies the different types of browser that can be used to run an agent.
Default- The new web browser will be the same type as the parent browser.
Dynamic Browser- The browser functions as a standard web browser, and it downloads images and executes JavaScript.
HTML Parser- The HTML Parser doesn’t execute JavaScript and does not load frames, so it is faster and more reliable than a Dynamic Browser. However, the parser doesn’t work on websites that rely on JavaScript, and the parser may also be unable to some web forms (even when they don’t rely on JavaScript).
JSON Parser- This property does not start a new browser. Instead, it parses JSON content returned by a web server and lets you easily extract content elements from the JSON content.
XML Parser- The property does not start a new browser. Instead, it parses XML content returned by a web server and lets you easily extract content elements from the XML content.
Capture Ajax Responses(Regex): A regular expression matching the URLs for which Ajax Responses should be captured and made available for Scripting. Multiple regular expressions separated by line breaks can be specified.
Capture Requests(Regex): A regular expression matching URLs which requests should be captured and made available for scripting. Multiple regular expressions separated by line breaks can be specified.
Clear Storage: This property allows users to clear the website’s cookies and local storage. The Default value indicates that no storage will be cleared. This property when set works on the commands such as Navigate_URL, Navigate_Link and not on the overall agent.
Default: A value of default will delete all cookies and local storage if using the in-memory cache, but only site cookies and local storage are using a persistent cache.
None: Indicates that will not delete cookies and storage.
All Cookies & Storage: It will delete all cookies and local storage if using the in-memory cache, but only site cookies and local storage are using a persistent cache.
Site Cookies & Storage: It will delete only website cookies and local storage if using the in-memory cache, but only site cookies and local storage is using a persistent cache.
All Cookies: It will delete all cookies only.
Site Cookies: It will delete website cookies only.
Site Session Cookies: It will delete site session cookies only.
Close Browser After Use: The default value is set to False. This property set to True allows the user to close any browser after use. This option is only applicable if the action opens a new browser.
Command Returning Max Scrolls: Limit the number of scrolls to a number captured by the specified command. This option can be useful when a page can scroll indefinitely.
Custom Request Headers: Custom headers are sent with all requests made by a browser. Headers must be sent on each new browser.
Detect Encoding: This property specifies how a new parser should detect the encoding of the content received from a web server. If the option is set to Default, this action uses the same detection method as the parent parser. If there’s no parent action, The default detection method is “Content & Server”. You must reopen the browser window or the agent for this change to take effect.
Discover Action: This property set to True configures action properties automatically when the command is first executed. The default value is False.
Editor Action: Specifies the web element or URL to use when performing the action in the design browser. The default value is “Default” which is indicated by “Use Specific URL” value False. To use the Specific URL, we set the “Use Specific URL” value True which allows users to use a specific URL.
URL: Specifies the URL to load.
Use Specific URL: Specifies whether to load a direct URL. This value is set to False.
Error Handling: This property specifies how the agent should react when an error occurs while executing the command action. The default reaction is to exit the command. Use the option “No Error Handling” if you want the agent to continue executing sub-commands after an error. You can handle the error in sub-commands by using the script parameter “IsParentActionError”. This property specifies the different ways of Error Handling.
Exit Command-The agent command will exit the action command and continue executing the next command. The agent will skip all the sub-commands of the action command.
Retry With No Error Handling -The agent command will retry the specified number of times, but then continue with no error handling.
Restart and Resume Agent- The agent command will restart and resume where it left off. This option is useful if an error puts the website into a state where the agent cannot continue.
Restart Agent and Retry Command- The agent command will retry the action command a specified number of times, and if the action command does not succeed, then it will Restart the Agent.
Stop Agent- The agent will stop.
Retry Command- The agent command will retry the action command a specified number of times, and if the action command does not succeed, it will skip all sub-commands of the action command and continue executing the next command. Set the property Retry Count to specify the number of retries. If Retry Count is set to zero, the agent will keep retrying the command indefinitely.
Error Retry Clear On Success: This property clears the counter if the action succeeds. The default value is set to True.
Error Retry Count: This property allows users to specify the number of times the agent should retry the command when an error occurs while executing the command action. This property is only applicable if “Error Handling ” is set to “Retry Command”. The default value is set to 5, which indicates that the agent will retry the command 5 times.
Error Retry Delay: This property allows users to specify the number of milliseconds the agent will delay a retry. This property is only applicable if “Error Handling ” is set to “Retry Command”. The default value is set to 5000, which indicates that the agent will delay a retry 5000 milliseconds.
Error Retry Proxy Rotation: The default value is set to “Keep and Rotate”. This property allows users to specify if the proxy should rotate before retrying the action and if the current proxy should be removed. This property is only applicable if “Error Handling ” is set to “Retry Command”.
None- Indicates that will not Rotate proxy before or after retrying the action.
Remove and Rotate-Indicates that current proxy will be removed and Rotate proxy before retrying the action.
Remove and Rotate After Retry-Indicates that current proxy will be removed and Rotate proxy after retrying the action.
Keep and Rotate- Indicates that current proxy will remain same and Rotate proxy before retrying the action.
Fixed Encoding: This property specifies the encoding when “Detect Encoding” is set to “Fixed”. You must reopen the browser window or the agent for this change to take effect.
Ignore Error Codes: Some websites return incorrect status codes, so this property allows users to ignore status codes by default unless the web server is not returning any content.
JSON Transformation: Regular expression used to transform JSON content loaded with a static parser.
Limit Number Of Scrolls: This property set to true allows users to limit the number of scrolls to a specified number. This property can be useful when a page can scroll indefinitely. The default value is set to false.
Max AJAX Calls: Stops waiting for AJAX after the specified number of AJAX Calls. The default value is set to 10.
Maximum Number Of Scrolls: This property allows users to limit the number of scrolls to a specified number. This property can be useful when a page can scroll indefinitely. The default value is set to “50”. This property is only applicable if “Limit Number Of Scrolls ” is set to “True”.
Never Open New Browser: This property set to True indicates never configure an action to open a web page in a new web browser when discovering an action. Some webpage may not function correctly when opening a link in a new browser. The default value is set to False.
No Parse: The web pages are not parsed if existing parsed pages exist. The default value is set to “False”.
Page Not Found Handling: Specifies the action to take if a web page was not found. The default is to do nothing and let normal error handling deal with the error.
Continue- If a web page not found, it continues executes to the agent.
Exit- If a web page not found, it will exit from the agent.
Redirect First Request : This property allows users to redirect the first request to a new browser window when Target Browser is set to “New”, even if the first request is coming from a frame within the current browser window. If this property is set to “False”, requests from frames within the current browser window will not be redirected.
Rotate Proxies: The property set to “True” allows users to rotate the proxy before executing the action. The default value is set to False.
Scroll Steps: The number of pixels the page will be scrolled in each step. The default value of “o” will scroll the page all the way to the bottom and all the way to the right in each step.
Scroll Until End of Page: This property set to True allows users to scroll to the end of the web page after an action. Scrolls repeatedly until unable to scroll any further, and wait for AJAX calls to complete if scrolling trigger AJAX calls. The default value is set to “False”.
Separate Parser Proxies: Creates a separate parser proxy loop if the action opens in a parser. The default value is set to “False”.
Target Browser: Specifies the web browser where a new web page should be loaded. These are the different options which can be used by a user:
New: Default value is set to New which specifies to load a web page in a new browser window.
Current: This specifies to load a web page in the same browser window.
Parent: This specifies to load a web page in the parent browser window.
Popup: This specifies to load a web page in a popup window.
Timeouts: Specifies timeout values for the action. Timeouts specified in activities override these values.
Ajax Completed: The default number of milliseconds to wait for an AJAX call to complete.
Ajax Content Render Delay: The default number of milliseconds to wait for ajax loaded content to render on a web page.
Ajax Content Render Delay After Scroll: The default number of milliseconds to wait for ajax loaded content to render on a web page after triggering a scroll. The command will stop waiting as soon as it can scroll the page further down. This property is different from “Ajax Content Render Delay” which always waits a fixed amount of time. A fixed timeout is slower but is required on some websites.
Asynchronous Completed: The default number of milliseconds to wait for an asynchronous action to complete.
Discover First Activity: The default number of milliseconds to wait for the first activity when discovering new activities.
Discover First URL Activity: The default number of milliseconds to wait for the first URL to start loading
Discover Next Activity: The default number of milliseconds to wait for the next activity when discovering new activities.
File Download Completed: The default number of milliseconds to wait for a file download to complete.
File Download Started: The default number of milliseconds to wait for a previous file download to complete to start downloading the next file.
Frame Completed: The default number of milliseconds to wait for frame content to complete loading. This timeout applies to internal frames, and only to external frames if the property WaitForExternalFrames is set to True.
JavaScript Parser Timeout: The number of milliseconds to wait for JavaScript DOM operations to complete
Main Page Redirect: The number of milliseconds to wait for the main page to redirect to another page.
Page Completed: The default number of milliseconds to wait for a page load to complete.
Wait For Content Timeout: The default number of milliseconds to wait for web content to appear on a web page, or a URL to load that matches a specified Regex.
Wait Times: The default timeout values are multiplied by this value. This can be a quick way to test if issues with action are caused by timeout values being too short. Default timeouts are used when discovering activities, and when scrolling a page.
Agent
Activity Timeout Minutes: An agent Restart and Continue if no activity has been recorded for the specified number of minutes. Set this value 0 to allow an unlimited number of minutes. The default value is set to 10 minutes.
AgentID: Universally unique agent ID.
Agent Start Timeout :- This property specifies the time taken by the agent to start in "seconds". By default , the timeout is set to 120 seconds. When this timeout happens, an error “Timeout Starting Agent” appears.
Agent Version: It shows the version of an agent. Any kind of modification in the agent is reflected through different agent versions.
Create Website Images: Default settings used when saving a website version.
Create Date Stamped Folder- Saves the files in a folder that is named with the current date.
Location- The directory where website pages should be saved.
Save HTML- Saves web pages as HTML.
Save PDF- Saves web pages as PDF.
Save Screenshot-Saves web pages as Screenshot.
Use Default Location- Saves web pages as images on the default directory path.
Custom Identifier: This property indicates a unique ID for each project which is referenced for MDS entries for the agent.
Custom Language: This property indicates the language used when Language is set to Custom.
Data Count Timeout Minutes: This property specifies the number of minutes allowed for an agent’s data count to increase before the run is considered failed. Set this value to 0 (zero) to allow an unlimited number of minutes. The default value is set to 30 minutes.
Directory: This property indicates the Default Directory for the agent.
Fail and Exit on Error Count: Fails and exits the agent when a specified number of errors have occurred. A value of zero means the agent will not fail and exit on error count.
Load Start URLs: This property allows the user to have the flexibility to run the agent without having to worry for loading the Start URL and can start with loading inputs rather than loading the URL first. The default value is set to True which makes it mandatory for the user to add a start URL and if it is set to False then no start URLs will be loaded by the Agent command. The default value is set to True.
Max Run Time: The default value is set as blank which indicates that the agent can run an unlimited number of hours or days. The specified value must be in the format HH:mm: ss additionally it can also be set in the below format if you want the agent to run for more than 23 hrs: 0.00:00:00 – Day.HH:MM: SS. For example, if you want to run your agent for 23 hrs. then it should be set as 23:00:00 and if you want it to run for 2 days then it should be set as 2.0:00:00.
Screenshot Logging: Default settings used for screenshot logging.
Date Stamp Folder - Saves log in a date-stamped sub-folder when using default log paths.
Log Path -The directory where log screenshots should be saved.
Max Screenshot Height - The screenshot will be resized.
Max Screenshot Width- The screenshot will be resized if it’s wider than this value.
Resize screenshot - Resize screenshot image file.
Screenshot Folder - The Folder name where log screenshots should be saved.
Template Path - Page template.
Use Default Paths - Use default paths. Default value is set to True.
Use Default Template - Use default template. Default value is set to True.
Anonymization
Clear Storage: This property specifies to delete cookies and local storage as specified by the “Clear Storage Method”.
Default: This property is used to delete cookies and local storage as specified by the “Clear Storage Method” when an agent starts.
On Agent Start: This property is used to delete cookies and local storage as specified by the “Clear Storage Method” when an agent starts.
On Every Page Load: This property is used to delete cookies and local storage as specified by the “Clear Storage Method” on every page load.
On Proxy Rotation: This property is used to delete cookies and local storage as specified by the “Clear Storage Method” at the time of proxy rotation.
Clear Storage Method: This property specifies the type of storage to delete when deleting storage. A value of default will delete all cookies, but it will not delete local storage if using the in-memory cache, but only site cookies and local storage are using a persistent cache. Also, note that ‘Clear Storage’ as well as ‘Clear Storage Method’ properties when sets are interlinked and work in conjunction. Also, these properties when set, work on the overall agent.
Default: A value of default will delete all cookies but will not delete local storage if using the in-memory cache, but only site cookies and local storage are using a persistent cache.
None: Indicates that will not delete cookies and storage.
All Cookies & Storage: It will delete all cookies and local storage if using the in-memory cache, but only site cookies and local storage are using a persistent cache.
Site Cookies & Storage: It will delete only website cookies and local storage if using the in-memory cache, but only site cookies and local storage are using a persistent cache.
All Cookies: It will delete all cookies only.
Site Cookies: It will delete website cookies only.
Site Session Cookies: It will delete site session cookies only.
Geolocation: The Geolocation API gives websites access to a high-level interface that allows them to query physical location information such as latitude and longitude, thereby breaking the user's anonymity. By default, it does not allow the websites to access your location and ensures that websites will not access the location without explicit permission. This setting is applicable only to dynamic web browsers.
Allow Geolocation Access: Allows/Disallows the browser to access the geolocation. This setting is applicable only to dynamic web browsers. By default, the property is set to Default which means that the websites will not be allowed to access the geolocation. And the second option Allow can be used to allow the websites to access the geolocation.
Geo Accuracy: The accuracy value to be sent along with the Geolocation request. For example, You can set it to 1 to get an accuracy of about 1 kilometer or 0.62 miles.
Geo Latitude: The latitude value to be sent along with the Geolocation request.
Geo Longitude: Longitude value to be sent along with the Geolocation request.
Keep Connection Alive: Keeps a connection to the target website alive when using HTML Parser. This option can be set to False to allow a proxy rotation service to properly rotate when using an HTTPS connection. It is used for maintaining the connection.
Profile Rotation: An Agent can be configured to use random web browser profiles while extracting data. The default value is set to No Rotation. This will reflect the value which is specified in the “Rotate Web Browser Profile” field.
Fake Audio Context: This property returns fake audio fingerprint context with random noise. This property is set to False by default.
Fake Browsing History - Returns Random Browser History Length and Overrides the Browser History Length. By Default it is selected as "True".
Fake Canvas String: This property returns fake, but valid canvas strings, even when “Allow Canvas Reading ” is turned off.Canvas reading in HTML5 is used by some websites to fingerprint a browser. This new property in CG Enterprise always generates a valid random (spoofed) canvas string to hide your fingerprint signature and provide uniqueness to your canvas string on the target websites . This property is set to True by default.
Fake Connection Info: This property returns fake information about the internet connection.This property is set to False by default.
Fake CPU: This property returns fake information about CPU and Memory. This property is set to False by default.
Fake Fonts: This property returns fake information installed fonts.This property is set to False by default.
Fake Language: This property returns fake information about the language. This property is set to False by default.
Fake Media Codecs Support - Emulated Media Codecs Support in Modern Web Browsers, where it mimics or pretends to support certain media codecs when queried by web pages or scripts. By Default it is selected as "True"
Fake Media Devices: This property returns fake information about media devices. This property is set to False by default.
Fake Performance Timers: This property returns fake timings from performance timers. This property is set to False by default.
Fake Plugins: This property returns fake information installed plugins. This property is set to False by default.
Fake Screen: This property returns fake information about screen size and color. It’s important to combine this feature with the Agent option “Randomize Browser Size”. This property is set to False by default.
Mask 'ToString' Prototype: The Mask 'ToString' Prototype generates a concise, human-readable string of an agent's masking properties, showing the state of each feature used to manipulate or emulate browser fingerprinting for anonymity. It helps with debugging, logging, and verifying configurations. The default value is set to True.
Mock Chrome Web Share - Mocks Chrome's Web Share API in which our SE software imitates the functionalities provided by Chrome's Web Share API. Specifically, it could mock two main functions:
navigator.share: This is a method in the Web Share API that allows web pages to trigger the native sharing capabilities of the user's device.
navigator.canShare: This method checks if data can be shared using the Web Share API.
By Default it is selected as "True".
Mock Chrome.App - Mocks Chrome.app API in which our SE software replicates the functions and responses of the chrome.app API. This API is typically used in Chrome extensions and apps to interact with browser-level functionalities and settings. By Default it is selected as "False".
Mock Chrome.Runtime - Mocks Chrome.Runtime API in which our SE software attempts to mimic the functions and responses of the chrome.runtime API. This API is typically used in Chrome extensions and apps to interact with the Chrome browser environment, manage extension lifecycle, and communicate between components. By Default it is selected as "False".
Rotate Web Browser Profile: This property emulates different web browser profiles to stay anonymous when websites use web browser fingerprinting. This setting is only applicable to dynamic web browsers. This setting may cause some websites to work incorrectly. The default value is set to “No Rotation”.
No Rotation: Indicates that the Web browser profile will not change.
On Every Page Load: Indicates that Web browser profile will Rotate on every page load.
New On Proxy Rotation: Indicates that Web browser profile will rotate only when the proxy gets rotated.
Web Driver: Sets the navigator's web driver property to true or false. This property is set to False by default.
Proxy Configuration: This property specifies how the proxy is configured for the agent. The default value is set to “Application” which specifies that the agent uses the proxies which is added under “Application Settings” →Proxies. This will reflect the value which is specified in “Proxy Type”.
Is Disallow Config: The default value is set to False. Setting this property to True disallows configuration files to overwrite the proxy properties.
Proxy Pools: This property specifies the proxy pools used for the agent. The default value is set to “None”. This property will display the proxy pool settings value which is specified in “Agent Settings→Proxy Pools→Proxy Pool Settings”.
Cycle Pools - The default value is set to False . Setting this property to True rotates backs to the first proxy pool when there are no more available pools.
Proxy Pool: This property specifies the number of proxy pools used in the agent. The default value is “0 (zero) Proxy pool”. This will display the count of proxy pools which is specified in “Agent Settings→Proxy Pools→Proxy Pool Settings”.
Rotate Error Count - The default value is 10. This property rotates the proxy pool on the number of page errors if "Rotate Proxy Pool on Errors" is enabled. This property only looks at the last number of "pages specified in "Error set Size" For example, if "Error Count" is set to 10 and "Error Set Size" set to 20, then the proxy pool will rotate if the last 20 page loads resulted in 10 or more page errors.
Rotate Error Set Size -The default value is 20. The number of pages to evaluate when deciding if the proxy pool should rotate. For Example,if "Error Count" is set to 10 and "Error Set Size" set to 20, then the proxy pool will rotate if the last 20 page loads resulted in 10 or more page errors.
Rotate Pool on Errors - This property rotates the proxy pool automatically after a specified number of page errors.
Proxy transformation script: A script used to change proxy the properties at run time. The script can also be used to do special validation at run time.
Example:
args.Proxy.GetTransformedProxy("149.36.10.0:60000", "uname", "pswd")
This will allow use of certain proxy provider options, such as sticky proxy sessions where the session ID is specified as part of the proxy username.This will also allow custom proxy verification before the proxy is being used. If a proxy is not valid, the script should return a value indicating rotation of proxies, and if the proxy should be removed from the pool.Proxy transformation takes place just before any proxy is used. It's agent wide by nature. Below are the some example use cases when we can use Proxy Transformation:1. It can be used when a proxy may need custom verification at runtime, to avoid extracting bad data for example.
2. A proxy may need custom username parameters at runtime to specify session.
3. Proxies may need to be disabled for specific URLs.Proxy type: The default value is set to "Application" , which specifies that the agent uses the proxy pools which is added under "Application Settings" →Proxies.
Random Delays: Default value is No Random Delays which is indicated by “Use Random Delays” value False. To enable the Random Delays, we set the “Use Random Delays” value True which allows users to insert random delays every time a page is loaded.
Maximum Delays: - Maximum number of milliseconds to wait after a page has loaded. The default value is 5000 milliseconds.
Minimum Delays: - Minimum number of milliseconds to wait after a page has loaded. The default value is 1000 milliseconds.
Use Random Delays: - Insert random delays every time a page is loaded. The default value is set to False indicates that there is no Random delay. To use this, we set this property True.
Randomize Browser Size: Default value is set to False. This property set to True indicates that new random size is set for the web browsers every time proxies rotate.
Timezone Configuration : An agent can be configured to use Timezone Id when loading a web page. The default value is set to System Default. This will reflect the value which is specified in the “Timezone” field.
Timezone : The "Time Zone" feature allows users to set a different time zone from the timezone set on the Windows Machine. It accepts the timezone ID in the IANA format (for example, "America/Los_Angeles" without the quotes). This property provides two options i.e. System Default and Override With Pool. If the user chooses Override With Pool, the agent gains access to the pools and can override as per the settings being set by the user accordingly, although if the user chooses System Default then it will take the Timezone of the default windows system.
The default value is set to System Default.
Timezone Pool : This property is used to configure the Timezone pool based on the requirements. Click the triple dots‘...’ button at the right end of the property to open the Timezone pools dialog box.
Search Timezones : This option enables the agent to search for time zones based on specific requirements.Filter option consists of two types i.e. Text filter through which we can simply write the name of the particular Timezone ID or group of Timezone IDs and select or the Value filter through which we can provide certain conditions based on which we can pick our Timezone IDs and use them in our pool.
Clear All : By selecting this option, all previously attached timezone IDs are cleared, resulting in an empty pool.
Rotate Timezone : Emulates different Timezone IDs. This setting can cause some websites to work incorrectly. The default value is set to “No Rotation”.
No Rotation : Indicates that the Timezone will not change.
On Every Page Load : Indicates that the Timezone will Rotate on every page load.
Rotate With Proxy Address : Indicates that Timezone will rotate with the proxy address.
New On Proxy Rotation : Indicates that the Timezone will rotate with proxy rotation.
Shuffle Time Zones : This option shuffles the individual Timezone IDs and and will provide shuffled Timezone IDs to the agent at runtime apart from picking Timezone IDs into sequence.
User Agent Configuration : Consolidates User-Agent-related settings such as User-Agent override and rotation configuration into a single configuration category. Integrated a built-in database of modern and legitimate user-agents for end-users to query. It empowers end-users to customize and organize user-agents based on browser type and version. This configuration includes:
User Agent Override: Configures User-Agent override, allowing options like Chromium Default or Override With Pools.
User Agent Pools: Configures the User-Agents pool, where end-users can customize their list.
User-Agent pools offer options like rotating user agents on every page load, rotating with proxy addresses, and shuffling the user agent list at runtime. The pools can include a built-in database and a custom list of user-agents added by end-users.
User Agent : It is used to configure the User Agent as Override with Pools or Chromium Default. To use the default Chromium User-Agent , select the "Chromium Default" from the dropdown and to use the User Agent Pools, choose "Override with Pool".
User Agent Pools : This property is used to configure the User-Agents pool based on the requirements. Click the triple dots‘...’ button at the right end of the property to open the UA pools dialog box.
Add User-Agent Pool (List): The default pool is a built-in database pool, which is added when creating a new agent. At runtime, user-agents from all enabled pools are combined into a single list, and, depending on the configuration, shuffles the list.
Built-in Database: SE3 provides a built-in database for user-agent lists with automatic population of Client Hints data.does not have the utility to automatically parse the client hints data from the user-agent string, as these information cannot always be found in the user-agent string, so the user has to manually populate these fields when using the Custom List pool.
The “Add As Custom List Pool” button in the Built-in database dialog allows the user to further customize the filtered user-agents.
Columns can be filtered by clicking on the filter icon at the right of the target column header.
Convert to Custom List Pool: With this option, users can generate a custom list pool from the filtered pool. Additionally, within the filtered pool, there are two options i.e. 'Import' and 'Export,' allowing users to import or export CSV/Excel files containing user agents.
Custom List: This option allows users to create custom User-Agent pools, enabling the customization of user agents to fit specific needs. It empowers users to customize and organize user-agents based on browser type and version according to their preferences.
In the User Agent Pool dialog box, you'll find a 'Rotate User Agent' option with following four options available in the dropdown:
Rotate User Agent : Emulates different user agents. This setting can cause some websites to work incorrectly. The default value is set to “No Rotation”.
No Rotation : User agent remains constant.
On Every Page Load : User agent rotates with each page load.
Rotate With Proxy Address : User agent rotates with the proxy address.
New On Proxy Rotation : User agent rotates specifically with proxy rotation.
Shuffle User-Agents : This feature randomizes individual User-Agents, offering the agent a set of randomly selected User-Agents during runtime, alongside the sequential selection. By default the option is checked.
Basic Authentication
Some websites use basic Windows authentication, and they will display a Windows login box. Sequentum Enterprise gives you the ability to set the Username and Password for basic Windows authentication by editing the Agent Command and then setting the Username and Password in the Basic Windows Authentication of the properties tab. After setting the basic Windows authentication properties, you must reload your agent for the properties to take effect. Basic Windows authentication does not work in HTML Parsers, JSON Parsers, and XML Parsers.
Username: A username to use when a website uses basic Windows authentication.
Password: A password to use when a website uses basic Windows authentication.
Command
Command Description: A custom description for the command. The default value is Empty.
Command Transformation Script: A script used to change command properties at runtime. The default value is disabled.
Disabled: This property set to True allows the user to disable the command. A disabled command will be ignored. The default value is set to False.
ID: This property indicates the internal ID of the command.
Increase Data Count: This property indicates the data count every time this command is processed. The default value is set to False. Set it to TRUE if you want to get the count of the number of times a specific command is executed to get the data. The data count value is increased during data extraction, so it is used to measure agent progress, and basis this increased data count, the agent decides the success criteria.
Name: This property specifies the name of the command.
Notify On Critical Error: A notification email is sent at the end of an agent run if the command encounters a critical error, and the agent has been configured to notify on critical errors. Critical errors include page load errors and missing required web selections. The default value is set to False.
Container
Always Execute: Set this property value as True, if you want the container is always executed if encountered on retry or continue. List Commands are only executed if they process a single input. Always Execute can be used to always execute container commands when retrying, even when they have already been completed. The default Value is set to False.
Command Link: Links to another container command where processing will continue. The targeted container command will be executed, so it’s normally best to link to a group command that does nothing, so it’s clear what happens after the link.
Dependent Command: The action of the dependent command will come into effect only when the agent has a supporting parent container command, in which case, it will be executed before the parent container command is processed.
Repeat While Selection is Valid: Set this property to TRUE if you want to repeatedly process the command while the command selection is valid. The default value is set to False.
Content Cache
Retention Days: This property specifies the number of days to keep the cache file.
Write Cache: The default value is false. When this property is set to true, it allows us to store all downloaded content in a cache, which can be used to rerun an agent without having to access the target website. By using this property, we can do minor changes in XPath, Regex, Transformation script by avoiding extra hitting and less execution time.
Data
Database Connections: A list of database connections stored in the agent.
Export Target: The Default value is set to Excel. This property allows us to set the export target format in which we want to export the data e.g. CSV, JSON, Parquet Export, Script Export Email, Excel Export, etc. The value under the ‘Export Target’ text area get set according to what specific export target option gets enabled
Details of most commonly used export targets are as follows:
JSON- The data exports to a single JSON File.
CSV- The data exports to one or more CSV files. The Default character encoding is UTF-8, but you can specify another type of encoding.
Parquet- The data exports to one or more Parquet files.
AWS S3 Bucket Delivery: The Default value is set to Disabled. This property allows us to deliver the data on S3 Bucket. To deliver the data on S3 Bucket, we need to set this value Enabled as True and specify the s3 Bucket Name, Credentials File Path, and Folder Name.
Bucket Name: Specify the bucket name. e.g. “ sequentum-test”
Compress Files: Default value is set to False. If you want to deliver the compressed files then you need to set this value as True.
Compressed Filename: Specify the compressed Filename.
Credentials File Path: Specify the credentials file path where your S3 credentials saved. e.g. Credentials\credentials
Deliver Data Files: Default value is set to True which indicates the deliver the data files which is your exported files like CSV or Parquet.
Deliver Extracted Files: Default value is set to False. To deliver the downloaded files like HTML, image, pdf file, etc. we need to set this property as True.
Enabled: To deliver the data on S3 Browser, we need to set the “Enabled” as True. The default value is set to False.
Files Transformation Script: A script to transform the exported filename(s) before delivery.
Folder Name: Specify the folder name s3 browser in which you want to deliver your files. This is also an optional field, if you will not specify any folder name then Folder name will be created with agent name automatically.
Profile Name: Specify the Profile name as specified in the credentials file. The default value is “default”. It’s an optional field.
Region ID: Specify the region id. Default region id is “us-east-1”.
Backup Method: This property specifies the Backup Method.
None: It will not keep any exported data backup.
Default: It will not keep the backup data in the agent’s local folder.
Copy: It is used to keep the backup data in the agent's local backup folder as specified Number of days value.
Backup Retention Days: Number of days to keep the backup data in the agent's local backup folder. Data copied to a backup target is not affected. The default value is set to 30 days.
Backup Target: The name of the directory where the backup should be stored.
CSV Export: The Default value is set to Disabled. This property allows us to deliver the data in CSV format. To deliver the data in CSV format, we need to set this value Enabled as TRUE and set the Timestamp File value as true. The default value of the Timestamp File is false, which overwrites the existing file. Timestamp File value appends in the file name which makes the file name unique every time it gets generated.
Append Data: To append extracted data to an existing exported CSV File, we need to set this value Enabled as TRUE. A new CSV file will be created if no exported CSV file already exists. The default value is set to False.
Enabled: To deliver the data in the database we need to set this value Enabled as TRUE. The default value is set to False. The File encoding used by the CSV file.
Encoding: The File encoding used by the CSV file. The default value is UTF-8. We can set other encodings like UTF-8, BOM, ASCII, Unicode, Unicode BOM, etc
Export Keys: The Default value is set to Parent-Child. This property is used to create a unique key for every record which is used to create mapping among files. If we have a single file in our Agent. Export Keys value if set to Default value as Parent-Child, then it doesn’t create any key. For a single file, either we need to specify this value as either Always or Row Counter. If we don’t want any unique key, then we set it Never. For Single File, we can set it to either Always or Row Counter and for Multiple Files, we can set it to Always or Parent Child or Row Counter.
File Path: The File path of the Exported CSV Files. The default file path as below and in order to use a custom file path set the Default Path to FALSE.
C:\Users\Documents\Content Grabber 2\Agents\<Agent_Name>\Export\<FileName>.csv
Filename Transformation Script: A script to transform the exported filename(s) before delivery.
Data->Export Target->CSV Export/Database Export/ Parquet Export ->Key Type
New Line Encoding:A script to transform the exported filename(s) before delivery.
Timestamp File: The default value of the Timestamp File is false, which overwrites the existing file. Timestamp value set to True adds a Timestamp to end of the CSV file.
Use Default Path: The default value is set to True allows users to use the default File path for the Exported CSV Files which is C:\Users\Documents\Content Grabber 2\Agents\<Agent_Name>\Export\<FileName>.csv. If you want to use custom Path instead of Default Path then we need to set this value as False.
Value Separator:A character used to separate values in the CSV File. Default value is set to Comma. We can use other characters such as Tab, Semicolon, Pipe.
Database Export: The Default value is set to Disabled. This property allows us to deliver in the data Database. To deliver the data in the database we need to set this value Enabled as TRUE and set the Timestamp File value as true. Default value of Timestamp File is false, which overwrites the existing file. Timestamp File value appends in the file name which makes unique the file name every time.
Add to Existing Data: The agent will add extracted data to existing data in the target database. This option is obsolete. Use "Keep Historical Data" instead.
Allow Drop Invalid Schema: Specifies if the agent is allowed to automatically drop the target database tables if the data schema becomes invalid. The option "When Truncating Data" means the agent is allowed to automatically drop the target database tables if the agent is configured to overwrite all existing data in the target database tables. WARNING: Dropping the target data schema will delete all previously extracted data in the target database.
Database Connection Id:Database Connection id.
Database Connection Name:Database connection name.
Enabled: To deliver the data in the database we need to set this value Enabled as TRUE. The default value is set to False.
Export Debug Data: To Export Debug data we need to set “Export Debug Data” as True. The default value is set to False.
Keep Historical Data: To add extracted data to existing data in the target database we need to set “Keep Historical Data” as True. The default value is set to False.
Never Delete External Data: Default value is set to False. If we set this property True, the agent will never delete data from the external database table, no matter the internal database configuration.
Separate Historical Data: Stores historical data in separate database tables. The default value is set to False. But please note that for this property to come into effect, 'Keep Historical Data' must be set to true.
Shared Database Tables: Supports export from multiple agents into the same database tables.
Writes files to disk instead of embedding them in the database: Default value is set to False, which indicates that writes files in the database. Write files to Disk we need to set this property True.
Key Type
Download Directory Name: This property allows users to specify the Directory name, where we want to save downloaded files.
Export Download File Path: This property is used to export the full path of downloaded files saved to disk. Setting this property to False does not export the downloaded file path.
Export Errors: This property allows us to Includes or excludes error data when exporting data. The default value is set to Exclude which indicates that error data will not be exported. If we want to export the error data then we need to set this option as “Include”.
Export Robots Files: Exports and distributes robots.txt files encountered during an agent run. The agent must obey robots rules for this option to have any effect when the value is set to Automatic.
Manual – It creates the Robots folder but does not extract the file from the site. We need to place the file manually.
Automatic- It downloads the robots.txt file from the site and places it at the respective folder(..\<Agent Name>\Export\Files\Robots\robots.txt) which is generated automatically. By default, this property remains None which do not generate the robots.txt file.
FTP Delivery: The default value is set to “Enabled” as “False”. To deliver the data on FTP, we need to set the Enabled as True.
Compressed Filename: Compressed filename.
Files Transformation Script: A script to transform the exported filename(s) before delivery.
Compress Files: The default value is set to False. To deliver Compress files we need to set this property as True.
Deliver Data Files: Default value is set to True which indicates the deliver the data files which is your exported files like CSV or Parquet.
Deliver Extracted Files: Default value is set to False. To deliver the downloaded files like HTML, image, pdf file, etc. we need to set this property as True.
FTP Delivery Enabled: To deliver the data on FTP, we need to set the Enabled as True. The default value is set to False.
Port: Port Number.
Private Key Path: Private key path.
Protocol: Indicates the protocol using which you want to deliver the data e.g. FTP, SFTP, FTPS Implicit, FTPS Explicit, SFTP(Private key).
Remote Directory: Name of Remote directory.
Server: Name of Server.
Username: Username.
Input Parameters: This property shows a list of Input Parameters that are used in an agent like you can set run_id_ an input parameter to get a number in increasing order every time the agent is run. The input parameters are always defined in a Parameter Name and Default Value pair.
Internal Database: The Internal Database used to store extracted data. The default value is SQLite which is indicated by “DataBase Type” value. We can use other database types such as SQL Server, MySQL. The value under the ‘Internal Database’ text area gets set according to what specific Database Type value is selected.
Automatically Drop Invalid Schema: If we want to automatically drop the internal data schema if it becomes invalid then we need to set this property as True. WARNING: Dropping the internal data schema will reset change tracking if it's enabled.The default value is set to False.
Change Tracking: This property is used to track changes made to exported data. An agent can keep track of the latest changes that have been made to extracted data. The agent will mark extracted data as deleted, modified or added. If data is deleted but later returned, the data will be marked as "returned", or "returned modified" if the data returned in a modified state. An agent can be configured to only export data that has changed since the last successful run, or only export data that has changed since a specified number of days. The default value is Disabled which is indicated by “Enabled” value False. To enable the Change Tracking, we set the “Enabled” value True which allows users to use default Change Tracking. Data will be marked as deleted if it was extracted last time the agent ran, but not during the current run. Data will only be marked as deleted if an agent completes successfully. This prevents data from being incorrectly marked as deleted if an agent fails halfway through a run. The Success Criteria options are used to define when an agent run should be considered successful.
Change Date Column Name: The name of the data column where the change date is stored, To export this value we need to set “Change Date Enabled” property as True.
Change Date Enabled: Default value is set to True indicates it exports the date a data row was last changed.
Changed Last Run Column Name: The name of the data column to store the value indicating if a data row changed last time an agent was run., To export this value we need to set “Change Last Run Enabled” property as True .
Changed Last Run Enabled: Exports a value indicating if a data row changed last time the agent was run. The default value is set to False.
Columns Affected Column Name: The name of the data column where the columns affected value is stored.
Delete On Days Not Seen:Data is marked as deleted if it hasn't been seen for the specified number of days. The default value of 0 means data will be marked as deleted if it was not found in the current agent run.
Enabled: Enables or disables change tracking. The default value is set to False which indicates change tracking is disabled. If we want to enable change tracking then we need to set this property value as True.
Export Method: This property specifies how to export data when an agent is not exporting historical data to a database. The following options are available:
Export All: Exports all data no matter if the data has changed or not.
Since Last Successful Run: Exports all data that has changed since the last successful run.
Since Number of Days. Exports all data that has changed since a specified number of days.
Export Method Days:When "Export Method" is set to "Since Number of Days", only data that has changed since the specified time period is exported.
Historical Data Export Method:This property specifies that Keeps all historical data or just data that has changed since the last successful run Default value is Changed Data Only which indicates that Exports all data that has changed since the last agent run. This option is only applicable if the agent is configured to export to a database, keep historical data and historical data is saved to separate database tables.This option is used instead of Export Method when exporting historical data to a database. The following options are available:
All Data: Exports all data no matter if the data has changed or not.
Changed Data Only: Exports all data that has changed since the last agent run.
All Non-Existing Data: Exports all non-existing data.
Identifier Column Name:The name of the data column where the object identifier is stored.
Identifier Enabled: Exports the object identifier used in the internal database. This value uniquely identifies the data row and will not change unless the internal database is recreated.
Insert Date Column Name:Exports the date a data row was first inserted. This is the date the data was first extracted, To export this value we need to set Insert Date Enabled property as True.
Insert Date Enabled: Exports the date a data row was first inserted. This is the date the data was first extracted.
Last Change Column Name: The name of the data column where the type of change is stored,, To export this value we need to set “Last Change Enabled” property as True.
Last Change Enabled: Exports the type of change that was last made to a data row.
Track Deletes: Tracks data that has been deleted. Data that was not found in the latest agent run will not change status if "Track Deletes" is turned off. Specifies if an agent should track deleted data. If an agent does not track deleted data, the last change status will not change for data that was not found in the last successful agent run. If an agent is tracking deleted data, the last change status will be set to Deleted for data that was not found in the last successful agent run.
Update Date Column Name: The name of the data column where the updated date is stored, To export this value we need to set “Update Date Enabled” property as True.
Update Date Enabled: Exports the date a data row was last processed. This is the date the data was extracted and compared to existing data. Notice that data may not have changed at this date.
Cleanup Export Folders: This property is set to "Application" by default which behaves as per the setting applied on the Application Settings->Folder->Data Export Path ->Cleanup. The cleanup export option is set to True/Checked by default under the Application Settings, which specifies that all existing files in the default export folder will be deleted before a new export starts.
Cleanup Log Folders: This property is set to "Application" by default which behaves as per the setting applied on the Application Settings->Folder->Log Path ->Cleanup. The cleanup logs option is set to False/Unchecked by default under the Application Settings, however if the same is to True then all the log files from the default log folder will get deleted every time the agent starts.
Database Reference: This property specifies the Database Reference. The default value is set to Empty. This will reflect the value which is specified in “Database Connection Name”.
Database Connection ID: This property specifies the Unique Database Connection ID.
Database Connection Name: This property specifies the Database Connection Name.
Database Type: The value under the ‘Internal Database’ text area get set according to what specific Database Type value is selected. The default internal database is an SQLite file database, but you can change it to either a SQL Server or MySQL database. Changing the internal database from SQLite to SQL Server or MySQL can increase the performance of agents significantly.
Delete Downloaded Files: If you want to Delete all downloaded files from disk every time the agent starts then this property set to True. The default value is False.
Delete Unmatched data from Hash Table : In the agent's Internal Database settings, there is a new property added since 2.78.6 SE version and you can now choose whether to delete or keep unmatched data in the Hash Table. The default setting is configured to delete unmatched data (true) from the Hash Table.
When you set this property to false, it ensures that the data in the hash table will remain intact and will not get deleted even if the agent couldn't reach the "Exit If Data Exists" command during a previous run due to selection issues or other challenges. This ensures that the agent won't retrieve the same data repeatedly in future runs, preventing duplication.Download Directory Name: This property indicates the name of the Directory where all downloaded files should be saved.
Downloaded File Exists Handling: Specifies what to do when downloading a file with a name that already exists on disk.
Overwrite Existing File: Specifies to overwrite the existing file when downloading a file with a name that already exists on disk.
Discard New File: Specifies to download only new files instead of old files.
Create File With Random Name: Specifies to create a file with the random name when downloading a file with a name that already exists on disk.
Embed Files: Default value is set to True which indicates embeds downloaded documents and images in the internal databases, so no files will be saved to disk. If we don’t want to embed downloaded documents and images in the internal Database, then we need to set this Property as False.
Export Database Reference: Applies only if “Use Separate Export Database” is set to True. This property specifies the Export Database Reference. The default value is set to Empty. This will reflect the value which is specified in “Database Connection Name”.
Database Connection ID: This property specifies the unique Export Database Connection ID.
Database Connection Name: This property specifies the Export Database Connection Name.
Export Database Type: Applies only if “Use Separate Export Database” is set to True. The default external database type is a SQL Server file database, but you can change it to either an SQLite or MySQL database.
Group Session Files: Default value is set to True indicates thatFiles downloaded in a session are saved in a separate folder named the same as the session. The option "Delete Downloaded Files" cannot be used if this option is set to false.
Old Data: Specifies what to do with old data before the agent starts extracting new data. The default value is set to Delete Old Data indicates that all previously extracted data is deleted when an agent starts a new run.
Delete Old Data: All previously extracted data is deleted when an agent starts a new run.
Keep All and Export: Extracted data is never deleted from the internal database, and all extracted data is exported to the chosen export target. This option is often used when an agent has been configured to extract only new data. The agent can check previously extracted data and stop when it reaches data that has already been extracted.
Keep Some and Don't Export: The agent will keep data from the last successful run, but it will only export data from the current run. This option is often used when previously extracted data can be used to increase the performance of an agent. For example, if the agent downloads large files, it may be able to use the information on the website to see if a file has changed, and if a file has not changed, then copy the file from the previously extracted data rather than downloading the file again.
Old Data Duration Type: Specifies how to limit the duration old data is kept when Old Data is set to Keep Some and Don't Export. The default option is Keep Number of Success Criteria Failure or Zero Data Count.
Keep All: The agent will keep all extracted data. Extracted data is never deleted from the internal database
Keep Number Of days: The agent will keep data specified number of days which is specified in “Old Data Duration Value.
Keep Number Of Extracts: The agent will keep data specified number of extracts which is specified in “Old Data Duration Value.
Keep Number of Success Criteria Failure: The agent will keep data specified number of success criteria failure which is specified in “Old Data Duration Value.
Keep On Zero Data Count: The agent will keep data when zero data count.
Keep Number of Success Criteria Failure or Zero Data Count: The agent will keep data specified number of success criteria failure which is specified in Old Data Duration Value or when zero data count.
Old Data Duration Value: Specifies the duration value when Duration Type is not set to Keep All. The default value is set to One.
Replace Data: Default value is set to True specifies to replace the existing internal data. If you don’t want to replace the data then set this property False.
SQLite Connection: Default value is set to SQLite specifies SQLite Agent connection.
Auto Vacuum: Decreases the database file size automatically when data is deleted.
Connection Name: Specifies the connection name.
Database directory: Specifies the path of the database directory
SQLite Sync: Synchronizes all disk operations, resulting in a slower but more reliable SQLite database.
Use Default Download Path: Default value is set to True specifies to use the default download path to download files.
Use Separate Export Database: This property value is set to True allows users to separate internal export data from runtime data. The default value is set to False.
Use Compatibility Exports: This property is used to retain the original export settings used while developing the agents and also provides flexibility to choose the compatibility or No compatibility export functionality.
No Compatibility: This property indicates that the agent is configured to support the new data export pipeline which has the old Data Distribution merged into the Data Export as a form of export targets (export to remote storage or Cloud storage) for selective execution of each of export targets added in the pipeline.
Compatibility: This property indicates that the agent is configured to support the old export target configurations where the data distribution options (s3, dropbox, azure etc.) and the data export targets like Excel, CSV or the other data export targets are configured separately.
Keep Compatibility Settings: This property supports the new data export pipeline option for new agents and for the old agents, it retains the compatibility export settings when the old agent is reconfigured to use the old export options.
Data List
Data Missing Action: This property specifies the action to take when data is missing.
Optional: This property specifies to use the optional command when data is missing.
Ignore Command when Data is Missing: This property specifies to ignore command when data is missing.
Data Provider: The Default value is set to Simple. This property is used to provide input data to the command and all sub-commands. You can assign a data provider to any Data List command and can load data from the different data sources such as Simple Provider, CSV Provider, Database Provider, Date Provider, Number Provider, Parquet Provider, Selection Provider, etc. Data List commands include the following in which we can use this property: Agent, Data List, Navigate URL, Set Form Field.
The value under the Data Provider text area gets set according to what specific ‘Provider Type’ value selected.
CSV Data Provider: Choosing CSV for the Data Provider is similar to the Simple data provider, but uses an external CSV file. We recommend that you choose the CSV Data Provider for large CSV files since the CSV data provider will perform much better than the Simple data provider for large quantities of data. For a CSV provider, you can choose the value Separator and the text Encoding of the CSV file. You can place CSV files anywhere on your computer, but we recommend you place them in the default input data folder for your agent. Later, if you want to export your agent, then you can include these files along with the export. The value under the ‘CSV Provider ’ text area reflects the same value which is specified in “File Name or Path” option.
Encoding: The File encoding used by the CSV file. We can set encoding like UTF-8, BOM, ASCII, Unicode, Unicode BOM etc. .
File Name Or Path: Specifies file name or path where your input csv/excel file is placed.
Has Header Fields: Default value is set to True specifies whether the first data row contains column names.
Ignore Parse Errors: Ignores parse errors.
Value Separator: A character used to separate values in the CSV File. Default value is set to Comma. We can use other characters such as Tab, Semicolon, Pipe.
Database Provider: Choose a Database for the Data Provider to work any of these database connections: SQL Server, Oracle, MySQL, OleDB etc .In Sequentum Enterprise, you can share database connections among all agents on a computer.
Date Provider: Choosing Date Range for the Data Provider specifies the date range .
Add Delayed Date: Adds a second date to the data provide. The second date will be delayed with a specified number of days, weeks or months.
Convert to Strings: Converts the dates to strings.
Date Format: Format of each date in the date range when converting dates to strings.
Days From End Date: Number of days, weeks or months from end date when end date is set to "Days From Today", "Weeks From Today" or "Months From Today".
Days From Start Date: Number of days, weeks or months from start date when start date is set to "Days From Today", "Weeks From Today" or "Months From Today".
Delay: Specifies of the second date is delayed by days, weeks or months.
Delay Days: Number of days, weeks or months the second date is delayed.
End Date: Last date in the date range.
Specific End Date: Specific last date in the date range.
Specific Start Date: Specific first date in the date range.
Start Date: First date in the date range.
Step: Steps between dates in the date range.
Design Row Index: This property specifies the index of the data row used at design time.
Discover More Data: Waits for asynchronous sub-commands to complete if no more cached data is available. Use this option if asynchronous sub-commands add more data to the data provider.
Hide Data in Editor: Hides the data in the Sequentum Enterprise Editor. This can be used to hide sensitive data, such as passwords, in the Sequentum Enterprise Editor.
Load More Data: Tries to load more data from the data source when no more cached data is available.
Named Connection Provider: Choose a Named Connection for the Data Provider to work on any of the already created database named connections viz SQL Server, Oracle, MySQL, OleDB, Postgre etc. or create new “Named Connection” by clicking the “Manage Connection” option.
Connection: Specifies the database Named Connection name. It is used to select the already created Named Connection from the drop down list. e.g. Postgre_namedCon
SQL: It is used to define the database query to load the data from specified named connection database e.g. SELECT * FROM public."SWSER CustomDate"
Number Provider: Choosing Number Range for the Data Provider specifies the number range which is used for any calculation or other purposes. To extract the Number range as a DataValue in a specific order with a specific interval we can use the Number Provider.
End Number: Specifies the last number in the number range. The default value is 1000.
Start Number: Specifies the first number in the number range. The default value is 1.
Step: Specifies the steps between numbers in the number range. Default value is 1.
Parquet Provider: Specify to choose Parquet for the Data Provider .
File Name Or Path: Specifies file name or path where your input parquet file is placed . The value under the ‘Parquet Provider ’ text area reflects the same value which is specified in “File Name or Path” option.
Provide Data As List: The provided data is a list of values. This can be used to set multiple values in a HTML list box.
Provider Type: This property specifies the type of data sources. Default value is “Simple”. You can use other data sources such as CSV, Parquet, Script, Number Range etc. .
Public Provider: If this is a Simple data provider.
Public Provider Name: The name of the data provider. The name of the command is used if this value is left empty.
Script Data Provider: Choose Script for the Data Provider for full customization of the agent input data. This option provides a .NET data table containing the input data, which may contain multiple data columns and rows. Sequentum Enterprise provides some standard .NET libraries which makes it easier to generate .NET data tables for a variety of input data. The value under the ‘Script Data Provider ’ text area reflects the same value which is selected in “Script Language” option
C# Script: Specifies C# script.
Enabled: To use the Script we need to set this Property as True. Default value is set to False, which indicates that script is disabled.
HtmlAttribute: An Html Attribute to extract from the selected web element. This attribute will be available in the script.
Library Assembly File: The name of a custom assembly file when "Use Default Library" is set to false.
Library Method Name:The method to execute when using the default script library.
Library Method Parameter: A custom parameter passed to the script library method.
Python Script: Specifies Python script.
Regex Script: Specifies Regex script.
Script Language: Specifies the scripting language which you want to use e.g C#, http://VB.NET , Python ,Script Library, Regular Expressions.
Template Name:The template name of the referenced template.
Template Reference: Loads this script from a template when the agent is loaded.
Use Default Library:Uses the default script library when Script Language is set to Script Library.
Use Selection:The script is provided with the selected web element. The script will not be provided with the selected web element if this value is False.
Use Shared Library: Uses a script library that is shared among all agents.
Selection Provider: Choose Selection for the Data Provider . The value under the ‘Selection Provider ’ text area reflects the same value which is specified in “HTML Attributes” option.
HTML Attributes: Specifies number of HTML Attributes, which is reflected as “HTML Attribute#1”, “HTML Attribute#2” etc..
Relative Xpath: Specifies the relative Xpath.
Test Set Count: When using a test set, this is the number of data rows to use for testing.Default value is set to 1.
Test Set Start Value: When using a test set, this is the index of the first data row to use for testing. Default value is set to 1.
Use Test Set: Uses "Test Set Start Value" and "Test Set End Value" to limit the number of data rows provided. Default value is set to False.
Debug
Debug BreakPoint: Debugging will break at this command if the break point is set.Default value is set to False.
Debug Disabled: A disabled command will be ignored during debugging. Default value is set to False.
Debug Error Option: This property specifies what action to take when an error occurs in the debugger. Default value is set to Notify which indicates that when an error occurs at debugging time , then it will be notified. If we want to ignore the error at debug time , then we need to set this property value as Ignore.
Debug Set: This property specifies the set of list elements to process when debugging.
ListCount:-Specifies the number of list items to use when debugging. A value of zero means all items are used.
ListStartIndex:-Specifies the index of first item to use in a list when debugging.
Default Template Library Settings
The Default Template Library Settings in Sequentum Enterprise offer control over script encryption and sharing between agents at agent level.
IsEncrypt: Sequentum Enterprise includes an IsEncrypt Template Library option that allows you to encrypt the Script Template Library. This setting is applicable only at the agent level. The default value is set to “Application”. Users can choose from the following options:
Application: Default value is Application, which uses the default setting defined in Application Settings.
True: Sets the property to True, overriding the application-level settings.
False: Sets the property to False, overriding the application-level settings.
IsShared:
Sequentum Enterprise includes an IsShared option that facilitates easy sharing of scripts between agents. This setting is applicable only at the agent level. The default value is set to “Application”, but users can choose from the following options:
Application: This is the Default value which utilizes the default setting defined in Application Settings.
True: Sets the property to True, overriding the application-level settings.
False: Sets the property to False, overriding the application-level settings.
Export
Data Validation Script: A script is used to validate a single row of export data.
Duplicate Export Row Handling: This property specifies what action to take when duplicate data export rows are detected. All child data of a removed row will be assigned to the existing duplicate row. The duplicate check can be performed on values extracted by Capture commands with the key property, or it can be performed on hash keys calculated from all values in an export data row. Default value is set to “None” .
None: This will not remove Duplicate rows.
Remove(SHA-512): This is used to remove Duplicate rows when an agent run in single session.
Remove(Key Values): This is used to remove Duplicate rows when an agent run in single session.
Remove(Key Values Across Sessions) : This is used to remove Duplicate rows when an agent run in Performance Sessions.
Empty Export Row Handling: This property specifies what action to take when an export data row is empty. If removing empty rows, all child data of an empty row will also be removed, even if the child data is not empty. Capture commands with the property “Act as System” are ignored when checking if a data row is empty. Default value is set to “None” .
None: This will not remove Empty rows.
Remove Row: Removes Empty rows.
Remove Row and Increase Error: Remove Empty rows and increase errors.
Trigger Export Failure: Export fails.
Empty Export Table Handling: This property specifies what action to take when an export data table is empty. Default value is set to “None”.
None: This will not remove Empty table.
Remove: Removes Empty table.
Remove Table and Trigger Error: Remove Empty table and trigger error message.
Trigger Export Failure: Export fails.
Export Empty Row If No Data: Default value is set to True indicates that exports a single empty data row if this container extracts no data. Parent and Sibling data will be lost if merged with an empty data set, so this option ensures that parent and sibling data is exported when this container extracts no data. This option only has an effect when “Export Method” is set to “Add Columns and Rows”. If we don’t want to export a single empty data row if the container extracts no data , then we need to set is False.
Export Enabled: Default value is set to True. A command with Export Enabled set to False will not save any data to data output. This includes all sub-commands if the command is a container command.
Export ID Name: This property specifies the name of the primary key column in the exported table (database table, spreadsheet, CSV file, XML Node), if this container generates a new table. The export name postfixed with “ID” is used if this property is empty. If multiple agents are exporting data to the same table, then you must set this option to the same value for all those agents.
Export ID Sort Order: This property specifies the sort order of the primary key column in the exported table (database table, spreadsheet, CSV file, XML Node), if this container generates a new table. Default value is set to 1000.
Export Keys: This property specifies how keys are exported for this container. This property applies only if the agent is configured to export to file.
Default: Default indicates that Primary key exported for the container.
None: Indicates that no any key will be exported.
Primary: This option allows users to export Primary key only.
Parent: This option allows users to export Parent key only.
Both: This option allows users to export both Primary and Parent keys.
In addition, there is another 'Export Keys' property available under Data->Export Target->Export Keys. This must be set to either "Row Counter" or "Always"
Export Method: This property specifies how to export data from this container. Default value is set to “Add Columns and Rows” which allows users to add columns and rows. There are different ways in which we can extract data:-
Separate Output: This property allows users to export data in separate file.
Add Columns And Rows: This property is used to add columns and rows.
Add Columns Only: This property is used to add columns only.
Add Columns and Merge Rows: This property is used to add columns and merge rows.
Convert Rows Into Columns: This property allows users to convert rows into columns
Export Name: This property specifies the name of the exported table (database table, spreadsheet, CSV file, XML Node), if this container generates a new table. The command name is used if this property is empty. If multiple agents are exporting data to the same table, then you must set this option to the same value for all those agents.
Export Parent ID Name: Specifies the name of the parent key column in the exported table (database table, spreadsheet, CSV file, XML Node), if this container generates a new table. The parent ID column name is used if this property is empty. If multiple agents are exporting data to the same table, then you must set this option to the same value for all those agents.
Export Parent Sort Order: Specifies the sort order of the parent key column in the exported table (database table, spreadsheet, CSV file, XML Node), if this container generates a new table. Default Value is 1000.
Export Rows to Columns Name Command: When "Export Method" is set to "Convert Rows Into Columns" this command provides the names for the new columns.
Export Rows to Columns Value Command: When "Export Method" is set to "Convert Rows Into Columns" this command provides the values for the new columns.
Export Validation Error Handling: Specifies what action to take when data validation fails on an export data row. Default value is set to “ Remove Row and Increase error”.
Remove Row and Increase Error: Remove Row and increase error when data validation fails.
None: This will not remove any row when data validation fails.
Remove Row: Removes row when data validation fails.
Trigger Failure: Trigger Export fails when data validation fails.
History Table Name: Specifies the name of the database table containing historical data if this container generates a new table and the agent is configured to store historical data in separate database tables. The command name appended with "History" is used if this property is empty. If multiple agents are exporting data to the same table, then you must set this option to the same value for all those agents.
Plural Export Name: Specifies the plural name of the exported table if this container generates a new table. The "Export Table Name" with the added character "s" is used if this property is empty. This property can be used to control the name of XML nodes when exporting to XML.
Row Count Container: Data exported by this container command will be used for row count and pagination when using the API. The container command must export to a separate data table. The Agent command is used as Row Count Container by default.
Link
Download Document Command: If the link action initiated a file download, the selected Download Document command is used to capture and export the downloaded document.
List
Process in Sessions: This property specifies that list will be split and processed in multiple sessions if the agent supports session ranges and a proper session range is specified. The input list associated with the Agent command (start command) will be divided by default, but you can specify any list command in an agent by setting the Process in Sessions property as TRUE on the list command. You can only set this option on one command in an agent. Default value is set to False.
Logging
Agent Logging: This property specifies the agent logging.
Always Log Proxy Information: This property set to True allows us to always logs proxy information irrespective of log level set. The default value is set to False.
Note: If you have Default Log Level set to None, then proxy information will not be logged.
Centralized Database Logging : This property is used to add the agent logs to a centralized database in addition to the agent file logging. By default the Centralized Database Logging is disabled and needs a Database connection to write the agent logs to a database .
Connection Name: Database connection for centralized agent logging. The Database connection name is used from the connection created through the "Application Settings->Managed Named Connections". The database connection can also be uploaded to the Agent Control Center for the Centralized logging.
Enable Centralized Logging: By default this property is set to False and setting it to True enables the centralized agent logging.
Environment: Only logging from agents running in the specified environment will be written to the centralized database. Default value is set to Prod which means logs written to a centralized database when the agent runs with the Prod environment.
Log Level : It is used to specify the maximum level of logging written to the centralized database. Default value is set to 1 which is used to write only "error logs" on a centralized database. Below are the log level values which is used for logging :
1 : Default value is set to 1 which is used to write only "error logs" on a centralized database
2: Log Level value set to 2 is used to write only Warning and Error logs(One additional Info message will also be there in Log Level = 2 where it will add Agent Agent started information.) on a centralized database.
3: Log Level value set to 3 is used to write Info, Waning and Errors logs.
Retention Days: It is used to specify Number of days to keep logging for an agent.The latest log for each agent is never deleted. Default value is set to 0 which means only the latest 1 day log will be retained.
Table Name: Database table name for centralized agent logging.
Default Log Level: Default log level if no log level is specified. These are the following options which we can use to log:
None: No any log will be created.
Low: Low log level will only log errors.
Medium: The Medium log level will log errors and warnings.
High: The High log level will log everything such as each node information, error info, warning info, Proxy Info, etc..
Default Log Path: Default log path if logging to file and no log path has been specified. Logs to the default agent log folder if this option is set to an empty string.
Default Log To File: Logs to file by default if not specified.
Deliver Error Data Files:Deliver error data files.
Log Error Data: Logs error data to Text files.
Timestamp Error Data Files :Timestamp error data files.
Multi threading
Default Number of Web Browsers: The agent uses a default number of active web browsers to retrieve data. The default number depends on the available memory. HTML Parsers do not count as web browsers and are only limited by the Max Active Parsers property.
Max Active Parsers: This property specifies the maximum number of active HTML, JSON and XML parsers. An active parser is a parser that is in the process of loading a web page. The default value is set to 5.
Max Web Browsers: This property specifies the maximum number of active dynamic web browsers this agent uses to retrieve data when the property "Default Number of Web Browsers" is set to false. An active web browser is a web browser that is in the process of loading a web page. The default value is set to 1.
Note: The best number for Max Active Parsers and Max Active Browsers depends on how hard you can hit the target website without making the website unstable and without getting blocked by the website. The number also depends on how much memory and how many CPU cores are available on the computer running Sequentum Enterprise.
A dynamic web browser uses a significant amount of memory and CPU and often uses many concurrent web connections to download content from a website, so the Max Active Browsers options should not be set too high. An HTML parser uses little memory and CPU, and only a single web connection, so the Max Active Parsers option can often be set much higher.
Parser
Show All JSON: The Default value is set to false. In an agent, the default JSON file limit is 100 records per page. This property set to TRUE allows us to show a large volume of data per page.
Parsers
Cache Method: The property specifies if HTML, JSON and XML parsers should retrieve pages from cache when available. Parser Cache Method set to Never by default.
Convert JSON Time to Local Time:This property is used to convert values in JSON date/time formats to local date/time formats.
HTTP Client: The type of HTTP Client used by parsers. One type of HTTP Client may be blocked by a target website in rare cases. The default value is set to "Windows".
HTTP Version: This property is used to set the HTTP versions used in the parser. The default value is HTTP/2.0. Other supported versions are HTTP/1.0 and HTTP/1.1.
JSON Parser Compatibility Mode:JSON parser is not supported by all browsers like IE7 some old browsers don't support. So we set this property to TRUE to make browser compatible with JSON.
Maintain Session: Maintains cookies and referrer between parsers and dynamic browsers.
None: It will not maintain any cookies and referrer.
WithBrowser: It will maintain cookies and referrer with browsers.
With Parser: It will maintain cookies and referrer with the parser.
Per Proxy: It will maintain cookies and referrer with proxy change.
New On Proxy Rotation: It will create a new session on new proxy rotation.
Parse NoScript: Specifies when <noscript> tags should be parsed. The default behavior is Always.
Send Client Hints: This property is used to send client hints Http request headers by default on both Dynamic Browser and Parser modes.
According to the MDN documentation, “Client hints are a set of HTTP request header fields that a server can proactively request from a client to get information about the device, network, user, and user-agent-specific preferences. The server can determine which resources to send, based on the information that the client chooses to provide”.
Modern websites may require, and advanced Bot detection frameworks may examine, the client hints Http request headers. Some websites block requests that do not have these headers, and fingerprinting frameworks may flag the request as suspicious if these headers are missing.
Client hints are broadly divided into high and low entropy hints:
Low Entropy Hints:
High Entropy Hints:
The low entropy hints are those that don't give away much information that might be used to create a fingerprinting for a user. They may be sent by default on every client request, irrespective of the server Accept-CH response header, depending on the permission policy.
The high entropy hints are those that have the potential to give away more information that can be used for user fingerprinting, and therefore are gated in such a way that the user agent can make a decision whether to provide them. The decision might be based on user preferences, a permission request, or the permission policy. All client hints that are not low entropy hints are considered high entropy hints.
Default: Default value is “Low And High Entropy”.
None: The user will not get any type of client hints.
Low Entropy: The Low Entropy Hints are those that don't give away much information that might be used to create a fingerprinting for a user. They may be sent by default on every client request, irrespective of the server Accept-CH response header, depending on the permission policy.
Low And High Entropy: Client hints are categorized into low and high entropy hints. Low entropy hints are sent by default on every client request, while high entropy hints require user agent approval.
Process Restart Conditions
Process Restart Conditions: Specifies the conditions under which an agent process is restarted.
Max Memory Usage: The maximum memory usage in MB allowed before an agent process restarts. Only applicable if the agent restarts on min/max memory.
Min Available Memory Block: The minimum amount of memory in MB an agent process must be able to allocate before it restarts. Only applicable if the agent restarts on min/max memory.
Pause Before Restarting: The number of minutes to pause between stopping and restarting an agent process.
Restart On Min/Max Memory: Restarts an agent process when a specified maximum memory usage is reached or when less than a specified minimum amount of memory is available. This option can be used to clear JavaScript memory leaks and ensure the process does not run out of memory.
Restart On Time Interval: Restarts an agent process at a specified time interval.
Restart Time Interval: The number of minutes between each restart if an agent process is restarting on time intervals.
Robots Rules
Robots.txt is a text file you put on your site to tell search robots which pages you would like them not to visit. Robots.txt is by no means mandatory for search engines but generally, search engines obey what they are asked not to do. It is important to clarify that robots.txt is not away from preventing search engines from crawling your site. The fact that you put a robots.txt file is something like putting a note “Please, do not enter” on an unlocked door – e.g. you cannot prevent thieves from coming in but the good guys will not open to door and enter. The location of robots.txt is the main directory. (i.e. https://www.labnol.org/robots.txt)
Obey Rules: Specifies how the agent should obey robot rules for the target website.
Always: You can configure an agent to always obey Robots rules and block URLs that a robots.txt file disallow.
Design Time Warning Only: A page warning can be generated during design time when navigating to a URL that is disallowed.
Never: You can also choose the Robots rules.
Note: If an agent is using a Dynamic Browser, Sequentum Enterprise will only check Robots rules on URLs loaded in the main browser frame. URLs loaded in sub-frames and IFrames will not be validated.
Scheduling
Email Notification: You can configure an agent to send a notification via email to one or more email destinations when your agent successfully or unsuccessfully extracts the http://data.In the Email Notification panel, you'll need to specify the following properties:
Always Notify: Always send a notification when the agent completes a run.
From Email Addresses: This displays who the message is from i.e. sender's name
Notification Enabled: To enable Email Notification, we set this property to true else set false to disable it.
Notify On Critical Error: By default, it is set to true, it notifies when agent encounters with a critical error.
Notify On Successful Extraction: It sends notification only when the agent completed successfully.
Notify On Unsuccessful Extraction: It sends notification only when agent completed unsuccessfully.
Port: Simple Mail Transfer Protocol (SMTP) is the standard protocol for sending emails across the Internet. By default, port 25 is used which is the default SMTP Non-Encrypted port.
Recipient Email Addresses: This shows to whom the message was addressed, i.e. recipient's name(can be one or more separated by comma).
Server: The email server Sequentum Enterprise can use to send emails.
SSL: Specifies if Sequentum Enterprise should connect to the email server using Secure Socket Layer (SSL).Some email servers, such as GMAIL requires a secure SSL connection.
Success Email Addresses: If an agent sends notifications on successful data extraction as defined under agent Success Criteria, the notification is sent to these email addresses
Username: The identification used by a person with access to a computer, network, or online service.
Post start notification: You can configure an agent to send a notification via email to one or more email destinations when your agent successfully or unsuccessfully extracts the http://data.In the Email Notification panel, you'll need to specify the following properties:
Enable- To enable Start Notification, we set this property to true else set false to disable it.
HasNextRunTimeParameter
Header-are used to send to the web service i.e. “Content-Type: application/json”
Post Data- Json formatted data to post to the web service. i.e. {"customId":<CUSTOM_ID>, "agentName":<AGENT_NAME>, "sessionId":<SESSION_ID>, "startTime":<START_TIME>, "maxRunTime":<MAX_RUN_TIME>, "inputParameters":{<INPUT_PARAMETERS>}} This function accepts the following parameters:
customId= Custom Identifiers are a great way to mark unique fields on your agent that can be referenced later.
agentName=Sequentum Enterprise will look for the agent in the default location for the user running the agent service.
sessionId= The session will run in a session with the specified session ID.
startTime=Time when agent trigger to start.
maxRunTime=The agent will stop and fail if it does not complete before this time span.
inputParameters= Are named values assigned to an agent when the agent starts.
URL- Url to web API i.e. https://contentgrabber.com/Mds/MdsAgents/AddStartNotification? <parameters>
Use Proxy- You simply add the proxy assembly to your web application's assembly references and use a proxy to call the API functions.
Post Status:
Enable- To enable Completed Notification, we set this property to true else set false to disable it.
HasNextRunTimeParameter
Headers-are used to send to the web service i.e. “Content-Type: application/json”
Post Data- Json formatted data to post to the web service. i.e. {"customId":<CUSTOM_ID>, "agentName":<AGENT_NAME>, "sessionId":<SESSION_ID>, "status":<STATUS>, "isSuccess":<IS_SUCCESS>, "isNotify":<IS_NOTIFY>, "pageLoads":<PAGE_LOADS>, "dataCount":<DATA_COUNT>, "exportRowCount":<EXPORT_ROW_COUNT>, "pageErrors":<PAGE_ERRORS>, "startTime":<START_TIME>, "runTime":<RUN_TIME>, "isManualStop":<IS_MANUAL_STOP>, "messages":[<MESSAGES>], "inputParameters":{<INPUT_PARAMETERS>}} Additional parameters used in complete notification are as follows :
isSuccess=It shows success when the agent has completed successfully.
isNotify=Notify about the agent run status.
pageLoads =Number of pages loaded by agent.
dataCount = Total data extracted by the agent.
exportRowCount=Total number of row exported by agent.
pageErrors=Total error thrown by the agent during execution.
runtime=total time taken by the agent to complete.
isManualStop=If agent is forcefully stopped.
URL- Url to web API i.e. https://contentgrabber.com/Mds/MdsAgents/AddStartNotification? <parameters>
Use Proxy- . You simply add the proxy assembly to your web application's assembly references and use a proxy to call the API functions.
Windows Scheduling: Sequentum Enterprise allows you to add tasks to the Windows Task Scheduler, as an alternative to the Sequentum Enterprise scheduler. Windows Scheduling property only works when windows scheduling option is on which is present under the following path: Tools -> Deprecated -> Windows Schedules -> Agent Schedule -> Scheduling -> Enable Schedule.
Interval - The Run interval fields allow you to select how often your agent will run.
Interval Type- Run interval can be set in seconds, minutes, hours or days. Start date and Start time enable to preciously control from when the agent will start executing.
Run only if user is logged on -Sequentum Enterprise also includes some scheduling security features. If you don't want your Agent to run when you aren't logged on to your computer, simply click the Run only if user is logged on checkbox.
Note- If you don't set the option Run only if user is logged on, the agent will run in a special Windows desktop session that does not allow input focus. This is a Windows security feature and cannot be circumvented. This may cause JavaScript on some websites to work incorrectly and the agent may not be able to extract data correctly. This scenario is very rare, but if it occurs you will need to set the scheduling option Run only if user is logged on and make sure the user is always logged on to the computer when the agent is running.
Scripting
Assembly References: A list of assembly references that can be used in custom scripts. We can add new assemblies by clicking on Assembly Reference we add only those assemblies which exist in assembly folder.
Custom Environment: This property specifies the custom environment variables set for the agent when “Environment” property is set to “Custom”. Individual environment variables must be separated by a new line. Example: PATH = C:\Program Files\Python37 or PATH = C:\Program Files\Python312
Environment: This property specifies the environment variable for the agent such as None, Anaconda 3, Custom, Python37,Python38 and other python versions available. The default value is “None” and indicates that no explicit environment variables are used in the agent. For using an external python engine, the Environment property needs to be set to either Anaconda3 or Python 312 or other Python versions available or Custom value depending upon the Python setup on the Windows machine.
Initialization Script: The initialization script is run before the agent starts. See the Agent Initialization Scripts topic to learn more on how to use the Initialization script.
Python Engine: This property specifies the type of python engine you want to use in your agent. The embedded engine is IronPython which is an open-source implementation of the Python programming language which is tightly integrated with the .NET Framework. On the other hand, you can use the External Python Engine option to use the full Python versions available such as 3.7,3.8, 3.9, 3.10, 3.11 or 3.12 which supports the CPython libraries such as Numpy and Pandas. Anaconda 3 is recommended as a full python 3.7 and further versions. All the External Python Engines must be installed separately on the Windows machine.
Self-Contained agents
Author Details: Information about the author of this agent. This information is displayed by default in self-contained agents.
Sessions
Always Separate Session Export Data: Always separates exported data. Performance sessions normally export data from all sessions to a single file when exporting to a file format. Setting this option to true will always export data to separate files. This option has no effect when database export is turned on, since data will always be exported per session. If both database export and file export are turned on, individual files will always be generated for each session.
Cleanup External Session Data: Removes exported session data from an external database when a session is removed.
Cleanup Performance Sessions: The default value is set to False . Setting this property to True automatically removes performance sessions that are not part of the set that is currently running.
Default Session Timeout: When running an agent in a session you can specify a session timeout, and the session cleanup will start automatically after the agent session completes and the specified timeout has passed. This gives your application a minimum amount of time to use the session data before it's removed.By default ,session timeout is set to 30 minutes.
Delay Between Performance Session: Delay in milliseconds between session startups when starting multiple performance sessions at once.
Remove Session: Specifies when session data is removed. By default session data is removed on timeout when using multiple sessions, but never automatically removed when using performance sessions. When removing session data immediately, only internal data is removed immediately. Externally exported data and status data will be removed when the session timeout occurs.
If you are not using the API to retrieve extracted data, but are only working with externally exported session data, then you can set the option Remove Session to Immediately to remove internal session data immediately after it has been externally exported. This will reduce the size and increase performance of the internal database. Session status information is not removed and will still be available until the session timeout has passed.
Separate Sessions Tables: Creates separate internal tables for each session.
Separate Sessions Databases: If this property value is set to "True" then it creates separate internal databases for each session. The default value is set to "False" for this property.
Note: -This property is applicable for an external database server e.g. SQL Server, Postgre, MySQL instead of the default SQLite database.
Session Support: Multiple instances of this agent can be run at the same time in different sessions.
Single Session-When agent runs in one instance only.
Multiple Session-To configure an agent to support sessions, set the agent option Support Sessions to Multiple Sessions.
Performance Sessions- When using Performance Sessions, the session ID must be in a special format that dictates how work is divided between sessions. The input list associated with the Agent command (start command) will be divided by default, but you can specify any list command in an agent by setting the option Process in Sessions on the list command. You can only set this option on one command in an agent.
Mixed Sessions: Mixed Sessions allow an agent to support both Multiple and Performance Sessions.
Split Proxies: Splits a proxy list when using performance sessions, so each session gets its own set of proxies.
True- To enable this property set split proxies to true.
False- By default it is false, uses the same set of proxies in each session.
Success Criteria
Success Criteria: Defines the criteria for a successful data extraction. A success criteria can be defined to tell an agent when it should consider an agent run successful. In Success Criteria Text area reflects the value enabled when any one of the below “Criteria Enabled “ property set to TRUE.
Custom Error Criteria: Maximum number of custom errors allowed before data extraction becomes unsuccessful. Default value is set to 1.
Custom Error Criteria Enabled: This property value set to TRUE specifies the agent's success depends on the number of custom errors. Custom errors can be added using Execute Script commands. Default value is set to False.
Data Count Criteria: Minimum number of data entries required for data extraction to be a success.
Data Count Criteria Enabled: This property value set to TRUE specifies the agent success depends on number of data entries extracted. Default value is set to False.
Export Row Count Criteria: Minimum number of export rows required for data extraction to be a success.
Export Row Count Criteria Enabled: This property value set to TRUE specifies the agent's success depends on number of exported rows to the main data table. Default value is set to False.
Is Custom Error Criteria Percentage: The maximum number of custom errors allowed before data extraction becomes unsuccessful is calculated as a percentage of the latest successful extraction. This will always result in a success if there's no existing data.
Is Data Count Criteria Percentage: The minimum number of data entries required for data extraction to be a success is calculated as a percentage of the latest successful extraction. This will always result in a success if there's no existing data.
Is Export Row Count Criteria Percentage: The minimum number of export rows required for data extraction to be a success is calculated as a percentage of the latest successful extraction. This will always result in a success if there's no existing data.
Is Page Error Criteria Percentage: The maximum number of page errors allowed before data extraction becomes unsuccessful is calculated as a percentage of the latest successful extraction. This will always result in a success if there's no existing data.
Is Page Load Criteria Percentage: The minimum number of page loads required for data extraction to be a success is calculated as a percentage of the latest successful extraction. This will always result in a success if there's no existing data.
Page Error Criteria: Maximum number of page errors allowed before data extraction becomes unsuccessful.
Page Error Criteria Enabled: This property value set to TRUE specifies the agent's success depends on the number of page errors.
Page Load Criteria: Minimum number of page loads required for data extraction to be a success.
Page Load Criteria Enabled: This property value set to TRUE specifies the agent's success depends on the number of page loads.
Templates
Template Name: The template path of the referenced template.
Use Template Reference: Loads this container from a template when the agent is loaded. Default value is False.
URL
Data Consumer: Specifies the input data to use when processing this command.
Captured Data Command: Specifies the previously captured data column name which you want to use as input data .
Data Source: The source of the data consumed.
Data Transformation Script: Data transformation script. Default value is set to Disabled which is reflected by "Enabled" property value False. If you want to enable the data transformation script then you need to set to "Enabled" property value as True.
Input Parameter Name : Specifies the input parameter name to use .
Provider Column Name: Specifies a column from the data source that should provide the data to this command. specifies a command that provides data to the agent. A command can provide data to itself.
Provider Container: Specifies a command that provides data to this command.
Follow Current Page URL: Follows a URL even if it's the exact same as the current page URL.
Ignore Invalid URLs: This property specifies to ignores invalid URLs without logging an error.
Processing Mode: Specifies if this command should open the link and process sub-commands synchronously or asynchronously. Sequentum Enterprise will try to work out the most appropriate mode if this value is set to Default.
User Interface Properties
Max Tree Expansions: The maximum number of nodes automatically expanded in the Tree View window.
Max Tree Selections: The maximum number of selected nodes in the Tree View window. Too high a value may affect the performance of the editor.
Web Browser
Allow Canvas Reading at Run Time: Default value is set to false do not allow canvas reading at run time. This property value set to True allows canvas reading at run time. It help in combating browser fingerprinting and avoids blocking. It works only in Dynamic Browser.
Allow Insecure Content: Default value is set to false do not allows loading/running insecure content at run time. This property set to to True allows loading/running insecure content at run time. By default, an https page cannot run JavaScript, CSS or plugins from http URLs.
Block URLs (Regex): This property indicates which regular expression matching URLs should be blocked. Multiple regular expressions separated by line breaks can be specified. It works only in dynamic browsers. For example, the given regex will block all URLs starting with https://www.labnol.org/category/internet. For example: [^(https://www.labnol.org/category/internet.*)]
Computed Styles:A comma separated list of JavaScript computed styles to make available for each web element. The special style "layout" provides the web element's position (left, top, width, height) relative to the web browser window's viewport.
Custom JavaScript: Custom JavaScript to inject into all pages loaded in a Dynamic Web Browser.
Enable PDF Extension at Run Time: This property is used to load PDF URLs in CG and download PDF documents. This property is also used to prevent blocking on some websites. Setting this property to true, enables the PDF extension in the dynamic browser at run time. Use “Application settings→Advanced Settings→System Settings” to set this property to True at design time. The default value is False.
Ignore URLs (Regex): A regular expression matching URLs that will be ignored when deciding if an action command should wait for the URL to load.
Inject Custom JavaScript: Injects the specified custom JavaScript into all pages loaded in a Dynamic Web Browser.
Load Flash at Run Time: This property value is set to True, which specifies to load Flash in the dynamic web browsers at run time. Use “Application settings→Advanced Settings→System Settings” to set this property to True at design time. The default value is False.
Load Images: This property specifies when images should be downloaded and displayed in the web browser. An agent can still capture images even when they are not downloaded and displayed in a web browser, but the images must be shown in the web browser to capture proper screenshots. An agent will perform better when not downloading and showing images in the web browser. This option is only relevant when using a dynamic web browser. There are below options:
Default - The web browser will load all the images on the web page during designing and debugging the agent.
Never - It will not load the images during debug, design or run time.
While Designing and Debugging Agent - It loads the images during designing and debugging time, but not at run time.
Always - It will always load the images.
Load StyleSheets: This property specifies that when style sheets should be downloaded in the web browser. This option also applies to HTML Parser in design mode. There are below options:
Default - The web browser will load all the style sheets on the web page during designing and debugging the agent.
Never - It will not load the style sheets during debug, design or run time.
While Designing and Debugging Agent - It loads style sheets during designing and debugging time, but not at run time.
Always - It will always load style sheets .
Load WebGL at Run Time: This property value when set to True, specifies to load WebGL in the dynamic web browsers at run time. Use “Application settings→Advanced Settings→System Settings” to set this property to True at design time. The default value is False.
Runtime Web Browser Height: This property is used to set the height of all web browsers at run time.
Runtime Web Browser Width: This property is used to set the width of all web browsers at runtime.
Use JavaScript Design Utilities: This property is used to turns on/off JavaScript design utilities. Default value is set to true which turns on JavaScript design utilities. To turn off the JavaScript design utilities we need to set it as False.
Web Browser Cache Properties
Cache Location: The location where the web browser will store cached content, such as HTML pages, images, cookies and local storage content. This setting is used at run time only. For debugging and editing use the application setting "Custom Cache Path".
Clear Cache on Start: Deletes the cache folder before an agent starts. This option is ignored for in-memory cache, since such cache is always deleted when an agent completes a run.
Custom Cache Path: When Cache Location is set to Custom, this is the custom folder where the web browser will store cached content.
Note : The cache can be generated only at Debug time and not at the Run time of the agent.
Web Selection
Selection: The selection XPaths of the web elements associated with this command.
Paths: List of selection XPaths.
Path: The selection XPath.
Select Hidden Elements: Selects visible and disabled elements when true. Otherwise selects only visible and enabled web elements.
Selection Missing Option: Specifies what happens if this selection does not exist in the current page.
Default: Specifies if this selection does not exist in the current page then logs error.
Ignore Command but Execute Sub-Commands: Specifies if this selection does not exist in the current page then it ignores the current command , but executes sub-commands of the command.
Ignore Command: Specifies if this selection does not exist in the current page then it ignores the current command as well as sub-commands.
Log Error and Ignore Command: Specifies if this selection does not exist in the current page then it ignores the current command as well as sub-commands and logs an error message.
Log Warning and Ignore Command: Specifies if this selection does not exist in the current page then it ignores the current command as well as sub-commands and logs a warning message. Note: Warning message will be logged if , Log level is set to either ‘Low’ or ‘High’.
Log PageLoad Error and Ignore Command: Specifies if this selection does not exist in the current page then it ignores the current command as well as sub-commands and logs a Page Load error.
Xpath Factory Properties-
Max Inner Prospects: The maximum number of inner nodes to examine when optimizing a selection XPath.