
Exporting Data
The new data export pipeline was introduced into Sequentum Enterprise 2.70.0. Agents that were created from older versions will retain their original export settings and will remain configurable via the old Export Configuration GUI.
Note: For Sequentum Enterprise versions older than 2.70.0, refer to Exporting Data (Legacy/Compatibility Mode) article. The old export configuration is still configurable and can still be used with the newer versions of SE by changing the Data Export Use Compatibility Export property in the Agent command and setting it to Compatibility by going to the Agent >Properties >Data> Use Compatibility Export>Compatibility.
The main changes in the new Data Export implementation are:
Introduction of data export pipeline model
The old Data Distribution is now merged into Data Export as a form of an export target (export to remote storage or Cloud storage)
Selective execution of each export target in the pipeline via run-time environment setting.
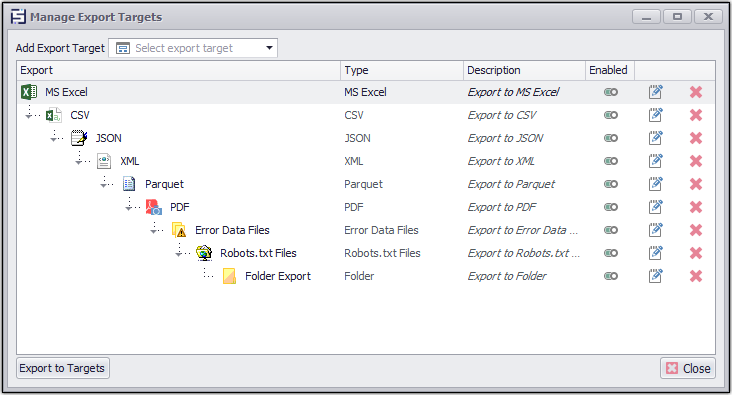
New Manage Export Targets GUI for easy and intuitive editing of the data export pipeline.Preview of the Data Export Pipeline management GUI (with sample configuration)
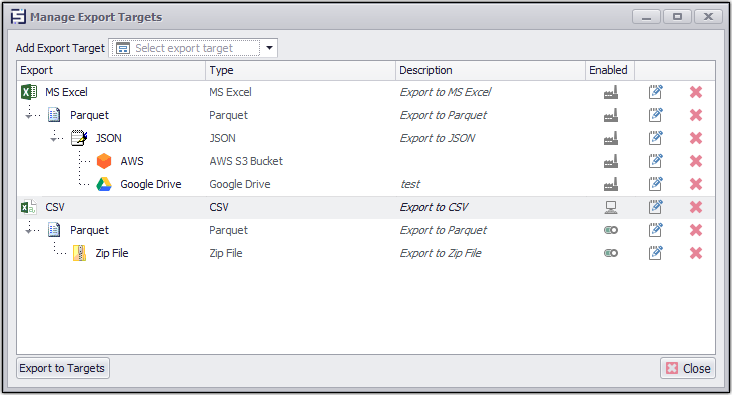
Preview of the Data Export Pipeline management GUI (with sample configuration)
The image above shows an example of an agent's data export configuration. The export configuration shown above consists of two main export pipelines, separated by a grey horizontal line:
The first pipeline exports to a Microsoft Excel spreadsheet, then to a Parquet file, then to a JSON format, and finally, sends all three exported files to a Google Drive and AWS S3 bucket.
The second pipeline exports to data in a CSV formatted file, then to a Parquet file, and adds the two exported files to a Zip file.
Configuring Export Targets
As with older versions of Sequentum Enterprise, newly created agents are, by default, configured to export to a Microsoft Excel (2003) spreadsheet, but you can configure the agent's export target(s) by clicking the ribbon menu button Data > Export Target Configuration.
Additional export targets can be added to the export pipeline via the Add Export Target drop-down, or by right-clicking to go to the context menu.
Export targets can be moved around the export pipeline on the screen using your mouse to drag and drop.
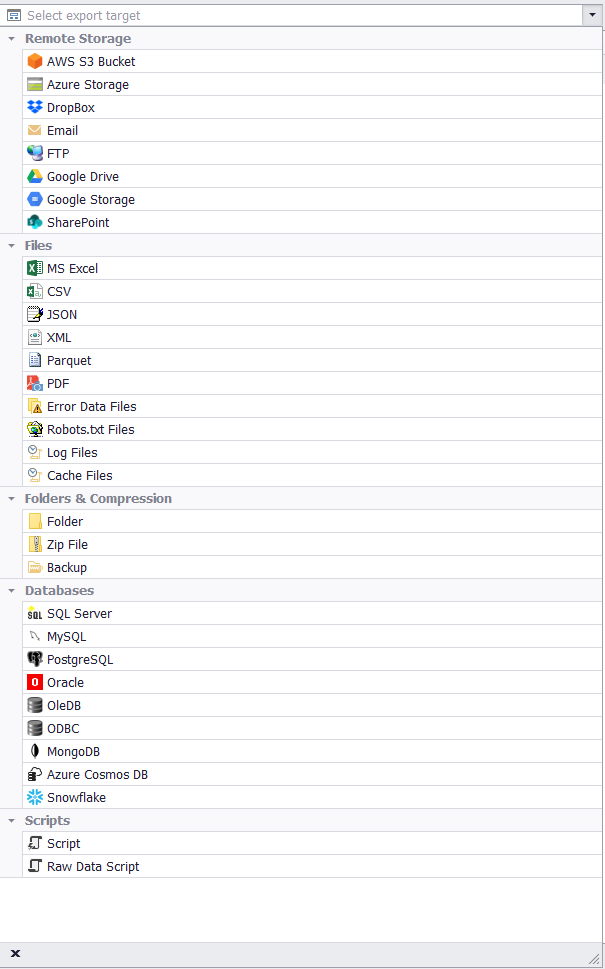
Supported Export Targets
Sequentum Enterprise supports data export to files, remote storage (cloud), database, and custom scripting.
Supported Export Targets
Supported Export Targets
Here is a list of all supported export targets:
Files - listed below are the supported file-type export targets:
Microsoft Excel - 2003 and 2007+ editions of Excel are supported.
Microsoft Excel 2003 - data will export to a single Excel spreadsheet, but it may save the data into more than one worksheet. Any images will be saved to the disk.
Microsoft Excel 2007 and later - data will export to a single Excel spreadsheet. You can save multiple data tables to a single worksheet using grouping and outlining. Any images will either be saved to the disk or embedded into the worksheet depending on the configuration.
CSV - data will export to one or more CSV files. The default character encoding is ASCII, but you can specify another type of encoding.
XML - data will export to a single XML file.
PDF - data will export to a PDF document. The data will be displayed the same way as for Excel 2007. Note: Only content that is visible in Excel will be written to PDF, and since Excel has a limit to the maximum cell height, long text content may not be exported correctly to PDF.
JSON - data will export to a single JSON file.
Parquet - data will export to Apache Parquet files. Nested data is not supported, so one Parquet file is generated for each data table.
Log Files Export: It is used to export the log files and Log HTML Files on either default folder or defined custom folder.Log Folder: It is used to export the log files on either default folder or defined custom folder.Log HTML Folder: It is used to export the log HTML files on either default folder or defined custom folder.
Folders & Compression
Folder - exported files can be stored in specific folder(s). The folder is created if it does not already exist.
Zip File - exported files can be compressed into a Zip file.
Backup - creates backup of all exported files into a specified folder.To use the centralized folder, please refer to the Centralized Folders.
Remote Storage (Cloud) - exported files can be delivered to the following:
AWS S3 Bucket
Azure Storage
Dropbox
Email
FTP
Google Drive
Google Storage
SharePoint
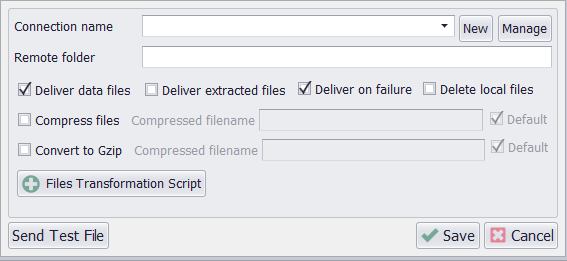
Common Remote Options
AWS S3 Bucket, Azure Storage, Dropbox, Email, FTP, Google Drive, Google Storage and SharePoint all of these remote storage export targets have few common options that provides flexibility to users to customize their remote storage locations or zip them while sending to their remote storage or if the user wants to store the extracted/downloaded files to their remote storage or store the data files and extracted files in Gzip format.
Here is a list of all the common remote storage options:
Connection name - Name of remote storage connection
Remote folder - Path/Name of the folder where the file needs to be stored
Deliver data files - It delivers the exported data. By default, it is checked
Deliver extracted files - It delivers the downloaded data. By default, it is unchecked.
Delivery on failure: It delivers the files in case of agent failure; by default, it is checked.
Delete local files: Post delivery local files will be deleted, by default, it's unchecked.
Compress files: This option converts the extracted file into a .zip file before uploading it to the specified Remote storage. By default, it is unchecked.
Convert to Gzip: This option automatically compresses exported files into the Gzip (.gz) format before uploading them to the specified Remote storage. By default, it is unchecked.
Files transformation Script: This option helps to append the file name or perform operation on the files.
Options in any remote storage
Database - the following database types are supported:
SQL Server - data will export to one or more SQL Server database tables.
MySQL - data will export to one or more MySQL database tables.
Oracle - data will export to one or more Oracle database tables.
OleDB - the data will export to one or more database tables. You can use any database that has an OleDB provider.
MongoDB - data will export to one or more MongoDB database collections.
Azure Cosmos DB - data will export to one or more collections in an Azure Cosmos DB instance. Note: Only the MongoDB API is currently supported.
PostgreSQL - data will export to one or more PostgreSQL database tables.
Snowflake - data will export to one or more Snowflake database tables.
Custom Export Scripts - export script gives user the flexibility of controlling the entire export process.
Script - Access to internal export data is available through the script. Additionally, the Export Script name can be edited to write a desired name and description for each individual script, based on the script's requirements and actual purpose.
Raw Data Script - Access to raw internal data is available.
Sequentum Enterprise always stores data in the internal database before exporting the data to the chosen output format. This means that you can always export data to a new format without having to extract the data again.
Exporting Data to Snowflake
The following fields are required when configuring Snowflake connection in Sequentum Enterprise:
Account - Your Snowflake account identifier. For example, the URL for an account uses the following format: <account_identifier>.snowflakecomputing.com. The "Account" input field requires only the account identifier, not the entire URL.
Username - The username associated with your Snowflake account.
Password - The password associated with your Snowflake account.
Warehouse- The Snowflake Warehouse to use (Must already exist in your Snowflake account).
NOTE:
Auto-resume/suspend behavior - During the data export stage, Sequentum Enterprise will try to resume the specified warehouse if it is in a suspended state or if the warehouse is not configured to auto-resume. However, after the data export completes, Sequentum Enterprise will not put the warehouse in a suspended state. You must configure your Snowflake warehouse's auto-suspend settings.
Database - The Snowflake database name to export the data into. Sequentum Enterprise can automatically create the database if it does not already exist, by enabling the "Create" option in the Snowflake Connection Dialog.
Refer to the section How to create and manage Database Named Connection for detailed reference on Database Named Connection.
Exporting Data to SharePoint
The following fields are required when configuring a SharePoint connection in Sequentum Enterprise:
Application (client) ID : A unique identifier for the application used to authenticate with SharePoint.
Client secret : A confidential key that works with the Client ID for secure authentication.
Directory (tenant) ID : A unique identifier for the Microsoft 365 organization hosting the SharePoint site.
Site : You can now configure the SharePoint site using one of the following options from the dropdown:
Site name – The name of the specific SharePoint site where the data will be exported. (e.g.,
sharepoint-xxx).Site URL – The full URL of the SharePoint site (e.g.,
https://xxx.sharepoint.com/sites/<sharepointsite_name>)
NOTE:
The user can also specify a Folder Name to export the file to a specific folder. Additionally, connections can be created and managed through the Manage Named Connection feature.
Refer to the section Manage Named Connection for detailed reference on how to use Manage Named Connection.
More Export-related References
Please refer to the Exporting Data (Legacy/Compatibility Mode) article for additional information on the following topics (these topics still apply to the current data-export implementation):
Keeping Historical Data
Exporting Data to Oracle
Exporting Data to MS Access
Exporting Downloaded Images and Files
Character Encoding
MySQL Character Encoding
Changing the Default Data Structures
Separate Export Method
Add Columns Only Export Method
Add Columns and Merge Rows Export Method
Convert Rows Into Columns
Exporting Data with Scripts
Export From Multiple Agents.
Adding Data Export Pipeline Using Config File
Config Setting examples to add data exports targets in the pipeline, Remote Storage and Named Connections:
Use the below config setting to add multiple data export targets along with Robots.txt and Folder Export Targets:
[ExportTargets.GetOrAddTarget("Excel").GetOrAddTarget("Csv").GetOrAddTarget("Json").
GetOrAddTarget("Xml").GetOrAddTarget("Parquet").GetOrAddTarget("Pdf").
GetOrAddTarget("ErrorDataFiles").GetOrAddTarget("RobotsTextFiles").
GetOrAddTarget("Folder").Set]
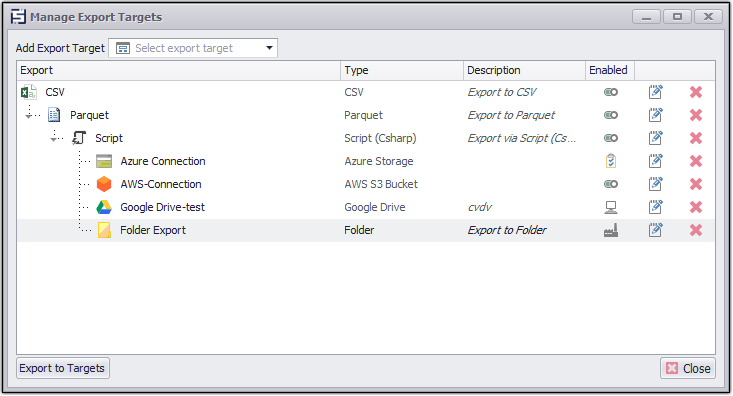
To add CSV, Parquet, and Script in the pipeline
To add the multiple Remote Storages e.g. S3 Browser, Email, Google Drive and Azure Storage use the following config:
[ExportTargets.GetOrAddTarget("Csv").GetOrAddTarget("Parquet").GetOrAddTarget("Script").Set]
IsEnabled=true
ScriptLanguage=Python
PythonScript=[Content.ExportData]
[Content.ExportData]
import datetime
from Sequentum.ContentGrabber.Api import *
from Sequentum.ContentGrabber.Commands import *
from datetime import datetime
from System.Collections.Generic import *
import re
import os
import shutil
def ExportData(args):
dtFormatted = datetime.now().strftime("%Y%m%d%H%M%S")
newExportedFiles = Liststr
Env_1 =args.GlobalData.GetString("env_")
args.WriteDebug("Environment -"+Env_1)
for i in range(len(args.ExportFiles.DataFiles)):
file = args.ExportFiles.DataFiles[i]
file_name = os.path.basename(file)
filename_withouext = os.path.splitext(file_name)[0]
filename_ext = os.path.splitext(file_name)[1]
newFile = file.replace(file_name, '{0}_{1}{2}'.format(dtFormatted, filename_withouext, filename_ext))
shutil.move(file, newFile)
newExportedFiles.Add(newFile)
args.ExportFiles.DataFiles = newExportedFiles
return True
[ExportTargets.GetOrAddTarget("Csv").GetOrAddTarget("Parquet").GetOrAddTarget("Script").GetOrAddTarget(RemoteExport,DoNotUse).Set]
EmailRecipientAddresses =abc@sequentum.com
EmailBccAddresses = xyz@sequentum.com
EmailCcAddresses = JKL@sequentum.com
EmailSubjectTemplate = ACC-TEST -Config
EmailBodyTemplate = ExportTarget Config
Environment =Prod
[ExportTargets.GetOrAddTarget("Csv").GetOrAddTarget("Parquet").GetOrAddTarget("Script").GetOrAddTarget(RemoteExport,Named Connections-AWS-S3).Set]
RemoteDirectory = acc-test-aws s3
Environment =Always
IsDeliverDataFiles=True
IsDeliverExtractedFiles=True
IsCompressFiles=False
[ExportTargets.GetOrAddTarget("Csv").GetOrAddTarget("Parquet").GetOrAddTarget("Script").GetOrAddTarget(RemoteExport,GoogleDriveCoomon).Set]
RemoteDirectory = acc-test- google drive
Environment =Dev
[ExportTargets.GetOrAddTarget("Csv").GetOrAddTarget("Parquet").GetOrAddTarget("Script").GetOrAddTarget(RemoteExport,Azure_NewConnection_Test).Set]
RemoteDirectory = acc-test- google drive
Environment =QA
To add Excel as an Export Target and and Sharepoint as Remote Storage, use the following config:
[ExportTargets.GetOrAddTarget("Excel").GetOrAddTarget(RemoteExport,Sharepoint).Set]
Environment = Always
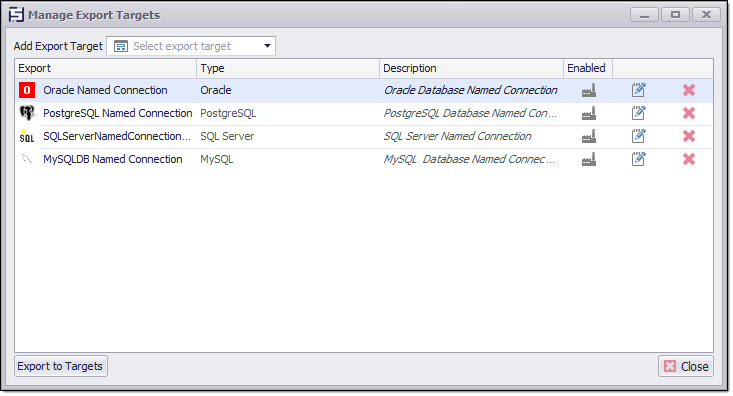
To add multiple Export Targets for different types of Databases e.g. Oracle, Postgre DB, SQL Server, or MySQL.
[ExportTargets.GetOrAddTarget(Database,OracleMangaedconnectiontest).Set]
Environment = Always|Never|Prod|Dev|QA
IsWriteFilesToDisk = false
IsExportDebugData = false
IsNeverDeleteExternalData = false
KeyType =Guid|Numeric
IsSharedDatabaseTables = false
IsKeepHistoricalData = false
AllowDropSchema = Always|Newer|WhenTruncatingData
IsSeparateHistoricalData = true
[ExportTargets.GetOrAddTarget(Database, PostgressSQLManagedConnectionTest).Set]
Environment = Always|Never|Prod|Dev|QA
IsWriteFilesToDisk = false
IsExportDebugData = false
IsNeverDeleteExternalData = false
KeyType =Guid|Numeric
IsSharedDatabaseTables = false
IsKeepHistoricalData = false
AllowDropSchema = Always|Newer|WhenTruncatingData
IsSeparateHistoricalData = true
[ExportTargets.GetOrAddTarget(Database, SQLServerNamedConnection).Set]
Environment = Always|Never|Prod|Dev|QA
IsWriteFilesToDisk = false
IsExportDebugData = false
IsNeverDeleteExternalData = false
KeyType =Guid|Numeric
IsSharedDatabaseTables = false
IsKeepHistoricalData = false
AllowDropSchema = Always|Newer|WhenTruncatingData
IsSeparateHistoricalData = true
[ExportTargets.GetOrAddTarget(Database, MYSQLManagaedConnectionTest).Set]
Environment = Always|Never|Prod|Dev|QA
IsWriteFilesToDisk = false
IsExportDebugData = false
IsNeverDeleteExternalData = false
KeyType =Guid|Numeric
IsSharedDatabaseTables = false
IsKeepHistoricalData = false
AllowDropSchema = Always|Newer|WhenTruncatingData
IsSeparateHistoricalData = true
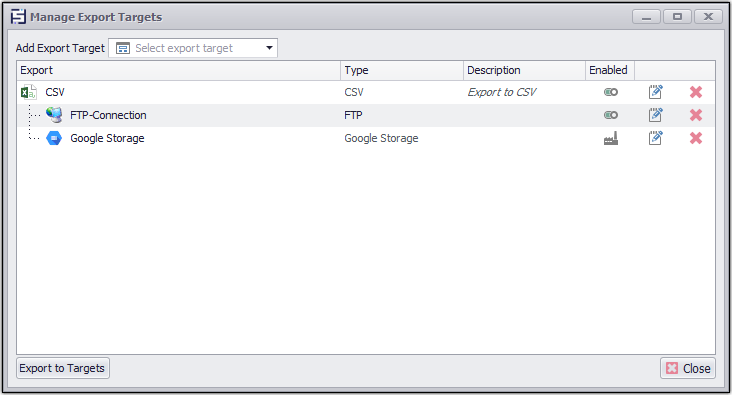
To add Export Target as CSV and upload the CSV file on multiple Remote Storages e.g. FTP and Google Storage.
[ExportTargets.GetOrAddTarget("Csv").GetOrAddTarget(RemoteExport,FTP Named Connection).Set]
RemoteDirectory = CGTesting
Environment =Always
IsDeliverDataFiles=True
IsDeliverExtractedFiles=True
IsCompressFiles=False
[ExportTargets.GetOrAddTarget("Csv").GetOrAddTarget(RemoteExport,GoogleStorage Named Connection).Set]
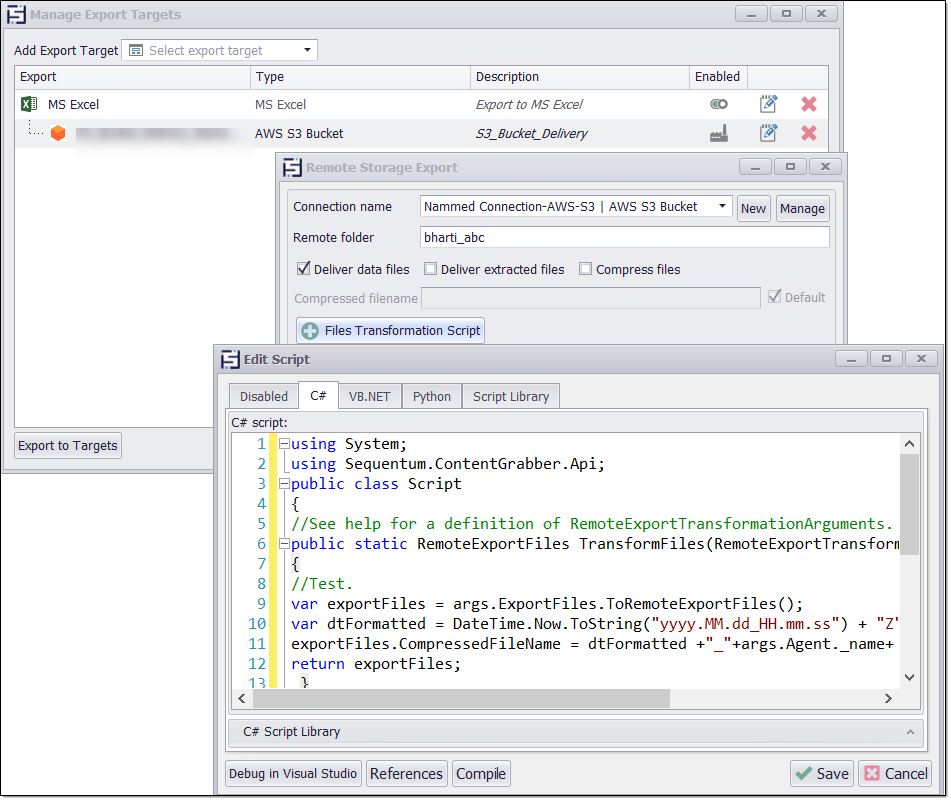
To add Export Target as CSV and add Remote Storages e.g. S3 Browser and deliver the compressed file and rename the compressed file using FileNameTransformationScript.
[ExportTargets.GetOrAddTarget("Csv").GetOrAddTarget(RemoteExport,Named Connections-AWS-S3).Set]
IsCompressFiles=True
RemoteDirectory =bharti_abc
[ExportTargets.GetOrAddTarget("Csv").GetOrAddTarget(RemoteExport,Named Connections-AWS-S3).FilesTransformationScript.Set]
IsEnabled=true
ScriptLanguage=Csharp
CsharpScript=[Content.TransformFilename]
[Content.TransformFilename]
using System;
using Sequentum.ContentGrabber.Api;
public class Script
{
//See help for a definition of RemoteExportTransformationArguments.
public static RemoteExportFiles TransformFiles(RemoteExportTransformationArguments args)
{
//Test.
var exportFiles = args.ExportFiles.ToRemoteExportFiles();
var dtFormatted = DateTime.Now.ToString("yyyy.MM.dd_HH.mm.ss") + "Z";
exportFiles.CompressedFileName = dtFormatted +"_"+args.Agent._name+ "_S3ExportTarget.zip";
return exportFiles;
}
}
To add Export Target as CSV and rename the CSV file using FileNameTransformationScript.
[ExportTargets.GetOrAddTarget("Csv").Set]
IsTimeStampFile=false
[ExportTargets.GetOrAddTarget("Csv").FilenameTransformationScript.Set]
IsEnabled=true
ScriptLanguage=Csharp
CsharpScript=[Content.TransformFilename]
[Content.TransformFilename]
using System;
using Sequentum.ContentGrabber.Api;
public class Script
//See help for a definition of FilenameTransformationArguments.
{
public static string TransformFilename(FilenameTransformationArguments args)
{
//Place your transformation code here. //This example just returns the input data
var dt = DateTime.UtcNow;
var dtFormatted = dt.ToString("yyyyMMdd");
var outputFileName=args.FileName+"-"+dtFormatted+".csv";
return outputFileName;
}
}

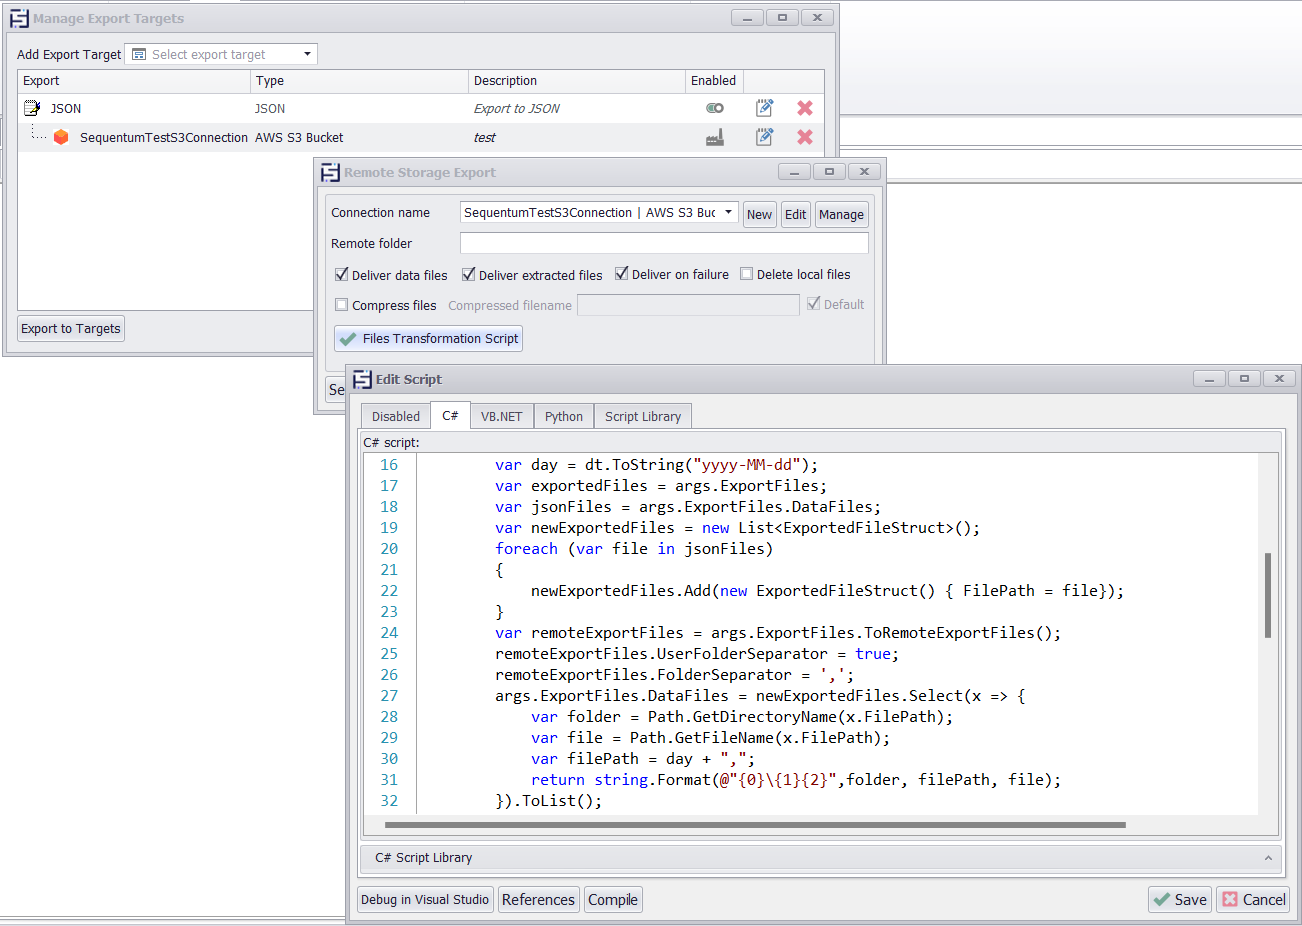
To add Export Target as JSON and and add Remote Storages e.g. S3 Browser and with Dynamic Folder Delivery Using using FileNameTransformationScript.
[ExportTargets.GetOrAddTarget("Json").GetOrAddTarget(RemoteExport,SequentumTestS3Connection).Set]
Environment= Prod
IsDeliverDataFiles=True
IsDeliverExtractedFiles=True
IsCompressFiles=False
[ExportTargets.GetOrAddTarget("Json").GetOrAddTarget(RemoteExport,SequentumTestS3Connection).FilesTransformationScript.Set]
IsEnabled=true
ScriptLanguage=Csharp
CsharpScript=[Content.TransformFilename]
[Content.TransformFilename]
using System;
using Sequentum.ContentGrabber.Api;
using System.IO;
using System.Linq;
using System.Text.RegularExpressions;
using System.Collections.Generic;
using Sequentum.ContentGrabber.Commands;
using System.Data;

public class Script
{
	//See help for a definition of RemoteExportTransformationArguments.
	public static RemoteExportFiles TransformFiles(RemoteExportTransformationArguments args)
	{
		//Place your export code here.
		var dt = DateTime.UtcNow;
		var day = dt.ToString("yyyy-MM-dd");

		var exportedFiles = args.ExportFiles;
		var jsonFiles = args.ExportFiles.DataFiles;

		var newExportedFiles = new List<ExportedFileStruct>();

		foreach (var file in jsonFiles)
		{
			newExportedFiles.Add(new ExportedFileStruct() { FilePath = file});
		}

		var remoteExportFiles = args.ExportFiles.ToRemoteExportFiles();
		remoteExportFiles.UserFolderSeparator = true;
		remoteExportFiles.FolderSeparator = ',';

		args.ExportFiles.DataFiles = newExportedFiles.Select(x => {
			var folder = Path.GetDirectoryName(x.FilePath);
			var file = Path.GetFileName(x.FilePath);
			var filePath = day + ",";

			return string.Format(@"{0}\{1}{2}",folder, filePath, file);
		}).ToList();

		//args.ExportFiles.DataFiles = newExportedFiles;

		args.WriteDebug(args.ExportFiles.DataFiles.Count.ToString());
		args.WriteDebug(args.ExportFiles.ToRemoteExportFiles().DataFiles.Count.ToString());

		remoteExportFiles.Clear();
		remoteExportFiles.Assign(args.ExportFiles);
		return remoteExportFiles;
	}

	struct ExportedFileStruct
	{
		public string FilePath;
		public string TableName;
	}
}
Use the below Config Setting to add a Shared FileNameTransformation Script.
[ExportTargets.GetOrAddTarget("Csv").Set]
IsTimeStampFile=false
[ExportTargets.GetOrAddTarget("Csv").FilenameTransformationScript.Set]
IsEnabled=true
ScriptLanguage=Csharp
TemplateReference=Shared
TemplatePath=ExportFileNameTransformation\Csharp\FileNameScript.cgt
To disable the already added Export Target
[ExportTargets.GetOrAddTarget(Database, SqlServer).Set]
ConnectionName = SQLServerNamedConnection
Environment = None
To remove all the Export Targets
[ExportTargets.Targets.Clear().Set]
To remove the Export Target from a specified position
[ExportTargets.Targets.RemoveAt(1).Set]
To use [AGENT_NAME] input parameter like as database name with agent name
Use the [AGENT_NAME] tag and it will automatically get converted to args.Agent.Name during runtime or debug time. This also helps in creating dynamic folders paths for the exported files, export folders, log files and downloaded files with the agent name added by default and reduces the manual effort to add the different agent names in the different agents using the custom folder location.
Examples:
[ExportTargets.GetOrAddTarget("Csv").Set]
IsTimeStampFile=True
[ExportTargets.GetOrAddTarget("Csv").GetOrAddTarget("Folder").Set]
Enabled=0
UseDefaultFilesFolder=false
UseDefaultDataFolder=false
DataFolder=D:\DownloadedFile\Data\[AGENT_NAME]
FilesFolder=D:\DownloadedFile\Files\[AGENT_NAME]\Download
To add Export Target as CSV and a ZipFile export target in pipeline.
Example:
[ExportTargets.GetOrAddTarget("Csv").Set]
IsTimeStampFile=True
[ExportTargets.GetOrAddTarget("Csv").GetOrAddTarget("ZipFile").Set]
Enabled=0
IsTimeStampFile=True
UseDefaultFilePath=False
FilePath=D:\ZipOutPutFiles
To add Export Target as CSV and a ZipFile export target in the pipeline with control over deleting empty Zip files.
Example:
Config File Settings Examples
[ExportTargets.GetOrAddTarget("Csv").Set]
IsTimeStampFile=True
[ExportTargets.GetOrAddTarget("Csv").GetOrAddTarget("ZipFile").Set]
Enabled=0
IsTimeStampFile=True
IsDeleteEmptyZipFile=true
Remove Specific Export Target.
The following config settings can be applied to remove any specific export target or all export targets in the No Compatibility Export Targets Configuration.position value should start from 0 and it would be numeric and below the specific target count.
[ExportTargets.RemoveAllTargets("RemoteExport",[connectionName])]
[ExportTargets.RemoveTargetAt("RemoteExport",[position],[connectionName])]