
Manage Named Connections
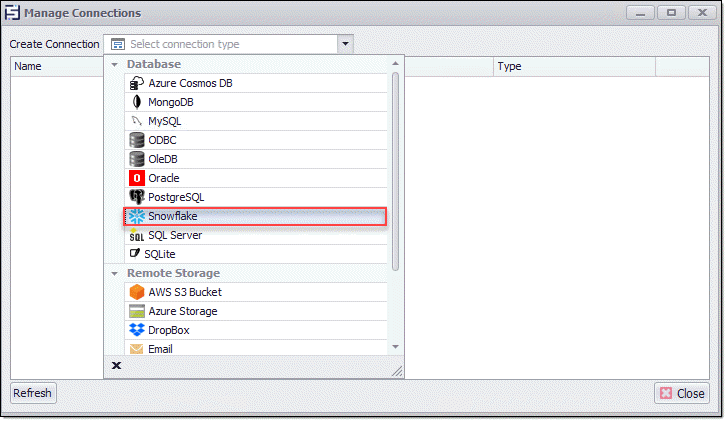
Manage Named Connections is used to create and manage the named connections. A named connection is a named resource that contains a name and a connection to a data source and is stored in an encrypted format. To create the connection via Sequentum Enterprise, we need to Go to "Application Settings → Manage Named Connections → Select Connection Type from Create Connection dropdown list" and then fill in the required details.
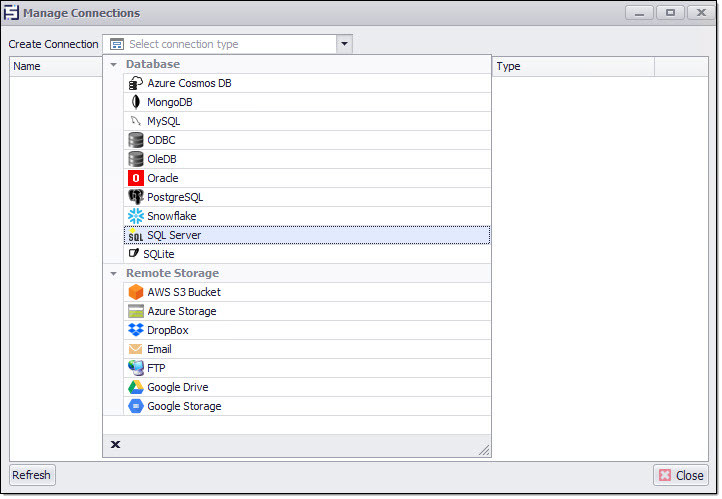
Two types of Named connections are supported in SE:
Database named connections
Remote Storage connections
Database Named Connections can be used to create and manage the supported database connections by Sequentum Enterprise such as Azure Cosmos DB, MongoDB, MySQL, ODBC, OleDB, Oracle, PostgreSQL, Snowflake, SQL Server, and SQLite. The database named connections can be used in the export targets to export your data to your named database connection and can also be used to read the data from databases using the Named Connection as a Data Provider in the Data List command. The following database types are supported:
Snowflake - data will export to one or more Snowflake database tables.
SQL Server - data will export to one or more SQL Server database tables.
MySQL - data will export to one or more MySQL database tables.
Oracle - data will export to one or more Oracle database tables.
OleDB - the data will export to one or more database tables. You can use any database that has an OleDB provider.
MongoDB - data will export to one or more MongoDB database collections.
Azure Cosmos DB - data will export to one or more collections in an Azure Cosmos DB instance. Note: Only the MongoDB API is currently supported.
PostgreSQL - data will export to one or more PostgreSQL database tables.
How to create and manage Database Named Connection
Follow these steps to create a database named connection for Snowflake:
From the Manage Connections window select Snowflake database from the connections type list.
If you are creating the Snowflake Connection for the first time then it will show you an alert message for installing the Snowflake ODBC driver.
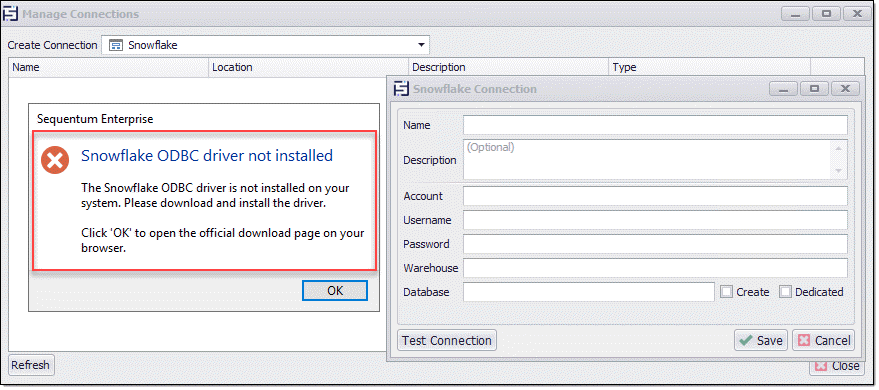
Click OK and it will open the official Snowflake ODBC driver download page on your default browser or download from snowflake's odbc driver page here.

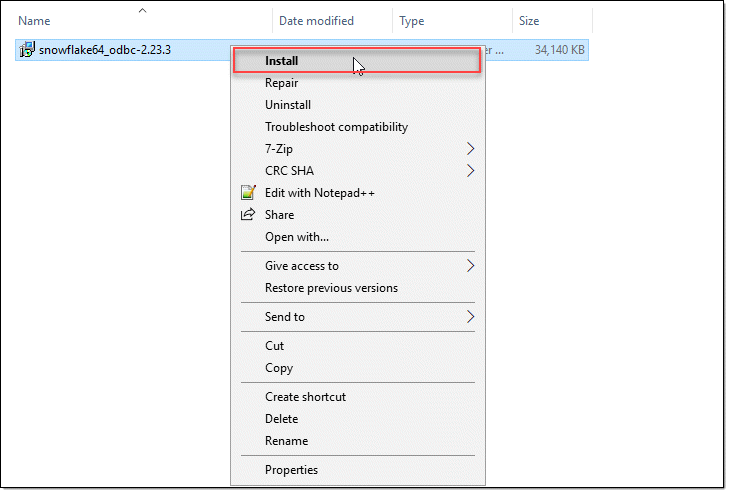
Download and follow the Setup steps to install the Snowflake ODBC driver on the windows machine.
Once the ODBC driver is installed select the Snowflake database again from the Manage Connections window and it will open the Snowflake Connections window for creating the connection.
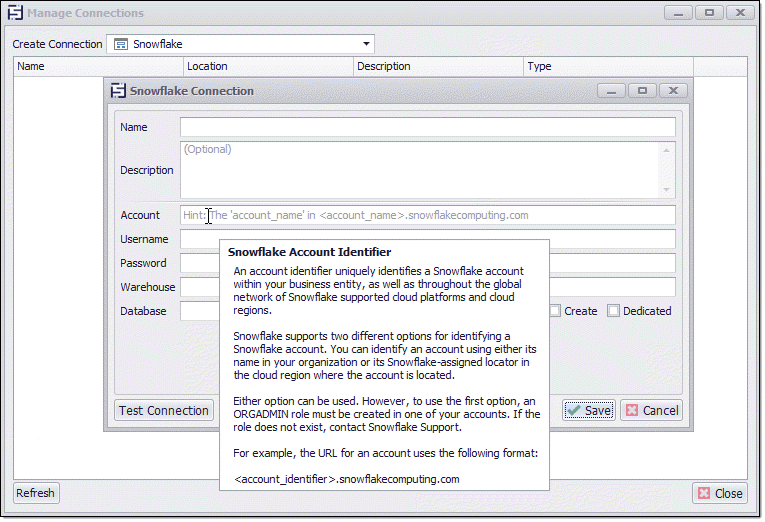
Fill in the required details for creating the Snowflake named connection. Specify the Connection Name, Description, Account, Username, Password, Warehouse, and the Database name. Click on the Test Connection button to check if your connection is established successfully.
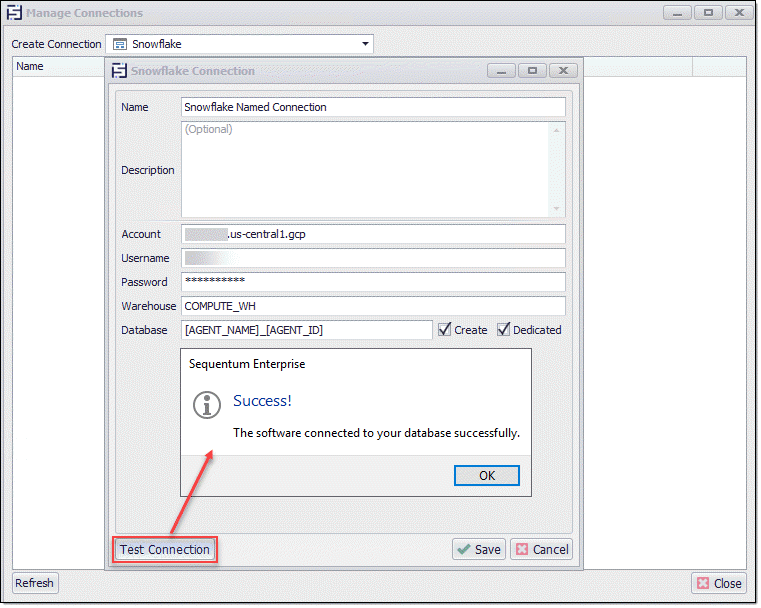
Once the Snowflake Connection is Tested and the connection is established successfully, Save your connection and it will get listed under the Manage Connections window with options to edit the connection, delete the connection, and an additional option to upload the connection to AgentControlCenter if you are logged in to your AgentControlCenter for uploading your connections.

Follow these steps to create a database named connection for SQL Server Database:
From the Manage Connections window select SQL Server database from the connections type list.
Fill in the required details for the database named connection such as specify the Connection Name, Description, Server, User Name, Password, and Database name and Test the connection.
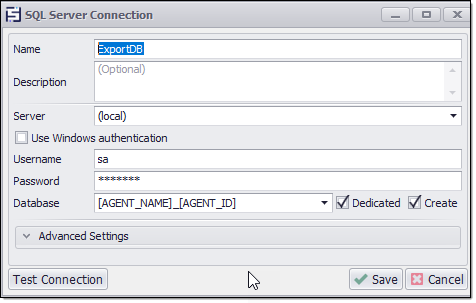
Once the SQL Server Connection is Tested and the connection is established successfully, Save your connection and it will get listed under the Manage Connections window with options to edit the connection, delete the connection, and an additional option to upload the connection to AgentControlCenter if you are logged in to your AgentControlCenter for uploading your connections.


Adding SQL Server Named Connection
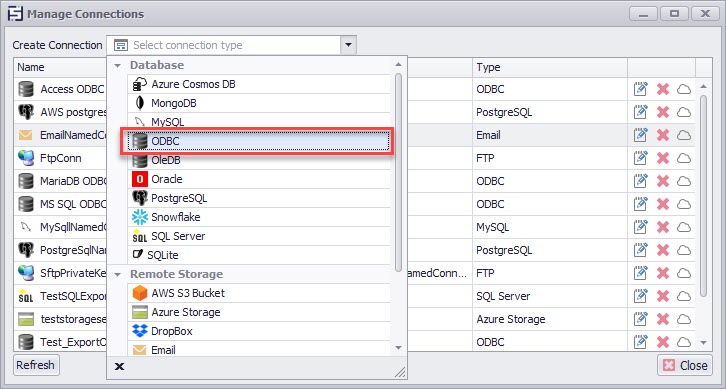
Creating ODBC Database Named Connections
Currently Sequentum Enterprise has native support for SQL Server, SQLite, MySQL, Oracle, PostgreSQL, MongoDB, Azure Cosmos DB, and Snowflake databases.
For other databases that Sequentum Enterprise do not native support for, you should consider using ODBC connection.
First of all, you need to ensure that you have an ODBC driver for your desired database installed. Please refer to your database documentation on how to download and install an ODBC driver as this process may vary greatly between different databases.
For Win64 operating systems you should install a 64 bit ODBC driver as Sequentum Enterprise is a 64 bit software.
Once you installed ODBC driver, select ODBC option from the Manage Connections window
Then, you should see the ODBC Server Connection window.
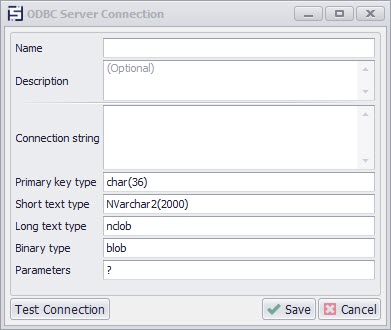
Enter connection Name, for example ‘My test ODBC connection’.
Enter Connection string. Please refer to your database and ODBC driver documentation on how to create a connection string as this varies greatly between different ODBC driver and databases.
You can test connection by pressing ‘Test Connection’ button. If you see any errors, that means that your connection string has problems and Sequentum Enterprise unable to establish connection with the database.
Please note that creating an ODBC connection does not automatically create a database if it does not exist. So, ensure that the database exists before using an ODBC connection.
Enter ‘Primary key type’, ‘Short text type’, ‘Long text type’, and ‘Binary type’ values. Please refer to your database documentation to find out the most appropriate data types as this varies greatly between different databases. Please ensure that you also specify length and/or precision where appropriate. For example, for MS SQL Server you should enter ‘nvarchar(4000)’ , and not just ‘nvarchar’.
Parameters field usually expects three characters. The first and the third characters are used to enclose database object names, i.e. table or column names.
select [column name 1], [column name 2] from [table name]
select “column name 1”, “column name 2” from “table name”
The most common would be square brackets ([ ]) and quotation marks (‘ ’) or (“ ”). Some databases may use rather uncommon characters such as Grave Accent (` `) character (Unicode number U+0060).
Please refer to your database documentation as these vary greatly between different databases.
The second character is used to specify an SQL parameter placeholder. Please note that ODBC does not support passing named parameters (@paramName) to an SQL statement. Therefore, you should never use @ and use the question mark(?) placeholder instead. For example,
SELECT * FROM Customers WHERE CustomerID = ?
Please find sample ODBC connection settings below
ODBC connection settings for SQLite
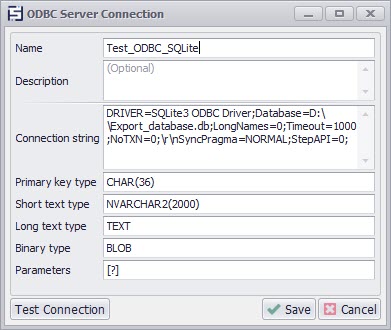
Connection string: DRIVER=SQLite3 ODBC Driver; Database=D:\\Export_database.db; LongNames=0; Timeout=1000; NoTXN=0; SyncPragma=NORMAL; StepAPI=0;
Primary key type: CHAR(36)
We are using CHAR(36) because SQLite does not have a native support for GUID / Unique Identifier data type.
Short text type: NVARCHAR2(2000)
Long text type: TEXT
Binary type: BLOB
Parameters: [?]
ODBC connection settings for MS SQL Server
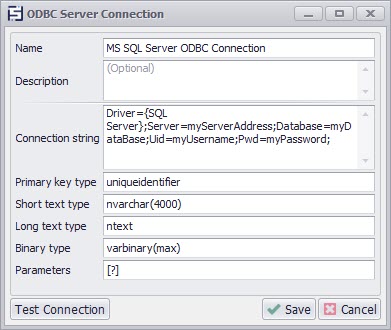
Connection string: Driver={SQL Server}; Server=myServerAddress; Database=myDataBase; Uid=myUsername; Pwd=myPassword;
Primary key type: uniqueidentifier
Short text type: nvarchar(4000)
Long text type: ntext
Binary type: varbinary(max)
Parameters: [?]
ODBC connection settings for MariaDB
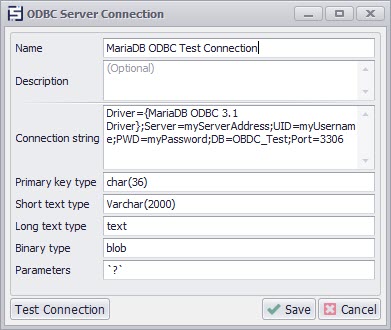
Connection string: Driver={MariaDB ODBC 3.1 Driver}; Server=myServerAddress; UID=myUsername; PWD=myPassword; DB=OBDC_Test; Port=3306;
Primary key type: char(36)
Short text type: Varchar(2000)
Long text type: text
Binary type: blob
Parameters: `?`
How to create and manage Remote Storage Named Connection
Remote Storage connections can be used to create and manage the supported database connections by Sequentum Enterprise such as AWS S3 Bucket, Azure Storage, Dropbox, Email, FTP, Google Drive, Google Storage, and SharePoint. The remote storage named connections can be added to the export targets to deliver the exported data to remote storage targets.
AWS S3 Named Connection
Follow the below steps to create an AWS S3 remote storage named connection:
From the Manage Connection window select AWS S3 Bucket remote storage.
Fill in the required details for the AWS S3 bucket connection such as specify the Connection Name, Add Description for the connection, Add Bucket Name, Add Access key, Add the Secret Key which will be saved and displayed encrypted, and add the Folder Name.

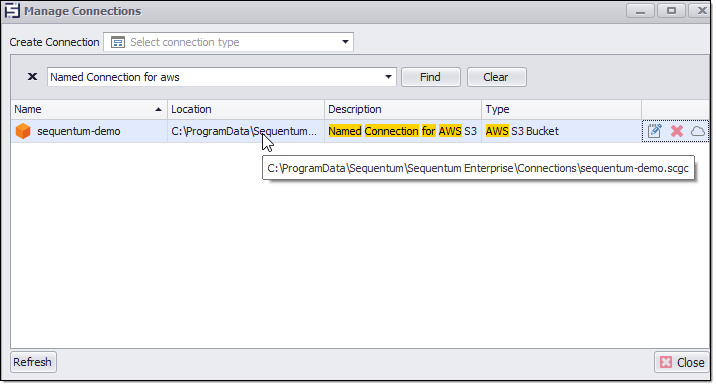
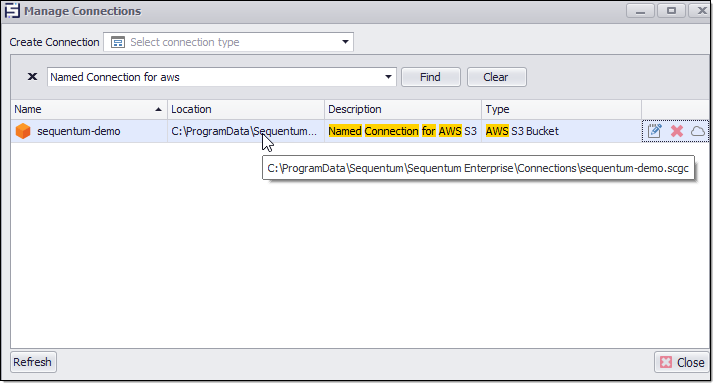
Name: Specify the Named Connection name e.g. "sequentum-demo".
Description: Specify the named connection description. This is an optional field.
Bucket Name: Specify the bucket name. e.g. "sequentum-test"
Access Key: Specify the Access Key for your AWS S3 bucket.
Secret Key: Specify the Secret Key for AWS S3 bucket which will be added and displayed encrypted.
Folder Name: Specify the folder name s3 browser in which you want to deliver your files. This is also an optional field, if you will not specify any folder name then the Folder name will be created with the agent name automatically.
Region ID: Specify the region id. The default region id is "us-east-1".
Use the "Save Test File" button to test the connection and a test file will be uploaded to your AWS S3 Bucket.
Once the AWS S3 bucket is Tested and the connection is established successfully Save your connection and it will get listed under the Manage Connections window with options to edit the connection, delete the connection, and an additional option to upload the connection to AgentControlCenter if you are logged in to your AgentControlCenter for uploading your connections.
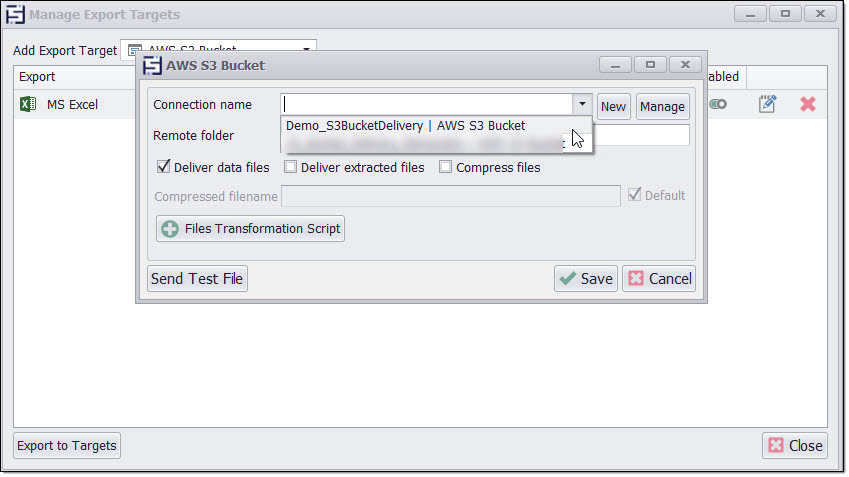
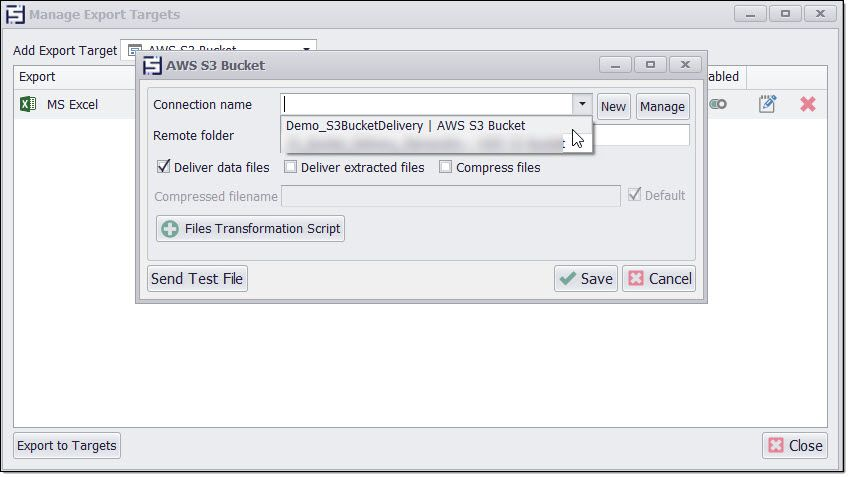
After creating the connection, you can add the named connections to your export target to deliver your exported data to your remote storage target. If your export target is set to export data to a file format such as Excel, CSV, Parquet, Json, XML, or a Script, then you can configure your agent to send the data export as a message attachment to one or more email destinations or alternatively, you can FTP the data to a remote server, save it to Google Drive, Google Storage, Azure Storage, Dropbox, etc.
To add the remote storage export targets, navigate to Data → Export Target Configuration → Select Export Target → Select the Connection name, and save it.
Note: If you want to export data to AWS Bucket by using the UploadFilesToBucket API then you can use the below code within the SE Application and it will export the data to the desired S3 destination:
using System;
using System.Collections.Generic;
using Sequentum.ContentGrabber.Api;
using Sequentum.ContentGrabber.Internal;
using Sequentum.ContentGrabber.Commands;
public class Script
{
public static CustomScriptReturn CustomScript(CustomScriptArguments args)
{
List<DeliveredFilesLink> uploadedFiles = DeliverAwsS3Bucket.UploadFilesToBucket(string accessKey, string secretKey, string region, string bucketName, string folderName, string[] filepaths, string externalid, string roleArn, bool requireExternalid, [bool useFolderSeparator], [char folderSeparator], [bool mirroredLocalFolderHierarchy])
return CustomScriptReturn.Empty();
}
}
AWS S3 Named Connection using ARN and External Id
Follow the below steps to create an AWS S3 ARN using AWS’s Assume Role functionality mechanism within remote storage named connection using:
From the Manage Connection window select AWS S3 Bucket remote storage.
Fill in the required details for the AWS S3 bucket connection such as specify the Connection Name, Add Description for the connection, Add Bucket Name, Add Access key, Add the Secret Key which will be saved and displayed encrypted, and add the Folder Name.

Name: Specify the Named Connection name e.g. "sequentum-demo".
Description: Specify the named connection description. This is an optional field.
Region: Specify the region id in which the AWS infrastructure is deployed or located. The default region id is "us-east-1".
Bucket Name: Specify the bucket name. e.g. "sequentum-test"
Policy: It is a JSON document that defines permissions for accessing AWS resources.
External Id: It is a unique identifier used in conjunction with IAM roles to grant cross-account access.
Role Arn: The Amazon Resource Name of an IAM role used in policies and API calls to grant permissions or assume the role.
Role custom trust policy: It defines which users, roles, accounts, or services can assume a specific role.
Folder Name: Specify the folder name s3 browser in which you want to deliver your files. This is also an optional field, if you will not specify any folder name then the Folder name will be created with the agent name automatically.
Use the "Save Test File" button to test the connection and a test file will be uploaded to your AWS S3 Bucket.
Once the AWS S3 bucket is Tested and the connection is established successfully Save your connection and it will get listed under the Manage Connections window with options to edit the connection, delete the connection, and an additional option to upload the connection to AgentControlCenter if you are logged in to your AgentControlCenter for uploading your connections.
After creating the connection, you can add the named connections to your export target to deliver your exported data to your remote storage target. If your export target is set to export data to a file format such as Excel, CSV, Parquet, Json, XML, or a Script, then you can configure your agent to send the data export as a message attachment to one or more email destinations or alternatively, you can FTP the data to a remote server, save it to Google Drive, Google Storage, Azure Storage, Dropbox, etc.
To add the remote storage export targets, navigate to Data → Export Target Configuration → Select Export Target → Select the Connection name, and save it.
Note: If you want to export data to AWS Bucket which includes ARN Role and External ID by using the UploadFilesToBucket API then you can use the below code within the SE Application and it will export the data to the desired S3 destination:
using System;
using System.Collections.Generic;
using Sequentum.ContentGrabber.Api;
using Sequentum.ContentGrabber.Internal;
using Sequentum.ContentGrabber.Commands;
public class Script
{
public static CustomScriptReturn CustomScript(CustomScriptArguments args)
{
List<DeliveredFilesLink> uploadedFiles = DeliverAwsS3Bucket.UploadFilesToBucket(string accessKey, string secretKey, string region, string bucketName, string folderName, string[] filepaths, [bool useFolderSeparator], [char folderSeparator], [bool mirroredLocalFolderHierarchy])
return CustomScriptReturn.Empty();
}
}
To make this feature work, the following mandatory steps must be followed:
Install AWS CLI on local machine.
In command prompt run :
aws configure After running the above prompt it will ask for the credentials as shown below, provide the required credentials and proceed further.
access_key: HGGFHBVFNNKJHJJ
secret_key: HFDGBbhgb65VFb7gCBn76vJ776Bjjgvb87
region : us-region-2
format : json
For pre-requisite for this refer to link Pre-requisite for external id in S3 managed connection
SharePoint Named Connection
Follow the steps below to create a SharePoint remote storage named connection:
From the Manage Connection window, select SharePoint remote storage.
Fill in the required details for the SharePoint connection such as Connection Name, Description, Application (Client) ID, Directory (Tenant) ID, Client Secret, Site details, and Folder Name.
Field
Name : Specify the Named Connection name, e.g., "sequentum-demo".
Description : Provide a description for the connection (optional).
Application (client) ID : A unique identifier for the application used to authenticate with SharePoint.
Client secret : A confidential key used along with the Client ID for secure authentication. This value will be saved and displayed in encrypted form.
Directory (tenant) ID : A unique identifier for the Microsoft 365 organization hosting the SharePoint site.
Site : You can now choose how to provide the SharePoint site details using the dropdown:
Site name: Enter the name of the specific SharePoint site site where the data will be exported (e.g.,
sharepoint-xxx).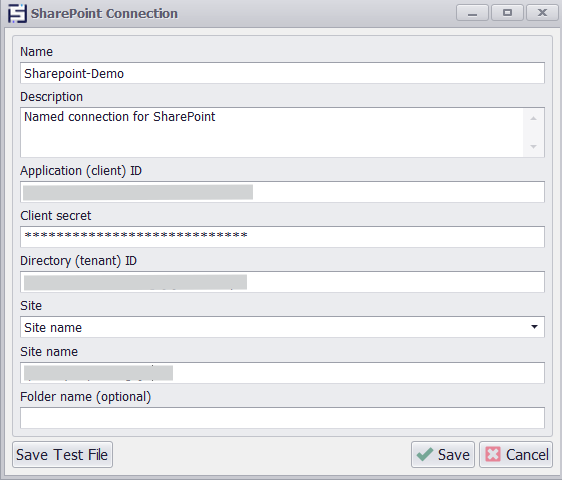
Site URL: Provide the full SharePoint site URL (e.g.,
https://xxx.sharepoint.com/sites/<sharepointsite_name>).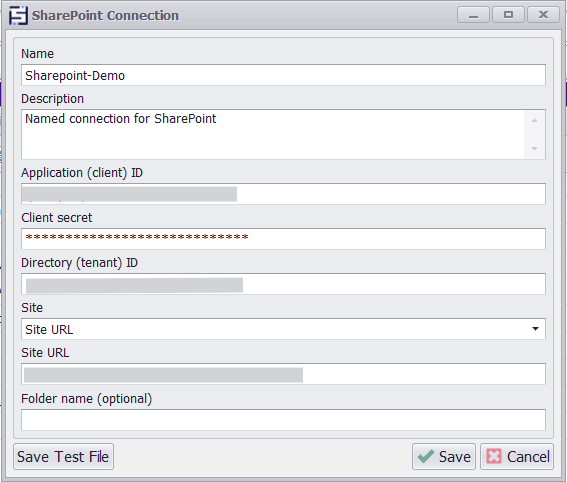
Folder Name (optional) : Specify the folder name in SharePoint where files will be delivered.
Additional Actions:
Save Test File : Use this button to test the connection. A test file will be uploaded to the specified SharePoint location to verify the setup.
Once the SharePoint is Tested and the connection is established successfully Save your connection and it will get listed under the Manage Connections window with options to edit the connection, delete the connection, and an additional option to upload the connection to AgentControlCenter if you are logged in to your AgentControlCenter for uploading your connections.
Similarly, you can add a Database Named connection export target to export your data to your database.
For the added named connection, you can also define when the result file should be delivered to the added remote storage. There are five options for setting up the Environment. Always, Never, Prod, QA, and Dev. Choose as per your requirements.
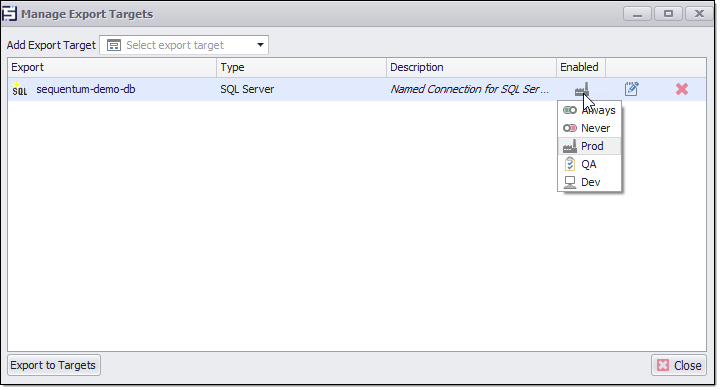
Always - It is used to deliver the exported file always. If we want to deliver the exported data to the destination in all the cases such as Completed, Incomplete failed, Completed Unsuccessfully, Dev, QA, Prod, then we use the Always option.
Never - If you don’t want to deliver the extracted data to the added remote storage, then you can use this option.
Prod - It delivers the data only when the agent runs with the Prod environment and runs successfully.
QA - It delivers the data only when the agent runs with the QA environment.
Dev- It delivers the data only when the agent runs with the Dev environment.
Create and Manage AWS S3 Named Connection
Named Connections Through Sequentum Enterprise API
The Sequentum Enterprise also provides API support to create Named connections. The following examples show to create Remote Storage and Databases Named Connection through SE API.
Note: Make sure that Sequentum Enterprise service is running before sending the API request.
API Request URL
http://localhost:8004/ContentGrabber/CreateNamedConnection?key={key}
key: Use the API access key from the Application Settings>API Access menu in the Sequentum Enterprise editor.
AWSS3
Example:
POST http://localhost:8004/ContentGrabber/CreateNamedConnection?key=6de336b03c514a9e9309cd3027da4ff3
Body:
{
"NamedConnectionType": "AwsS3",
"ConnectionName": "S3APINamedConnection",
"Description": "AWSS3-NamedConnectionViaAPI",
"AccessKey": "myaccesskey",
"SecretKey": "mysecretkey",
"Region": "us-east-1",
"BucketName": "my-bucketname",
"FolderName": "my-folder-name"
}
Azure Storage
Example:
POST http://localhost:8004/ContentGrabber/CreateNamedConnection?key=6de336b03c514a9e9309cd3027da4ff3
{
"NamedConnectionType": "AzureStorage",
"ConnectionName": "AzureStorage-APINamedConnection",
"Description": "AzureStorage-NamedConnectionViaAPI",
"StorageType": "File",
"AzureStorageAccountName": "cgstorageacc",
"AccessKey": "myaccesskey3abcd++==",
"FileShareName":"myfileshare",
"FolderName": "[AGENT_NAME]"
}
DropBox
Example:
POST http://localhost:8004/ContentGrabber/CreateNamedConnection?key=6de336b03c514a9e9309cd3027da4ff3
Body:
{
"NamedConnectionType": "DropBox",
"ConnectionName": "DropBox-APINamedConnection",
"Description": "DropBox-NamedConnectionViaAPI",
"AccessToken": "AAAAAAAAAAcccccessToooookkkeeen",
"FolderName": "myfolder"
}
Example:
POST http://localhost:8004/ContentGrabber/CreateNamedConnection?key=6de336b03c514a9e9309cd3027da4ff3
Body:
{
"NamedConnectionType": "Email",
"ConnectionName": "A-Email-APINamedConnection",
"Description": "Email-NamedConnectionViaAPI",
"Server": "123.45.678.910",
"Username": "myusername",
"Password": "mypassword",
"Port": 587,
"IsSsl":false,
"FromEmailAddress": "fromemail@address",
"RecipientEmailAddresses": "email@recipient",
"BccEmailAddresses":"email@bcc"
"CcEmailAddresses":"email@cc"
}
FTP
Example:
POST http://localhost:8004/ContentGrabber/CreateNamedConnection?key=6de336b03c514a9e9309cd3027da4ff3
Body:
{
"NamedConnectionType": "Ftp",
"ConnectionName": "FTP-APINamedConnection",
"Description": "FTP-NamedConnectionViaAPI",
"Protocol": "Ftp",
"Server": "22.23.245.27",
"Port": "21",
"Username": "ftpuser",
"Password": "ftppass",
"RemoteDirectory": "ftpdirectory"
}
Google Drive
Example:
POST http://localhost:8004/ContentGrabber/CreateNamedConnection?key=6de336b03c514a9e9309cd3027da4ff3
Body:
"NamedConnectionType": "GoogleDrive",
"ConnectionName": "GoogleDrive-APINamedConnection",
"Description": "GoogleDrive-NamedConnectionViaAPI",
"Credentials": "{\"google-drive\":\"credentails\"}",
"FolderName": "google-drive-folder"
Google Storage
Example:
POST http://localhost:8004/ContentGrabber/CreateNamedConnection?key=6de336b03c514a9e9309cd3027da4ff3
Body:
{
"NamedConnectionType": "GoogleStorage",
"ConnectionName": "GoogleStorage-APINamedConnection",
"Description": "GoogleStorage-NamedConnectionViaAPI",
"Credentials": "{\"google-storage\":\"credentials\"}",
"BucketName": "google-storage-bucket",
"FolderName": "google-storage-folder"
}
Sharepoint
Example:
POST http://localhost:8004/ContentGrabber/CreateNamedConnection?key=6de336b03c514a9e9309cd3027da4ff3
Body:
{
"NamedConnectionType": "SharePoint",
"ConnectionName": "SharePointAPINamedConnection",
"Description": "SharePoint-NamedConnectionViaAPI",
"ClientID": "myClientID",
"Client Secret": "myClientSecret",
"Tenant ID ": "MyTenantID",
"Site": "my-sitename",
"FolderName": "my-folder-name"
}
MySQL
Example:
POST http://localhost:8004/ContentGrabber/CreateNamedConnection?key=6de336b03c514a9e9309cd3027da4ff3
Body:
{
"NamedConnectionType": "MySql",
"ConnectionName": "MySql-APINamedConnection",
"Description": "MySql-NamedConnectionViaAPI",
"Protocol": "TcpIp",
"Server": "localhost",
"Username": "root",
"Password": "mysqlpass",
"Port": 3306,
"Database": "[AGENT_NAME]_[AGENT_ID]",
"IsCreateDatabase": true,
"IsDedicatedDatabase": true,
"Charset": "Default"
}
PostgreSQL
Example:
POST http://localhost:8004/ContentGrabber/CreateNamedConnection?key=6de336b03c514a9e9309cd3027da4ff3
Body:
{
"NamedConnectionType": "PostgreSql",
"ConnectionName": "PostgreSQL-APINamedConnection",
"Description": "PostgreSQL-NamedConnectionViaAPI",
"Username": "postgres",
"Password": "postgrespass",
"Server": "(local)",
"Port": "5432",
"Database": "[AGENT_NAME]_[AGENT_ID]",
"IsCreateDatabase": true,
"IsDedicatedDatabase": true
}
SFTP
Example:
POST http://localhost:8004/ContentGrabber/CreateNamedConnection?key=6de336b03c514a9e9309cd3027da4ff3
Body:
{
"NamedConnectionType": "Ftp",
"ConnectionName": "SFTP-APINamedConnection",
"Description": "SFTP-NamedConnectionViaAPI",
"Protocol": "Sftp",
"Server": "127.99.0.1",
"Port": "22",
"Username": "sftpuser",
"Password": "sftppass",
"RemoteDirectory": "sftpremoteDirectory"
}
SFTP (Private Key)
Example:
POST http://localhost:8004/ContentGrabber/CreateNamedConnection?key=6de336b03c514a9e9309cd3027da4ff3
Body:
{
"NamedConnectionType": "Ftp",
"ConnectionName": "SftpPrivateKey-APINamedConnection",
"Description": "SftpPrivateKey-NamedConnectionViaAPI",
"Protocol": "SftpPrivateKey",
"Server": "34.56.550.656",
"Port": "22",
"PrivateKey": "------BEGIN RSA PRIVATE KEY-----
myprivatekey
-----END RSA PRIVATE KEY-----",
"Username": "myusername",
"Password": "",
"RemoteDirectory": "myremote"
}
SQL Server
Example:
POST http://localhost:8004/ContentGrabber/CreateNamedConnection?key=6de336b03c514a9e9309cd3027da4ff3
Body:
{
"ConnectionName": "SqlServerNamedConnectionTest4",
"NamedConnectionType": "SqlServer",
"Username": "sa",
"Password": "mypass",
"Server": "(local)",
"Database": "TestDb",
"UseWindowsAuthentication": false,
"IsCreateDatabase": true,
"IsDedicatedDatabase": false,
"RecoveryModel": "Simple",
"UseSystemDefaultRecoveryModel": false,
"Description": "This is test connection"
}