
Scheduling
Agent control center provides an agent scheduling facility that enables you to automatically run your agents at predetermined time slots whenever you need it to run. This can be done every hour, every day, month, year and so on based on the requirement.
You can schedule agents using the Agent Control center scheduler.
Agent Schedule
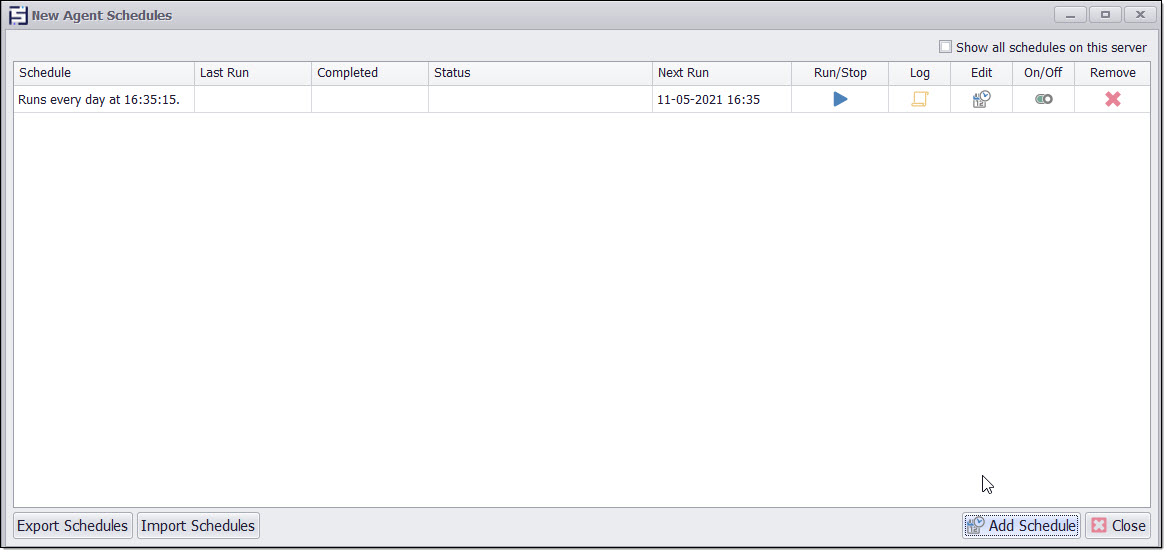
To view and add job schedules of an agent, select Job Schedules from the agent context menu in the Agent Repository.
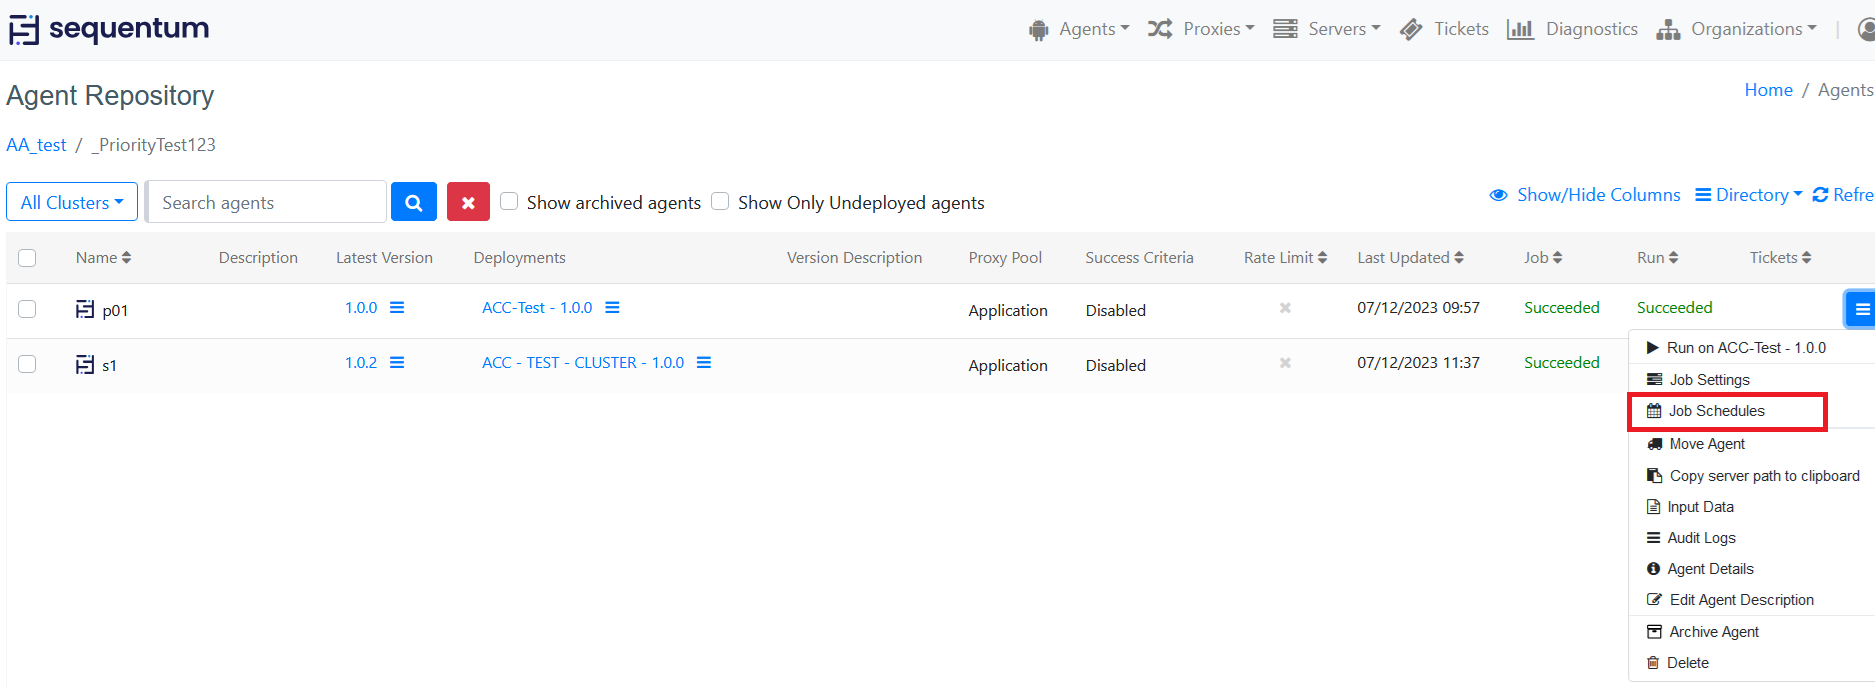
Job schedules page shows the details regarding the status of all schedules.

Click on Add Schedule button to add a New schedule.

Adding Job Schedule in ACC is possible in 2 different ways.
Basic Schedule
Advanced Schedule (Schedule using CRON)
Basic Schedule
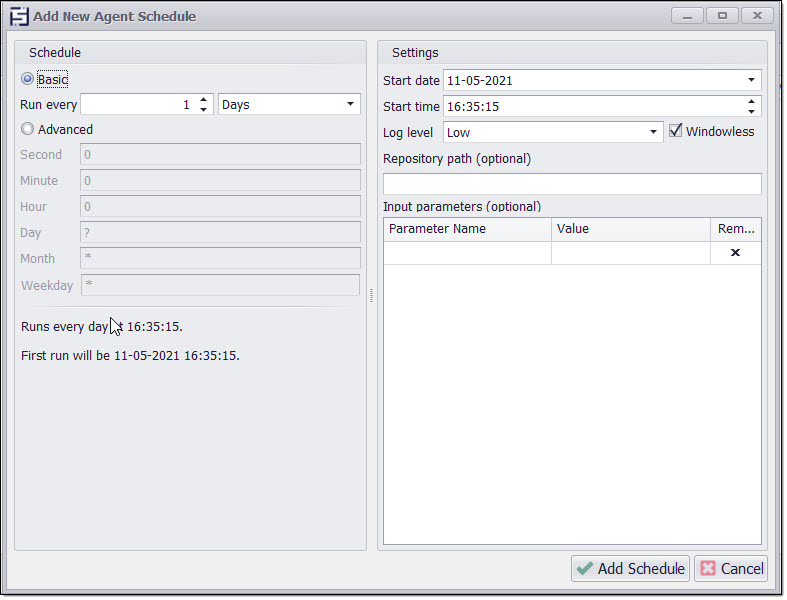
A basic schedule can run an agent in a specified number of days, hours, minutes or seconds.
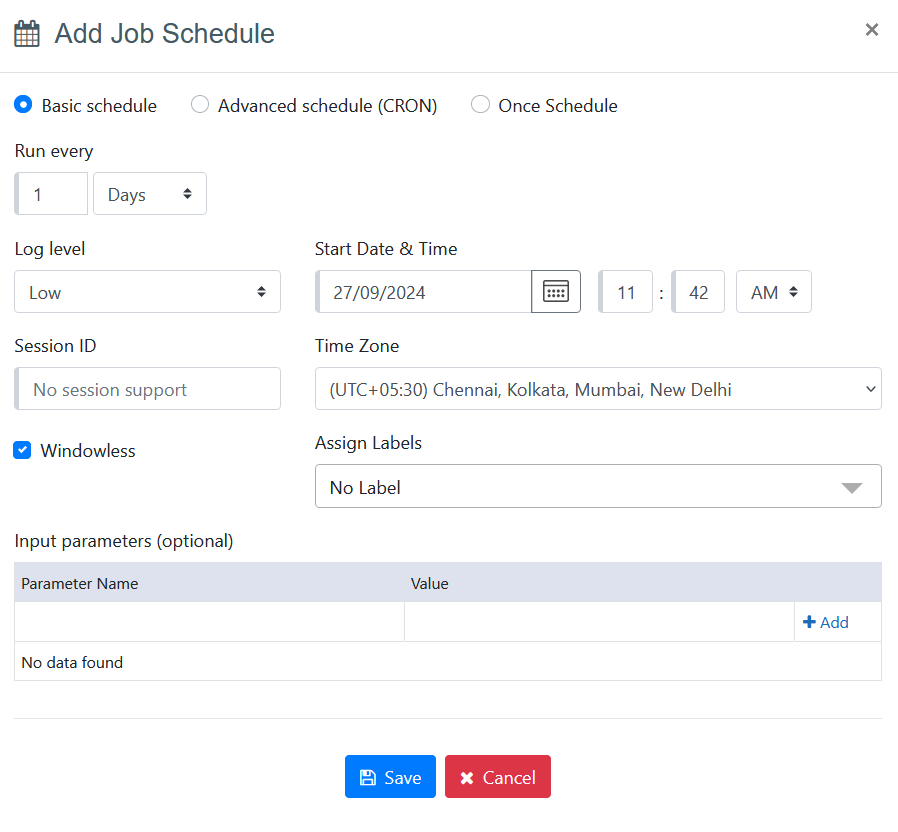
Start time and time zone specify the time an agent will run.
There is an option to schedule a job minutes wise, seconds wise, hours wise and days wise by selecting from the drop-down.

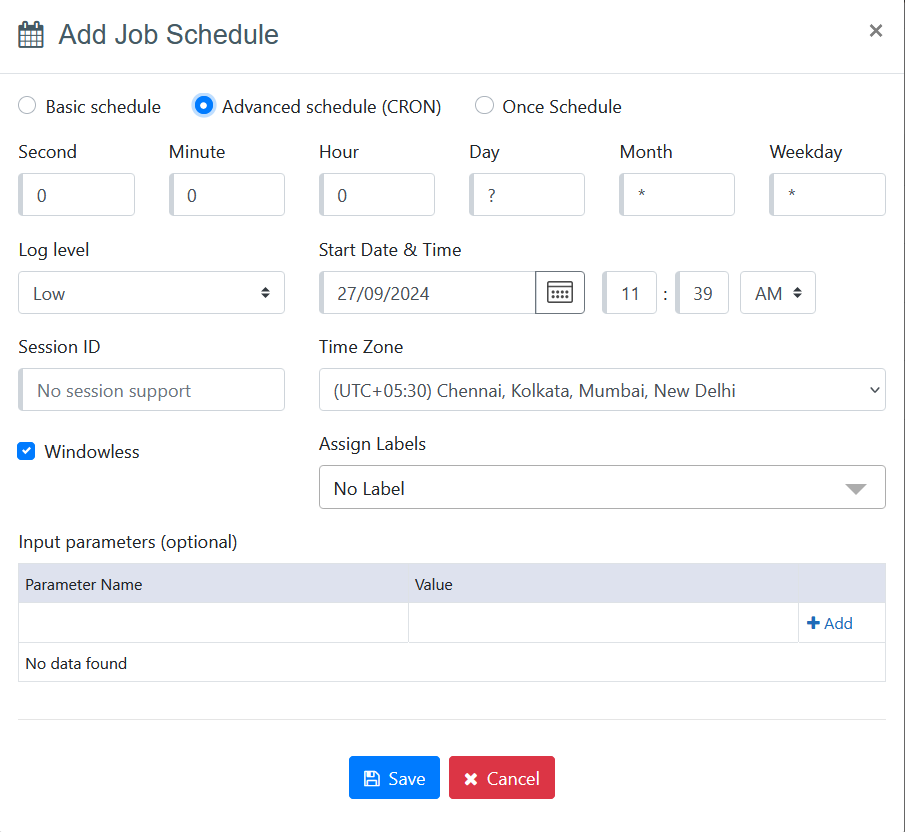
CRON Schedule
A CRON expression can be used to add a more complex schedule. Please see CRON expressions for more information.
CRON schedule provides a facility to schedule an agent on a particular weekday or a particular time frame of a day.
Log level is the log level used when the agent is run. The log level can be High, Medium, Low or None.
Session ID can be used to start multiple sessions of an agent e.g. if someone wants to run the agent in five sessions then 1-5/5 can be written in session ID and it will run the agent in five sessions with session IDs 1/5, 2/5, 3/5/, 4/5 and 5/5. The Session ID field will be disabled with a message “No session support” if the agent is not configured to support the sessions.
Input parameters can be used to provide input data for the agent. See Input Parameters for more information.
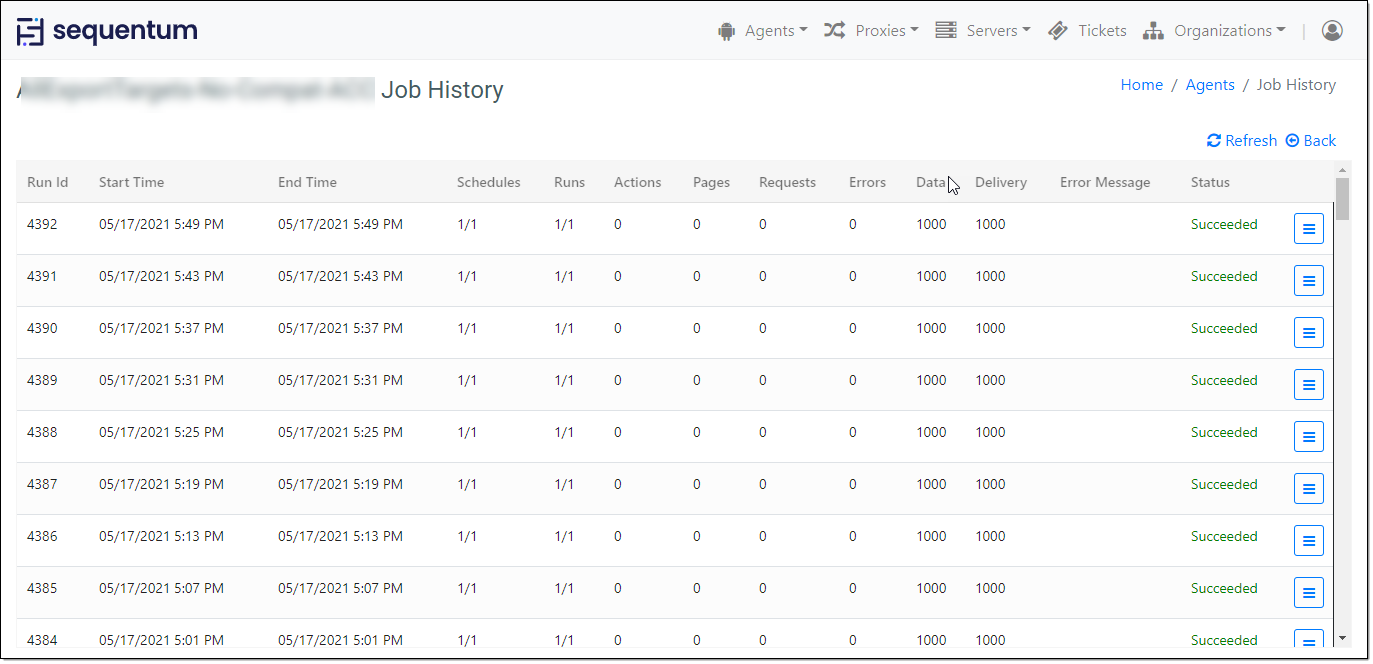
Job Schedules page shows the status of the agents run.
In order to view the Job Schedules page, Navigate to the Job Schedules of the context Menu of the Agent Repository page.

Note: In order to edit or disable the schedule you can do it using the options Edit/Disable from the context Menu of the Schedules page of ACC.

Multiple Schedules can be added for an agent, navigate to Agents -> Schedules -> Select Schedulers by Server or Cluster, select the agent you desired to view the Job History, click on Job History from the Context Menu in order to view the Job History details.
Note: When a scheduled job is in execution then the new schedules can’t be added for that job. One should wait for the completion of the job to add new schedules however the schedule can be edited for that job even when it is in execution.
Sequentum Enterprise provides an agent scheduling facility that enables you to automatically run your agents at predetermined time slots whenever you need it to run. This can be done every hour, every day, month, year and so on.
You can schedule agents using the Sequentum Enterprise scheduler or the Windows Task Scheduler. We recommend you use the Sequentum Enterprise scheduler for new agents since it provides more advanced features and integrates more tightly with the rest of the Sequentum Enterprise application. The Windows Task Scheduler integration is provided for backward compatibility. Please read the Windows Task Scheduler if you prefer to use this scheduler.
Schedule Lables
With labels, you can now categorize and describe schedules according to your specific requirements. This feature aims to provide flexibility in how you organize and identify schedules within the application.
To create a new label, click on "Add Labels" . A new label window will appear.

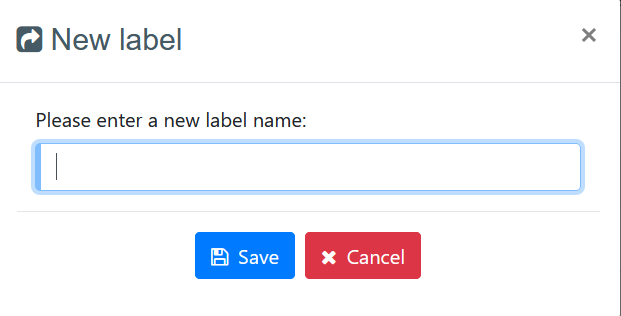
In the new label window, enter the name of the new label you want to create. Click on the "Save" button to confirm and create the label.
After creating labels, you can assign them to schedules.
Click on "Add Schedule" or "Edit Schedule" (if the schedule is already added).
In the scheduling window, look for an option dropdown labeled "Labels".
Click on this dropdown to view all the labels you have created.
Select one or more labels from the dropdown list that you want to assign to this particular schedule.
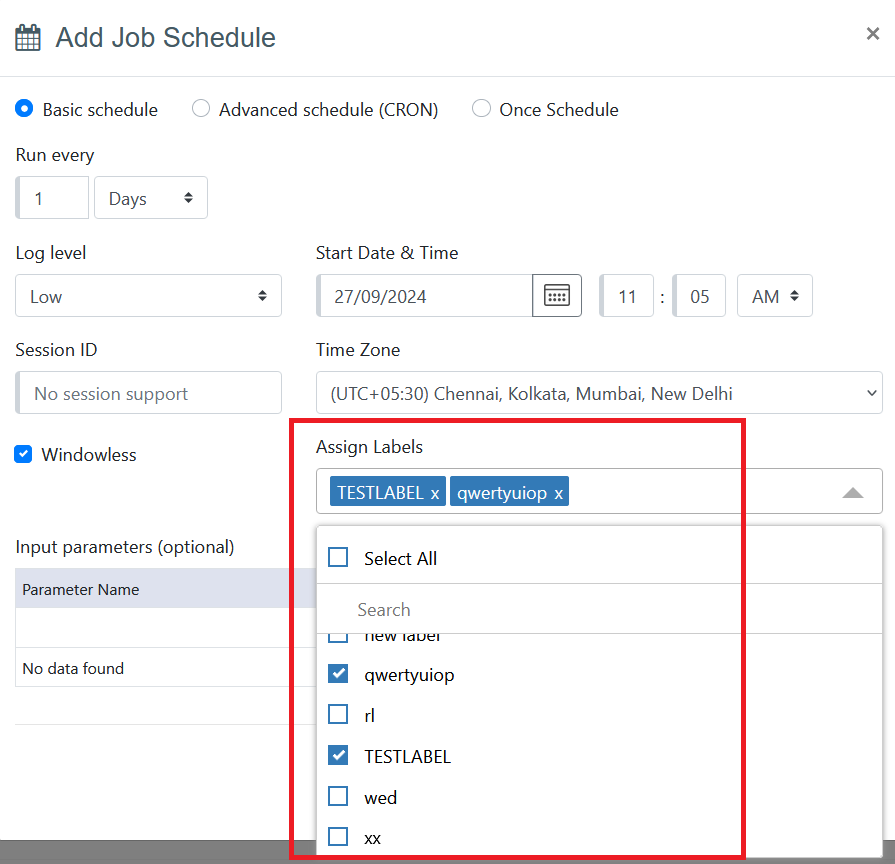
Once you have selected the labels, click on "Save" to apply the labels to the schedule. The schedule will now be associated with the selected labels.
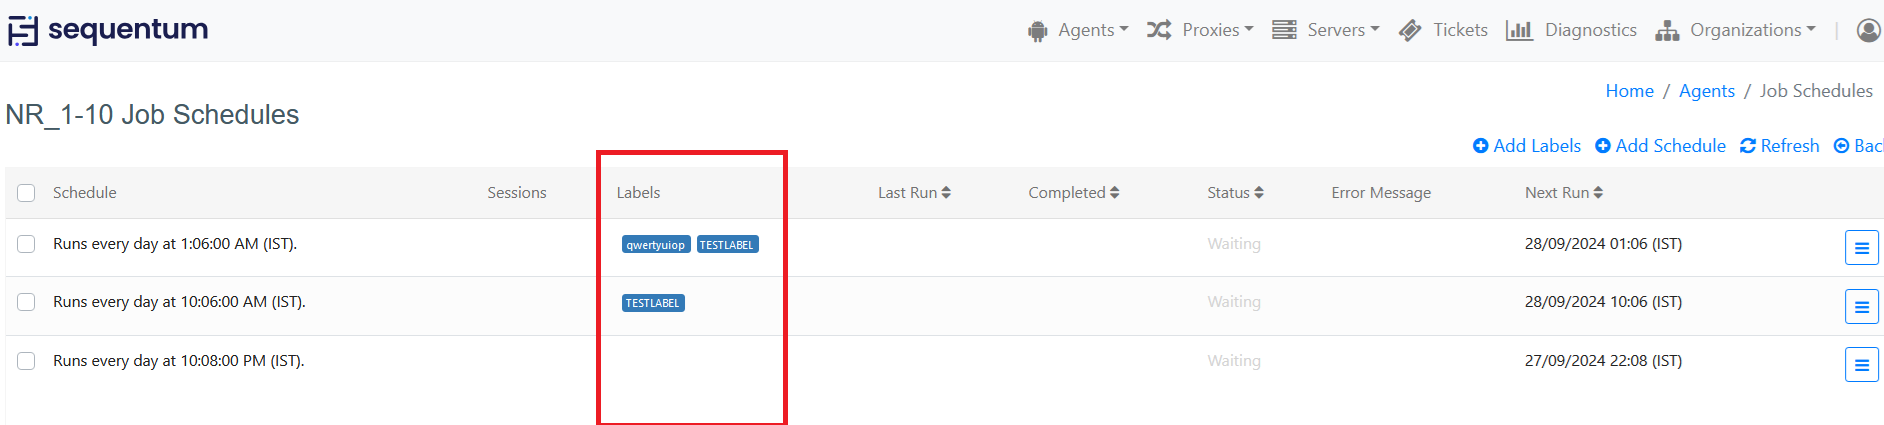
Assigned labels will be displayed in a dedicated column next to the schedule details in the interface. This column shows all labels associated with each schedule, making it easy to identify and categorize schedules based on their assigned labels.
Sequentum Enterprise Scheduler
If you have an agent loaded in Sequentum Enterprise, you will be able to access the Scheduling feature. From the Agent menu at the top of the Sequentum Enterprise application. Simply Click on the Schedules menu option to display the Scheduling window.
If one or more schedules already exists for the current agent, a Window listing all schedules will open, and you can edit existing schedules or add more schedules from there.
Cron Expressions
The Sequentum Enterprise Scheduler uses Cron expressions to define when the scheduler should run an agent. If you set up a basic schedule, Sequentum Enterprise will automatically convert the basic schedule into a Cron expression. When you edit an existing schedule, the Cron expression will always be shown, but you can simply switch back to the basic schedule if you don't want to work with Cron expressions.
Please read Cron Expressions for more information about Cron syntax.
Schedule via scripting
Schedules can also be added via scripting and it allows you to use the Cron schedules in your script to add a schedule. It can be added by using the below two methods:
Add Schedule script method allows you to add an agent schedule which can be a "once off" schedule which automatically gets deleted once the agent run has successfully completed. This type of scheduling method allows you to add temporary schedules which get removed on its own once the agent completes its execution successfully.
The sample script below can be used either in the Agent Initialization Scripts or in the Data Export Scripts.
var inputParameters = new Dictionary<string, string>();
inputParameters.Add("run_id_", "new");
var logFile = @"C:\logs\log.txt";
var cronExpression = "0 0 */4 * * *"; // Cron expression for schedule that runs a job every 4 hours.
var isDeleteScheduleOnSuccess = true; // One-off schedule
var sessionID = "1-5/5"; // The session to schedule. Otherwise, set to null.
// Adds a one-off schedule that will execute every 4 hours.
// The agent will run every 4 hours from now, and will delete the schedule if the agent
// completes successfully. Otherwise, the agent will run again after 4 hours.
args.AddSchedule(args.Agent, sessionID, cronExpression, inputParameters, DateTime.Now, isDeleteScheduleOnSuccess, AgentLogLevel.High, logFile, true);
2. The schedule can be specified as once off and will then be removed if the scheduled run completes successfully, fails or can be set to remove always. This is a more useful method and provides more flexibility to the user for adding a temporary schedule via scripting.
var inputParameters = new Dictionary<string, string>();
inputParameters.Add("run_id_", "new","run_method_", "ContinueAndRetryErrorsRefreshAgent");
var logFile = Path.Combine(args.Agent.DirectoryName, "Log", "ScheduledRun.log");
var isDeleteScheduleOnSuccess = true; // One-off schedule
var sessionID = ""; // The session to schedule. Otherwise, set to null.
// Cron expression for schedule that runs after 1 minute.
var nextSchedule = DateTime.Now.AddMinutes(1);
var cronExpression = string.Format("0 {0:mm} {0:HH} * * *",nextSchedule);
// Adds a one-off schedule that will execute 1 minute from now.
// The schedule will get deleted if the agent completes successfully.
args.AddSchedule(args.Agent, sessionID, cronExpression, inputParameters, DateTime.Now, isDeleteScheduleOnSuccess, AgentLogLevel.High, logFile,true);
Although both scripts are used for adding temporary schedules, the second script provides more flexibility as it covers all points for which a user would always want to get the temporary schedule removed.
Scheduler Windows Service
The Scheduler depends on the Sequentum Enterprise Windows service, and the service must be running for the scheduler to be operational. If the service is not running, a message will be displayed at the top of the Scheduler Windows with a link allowing you to start the service. We recommend you configure the service to start automatically when your computer starts.
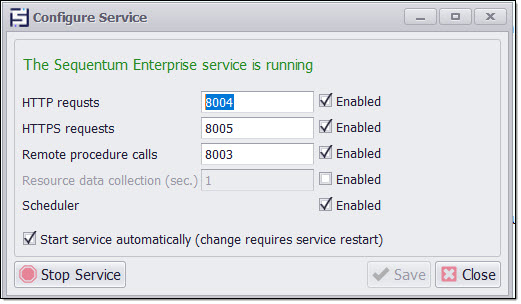
Make sure the Sequentum Scheduler is enabled before you start the service. Remote procedure calls and Web request are used by the API and are not required by the scheduler.
Daylight Saving Time and Scheduling
It is a best practice to avoid scheduling jobs near or during the transition hours of Daylight Savings Time (DST) in order to avoid some oddities which confuses some users. Otherwise, you should learn and clearly understand all the complexities and nuances involved.
Some users may be unaware that the rules could be different for different countries, states, provinces, localities. For example, the 2020 daylight savings time starts in the United States on March 8, but in Mexico on April 5. It is also important to understand that not only the dates are different for different locales, but the time of the shift is different as well. Many places shift at 2:00 am, but others shift time at 1:00 am, others at 3:00 am, and still others right at midnight.
Warning:
Be careful when setting fire times between the hours of the morning when daylight savings changes occur in your locale (for US locales, this would typically be the hour before and after 2:00 AM - because the time shift can cause a skip or a repeat depending on whether the time moves back or jumps forward.
Depending on a schedule type selected and other schedule parameters, the following scenarios are possible:
schedule may fire twice
schedule may be skipped and won’t fire
schedule fire time may be shifted by an hour
Simple Schedule and Advanced Schedule (CRON) each handle daylight savings time in their own way.
Simple Schedule: run every “N Seconds”, or “N Minutes”, or “N Hours”
If you use Simple Schedule and select Run every “N Seconds”, or “N Minutes”, or “N Hours”, it simply keeps firing every “N Seconds”, or “N Minutes”, or “N Hours”, and, as such, it has to do nothing in particular with respect to daylight savings time in order to "stay on schedule"
Regardless your Simple Schedule is firing every 30 seconds, or every 15 minutes, or every hour or every 24 hours it will continue to do so. However, the implication of this which confuses some users is that if your Simple Schedule is firing, for example, every 12 hours, before daylight savings event it may be firing at what appears to be 3:00 am and 3:00 pm, but after daylight savings 4:00 am and 4:00 pm or vice versa. So, your schedule appears to shift by an hour. This is because the day on which the daylight savings event occurs will not have 24 hours, but instead it will have 23 or 25 hours respectively. This is not a bug.
Simple Schedule: run every “N Days”
If you use Simple Schedule and select Run every “N Days”, it simply keeps firing every “N Days” at the exact same time you specified. For example, if you create a schedule to fire every day at 10:00 am, before and after daylight savings time switches it will continue to do so at 10:00 am.
However, there is one exception. If your schedule is scheduled to run between the hours of the morning when daylight savings changes occur, your schedule may shift by an hour during that day, and then reverts back to its original time.
For example, you are in the USA and you set up your Simple Schedule to run every 1 Day at 2:30 am. That means that it will run every day at 2:30 am with the exception of one day of the year when the Daylight Saving Time starts. In some parts of the USA the Daylight Saving Time starts on March 8, 2020 and at 2:00:00 am clocks were turned forward 1 hour to 3:00:00 am instead. That means that 2:30 am never occurs on that day and your schedule will run at 3:30 am that day only. So, your schedule appears to shift by an hour which may confuse some users. This is not a bug. The next day you schedule will revert 1 hour back to its original time of 2:30 am and will continue run at 2:30 am.
Due to the fact that the day on which the daylight savings event occurs will not have 24 hours, but instead it will have 23 or 25 hours, the actual time intervals between the runs of the schedule could be 23 or 25 hours respectively on those days instead of 24 hours. If it is important for you to keep a time interval between runs unchanged (24 hours) throughout the year, you should consider to set up your Simple Schedule to run every “24 Hours” instead of every “1 Day”.
Advanced Schedule (CRON)
Because Advanced Schedule (CRON) fire at given hours/minutes/seconds, they are subject to some oddities when DST transitions occur.
For example, if you create a schedule to fire every day at 10:00 am, before and after daylight savings time switches it will continue to do so at 10:00 am. However, due to the fact that the day on which the daylight savings event occurs will not have 24 hours, but instead it will have 23 or 25 hours, the actual time intervals between the runs of the schedule could be 23 or 25 hours respectively on those days instead of 24 hours.
There is one important point users must understand about Advanced Schedule (CRON) with respect to daylight savings. You should careful about creating schedules that fire near or during the transition hours of Daylight Savings Time. This critical window of time is between midnight and 3:00 am and depends on your locale. The reason is that depending on your schedule, and the particular daylight savings event, the schedule may be skipped or may fire twice, or may appear to not fire for an hour.
As an example, if you are in the USA, where the Daylight Saving Time starts on March 8, 2020 and at 2:00:00 am clocks were turned forward 1 hour to 3:00:00 am instead. If you have Advanced Schedule (CRON) that fires every day at 2:15 am, then on March 8, 2020 the schedule will be skipped, since, 2:15 am never occurs that day.
On November 1, 2020 the Daylight Saving Time ends and at 2:00:00 am clocks were turned back 1 hour to 1:00:00 am instead. If you have Advanced Schedule (CRON) that fires every day at 1:15 am, then on November 1, 2020 the schedule may run twice, since, 1:15 am occurs twice that day.
Cron Expressions
The Sequentum Enterprise Scheduler uses Cron expressions to define when the scheduler should run an agent. The scheduler supports standard Cron expressions with seconds, but without year, so the expressions consist of 6 parts.
Field Name | Mandatory | Allowed Values | Allowed Special Characters |
|---|---|---|---|
Seconds | Yes | 0-59 | , - * / |
Minutes | Yes | 0-59 | , - * / |
Hours | Yes | 0-23 | , - * / |
Day of Month | Yes | 1-31 | , - * ? / L W |
Month | Yes | 1-12 or JAN-DEC | , - * / |
Day of Week | Yes | 0-7 or SUN-SAT | , - * ? / L # |
Cron Expression Examples
Cron Expression | Meaning |
|---|---|
| Execute a job every second |
0 */5 * * * * | Execute a job every 5 minutes |
0 0 * * * * | Execute a job every hour |
0 0 12 * * * | Executes a job at 12 pm (noon) every day |
0 0/5 14,18 * * * | Executes a job every 5 minutes starting at 2 pm and ending at 2:55 pm, AND fire every 5 minutes starting at 6 pm and ending at 6:55 pm, every day |
0 0 0 * * 3 | Executes a job at midnight every Wednesday |
0 15 10 L * * | Executes a job at 10:15 am on the last day of every month |
0 15 10 15 * * | Executes a job at 10:15 am on the 15th day of every month |
0 0 0 1,2 * * | Executes a job at midnight of the 1st, 2nd day of each month |
0 15 10 * * 5#3 | Executes a job at 10:15 am on the third Friday of every month |
Special characters
Asterisk ( * ) - The asterisk indicates that the cron expression matches for all values of the field. E.g. using an asterisk in the 2nd field (minute) indicates every minute. * is a non-restricted character.
Slash ( / ) - Slashes describe increments of ranges. For example, 3-59/15 in the 2nd field (minutes) indicate the third minute of the hour and every 15 minutes thereafter. The form "*/..." is equivalent to the form "first-last/...", that is, an increment over the largest possible range of the field.
Comma (,) - Commas are used to separate items of a list. For example, using "1,2,5" in the 6th field (day of the week) means Mondays, Wednesdays, and Fridays.
Hyphen ( - ) - Hyphens define ranges. For example, using "MON-FRI" in the 6th field (day of the week) means all weekdays, but not weekends.
L - 'L' stands for "last". When used in the day-of-week field, it allows you to specify constructs such as "the last Friday" ("5L") of a given month. In the day-of-month field, it specifies the last day of the month.
W - The 'W' character is allowed for the day-of-month field. This character is used to specify the weekday (Monday-Friday) nearest the given day. As an example, if you were to specify "15W" as the value for the day-of-month field, the meaning is: "the nearest weekday to the 15th of the month." So, if the 15th is a Saturday, the job executes on Friday the 14th. If the 15th is a Sunday, the job executes on Monday the 16th. If the 15th is a Tuesday, then it executes on Tuesday the 15th. However, if you specify "1W" as the value for day-of-month, and the 1st is a Saturday, the job executes on Monday the 3rd, as it does not 'jump' over the boundary of a month's days. The 'W' character can be specified only when the day-of-month is a single day, not a range or list of days.
Hash ( # ) - '#' is allowed for the day-of-week field, and must be followed by a number between one and five. For example, 5#2 indicates "the second Friday" of a given month.
Question mark ( ? ) - It is used instead of '*' for leaving either day-of-month or day-of-week blank. ? is a restricted character.
Windows Task Scheduler
Sequentum Enterprise allows you to add tasks to the Windows Task Scheduler, as an alternative to the Sequentum Enterprise Scheduler.
If you have an Agent loaded in Sequentum Enterprise, you will be able to access the Scheduling feature. From the Tools menu at the top of the Sequentum Enterprise application. Simply Click on the Add Schedule menu option in the Deprecated options group to display the Scheduling window.
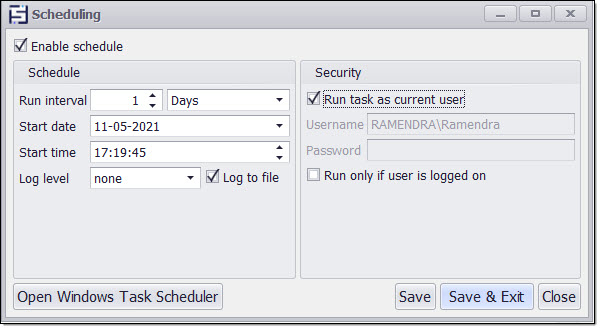
Sequentum Enterprise's Scheduling Window
The Enable schedule checkbox allows you to easily turn scheduling on or off for the agent. Click the Enable schedule checkbox so you can begin configuring the schedule details.
The Run interval fields allow you to select how often your agent will run. This can be set in seconds, minutes, hours or days. Start date and Start time enable to preciously control from when the agent will start executing.
The log feature allows you to record when the agent runs. The log level setting you choose (i.e. none, Low, Medium, High) will determine the level of detail that is recorded about each run. For instance, you may want to track all error messages or issues encountered by the running agent so you might choose "High". However, be mindful that a high level of logging may slow the Agent performance.
Sequentum Enterprise also includes some scheduling security features. If you don't want your Agent to run when you aren't logged on to your computer, simply click the Run only if user is logged on the checkbox.
If you don't set the option Run only if user is logged on, the agent will run in a special Windows desktop session that does not allow input focus. This is a Windows security feature and cannot be circumvented. This may cause JavaScript on some websites to work incorrectly and the agent may not be able to extract data correctly. This scenario is very rare, but if it occurs you will need to set the scheduling option Run only if user is logged on and make sure the user is always logged on to the computer when the agent is running.
When using the option Run task as current user you may get an error Access Denied. To avoid this error you can run Sequentum Enterprise as an administrator or you can clear the option Run task as current user and enter your username and password instead. To run Sequentum Enterprise Enterprise as an administrator, right click on the Sequentum Enterprise Enterprise program file or shortcut and select Run as administrator from the context menu.
Using Windows Task Scheduler
Should you want to manage multiple agents from one place or are looking for additional controls, or calendar functionality, you can utilize the Windows Task Scheduler instead. To do this, simply click on the Open Windows Scheduler button on the Scheduling window.
Windows Task Scheduler is used to create and manage common tasks that your computer will carry out automatically at the times you specify. In this instance, the task will be to run a web data extraction agent(s) at the scheduled time(s) you require.
To setup a basic agent schedule task, simply go to the Action menu and select the Basic Task Wizard. This wizard will lead you through the required steps to setup your schedule task.
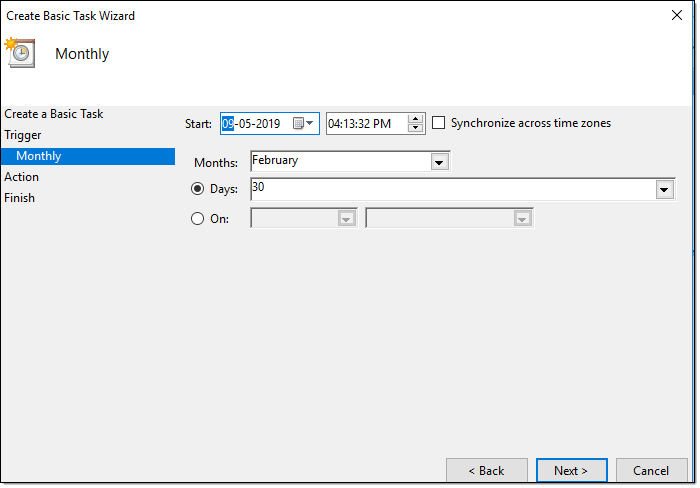
Windows Task Scheduler - Using the Basic Task Wizard
For more advanced scheduling options or settings such as multiple task actions or triggers, use the Create Task command in the Actions menu.
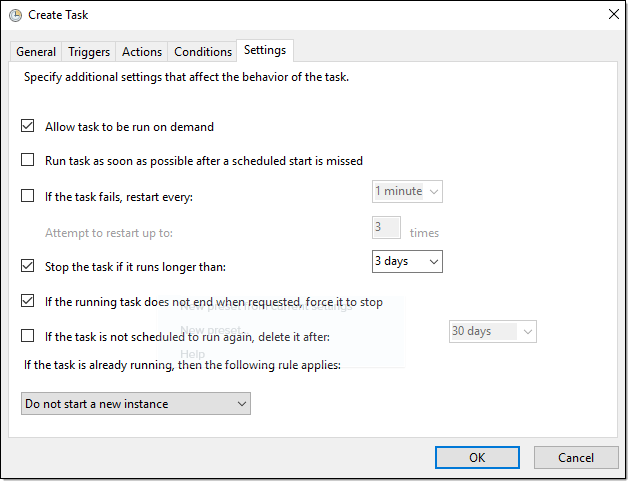
Windows Task Scheduler - Create Task Command (for advanced options)
Tasks are stored in folders in the Task Scheduler Library. To view or perform an operation on an individual task, select it in the Task Scheduler Library and click on a command in the Action menu.