
Error Logs and Notifications
You can use error notifications to warn when an agent encounters an error so that the administrator can take appropriate action. The administrator can use the logs to get more information about the errors.
Error Notifications
Notifications are email messages that are sent to a specific email address when certain conditions occur. The notification configuration screen is available by clicking the Agent Settings > Email Notifications menu.
This agent sends email notifications if it encounters any critical errors
An email notification can be sent when an agent finishes, but never during agent execution or when debugging an agent. You can choose to send email notifications when one or more of the below conditions are met:
Condition | Description |
|---|---|
Always send notifications when an agent completes a run | A notification email will always be sent when the agent finishes, whether an error occurs or not. |
Send notification on critical errors | An email notification will be sent when critical errors occur. A critical error will appear colored red on the log screen. These critical errors include page load errors and also situations where required web selections are missing from a web page. |
Send notification on unsuccessful data extraction | A notification email will be sent when an agent run doesn't meet defined success criteria. |
Send notification on successful data extraction | A notification email will be sent when an agent run meets defined success criteria. The notification is sent to Success email addresses if specified. |
A script can trigger notifications by calling one of the below methods on the script parameter object:
Method | Description |
|---|---|
void Notify(bool alwaysNotify = true) | Triggers notification at the end of agent execution. If alwaysNotify is set to False, this method only triggers a notification if you configure the agent to Send notification on critical errors (see above). |
void Notify(string message, bool alwaysNotify = false) | Triggers notification at the end of an agent execution, and adds a message to the notification email. If alwaysNotify is set to False, this method only triggers a notification if you configure the agent to Send notification on critical errors (see above). |
Success Criteria
A success criterion can be defined to tell an agent when it should consider an agent run successful. For example, success criteria could include that the agent must load a minimum number of pages.
Define criteria for a successful agent run.
The Success Criteria window can be opened from the Data menu in the Sequentum Enterprise editor, or from the Notification window.
The following four success criteria can be defined:
Criteria | Description |
|---|---|
Min. page loads | The minimum number of pages the agent must load. |
Min. data count | The minimum number of data entries the agent must extract. A data entry is defined by setting the option 'Increase data count' on any command. The data count is increased every time a command with 'Increase data count' is executed. |
Max. page errors | The maximum number of page errors allowed |
Min. export rows | It defines the minimum number of rows exported to a file. A minimum number should be specified here so that it can prevent exporting blank files. |
Success criteria can be specified as absolute numbers or as a percentage of the value from the last successful agent run. For example, if Min. page loads are set to 95%, it means that the agent must load a minimum of 95% of the number of pages it loaded at the last successful run. A Percentage criterion always succeeds if the agent has not been successfully run before.
Success criteria can be used to decide when email notifications are sent but are also used in Change Tracking to decide when it's safe to mark data as deleted.
Advanced Success Criteria
The Advanced Success Criteria is categorized into 3 types namely Null Percentage Criteria, Bucket Criteria & Captured Value Criteria.
The Advanced Success Criteria can be set through the Success Criteria Window under the Data menu as shown in the screenshot below:
Null Percentage Criteria
By default, the Advanced Success Criteria section will show the Null Percentage Criteria tab which lists the Export Table and its columns with the Sample Data and additional two columns namely Enabled and Maximum Allowed Null Percentage for each of the corresponding output columns.
Enabled: Shows the checkbox for enabling and disabling the Null Percentage Criteria for an output column.
Maximum Allowed Null Percentage - This shows the value entered for the allowed percentage of null data in an output column. The Maximum null percentage value must be between 0 to 100 and if it is set to empty, it is considered to be 0%.
The Null Percentage criteria can be applied to any of the export tables and to any of the output columns in the export table. We can set the maximum percent of null data allowed for any particular column in the export table as shown below:
At the end of the export, the null percentage is calculated against the data in the exported table for each column for which the null percentage criteria is enabled and if the exported data percentage is not within the limit of the set null percentage, then the agent will fail with status as completed unsuccessfully.
For example, if you want to apply a 5% null value check on a particular output column, say ItemBrand then, just enable the Null Percentage Criteria for that column and add 5 under the Maximum Allowed Null Percentage column. The null % will be checked against the ItemBrand output column in the exported data and if the ItemBrand data has more than 5 % of null values, it will fail with status as completed unsuccessfully and if the ItemBrand column has exactly 5% or fewer null values, then it will complete successfully.
The Null Percentage Criteria shown in the above screenshot is enabled for all the columns and the Maximum Allowed Null Percentage is also set for some of the columns. Zero(0) is set for StoreName, TopCategory is left empty and the SubCategoryBreadcrumb is set to 100, and so on.
StoreName column: The Maximum Allowed Null Percentage is set to zero (0) which means that if any row has a null value for the StoreName column, then the agent will fail with the status as completed Unsuccessfully as per the Null Percentage Criteria, which does not allow any null data in for the StoreName output column.
TopCategory column: The Maximum Allowed Null Percentage is set to empty which is considered as 0 which means that if any row has a null value for that particular field, then the agent will get failed with completed Unsuccessfully status due to Null Percentage Criteria.
SubCategoryBreadcrumb column: The Maximum Allowed Null Percentage is set to 100, which means for the SubCategoryBreadcrumb column, the Advance Success Criteria will always pass and the agent will always complete successfully.
ItemBrand column: The Maximum Allowed Null Percentage is set to 5 which means if there are more than 5% rows that have null values for the ItemBrand field then the agent will fail with completed Unsuccessfully status and if ItemBrand has null values equal to 5% or less, then the agent will complete with Success status.
Note: Please note that the Null Percentage Criteria is checked at the export time and is applied sequentially which means if the criteria check fails for the first output column ( The first column which has the Null Percentage Criteria enabled) then it will not check the criteria for the remaining columns and if the first column criteria are met, only then the check will move to the next column as so on.
In the above example, if the null percentage criteria meet for the initial columns and do not meet the criteria for the ItemBrand column, then the agent will fail with a sample log message as below:
Thes log messages show that the agent failed due to the NullPercentage Criteria with the name of the captured command/field i.e. ItemBrand , the actual percentage of null data i.e.11.64 and the maximum allowed null percentage value i.e. 5.
Captured Value Criteria
The Advanced Success Criteria Windows has a Captured Value Criteria tab which lists the Export Table and its columns with the Sample Data and additional four columns namely Enabled, Capture Value Table, Capture Value Column, and Minimum Allowed Export Percentage (0 to 100).
Enabled: Shows the checkbox for enabling and disabling the Captured Value Criteria.
Capture Value Table - The name of the internal table that will be used in this criteria. You must select this table.
Capture Value Column - The column of the internal table whose value will be used in this criteria to calculate the exported percentage. You must select this column. If the value of this column is empty, then criteria will fail.
Minimum Allowed Export Percentage (0 to 100) - This shows the value entered for the minimum allowed percentage of exported data for the capture value column. The Minimum Allowed Export percentage value must be between 0 to 100 and if it is set to empty, it is considered to be 100%.
In this criterion, the data in the exported table is compared against a particular captured value in the internal table.
The Captured Value Criteria can be enabled for any exported table. At the end of the export, the data in the exported table is compared against the value of a specific column in the internal table. If the data in the exported table is less than the captured value percentage, then the agent will fail with the status Completed Unsuccessfully due to the Captured Value % criteria. You can see the errors by going through the error logs of the agent.
The Captured Value success criteria are used in real-time based on counts on the site, for example, if 95 stores are listed today, the run must export 95 stores, and if 104 stores are listed today, the run must export 104 stores, else the agent should fail with proper details recorded in the log.
A sample Captured Value Criteria is shown above which selects an internal table as store_list in the Capture Value Table and Total Count in JSON column in the Capture Value Column and the Minimum Allowed Export Percentage is kept empty which means 100% criteria will be applied. The Minimum allowed export % will be checked against the exported data and if the exported data are less than the Minimum allowed export % i.e. 100 then it will fail with status as completed unsuccessfully and if the exported data is equal to the minimum allowed export % or more than the Minimum allowed export % then it will complete successfully.
Captured Value Criteria checks the data against every captured value of a specific column which is selected in the “Capture Value Column” and for every failed Captured value it logs the error message with relevant details in the log as shown below:
These Log messages indicate that the agent failed due to the Captured Value Criteria and the count of the exported rows i.e. 85 and 95, and for which particular Captured value i.e. 95 and 104, and also shows the allowed null percentage i.e. 100, and the exported percentage i.e 89.47 and 90.38 due to which the agent failed to meet the Captured value success criteria and the agent Completed Unsuccessfully.
Note - Please note that if the selected Capture value contains a String value like “one”,” two” or “three” etc. instead of an integer value like 1,2,3,4, etc. then the String value will be ignored and the Captured Value Criteria will not be applied on the exported data.
Bucket Criteria
The Advanced Success Criteria Windows has the Bucket Criteria tab which lists the Export Table and its columns with the Sample Data and additional five columns namely Enabled, Bucket Table, Unique Bucket Name Column, Bucket Count Column, and Minimum Percentage Criteria Column.
Enabled: Shows the checkbox for enabling and disabling the Bucket Value Criteria.
Bucket Table -The name of the internal table whose values will be used in this criteria. The Table name can not be empty.
Unique Bucket Name Column -The column of the internal table will be used to display the Bucket name. The value of this column should be unique.
Bucket Count Column -The column of the internal table whose value will be used in this criteria to calculate the exported percentage. You must select this column. If the value of this column is empty, it is considered to be equivalent to the exported data.
Minimum Allowed Export Percentage (0 to 100) - This shows the value entered for the minimum allowed percentage of exported data for the Bucket column. The Minimum Allowed Export percentage value must be between 0 to 100 and if it is set to empty, it is considered to be 100%. You must select this column.
The bucket criteria is similar to the captured value criteria. In this criterion, the captured value is replaced with a value from the input table. Here's an example of the input table.
As opposed to Captured Value Criteria, the Count and Percentage can be set for each category in the input file itself as shown below:
At the end of the export, the data in the exported table is calculated against the count and percentage columns in the input file. If the data count in the exported table is less than the allowed percentage, then the agent will fail with the status as completed unsuccessfully. You can see the errors by going through the error logs of the agent.
The Bucket success criteria is used to define buckets such as the number of cars in a category and validate at the end of the run that each special bucket meets the success criteria.
For example, if there are 16 cars listed for ILX_Acura, then the run must export 20% of the cars which is defined in the Make_percentage field, if there are 100 cars listed for 745e_BMW, the run must export 100% of cars which is defined in the Make_percentage field i.e. empty, else the agent should fail with proper details recorded in the log.
In the above example, the InputList internal table is used as the Bucket Table and Make_Model_Unique column is used as the Unique Bucket Name Column and Make_Count_1 column is used as the Bucket Count Column and Make_Percent_1 is used as the Minimum Percentage Criteria Column.
The Bucket Criteria checks the data against every Bucket exported data count and percentage which is selected in the Bucket Count Column and Minimum Percentage Criteria Column for every failed Bucket Criteria it logs the error message with relevant details in the log as shown below:
The Advanced Success Criteria can be used along with the Success Criteria or if you want, you can just use the Advance Success Criteria or just the basic Success Criteria.
The Success Criteria, basic or advanced both the Success Criteria and Advanced Success Criteria are applied during the export process. Sequentum Enterprise will apply the criteria in a specific order when both the criteria are added in an agent.
Please note that while applying the Advanced Bucket Criteria or Advanced Captured Value Criteria along with the basic Success Criteria, if the agent doesn't meet the basic Success Criteria then, SE will not evaluate the Advanced Bucket Criteria or Advanced Captured Value Criteria added in the agent. However, if the basic Success Criteria are met, then SE will further evaluate the Advanced Bucket Criteria or Advanced Captured Value Criteria added in the agent.
However, in case of the Null Percentage Criteria both the criteria (Basic and Advanced) are evaluated. Even if the agent doesn't meet the basic Success Criteria, the check continues to evaluate the Advanced Null Percentage Criteria. Similarly, if the basic Success Criteria are met, SE will further evaluates the Advanced Null Percentage Criteria.
Email Troubleshooting
Most email servers are very restrictive in regard to who or what is allowed to send emails. If you are getting an error when sending emails from Sequentum Enterprise, then it's most likely a problem with the configuration of your account. Here is a list of things you can check:
Make sure your email account is configured to allow you to send emails from the email address specified in From email address.
Make sure your username and password are correct, and that login to your account is not restricted. Use another email client or your web browser to login to your email account to make sure you can login.
Use SSL if required. Most online services, such as Gmail, require SSL.
Use the correct port. Gmail uses port 587 for example.
Most online services, such as Gmail, don't allow just any application to login to your email account. Many online services will have a special option to allow any application to login to your account, and you must set this option to allow Sequentum Enterprise to login. In Gmail you can set this option on the following page:
https://www.google.com/settings/security/lesssecureappsRefer to this article to troubleshoot SMTP connection to Yahoo Mail
Error Logs
Logging is set to low by default when running an agent, and high by default when debugging an agent. Debug logging is always saved to a database table, but runtime logging can be saved to a database table or a text file.
The database table supports the log viewer in the Sequentum Enterprise editor, which you can access by clicking the View Log button in either the Run ribbon menu or the Debug ribbon menu.
Sequentum Enterprise supports 3 log levels, High, Medium and Low. The High log level will log everything. The Medium log level will log errors and warnings, and the Low log level will only log errors.
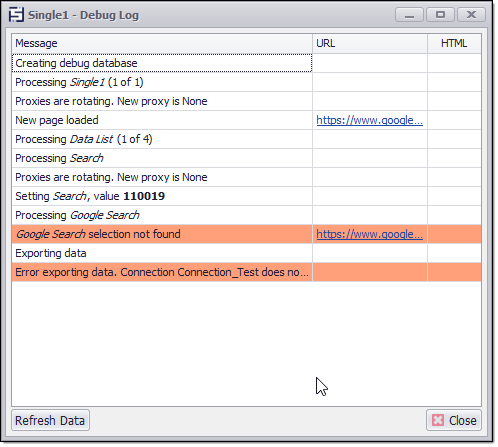
The critical errors in this log are red in color
URL Column
The URL column in the Agent Debug Log window shows links to all web pages that the agent has processed, and you can double-click on any of these links to open the web page in your default browser. For any failures on data extraction, this is an easy way to open the web page and check if the web page layout is different from the expected layout.
NOTICE
Double-clicking on a link to a sub-page only works if the website allows direct links into the sub-pages. Many websites don't allow direct links into sub-pages without going through other pages first. Read below to learn how to directly access the HTML for sub-pages.
HTML Column
If a website does not allow direct links into sub-pages, you can configure an agent to save the entire HTML of all processed pages. When you configure the agent to log all HTML, the HTML column will contain buttons that you can click to view the raw HTML in the Sequentum Enterprise HTML viewer. The raw HTML does not include style sheets and other support files that are necessary to render a complete web page properly, but it will often show you enough information to determine what is causing an error (such as a CAPTCHA page).
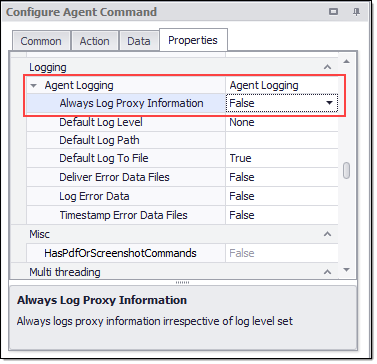
Always Log Proxy Information
If you use multiple proxy servers for anonymization purposes, it might be useful to log information about the proxy servers. This would help you find information about what proxy server is used for a specific page load or request, how your proxies rotate and diagnose potentials issues.
The Always Log Proxy Information property can be set to true to always log proxy information irrespective of a log level set.
Read the following article IP Blocking & Proxy Servers about proxy servers and why you may want to use them.
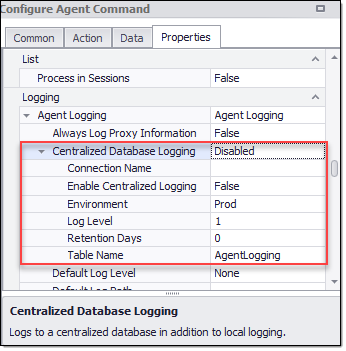
Centralized Database Logging
Centralized database logging is used to add the agent logs to a centralized database in addition to the agent file logging. By default, the Centralized Database Logging is disabled and needs a Database connection to write the agent logs to a database. This feature is only supported for SQL Server, MySQL and PostgreSQL database.
Connection Name: Database connection for centralized agent logging. The Database connection name is used from the connection created through the Application Settings → Managed Named Connections. The database connection can also be uploaded to the Agent Control Center for Centralized logging.
Enable Centralized Logging: By default, this property is set to False, and setting it to True enables the centralized agent logging.
Environment: Only logging from agents running in the specified environment will be written to the centralized database. The default value is set to Prod which means logs written to a centralized database when the agent runs with the Prod environment.
Log Level: It is used to specify the maximum level of logging written to the centralized database. The default value is set to 1 which is used to write only error logs on a centralized database. Below are the log level values which is used for logging :1: Default value is set to 1 which is used to write only error logs on a centralized database2: Log Level value set to 2 is used to write only Warning and Error logs(One additional Info message will also be there in Log Level = 2 where it will add Agent started information.) on a centralized database.3: Log Level value set to 3 is used to write Info, Waning, and Errors logs.
Retention Days: It is used to specify the number of days to keep logging for an agent. The latest log for each agent is never deleted. The default value is set to 0 which means only the latest 1-day log will be retained.
Table Name: Database table name for centralized agent logging.
Log Files Export Target
In order to export the log files to your desired location, you can add a Log Files export target by going to the Data → Export Targets Configuration and select the Log Files Export Target and it will be added at the end of the Export Targets Pipeline.
By default it has the agent Logs folder path and can be modified to add the desired custom path and the log files will start getting copied to the new custom path.
You can also choose to Cleanup the Logs folder every time the agent runs when using the Log Files export target so that you do not the same files present over two locations.
Log Files: It is used to export the log files and Log HTML Files on either the default folder or a defined custom folder.
Log Folder: It is used to export the log files on either the default folder or a defined custom folder.
Log HTML Folder: It is used to export the log HTML files on either the default folder or a defined custom folder.
Log Path: It is used to export the log files to a particular path. There are 3 ways to export the log files for all agents using this one common setting which is available under the Application Settings→Folders.
Agent Folder: This is the default option that is used to deliver the log files in the individual agent’s Log folder for every agent.
Custom Folder: It is used to export the log files to the custom path which is defined by the user for all the agents.
Agent Group Folder: It is used to export the log files in the Agents folder for all the agents.
Cleanup: The cleanup logs option is set to False/Unchecked by default. Setting the Cleanup option to True will delete all the existing log files from the default log folder every time the agent starts.
Cleanup Log Folders: This property is set to "Application" by default which behaves as per the setting applied on the Application Settings→Folder→Log Path →Cleanup
The cleanup logs option is set to False/Unchecked by default under the Application Settings, however, if the same is to True then all the log files from the default log folder will get deleted every time the agent starts.