
Building Your First Agent
The following diagram shows the key steps for building a web data extraction agent. We provide links for other topics which will explain each of these steps in further detail.
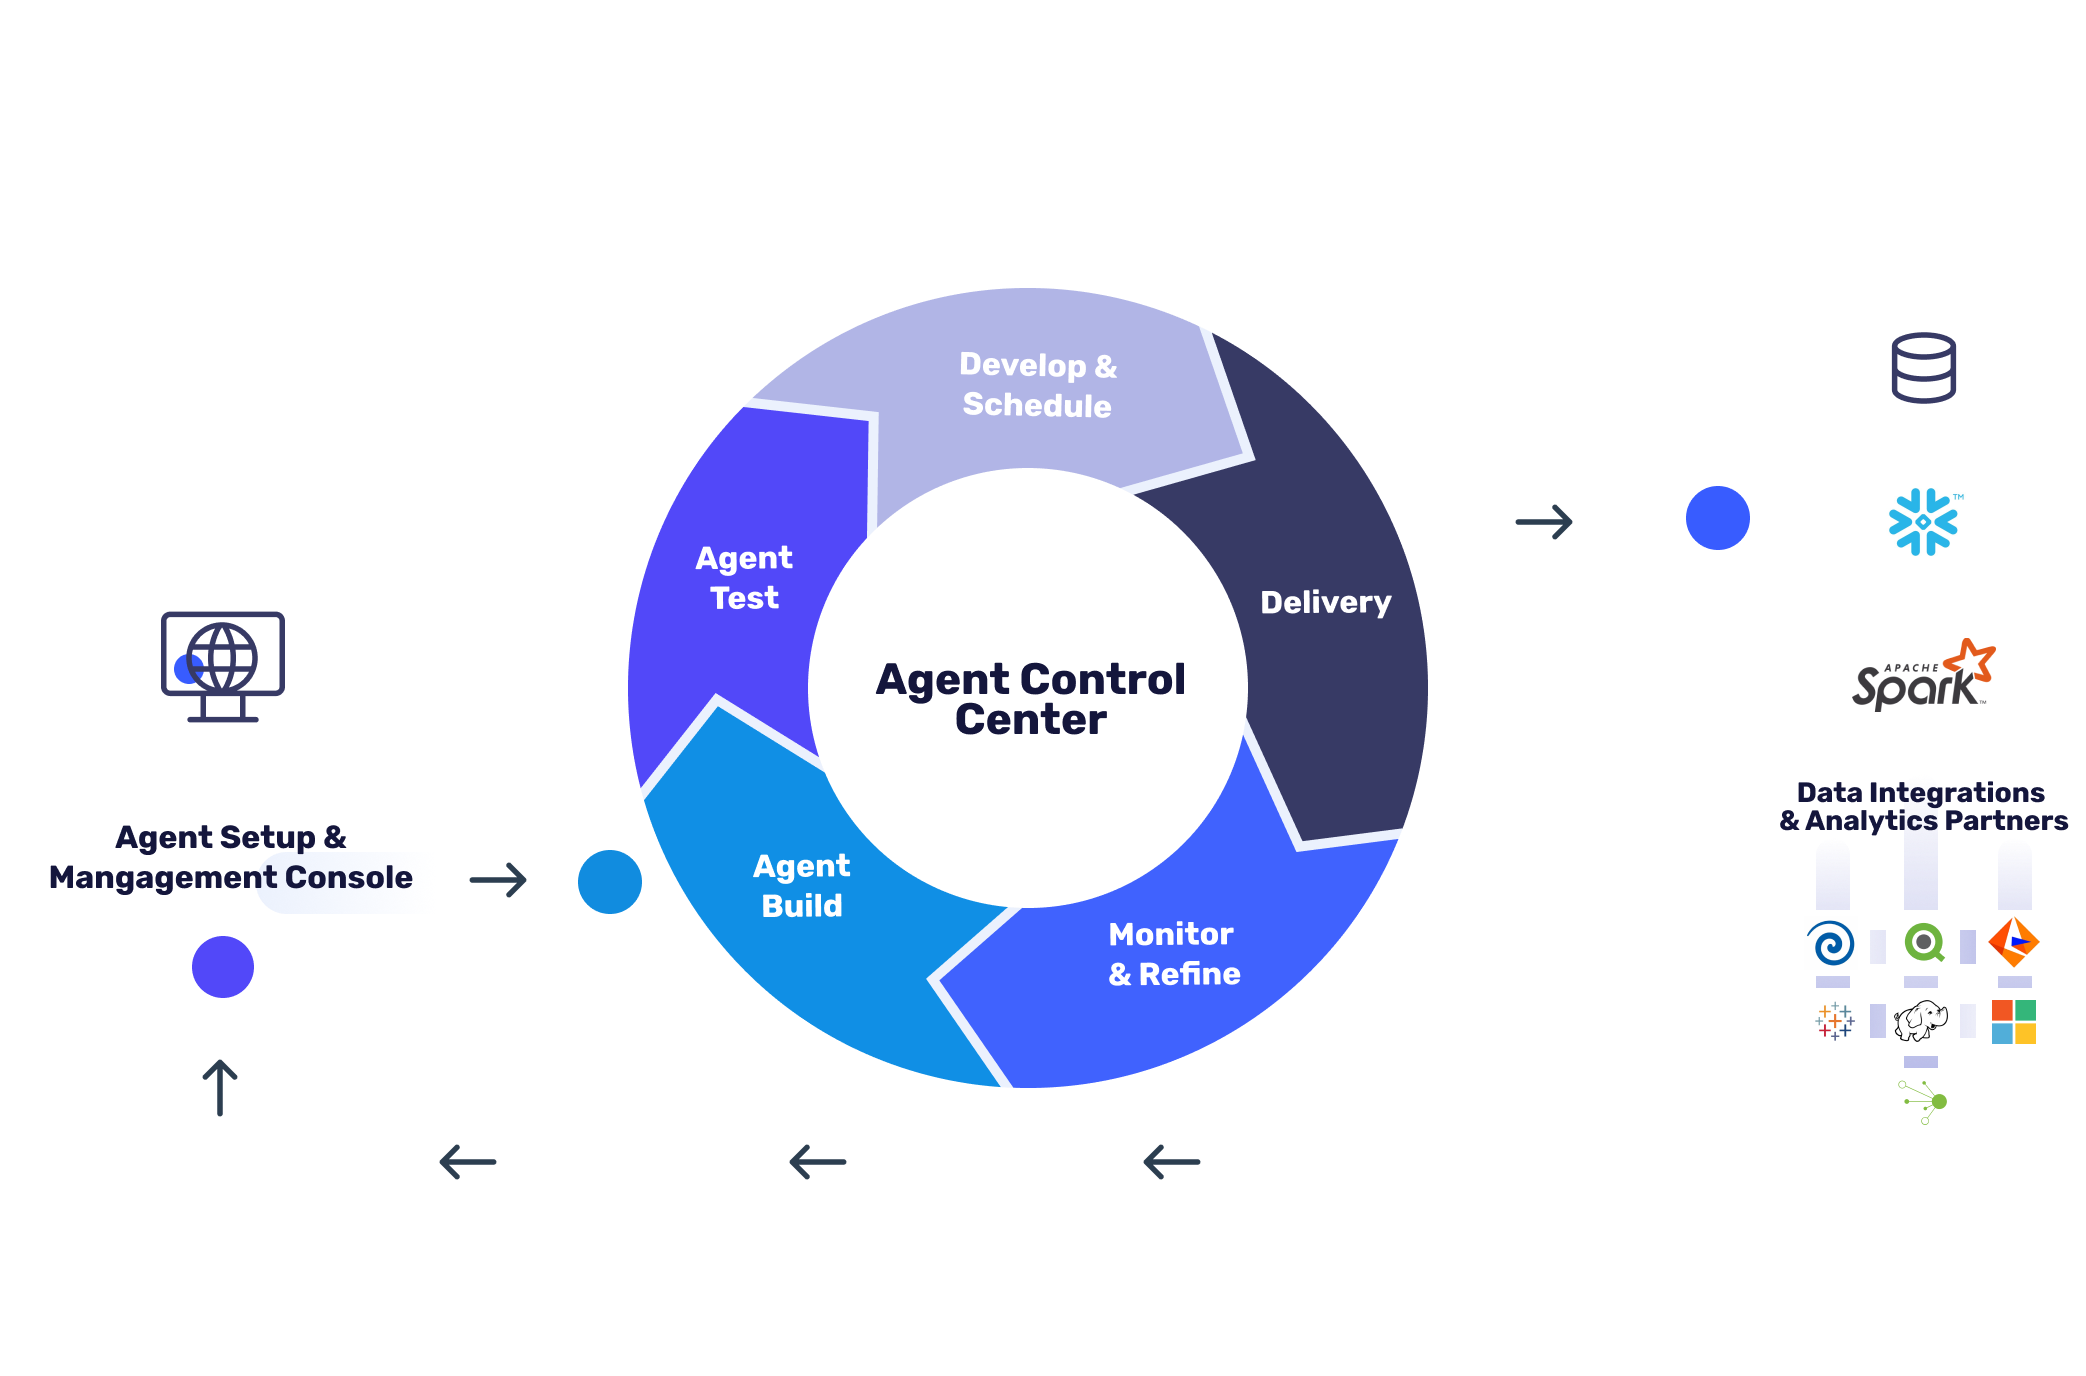
Basic web data extraction agent creation process
In this section, we cover the identification of data elements on your target website and create a web data extraction agent. We'll work through each of the above steps with examples that match common web data extraction usage, so you can get comfortable building your own agents.
We cover these topics in this section:
After you get comfortable creating an agent, you can learn more about the Sequentum Enterprise Editor.
Choosing a Start URL
The Start URL is the place where you begin data collection and corresponds to the starting point of your web data extraction agent.
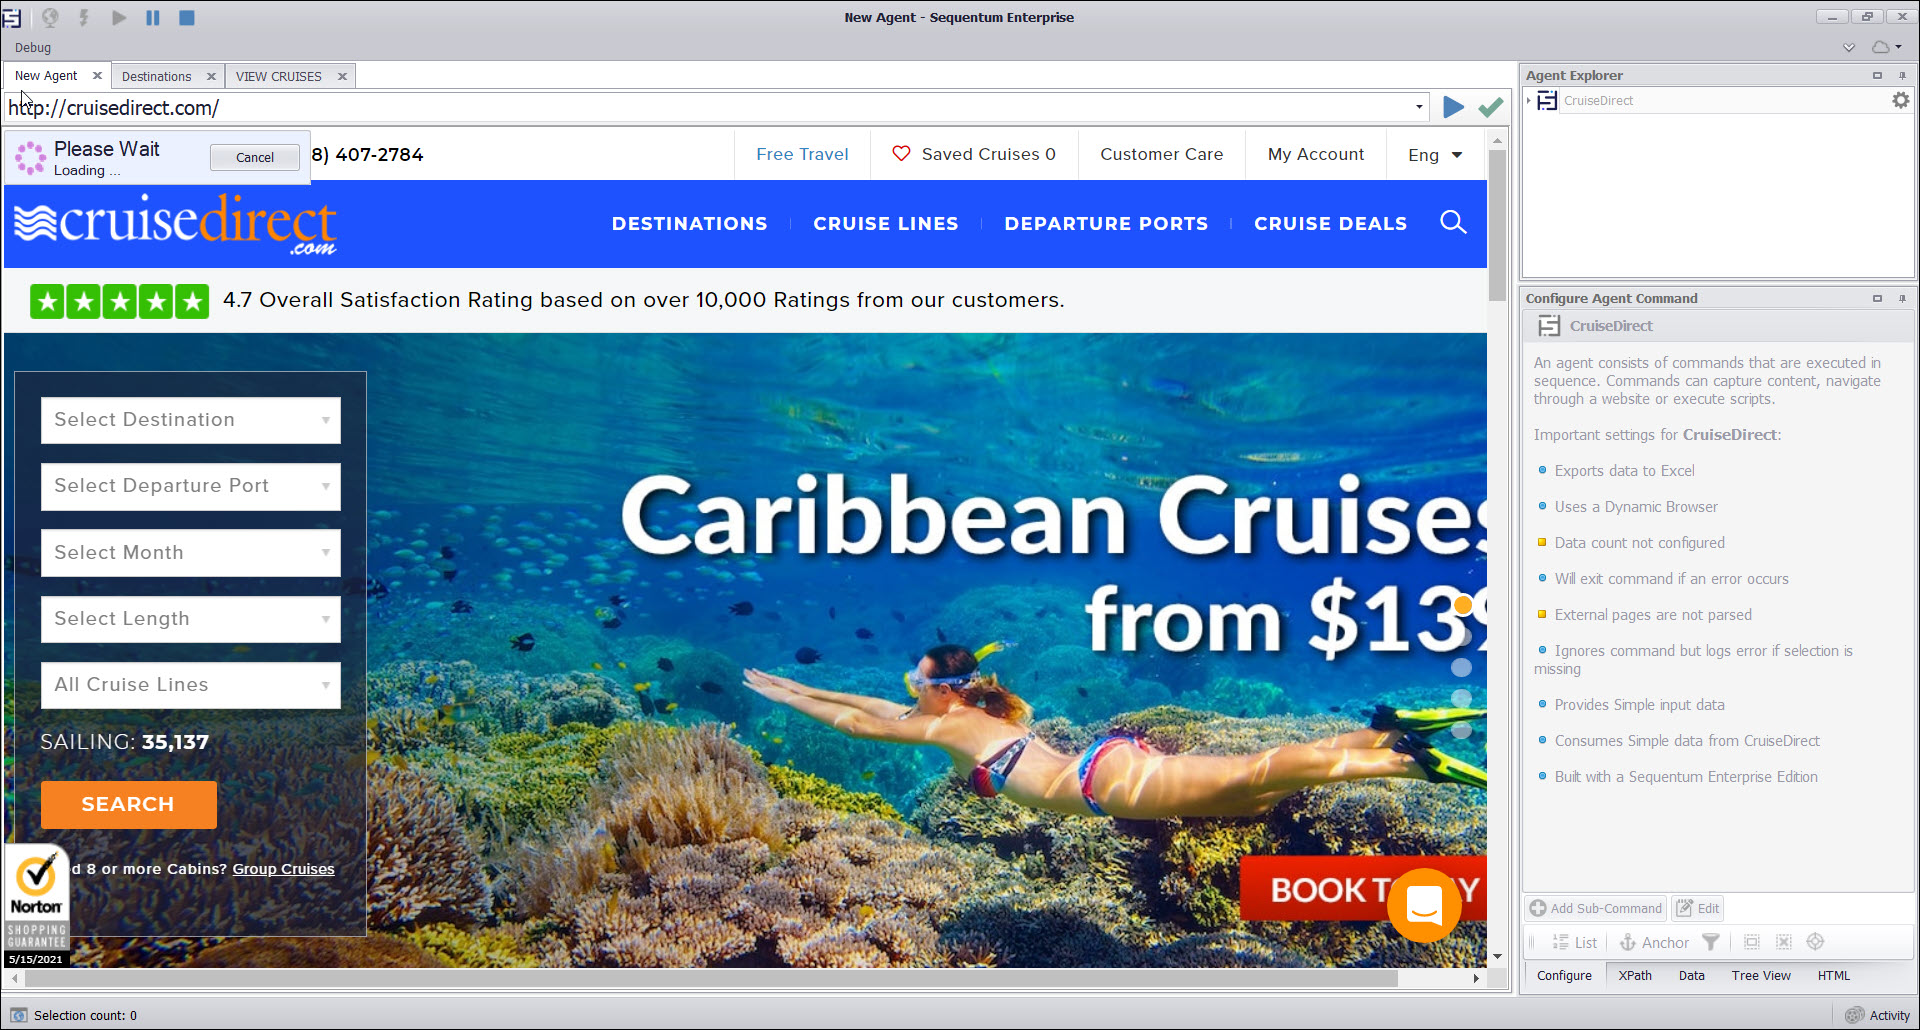
In the following sections, we'll use the Cruise Direct website for our example.
Note: In this example, we start from the Cruise Direct home page, however, if the data you require is not located on a website home page, you can start the agent from a website sub-page. This approach will make the agent more efficient, so it’s worth taking the time to be more specific.
We start by pasting the start web page URL from the target website (
http://www.cruisedirect.com) into the Sequentum Enterprise Address Bar.
2. Next, click the Blue Play button to load the Cruise Direct home page.
Note: you can also press the Enter key to load the Cruise Direct home page.
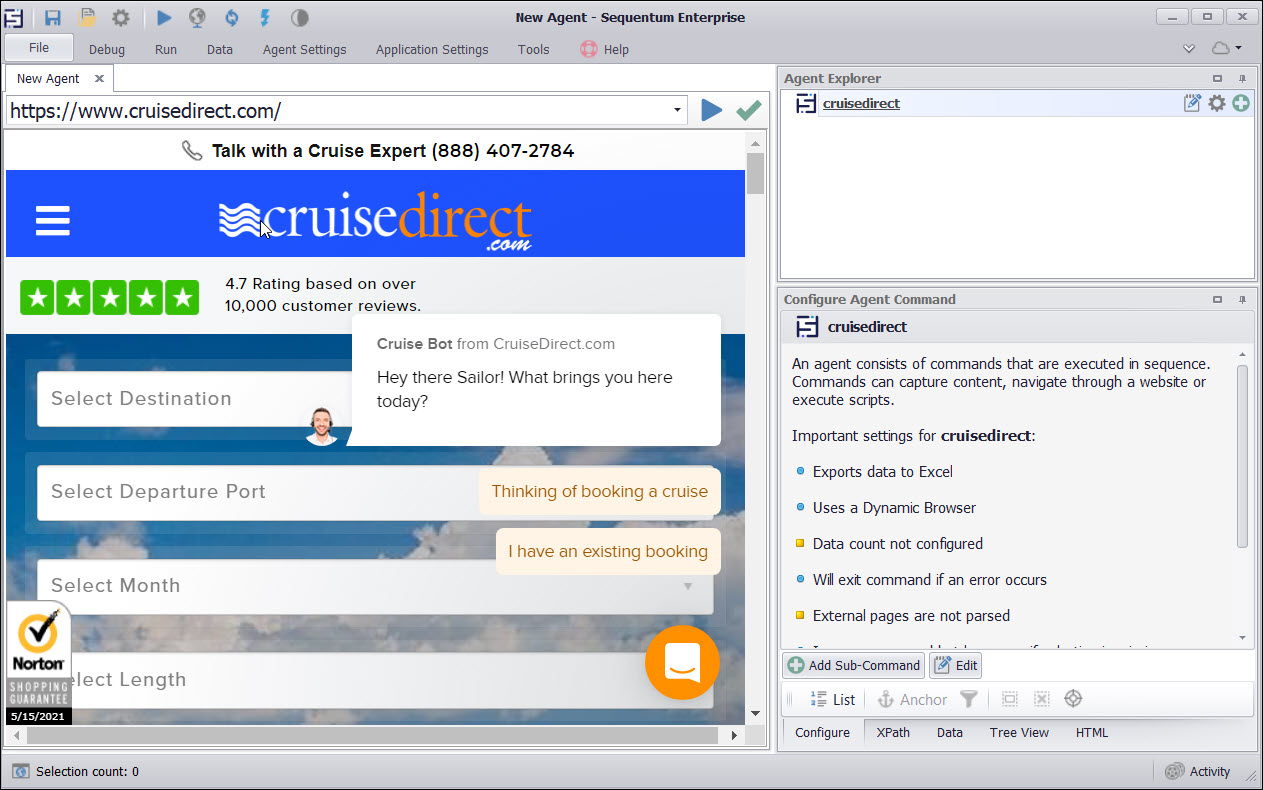
Sequentum Enterprise with Cruise Direct home page loaded
In the next section, Select the Content to Capture, we will continue to use the Cruise Direct website data for our example.
Select the Content to Capture
In the previous section, we selected our Start URL and loaded the web page into Sequentum Enterprise. Next, you can select the data you want to capture and start building your web data extraction agent. In our Cruise Direct example, we plan to search for available cruise vacations and then extract details about each cruise.
First, we need to perform a search to retrieve the data for the available cruises. For this, we select the
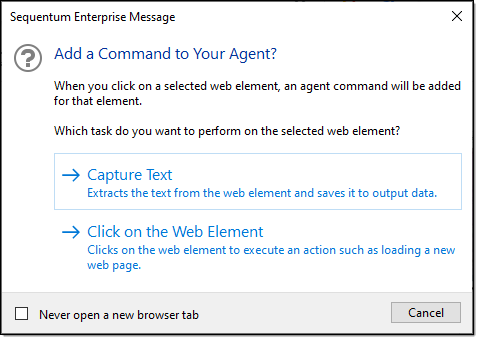
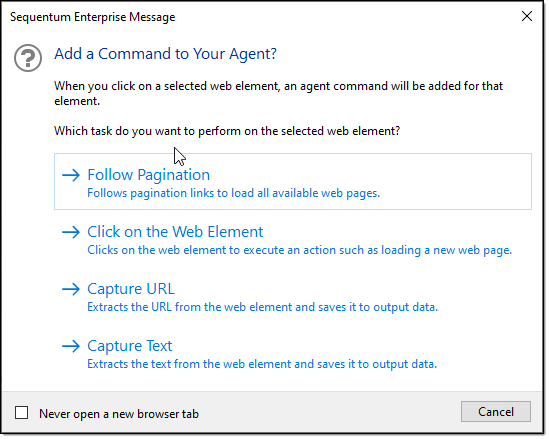
Blue Search button(Find your perfect cruise) element with the mouse, then click on it again to open the Sequentum Enterprise Message window.
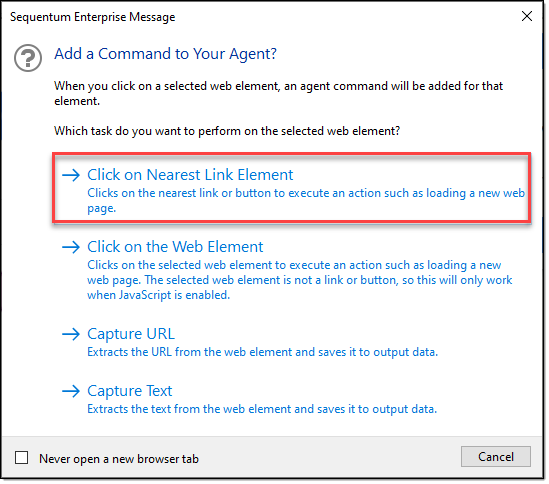
Sequentum Enterprise Message Window
Note: If the search button is not visible on the Agent window try to increase the window size and load the web page again.
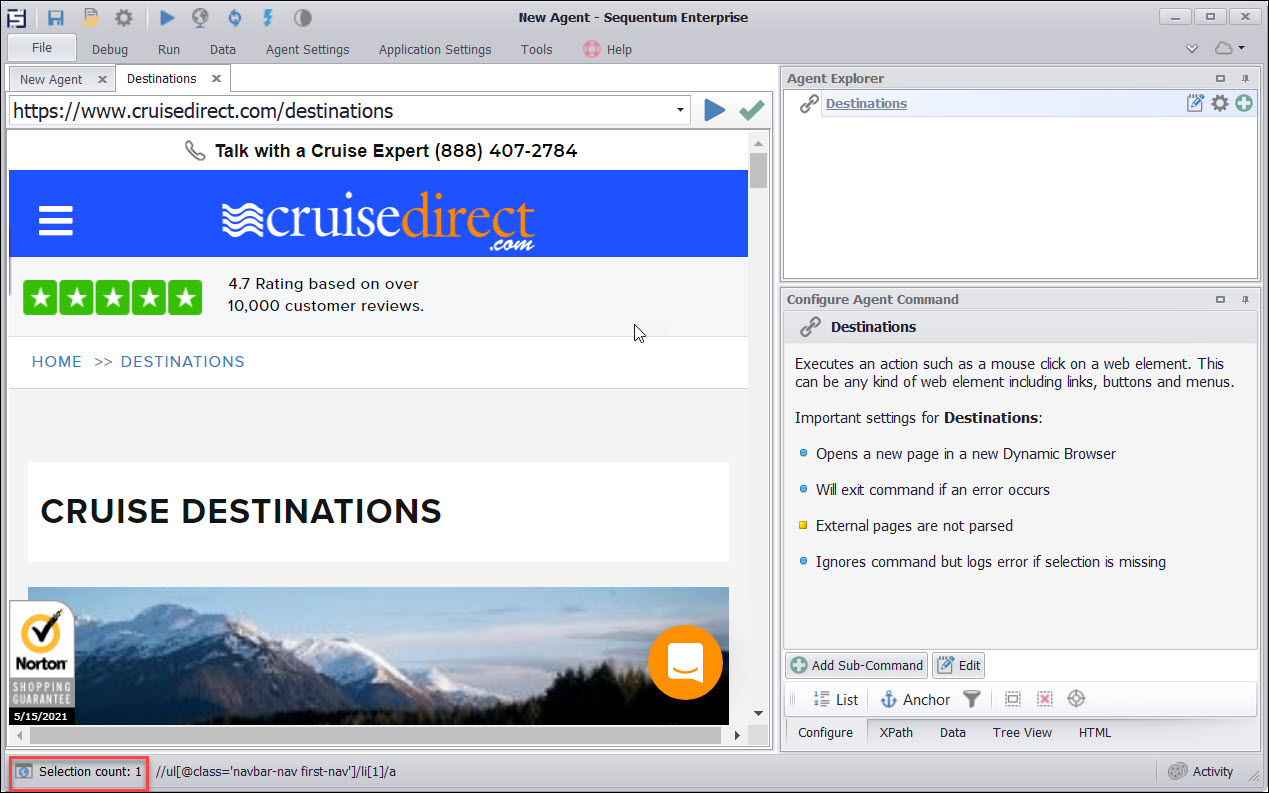
2. From the message window, we choose the Click On The Web Element option to add a new Navigate Link command to the agent that will execute the search and display the search results on a new web page. Notice that Sequentum Enterprise has added our first command to the Agent Explorer.

Agent Explorer with new Search command linked to the new Search page
3. We are now ready to add commands to our agent to extract the cruise data. As we have multiple number of Cruises available in the same page, we will use a
List to simplify the extraction for us. To capture the data element, move your mouse precisely over the data element you want until you see the data-capture box around it. Select the cruise name by clicking it once. Now in order to create a list you can scroll down and find the next cruise name that is available. Now press shift and click the new cruise name with the mouse which will select all the existing cruise names available.
First Cruise Line data element selected within Sequentum Enterprise
4. You will be able to see the count of the number of elements selected at the bottom left corner of the Agent window (highlighted in above image too). You can also check if the data is selected correctly by checking the Tree View in the Agent Explorer.
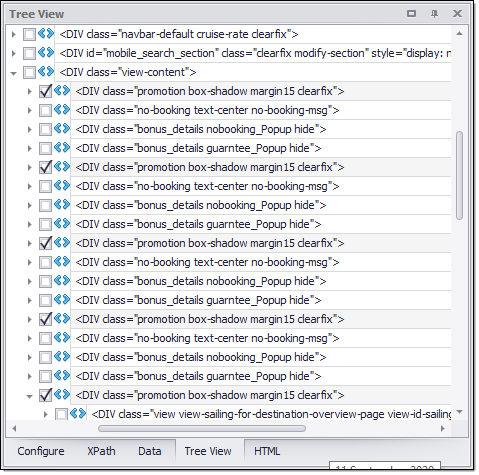
Check the Selected Elements from the Tree View in Agent Explorer
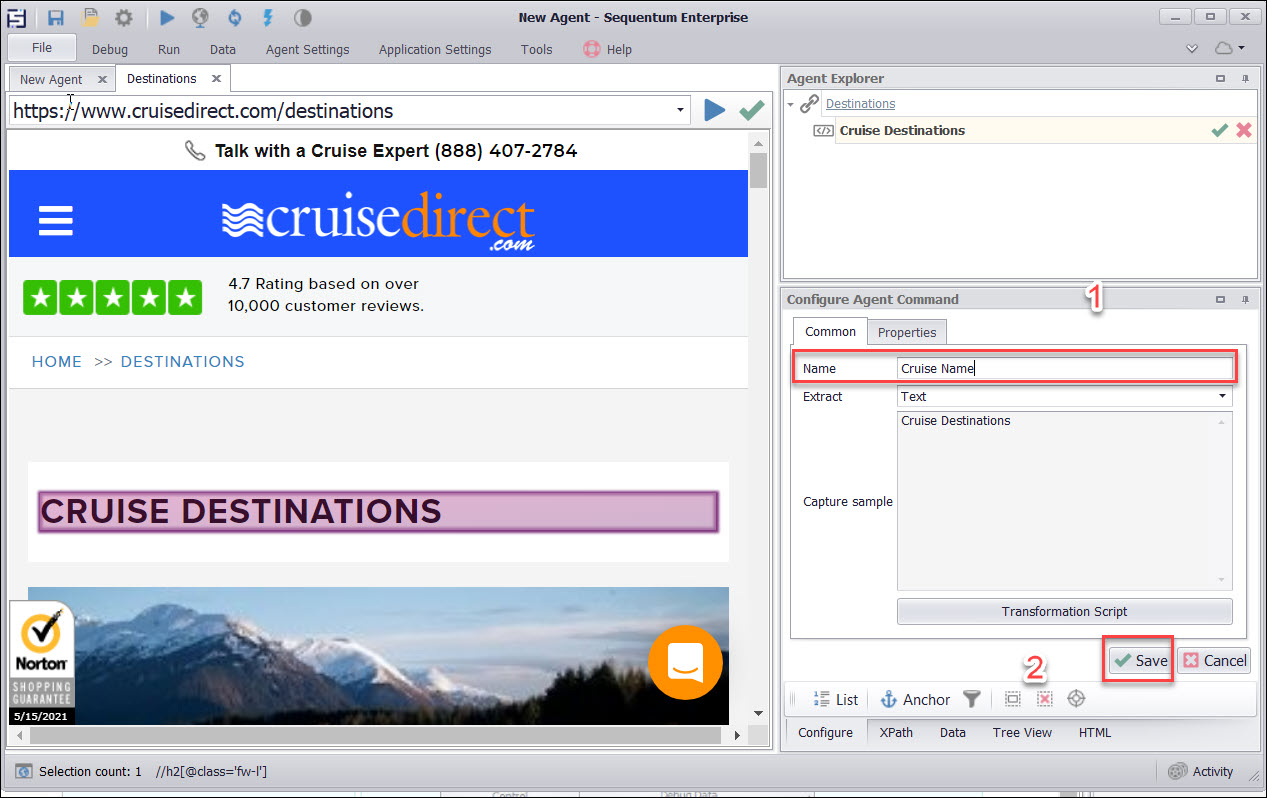
5. Now, Click on the cruise name again after selection, a dialogue box will appear that will ask to add the command to your agent. Then click the Capture Text option in order to create a list of all the cruise names.
Click On Capture Text to capture the data
6. Edit the web element names to rename and change the default names set by Sequentum Enterprise. Click on "Edit" in Configure Agent Command to do the same.
Second Cruise Line data element selected while in List selection mode
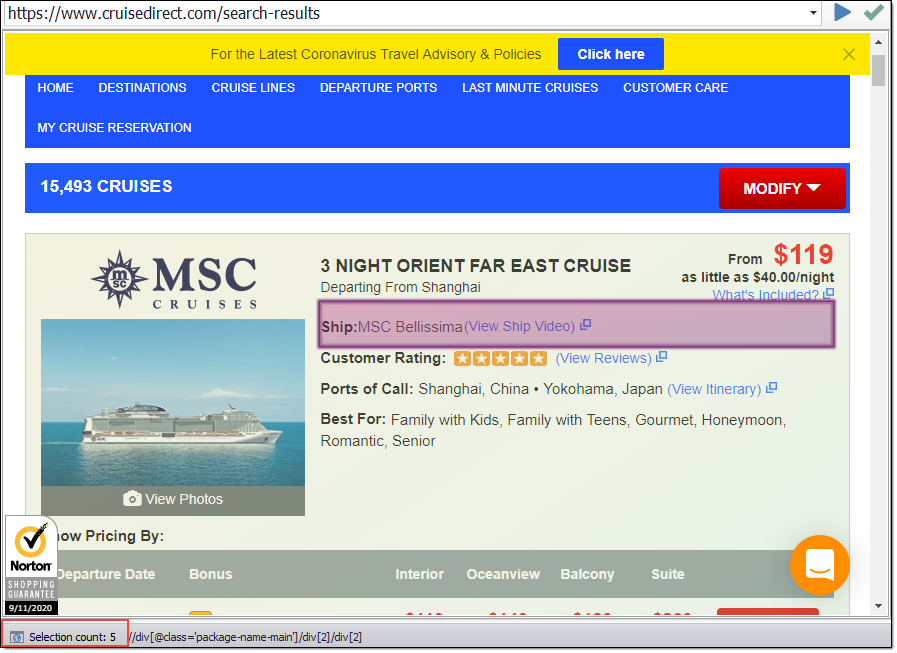
7. This will create a List in which you can add different commands. Now, Click Ship name available in the first Cruise name. This will automatically select all the other ship names available in the other Cruises. You can check the count of Ships selected at the bottom left corner of the Agent Window.
8. Similarly, follow the same procedure for "Departing from", "Ports of Call", "Best For".
9. Edit each command and rename it as required.
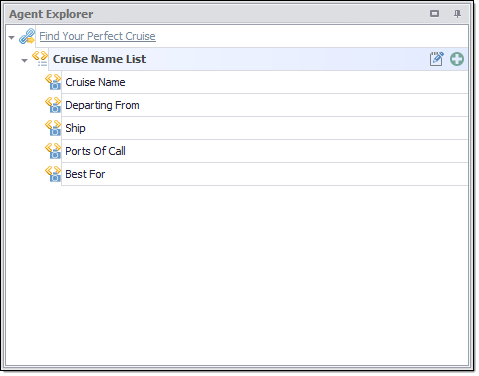
Agent Explorer with new Cruise Name List and Cruise Name commands
10. After capturing the cruise names and other required information in a list we can capture the pricing information that is available in the table for each cruise.
In order to do the same, add a new web element list as a new child node by using the add command button available on the existing web element list that we created for the cruise names.
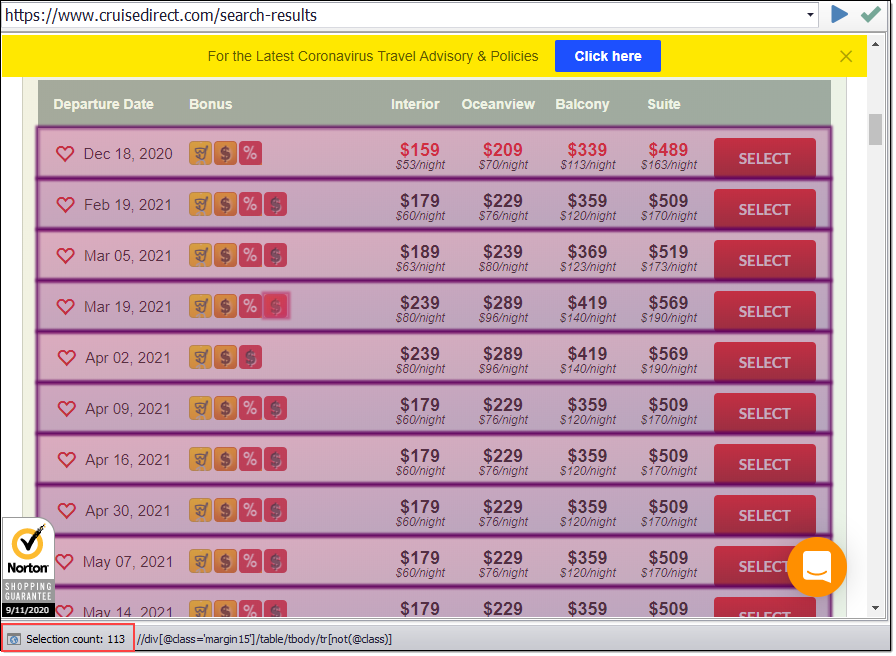
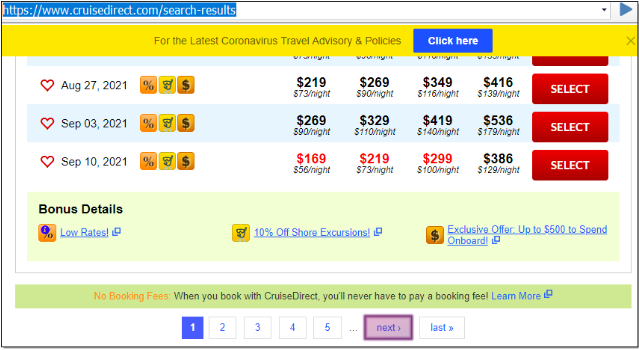
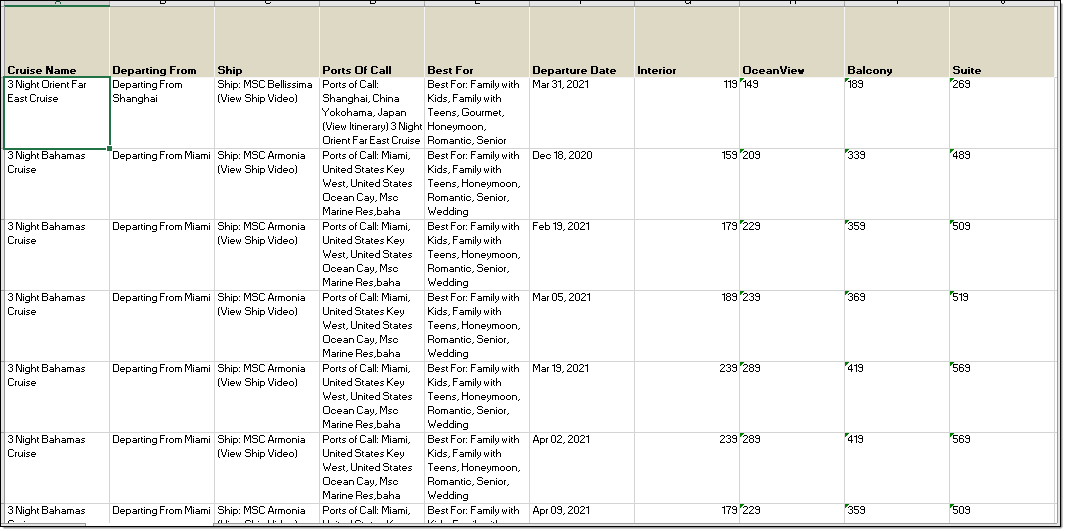
11. Now we are extracting the individual cruise web elements from each table. Edit the new Web Element List and select one row from the Pricing table given below the cruise name. Press shift and select the second Row as shown in the figure to capture all the element in the list. You can now count the number of elements selected from the bottom left corner of the agent window. Then save the Web element list.
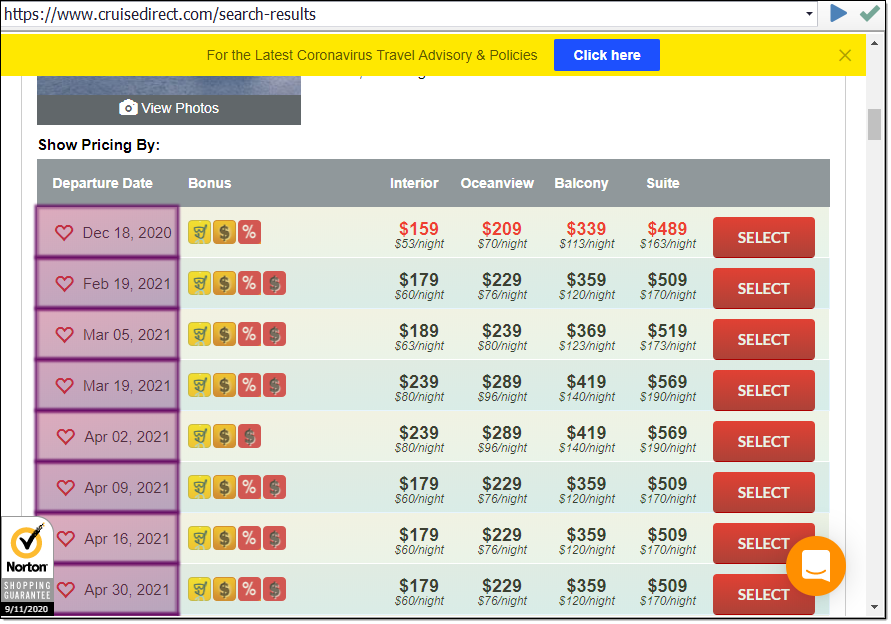
12. Now select a Date form Departure date column from the table and you will see that Sequentum Enterprise has automatically selected all the elements of that column as the list element is already created.
13. Click again to display the Sequentum Enterprise message window and click on Capture Text to add the command to the Agent so we can capture the individual web elements.
14. Edit the command you created and name it accordingly.
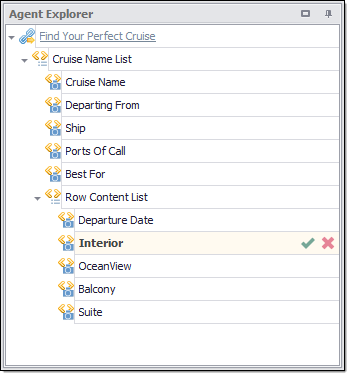
15. Similarly, add commands for the "Interior", "OceanView", "Balcony" and "Suite" web elements by clicking twice on each of the web elements. Edit and change the names of the new commands so that it looks like this.
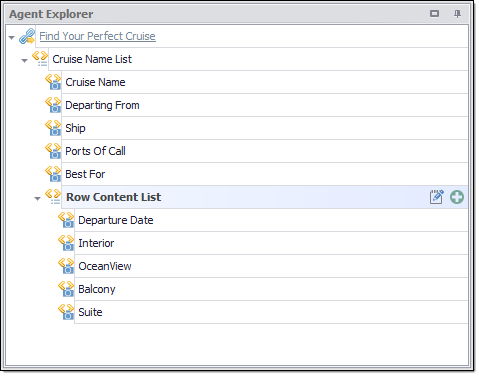
Agent Explorer showing all Capture Text commands
16. The Next step is Pagination in order to crawl the data from all the search results.
17. For this, scroll down and find the pagination element. Click on "Next" with the mouse to select the element as shown in the figure below. Now click again to add the command, a Dialogue box will appear .
Web page showing selection "Next"
18. Now we choose the Follow Pagination option to add the pagination command to the Agent.
Sequentum Enterprise has added the pagination command to the Agent and loads the next page on the same browser tab.
Sequentum Enterprise Message window with Follow Pagination option selected
19. When we click on the pagination command we can see all the search list commands inside of the pagination command. This means our agent will now iterate through all the search result pages to extract this information.
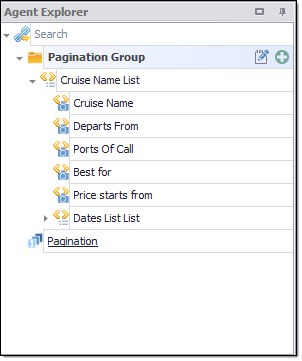
Agent Explorer showing the contents of the Pagination command
20. We have now finished building the Agent so we should save it. To save the Agent, choose File > Save in the Sequentum Enterprise menu, and then enter the Agent Name “cruisedirect”. Then click the Save button to commit your changes.
In the next section, Refine Your Data we use Sequentum Enterprise's Content Transformation method to change the extracted price data.
Refine Your Data (Optional)
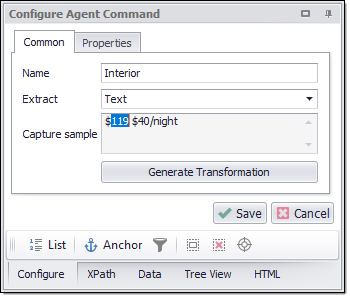
In the previous section, we added commands to our agent to capture all the cruise price content we require. The prices include a $ sign, but we want to get rid of that $ sign, so we can only have integer in price column.
First edit the "Interior" command in the Agent Explorer.
2. Next, we scroll down to the Capture sample window and highlight only the price number. You should notice that the Transformation Script button has now changed to a Generate Transformation button.
Selecting text to Transform in the Configure Agent Command panel
3. Now click on the Generate Transformation button, and we can now see only the price number in the Transformed window.
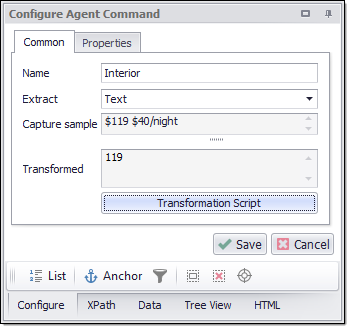
Transformed text in the Configure Agent Command panel
4. Click Save to save the transformation.
5. Repeat the steps above for "OceanView", "Balcony" , and "Suite" .
6. We can also add data type to each command as per the data captured by them.
7. Edit a command and click on the properties tab. Scroll down and you will be able to see the Data Type set as Short Text by default. You can change the Data Type from the available drop down list as per the content captured.
For Example: The prices can be set as decimals.
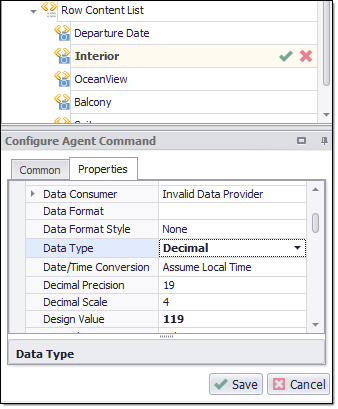
Data type set to decimal for Price
In the next section, Output Data Format we look at the data output formats available for the extracted web data and show how to change and configure a new export target.
Output Data Format
Sequentum Enterprise can export extracted web data as a report or to numerous different database types. Data output options include Excel, CSV, XML, PDF, JSON, Parquet, or a Database (SQL Server, MySQL, Oracle, OleDB).
You can also use a Sequentum Enterprise export script to completely customize the data export to your own database structures. This is useful when you want the data updates to be dynamically reflected, such as for an online website / portal.
Sequentum Enterprise can export data to Excel 2003+ and take advantage of features in Excel 2007+ such as outlining and embedded images.
Data is exported automatically to your chosen export destination when a data extraction project completes, so you don't have to export data manually. However, you can always export extracted data manually at any time to any export destination.
The following steps show how easy it is to choose the data export type you want to use.
We start by clicking on Sequentum Enterprise's Data menu and then clicking the Export Target Configuration button.

Sequentum Enterprise Data menu
2. After clicking the Export Target Configurations button the Data Export Configuration Window displays. This window allows you to change and configure a new export target. The default option is MS Excel.
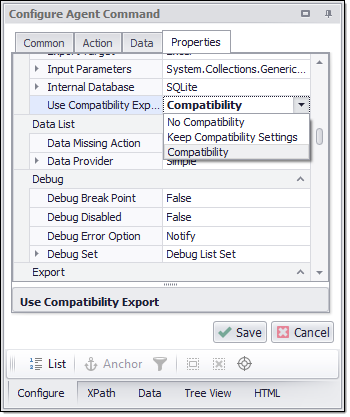
Note: The Below Export Setting is available only when the agent is in Compatibility mode. You can change it from the Agent properties. Change the property from No Compatibility to Compatible in Use Compatibility Export.
Click on the list on the left to change the export target or configure for multiple exports by checking Enable Export. You can also change the default destination folder location for where the data file(s) are outputted. Other options are available like appending the current export to existing files or including a timestamp in the filename. Additionally, File Name Transformation is also available where the user can write a script to fully rename and customize the export filename.
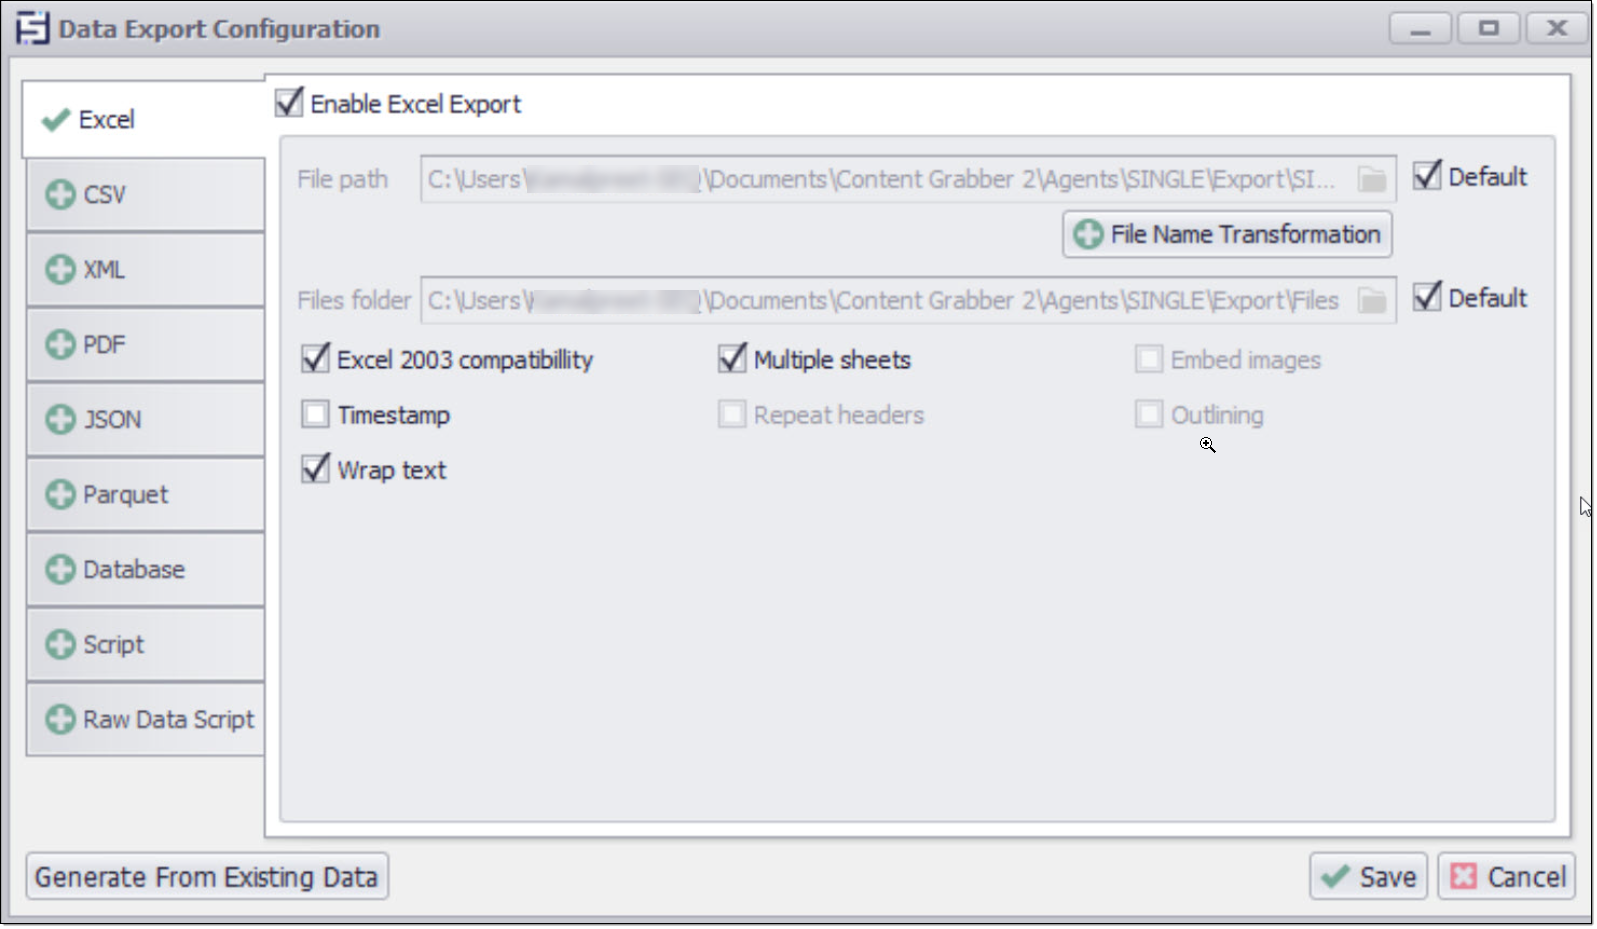
Sequentum Enterprise Data Configuration window
3. If the agent is set in No Compatibility Mode. The export window looks like this.
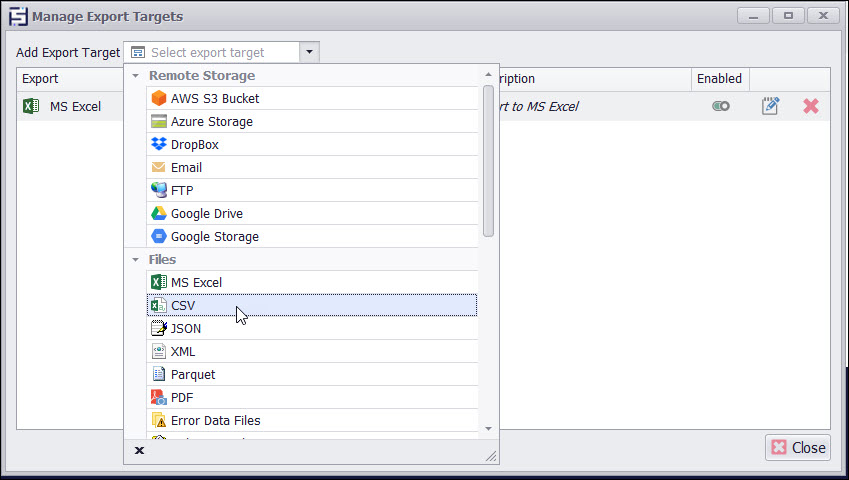
Export Window in No compatibility Mode
4. Here, you can select any of the available Export formats suitable for the agent. MS excel is the default export target set by Sequentum Enterprise. You can simply delete it and can set any of the export targets shown in the above image.
In the next section, Test Your Agent we use Sequentum Enterprise's Debugging features to test that the "cruisedata" Agent is functioning as expected.
Test Your Agent
Once you have finished developing your agent, it is important to test it to ensure the correct data is being extracted and in the format you require. Sequentum Enterprise has a sophisticated debugging engine which enables you to carefully analyze all aspects of your agent and the data being extracted. It can also help you to pinpoint any trouble spots in your agent code so you can quickly resolve them. For more detail on the Debugger features available in Sequentum Enterprise refer to Testing/Debugging an Agent.
Now let's debug the Cruise Direct agent to check that the commands are working properly.
To do the test run, click the ‘Debug’ menu option at the top left of the screen and then the click ‘Start’ arrow button to start the debugging.
Sequentum Enterprise Debugger running the Cruise Direct Agent
During the debugging, we can observe and check that Sequentum Enterprise goes through each of the commands in sequence and processes each of the web pages to extract the required data.
Part way through running the agent, we will click the ‘Stop’ button to stop the debugging. Then click ‘View Export Data’ to check that the output results are correct.

Sequentum Enterprise default view of the export data
To see the export data in Excel, we can simply click on the ‘Open Exported Spreadsheet’ button to open the Excel spreadsheet.
Viewing the Cruise Direct export results in an Excel Spreadsheet
The extracted data contains one row for each departure date, but you could also choose to save the date and price information in a separate data table.
In the next section, Scheduling you will learn how to set up an agent so it can be automatically run at intervals of your choosing.
Checking In and Scheduling Using ACC
Sequentum Enterprise provides an Agent scheduling facility through the Agent Control Center that enables you to automatically run your agent at predetermined time slots whenever you need it to run. This can be done every hour, every day, month, year and so on.
Once you have completed your agent, you will check it into the ACC. From the File menu at the top of the Sequentum Enterprise application. Simply Click on the Check-In Agent menu option to display the Check in window.
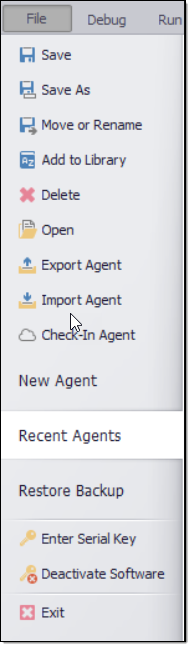
File Menu
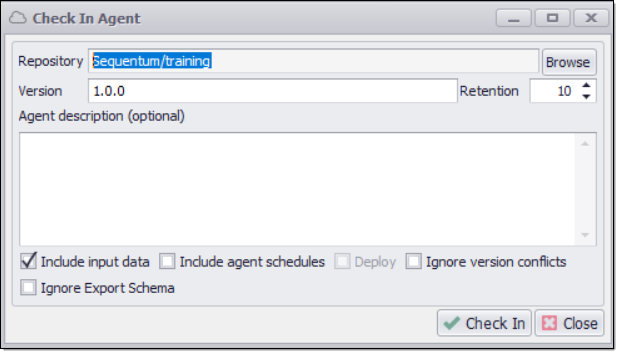
Sequentum Enterprise Check-In Window
For details on how to configure Sequentum Enterprise's Scheduling feature, refer to Scheduling in the Sequentum Enterprise Editor section.
In the next section, Run Your Agent we will show you how you run your finished web data extraction Agent.
Run Your Agent
Now, we have completed the development and the testing of the Cruise Direct Agent, it is ready to use.
To run your agent, you simply click on the Run menu at the top left of the Sequentum Enterprise application then click the Run Agent arrow selection.

Sequentum Enterprise Run menu selections
Note: if you have already scheduled your Agent to run at a later time or date, you can just leave it on your Internet enabled PC or server and it will run automatically. Refer to Scheduling for more detail.