
Installation & Quick Start
This Quick Start is intended for Administrators to quickly get the Agent Control Center up and running with a couple of Sequentum Enterprise servers that participate in a cluster to provide load balancing and redundancy if a server fails or needs maintenance. If you only have a single Sequentum Enterprise server, you can still follow this guide, but just add a single Sequentum server to your cluster. You can easily add more Sequentum servers to your cluster later.
We also explain how to check-in agents to the Agent Control Center, and how to deploy them to a cluster and run or schedule them on the cluster.
Prerequisite
The Agent Control Center needs to connect to the SQL Server 2016+ database. which can be outside the ACC server or you can install the Express Edition of the SQL Server database which is free to use on the ACC server.
The SQL Server database setup needs to be pre-installed before you start the ACC installation on the server if you want to use the local database. You can use the Express Edition of the SQL Server database as it is free to use and the Agent Control Center database does not require an Enterprise edition or paid edition of the SQL Server database.
Agent Control Center does not support Internet Explorer so Google Chrome or Firefox browsers need to be pre-installed on the server and should be used as the default browser on the server.
Hardware and Software Requirements
The Agent Control Center is a Windows-based software application and can be installed on Windows 10,11, Windows Server 2016, Windows Server 2019, and Windows Server 2022.
Depending on the number of agents, the server size can be increased or decreased. However, we recommend the following as the minimum hardware requirement for setting up the Agent Control Center:
64bit Windows Server 2016+
Intel Core i5-6xxx or equivalent
4 vcpus
16GB RAM
100 GB internal hard drive
Installing the Agent Control Center on Windows Server 2016
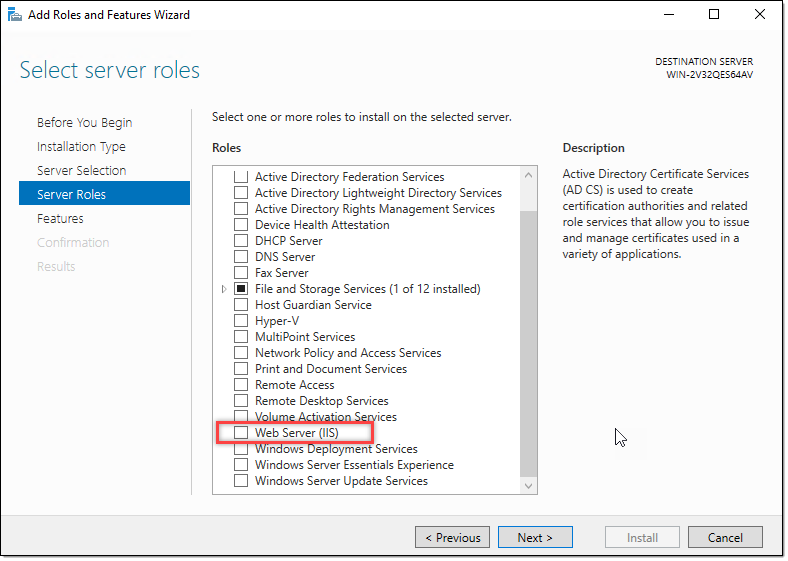
Enable the Web Server (IIS) server role and establish role services.
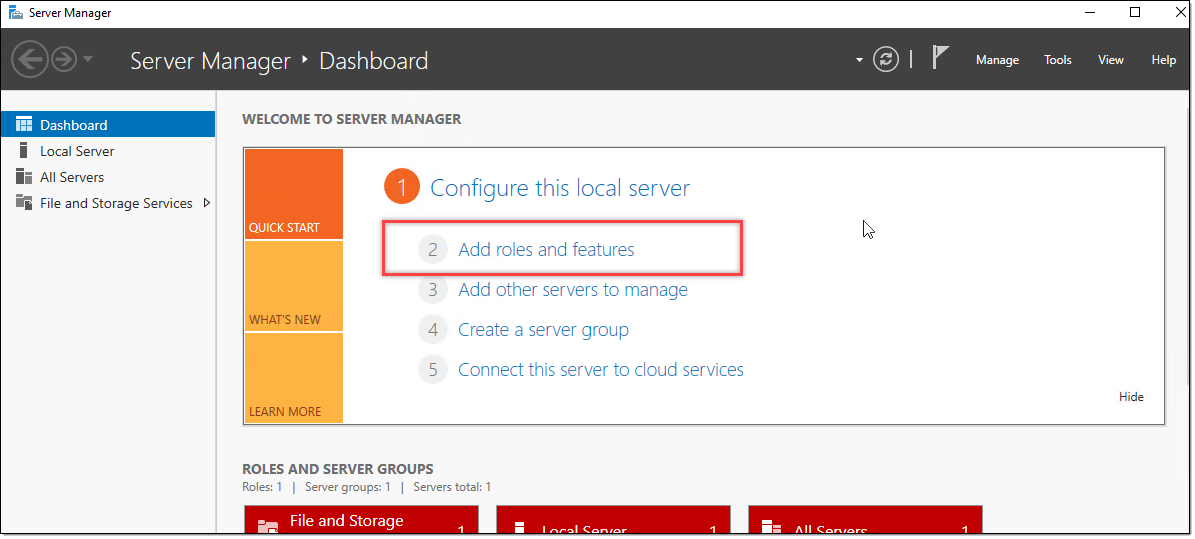
Open the Add Roles and Features wizard from the Server Manager. If the link shown below is not available, use the Manage menu at the top right corner.
2. On the Server Roles step, check the box for Web Server (IIS).
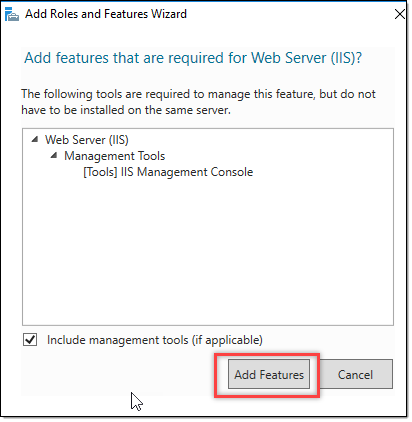
If the following popup opens, click Add Feature to add the IIS Management Console.
3. After the Features step, the Role services step loads for Web Server (IIS). Accept the default role services provided.

4. Proceed through the Confirmation step to install the web server role and services. A server/IIS restart isn't required after installing the Web Server (IIS) role.
Install the ASP.NET Core 6 Hosting Bundle
Download the ASP.NET Core Runtime 10.0.8 - Windows Hosting Bundle Installer using the direct download link.
Run the installer on the server.
Restart the server.
Agent Control Center .NET Hosting Bundle Compatibility
If you are using an older version of Agent Control Center (versions 4.3.0 to 3.1.3), install the ASP.NET Core 6 Hosting Bundle instead of the ASP.NET Core 10 Hosting Bundle.
If you are using an older version of Agent Control Center (versions 3.1.3 to 2.4.3), install the .NET Core 3 Hosting Bundle instead of the ASP.NET Core 6 Hosting Bundle.
If you are using Agent Control Center version 2.4.3 or below, install the .NET Core 2 Hosting Bundle using the following link and then restart the server:
Current .NET Core 2 Hosting Bundle installer (direct download)
ASP.NET Core Hosting Bundle End of Life (EOL) Notice
.NET Core 2, .NET Core 3, and .NET 6 have reached End of Life (EOL), meaning they are no longer supported by Microsoft. We recommend upgrading to a supported release, such as the latest version of Agent Control Center that supports the ASP.NET Core 10 Hosting Bundle. See Microsoft’s support policy for more details.
Install the Agent Control Center Web Portal
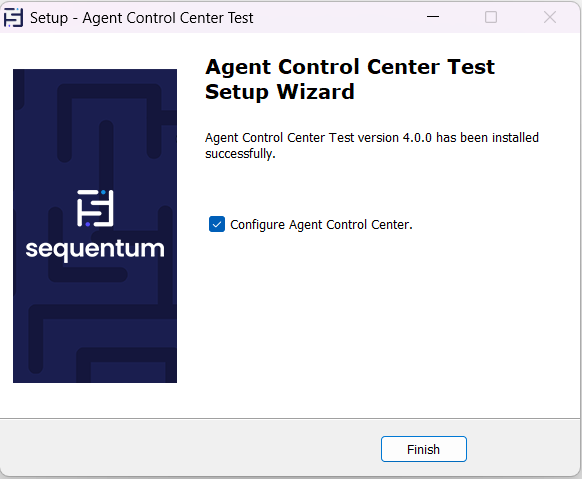
Run the latest Agent Control Center installer on the server.
2. Make sure the Configure Agent Control Center checkbox is checked and then click Finish.
The following web page will open if everything has been installed correctly. If you’re getting an error at this point, please make sure you restarted your server after you installed the .NET Core Hosting Bundle or if you are still not able to see the Configuration page then refer to the section Common Installation Issues.
If you need to get back to the configuration page (if you need to restart your server for example), use the URL http://localhost:8010/config
3. The default URL for your ACC (Agent Control Center) will be your external IP address with port 8010. If you have a domain name mapped to your external IP address, then you can enter it here, but leave it as default for now, and you can come back and edit the URL later.
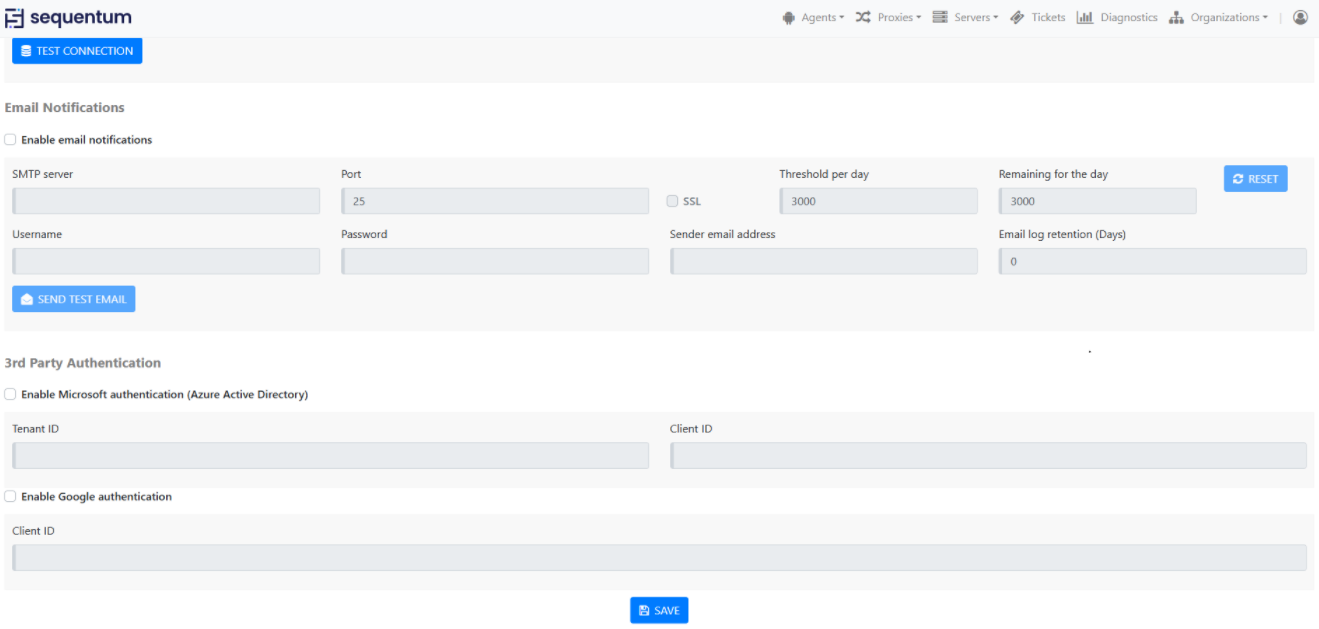
4. User Session Timeout: A "User Session Timeout" section has been added to the Configuration page to allow super admins to define session duration using a combination of Days and Hours inputs. Upon saving configuration, the super admin user who performed the change is logged out immediately to apply the new timeout.
By default, the timeout feature is disabled.
When enabled, session timeouts are enforced based on the configured duration.
By default the session timeout is of 1 day.
5. Enter an Organization name. This will be the name of your first organization, but you can edit this organization and add more organizations later. The organization name will normally be the name of your company but can be any name.
6. Add a Super Admin user to your organization. The Super Admin user will have access to everything in the ACC, including adding new organizations and users.
7. Generate an encryption key. The encryption key is used to encrypt sensitive information such as database and SMTP passwords. Choose Generate Key if you're performing a new ACC installation. This will generate a new encryption key and an unencrypted copy of this key will be placed in a file key.dat in the ACC installation folder. You should move this file to a secure location since it's not required by the ACC unless you move your installation to a new server. If you later need to move your ACC installation to a new server or recover from a server failure, you can use this key to ensure the ACC can continue to read encrypted data.
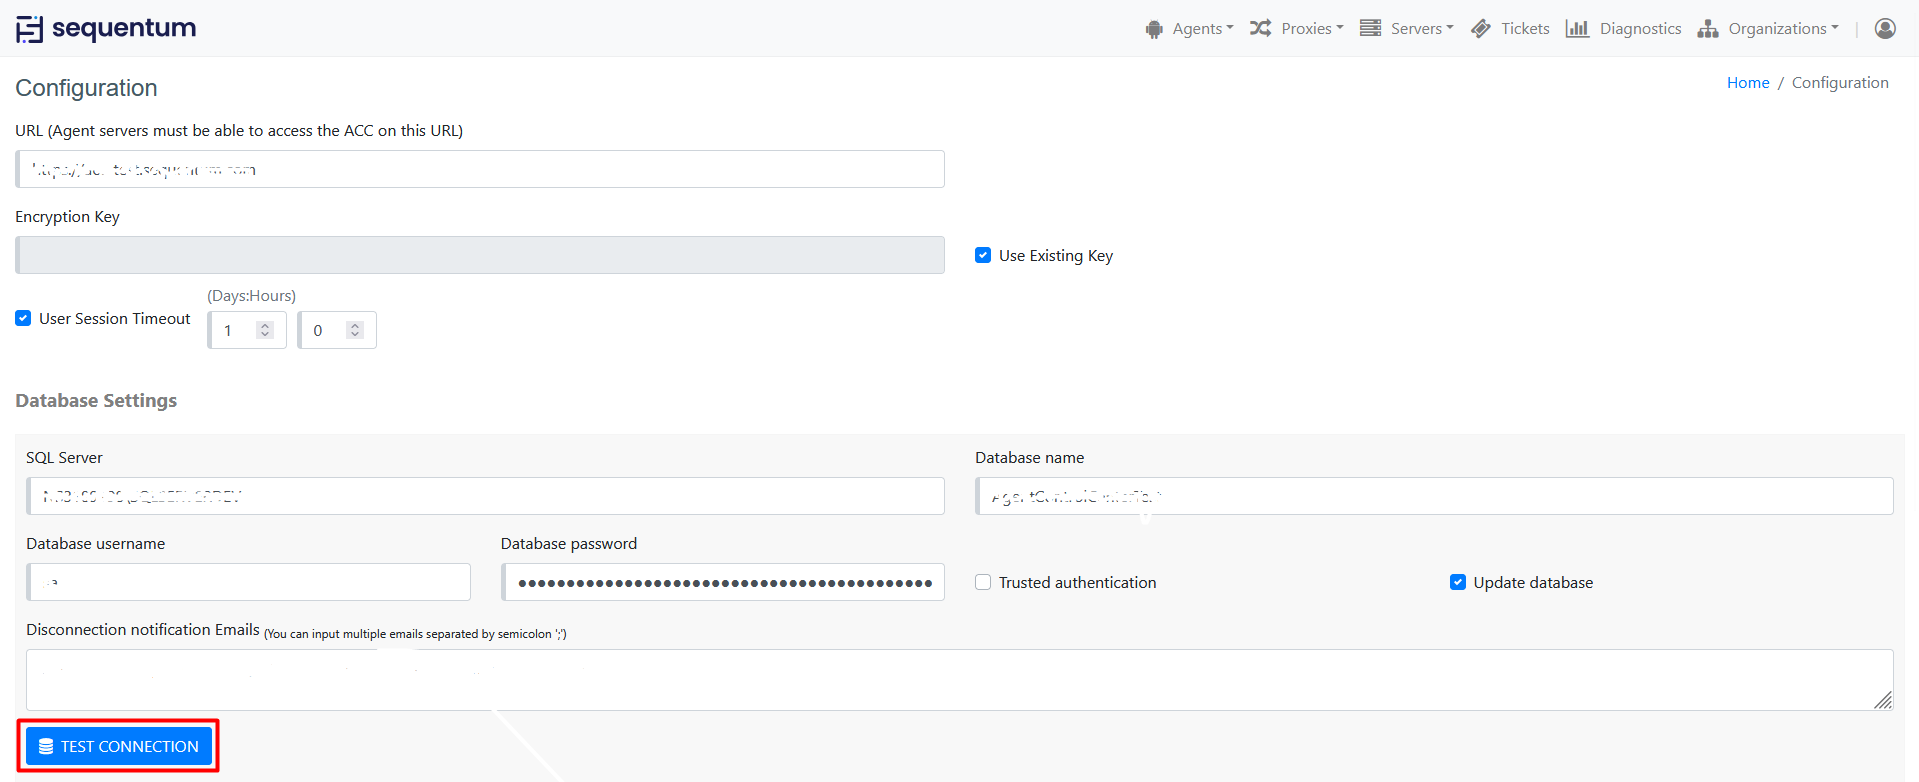
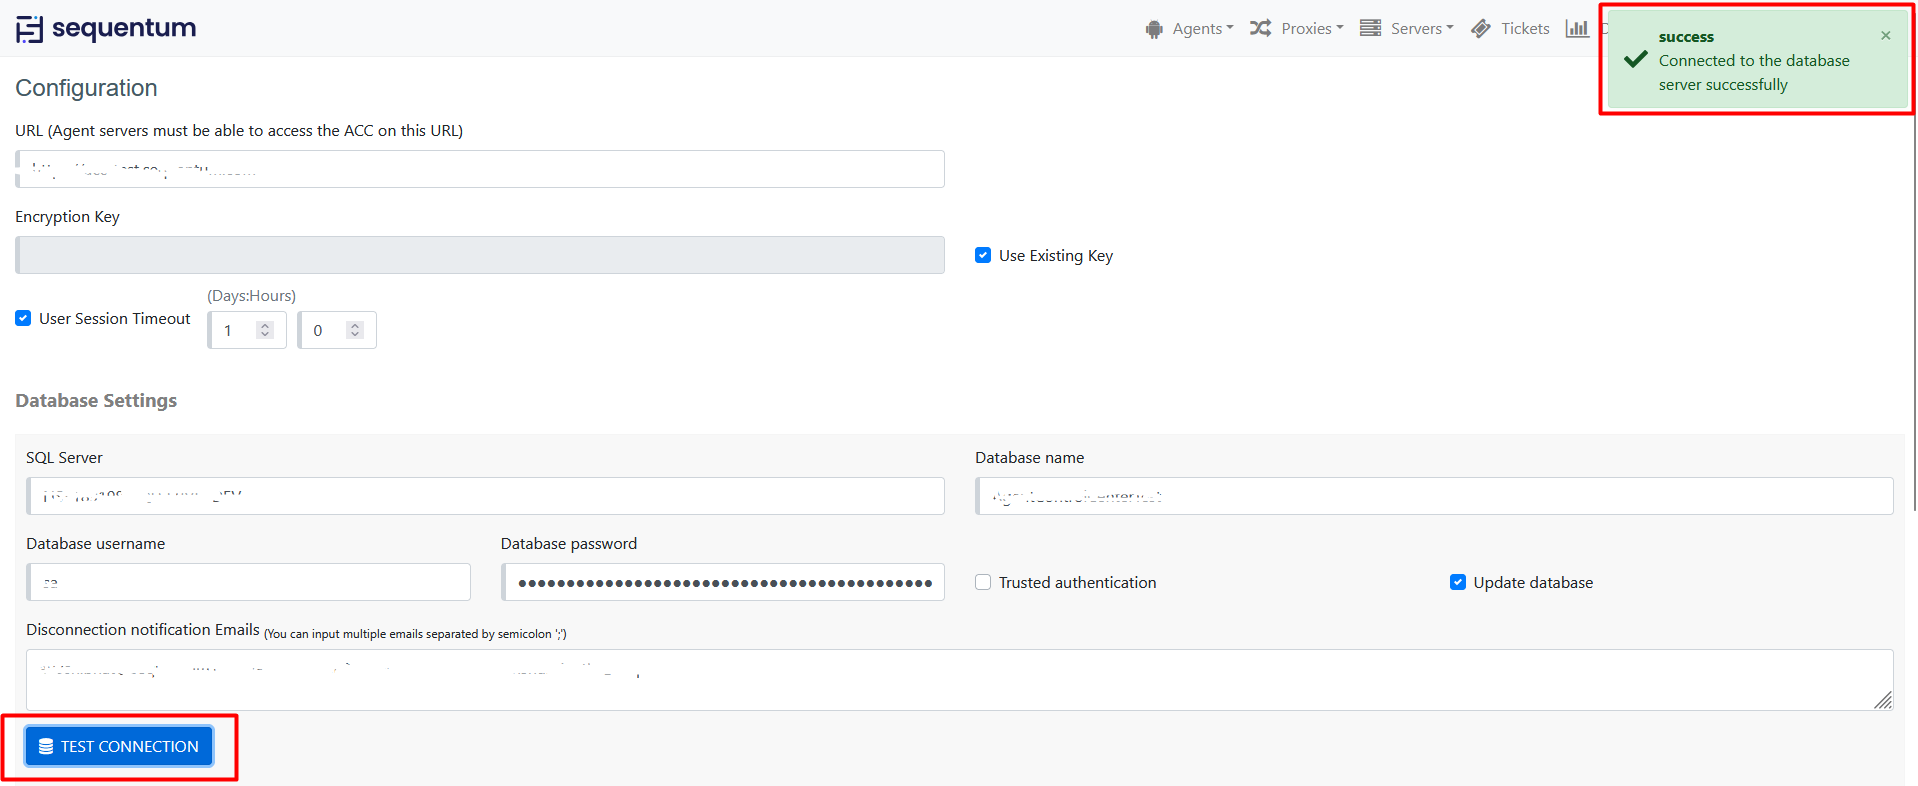
8. The ACC needs to use a SQL Server database to store information. You can use your own SQL Server instance or install SQL Server Express which is free. If you want ACC to create a new database for you, the database user you specify must be authorized to create new databases. You can also enter the name of an existing database and let ACC create the required database tables in your database. We recommend you create a dedicated database for ACC. Additionally, you can also test your database connection by clicking on the Test Connection button available under the Database Settings section. Test connection allows you to re-confirm database credentials and connectivity.
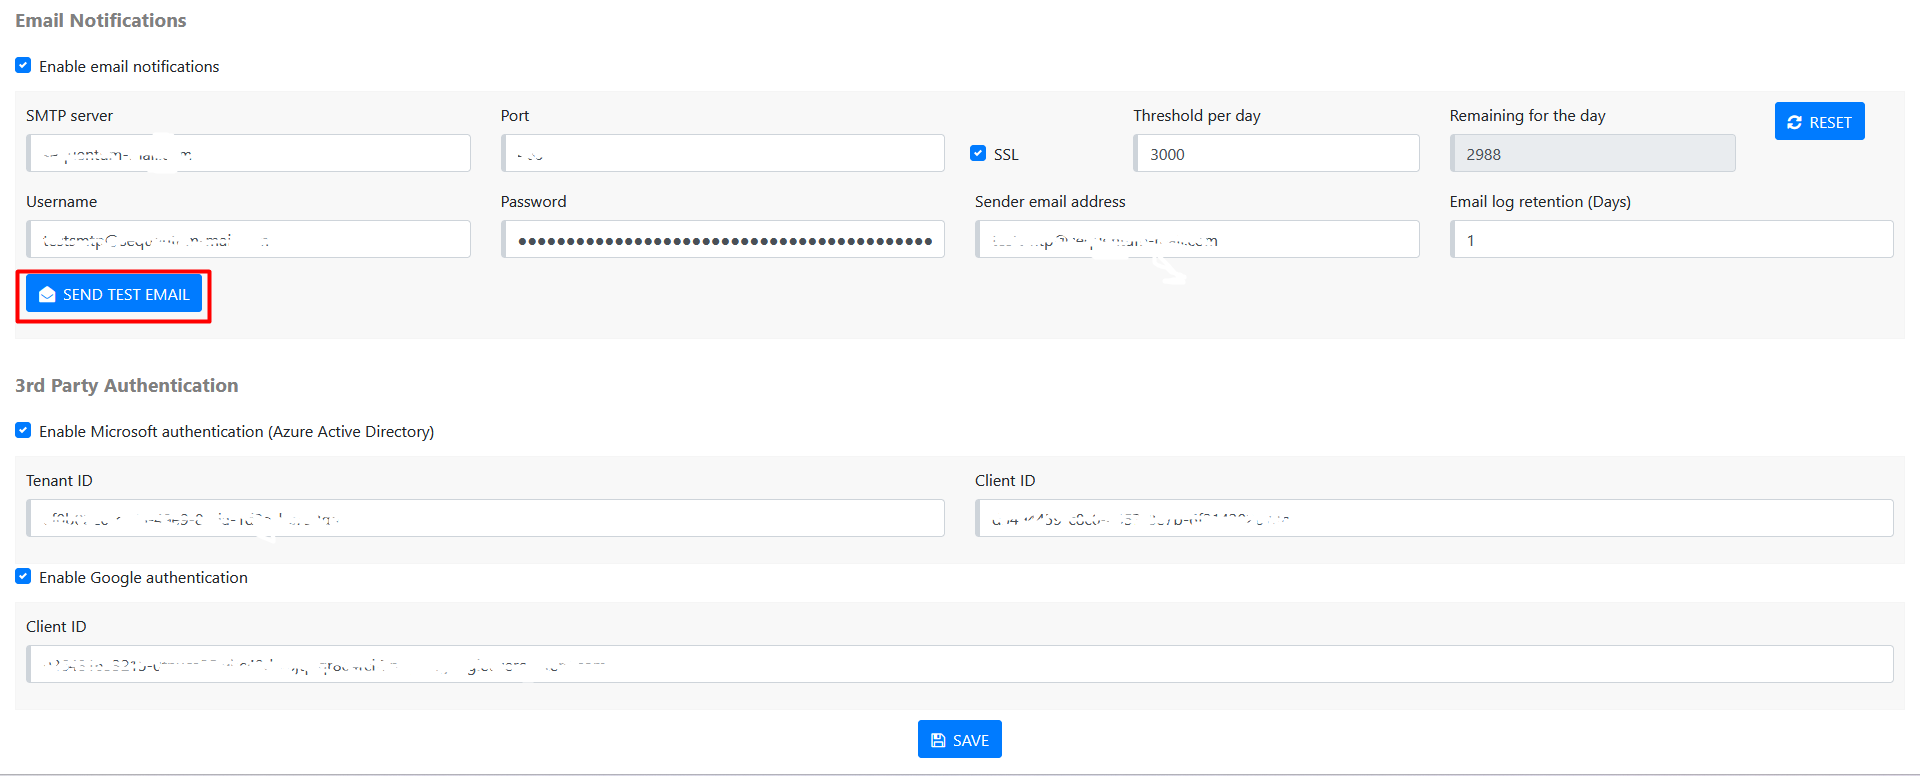
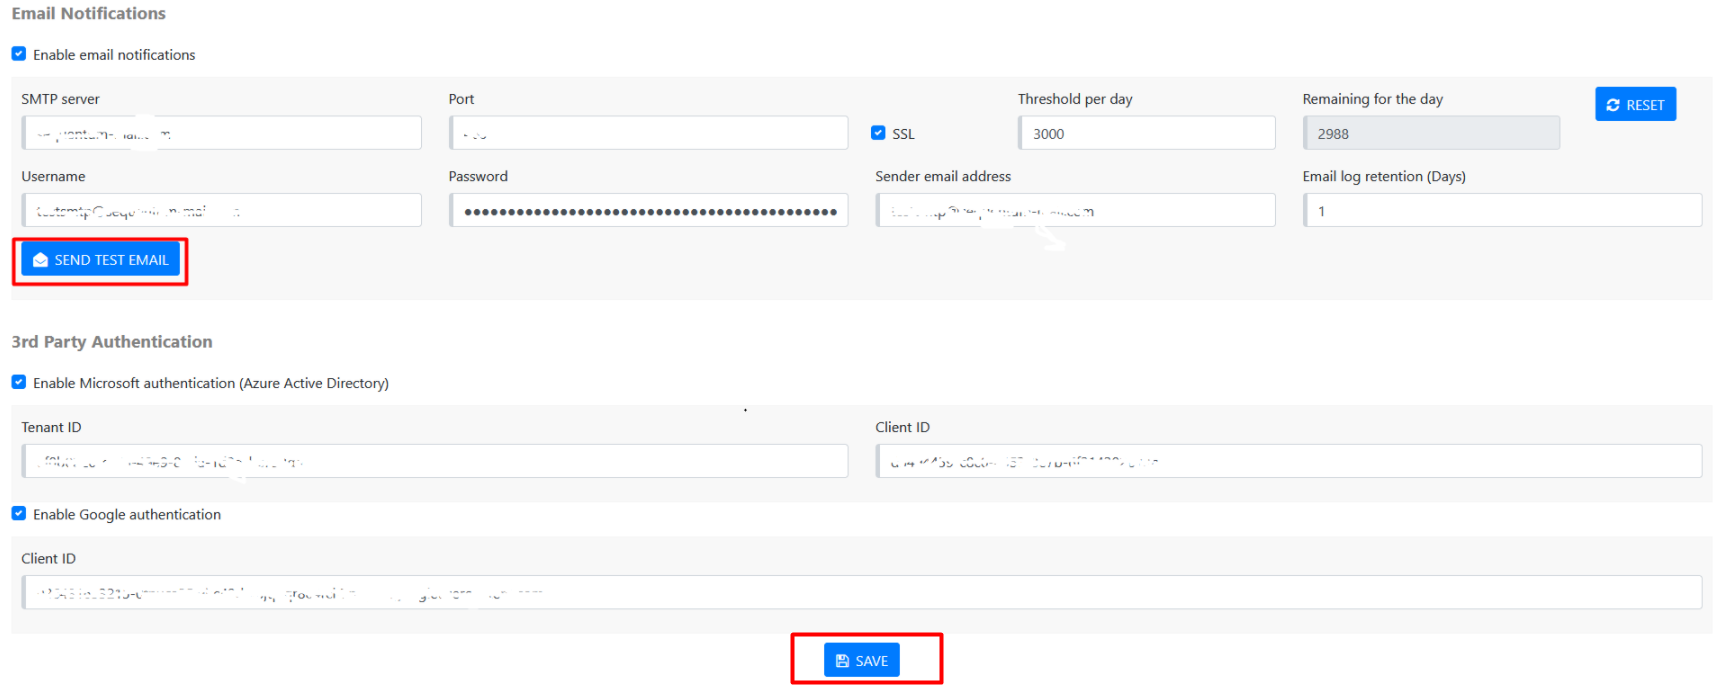
9. If you want to receive email notifications on certain events, such as when a job fails, you need to enter the details of an email SMTP server that can send out these emails. This could simply be your Gmail account or any other online email account you have, but we recommend you use a dedicated SMTP service if you have a large number of agents as online email accounts often limits the number of emails you can send during a given time period.
The Sender Address is the email address that will send out the emails. Make sure your SMTP server allows this email address to send emails.
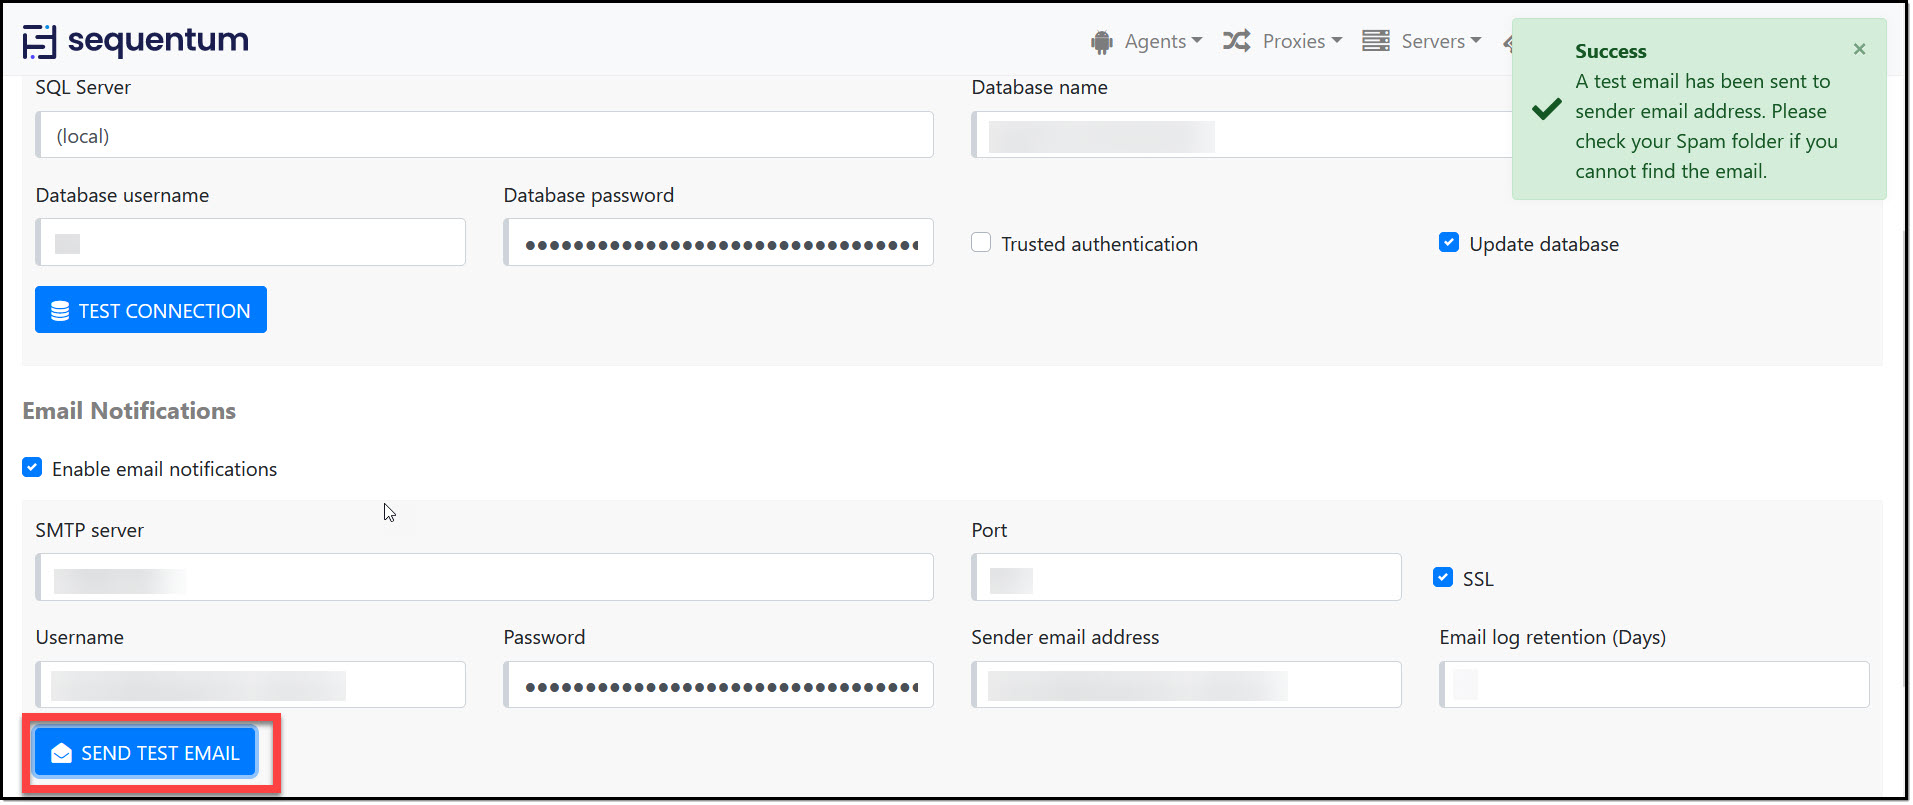
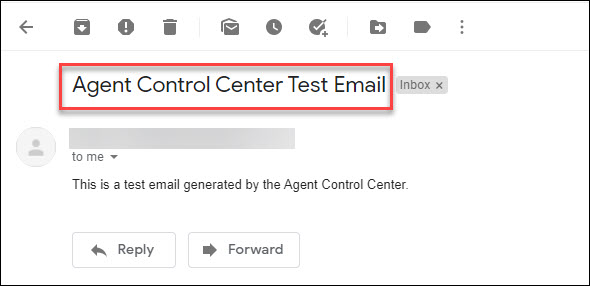
You can always come back to this page and configure your email settings later. Additionally, you can also test your SMTP connection using the Send Test Email button available under the Email Notifications sections. To test your SMTP connection you can use your own email address in the Sender Address field and then click on the Send Test Email button and you will receive a test email to confirm that your SMTP server is able to send email notifications through the Agent Control Center.
10. Click the Save button once you have completed the configuration.
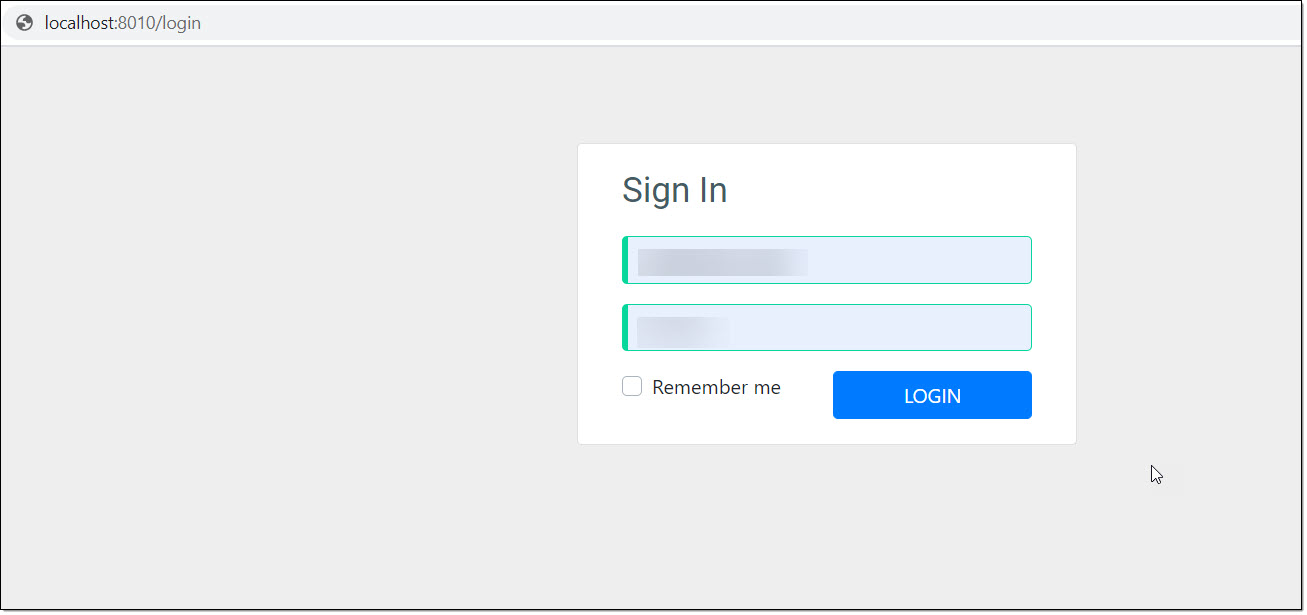
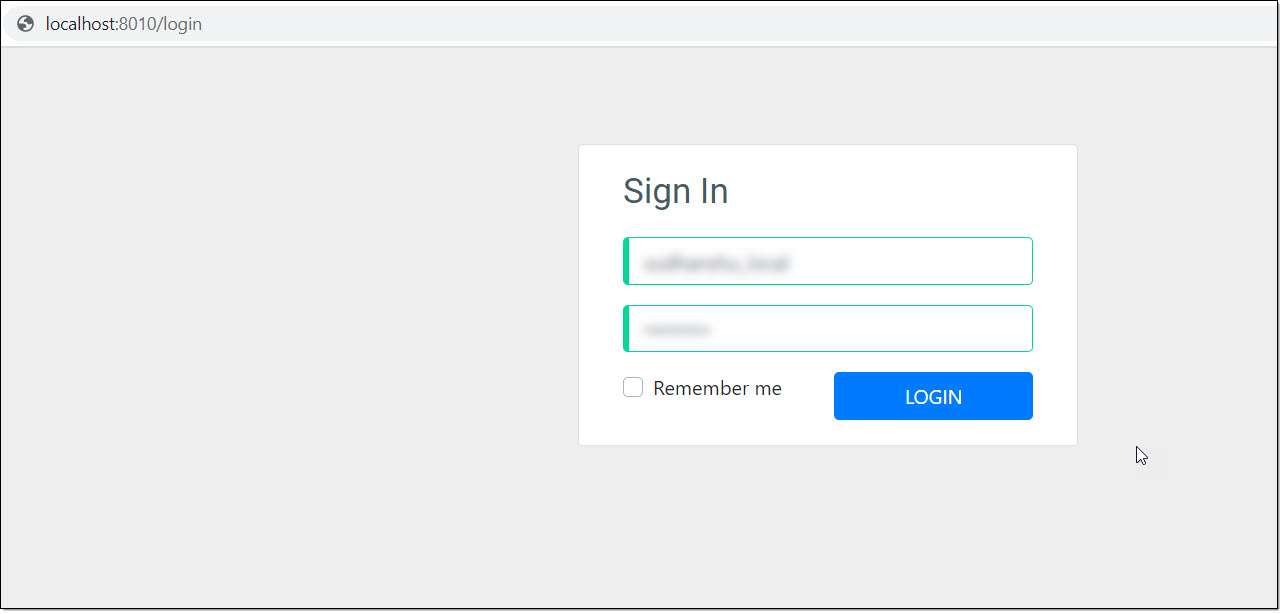
11. Once you save the configuration, you’ll be redirected to the ACC login page. You can always reach the ACC portal on http://localhost:8010.
12. Use the username and password you specified during configuration to login to the Agent Control Center.
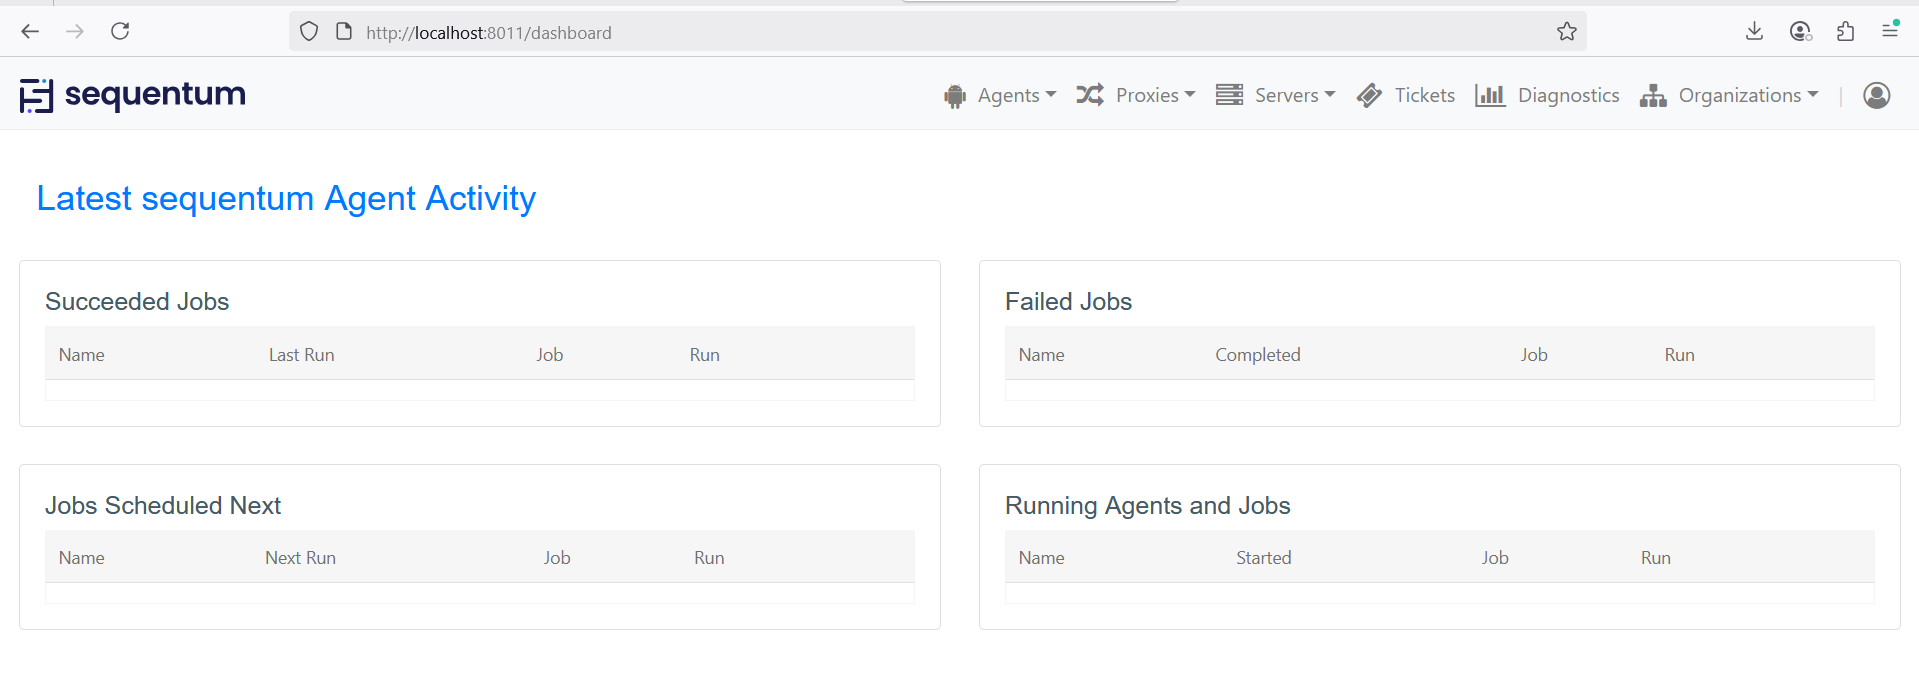
After logging in, you’ll see the ACC Dashboard which will be empty because you have no agents in the ACC.
13. We now need to add Sequentum Enterprise servers to the Agent Control Center. The Sequentum Enterprise servers only need Sequentum Enterprise installed, so no other configuration is required.
We’ll add two Sequentum Enterprise servers to the ACC, so we can create a cluster consisting of two servers. This will give us some redundancy if a server fails or need maintenance.
The ACC communicates with Sequentum servers on port 8004 by default, so make sure you first open port 8004 in the Windows firewall on the Sequentum servers. See Connecting a Sequentum Server to the ACC to learn how to open port 8004 in the Windows Firewall.
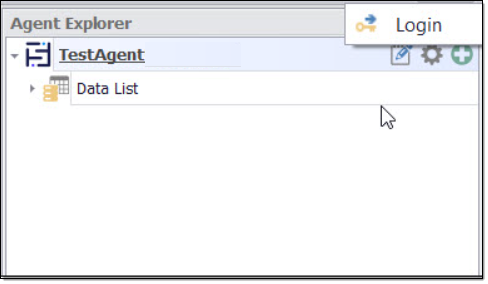
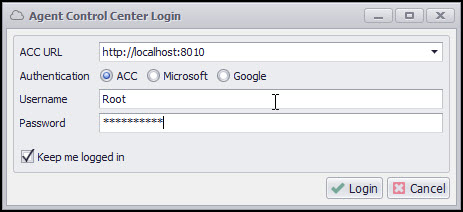
On each server, install the Sequentum Enterprise server edition, and then open the Sequentum Enterprise Editor. In the Sequentum Enterprise Editor open the Agent Control Center menu in the top right corner and select Login.
Enter the ACC URL configured in step 3 and the user name and password configured in step 5.
Open the Agent Control Center menu again and select Connect This Server.
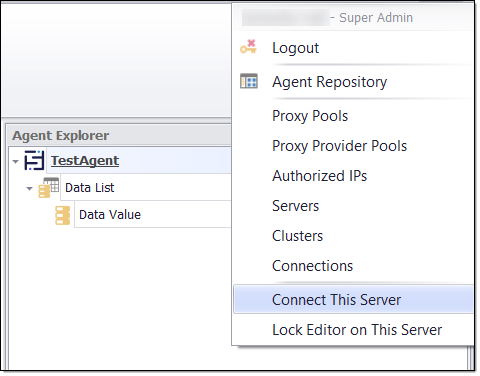
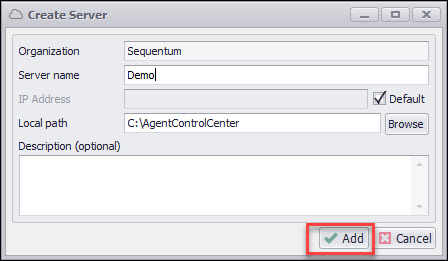
Enter a server name and a local path, and then click Add. The local path is the directory where agents will be deployed on this server.
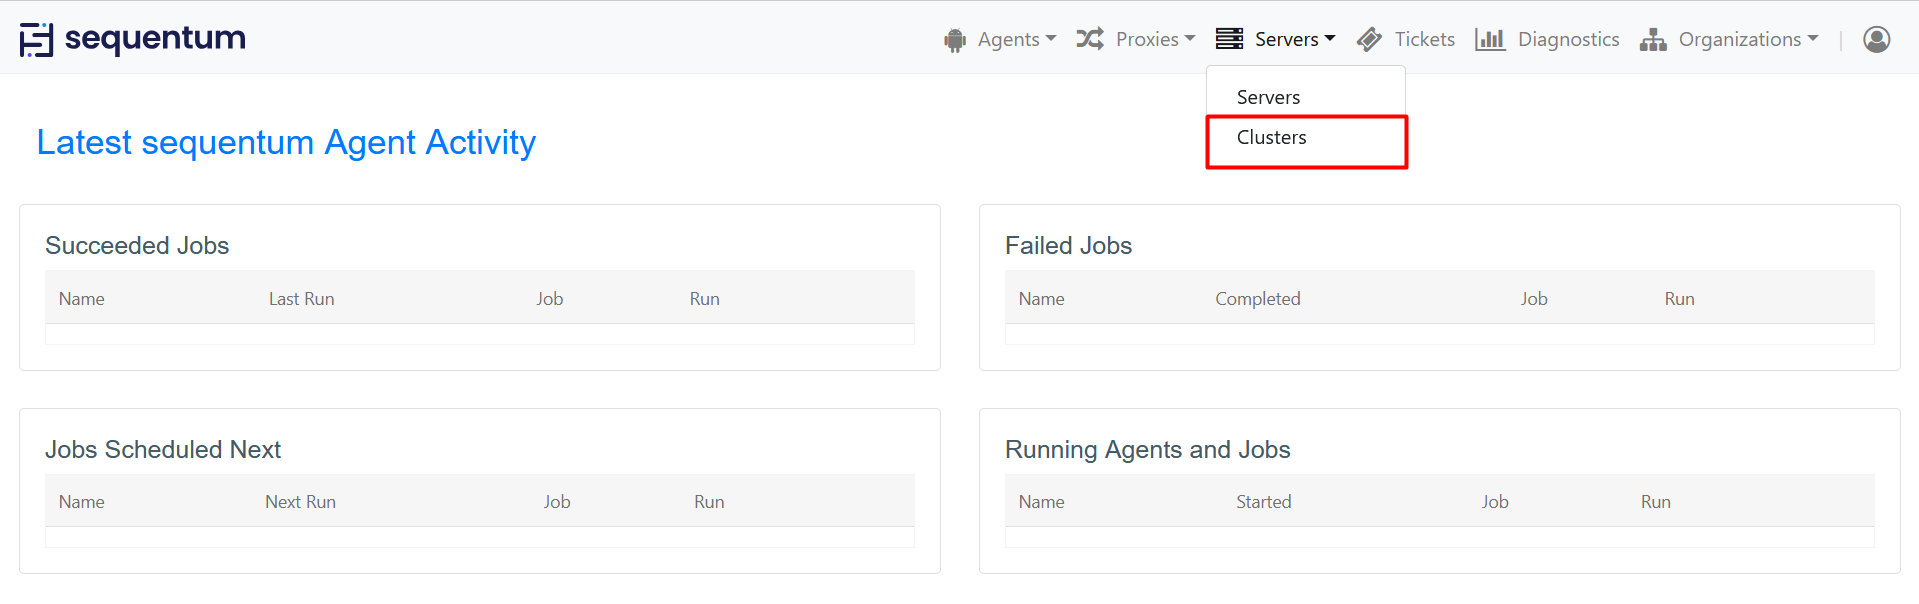
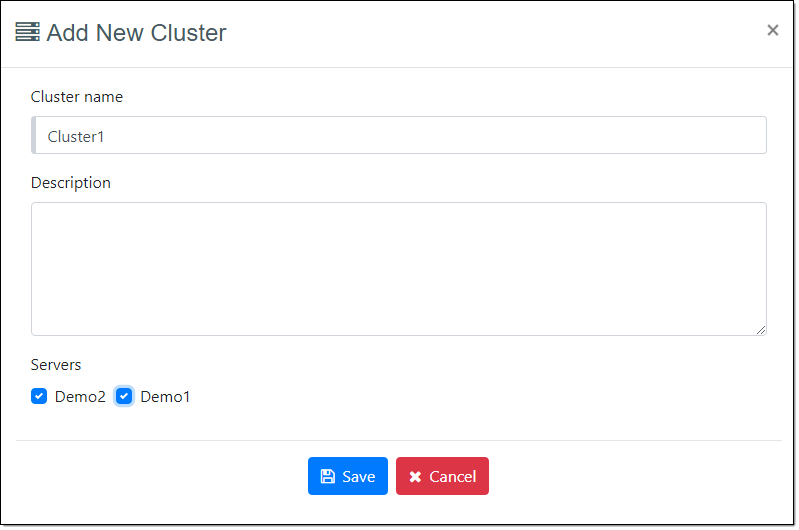
14. We now have two Sequentum servers connected to the Agent Control Center, so we can create a cluster consisting of those two servers. Open the ACC Portal again and then open the Servers menu and select Clusters.
15. Click the Add New Cluster link.
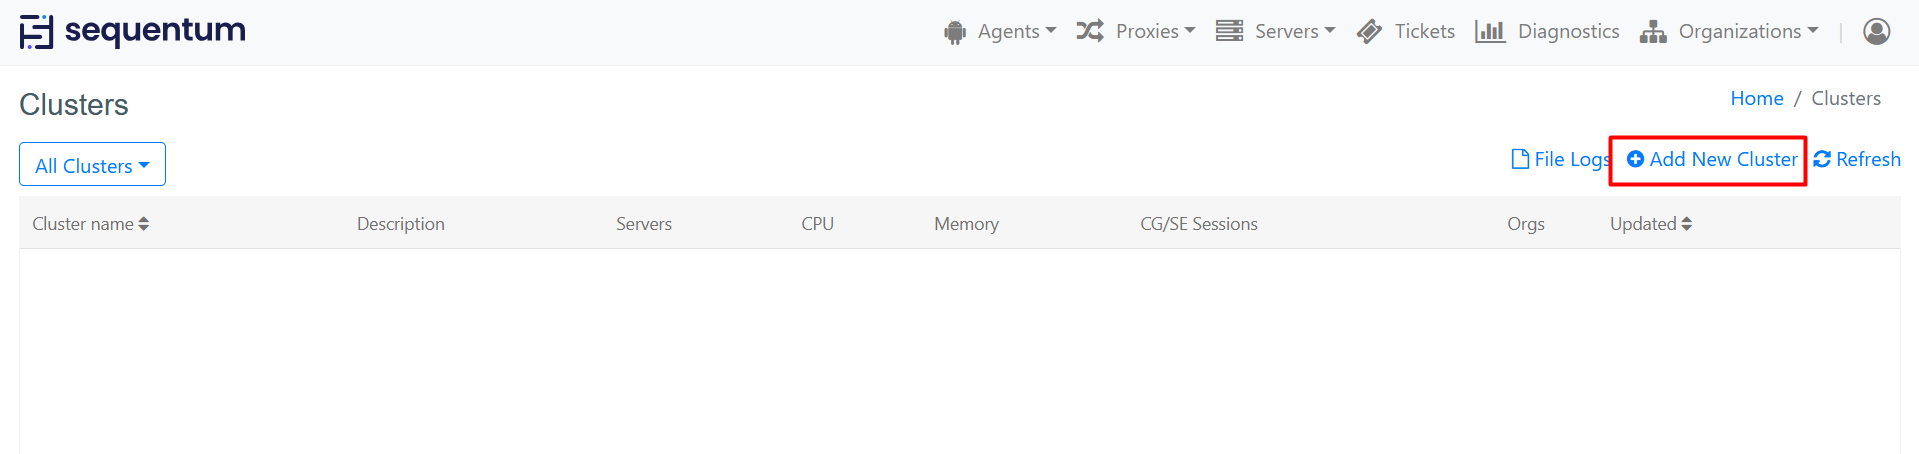
Enter a cluster name and select the two servers available.
16. We now need to give our Demo organization access to this new cluster. Select the Demo organization from the All Clusters drop-down menu.
A new drop-down menu will appear. Select the new cluster from this drop-down menu and click the Add button next to the drop-down menu.
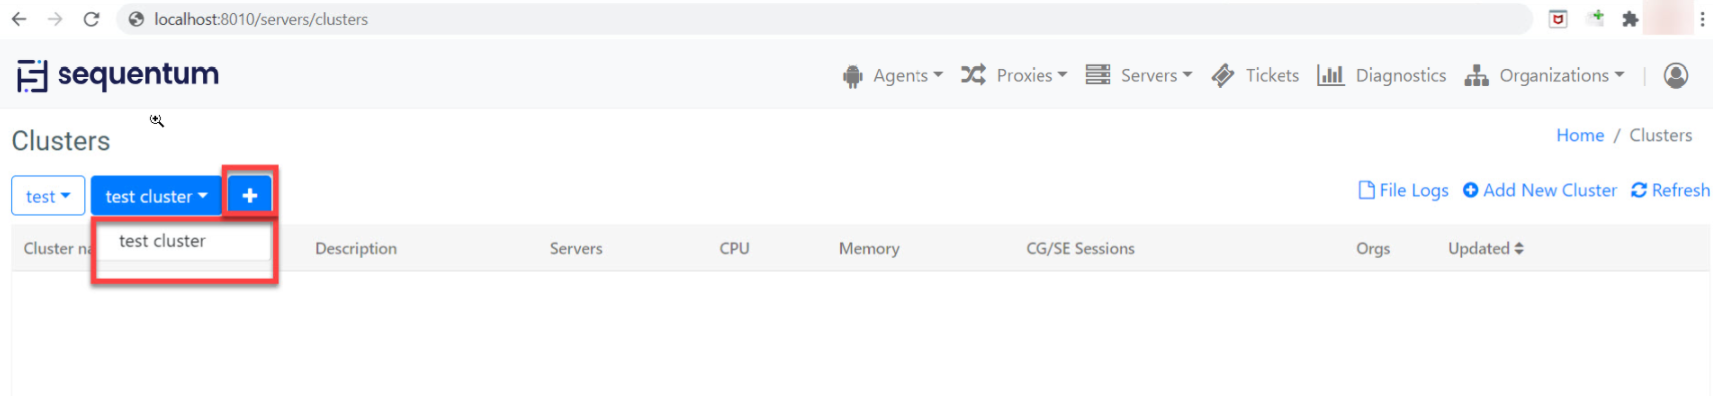
The new cluster is now available to the Demo organization, and we can use it to deploy and run agents.
Running and Monitoring Agents
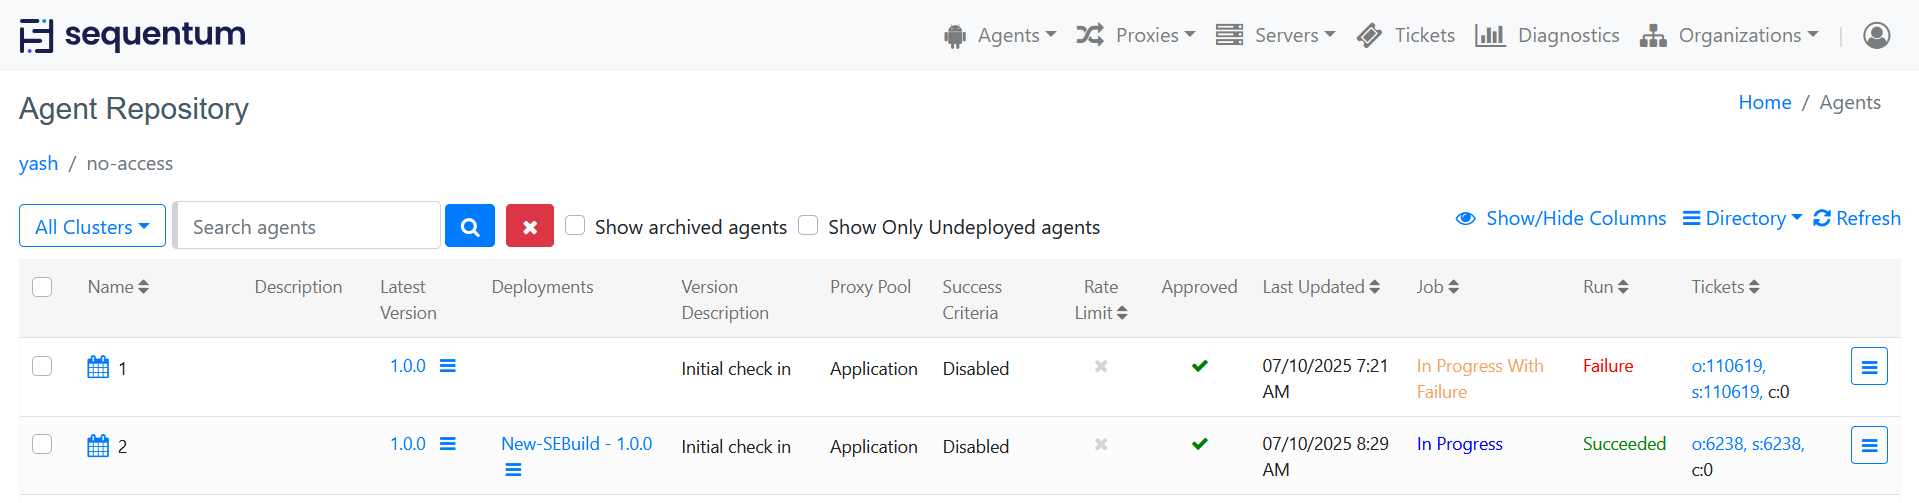
Before we can start running agents from the ACC, we need to check-in a couple of agents to the ACC Agent Repository. The ACC Agent Repository is a collection of agents organized in a directory structure similar to a normal file system. Each organization in the ACC has its own repository and users in the organization can check-in and check-out agents from the repository. All agents checked in to a repository are under version control, and the last 10 agent versions will be stored by default.
We’ll start by creating the following 3 sub-directories in our repository.
Dev
QA
Prod
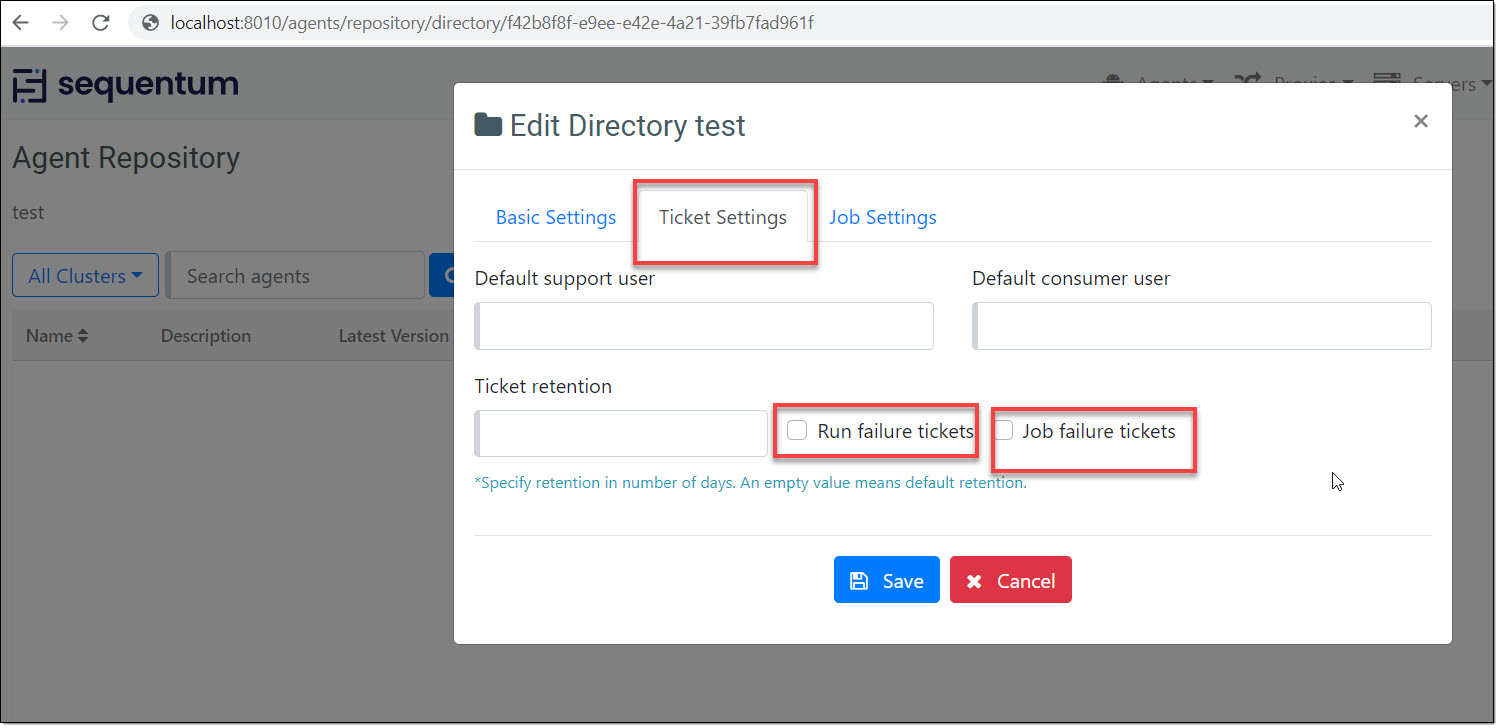
User access and privileges are given to directories, so the way agents are organized in the repository is important. You can organize the agents in any way you like, but we recommend you have a directory Dev where agent developers check-in agents that are under development. Only agent developers will have access to this directory. Once agents are ready for quality assurance, they’re moved into the QA directory, and once ready for production they are moved into the Prod directory. Configure the directories so that only agents in the Prod directory will generate failure tickets and send out email notifications. You may give data consumer users limited access to the Prod directory, so they can view the status of agents.
You may want to add more top-level directories. For example, if you’re extracting data for multiple customers, you may want a top-level directory for each customer, and then have the 3 directories Dev, QA, and Prod under each customer directory.
Open the agent repository and click Add Directory to create a new directory.

Create the directories Dev and QA with default options. Create the directory Prod and set the options to generate tickets when jobs or agent runs fail.
A Job consists of one or more job schedules and each job schedule runs the agent once every time the schedule is triggered, so a single job run may consist of many agent runs. You use multiple job schedules when you want to limit the load on a target website and spread out data extraction from the website over multiple days. A job run does not complete before all job schedules have run once, and the job only succeeds if all individual job schedules succeed.
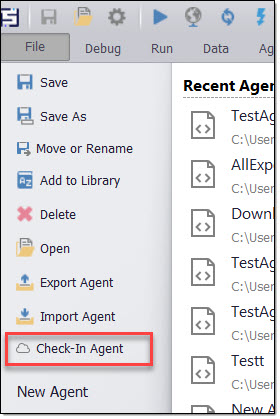
2. Develop two agents using the Sequentum Desktop Edition or just use your existing agents if you have any.
Open the Sequentum Desktop Editor, and for each agent, open the agent in the editor and select Check-In Agent from the File menu.
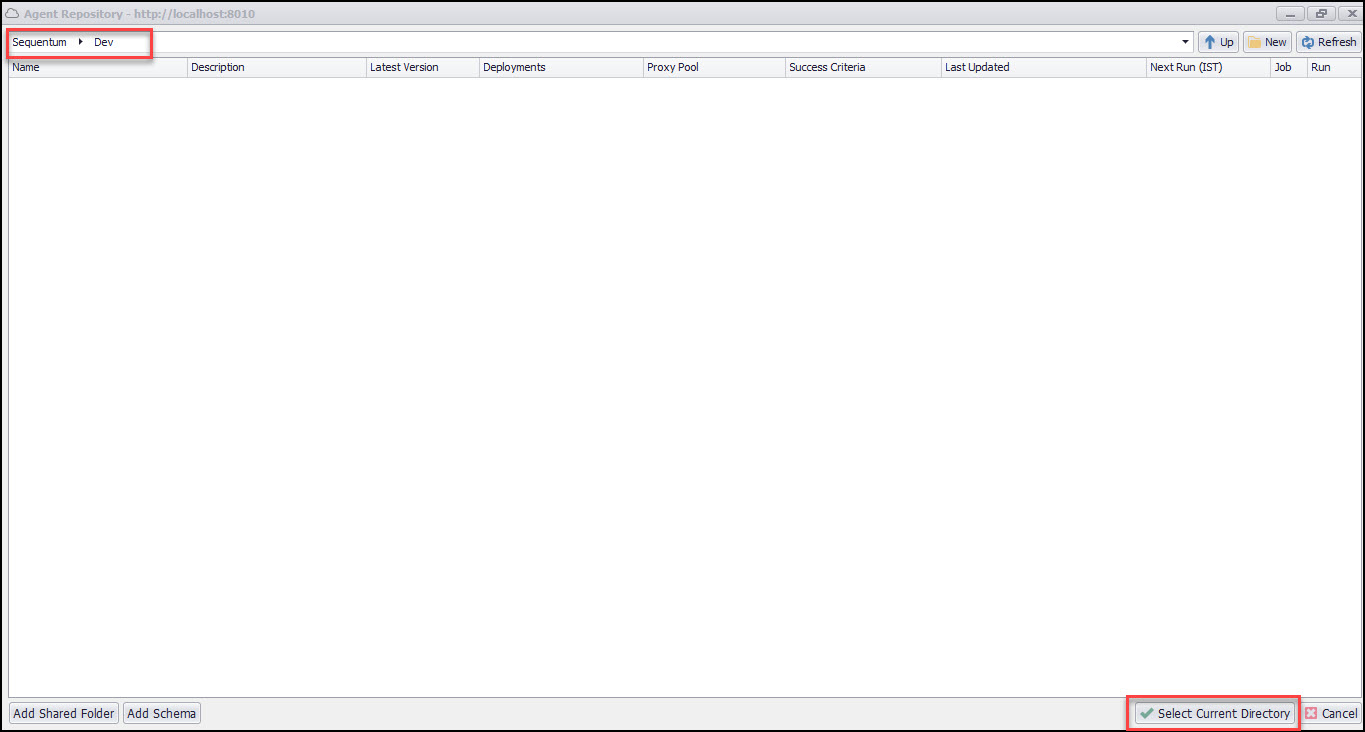
Click the Browse button and select the Dev directory.
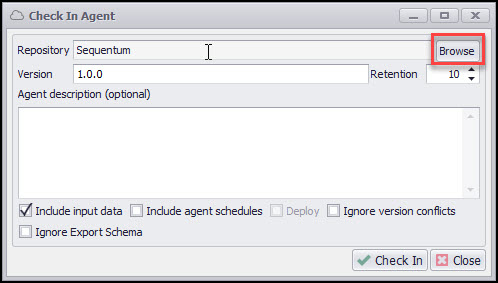
You must enter a version number and we recommend you start with version 1.0.0. If the agent is already in the Agent Repository, you’ll be able to see the latest version number. Version 1.0.0 is used by default if the agent is not in the Agent Repository.
After checking in the agents, open the ACC Web Portal and verify the two agents are now available in the Dev directory.
3. We’ll now deploy the two agents to our cluster. For each agent in the Agent Repository, click the context menu and select Deploy to Cluster.
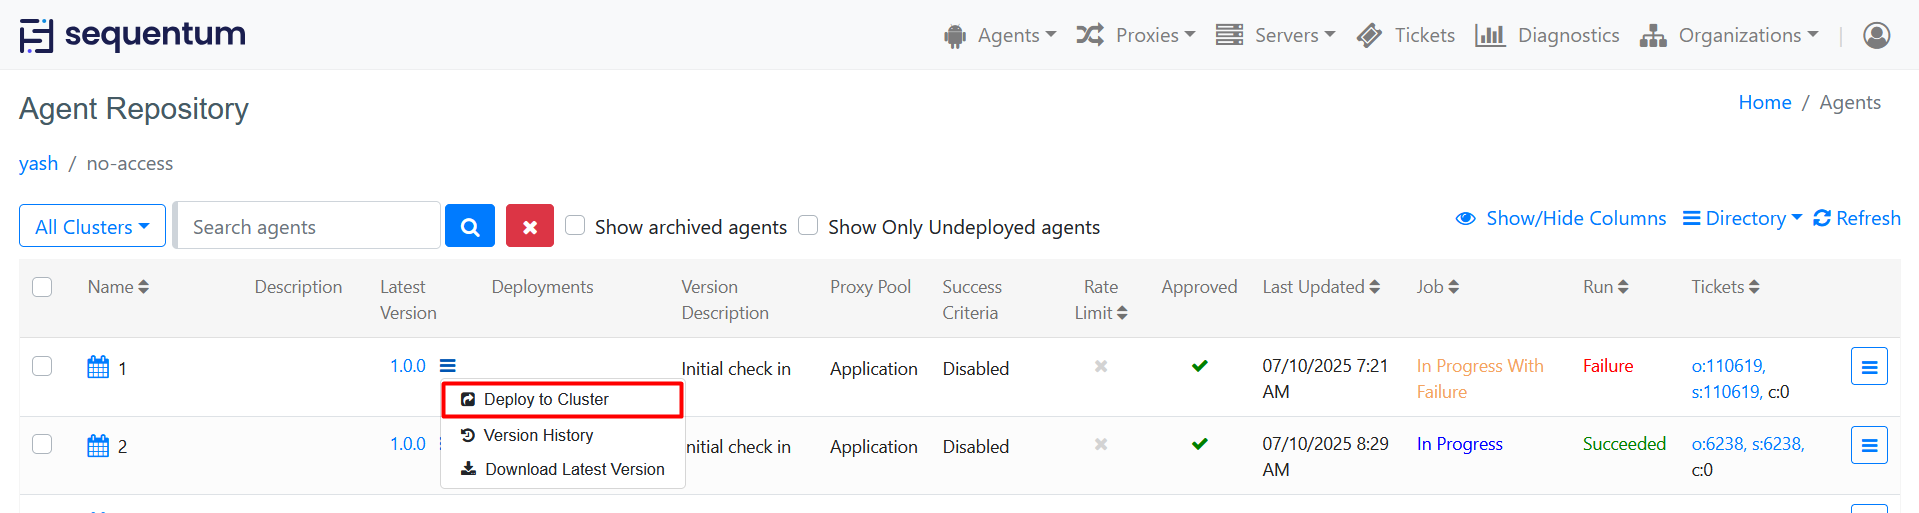
Select the available cluster and deploy the agent.

The two agents are now deployed to both servers in the cluster and we’re ready to run the agents.
The ACC will automatically run an agent on the most appropriate server in the cluster. If all servers in the cluster are online, the most appropriate server will be the server with the least load.
We’ll run both agents at the same time, so we should see the ACC try and spread the load by running one agent on each server.
Servers in a cluster are sending resource usage data to the ACC every minute, so we'll run the second agent at least one minute after the first one, so the ACC has a chance to work out which server is best suited for the second agent run.
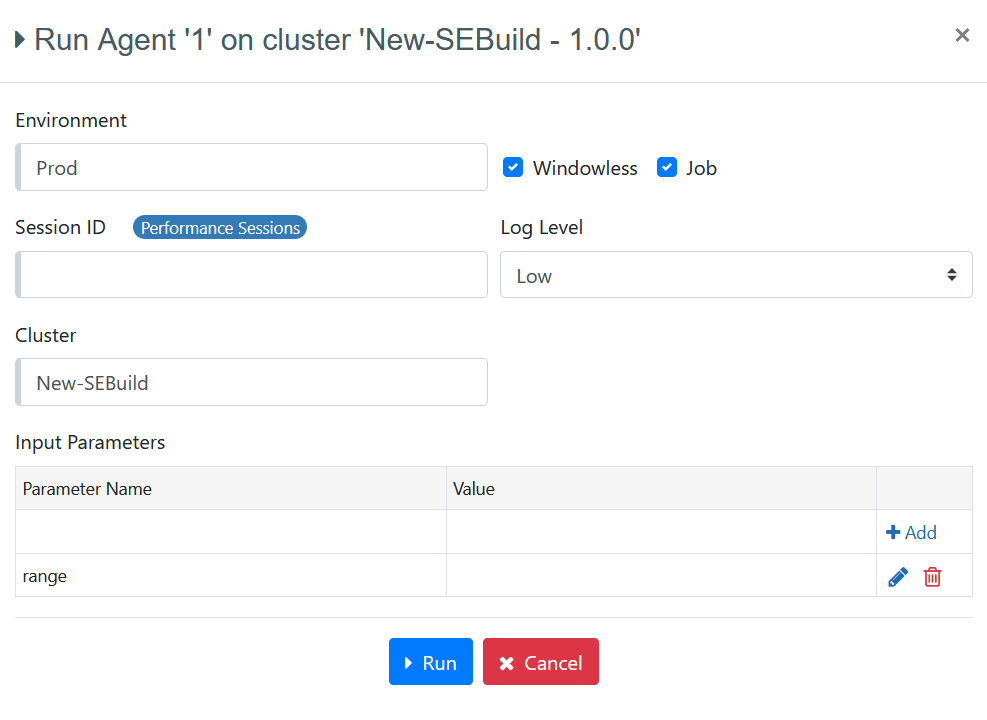
4. For each agent, select Run Agent on Cluster from the agent’s context menu.
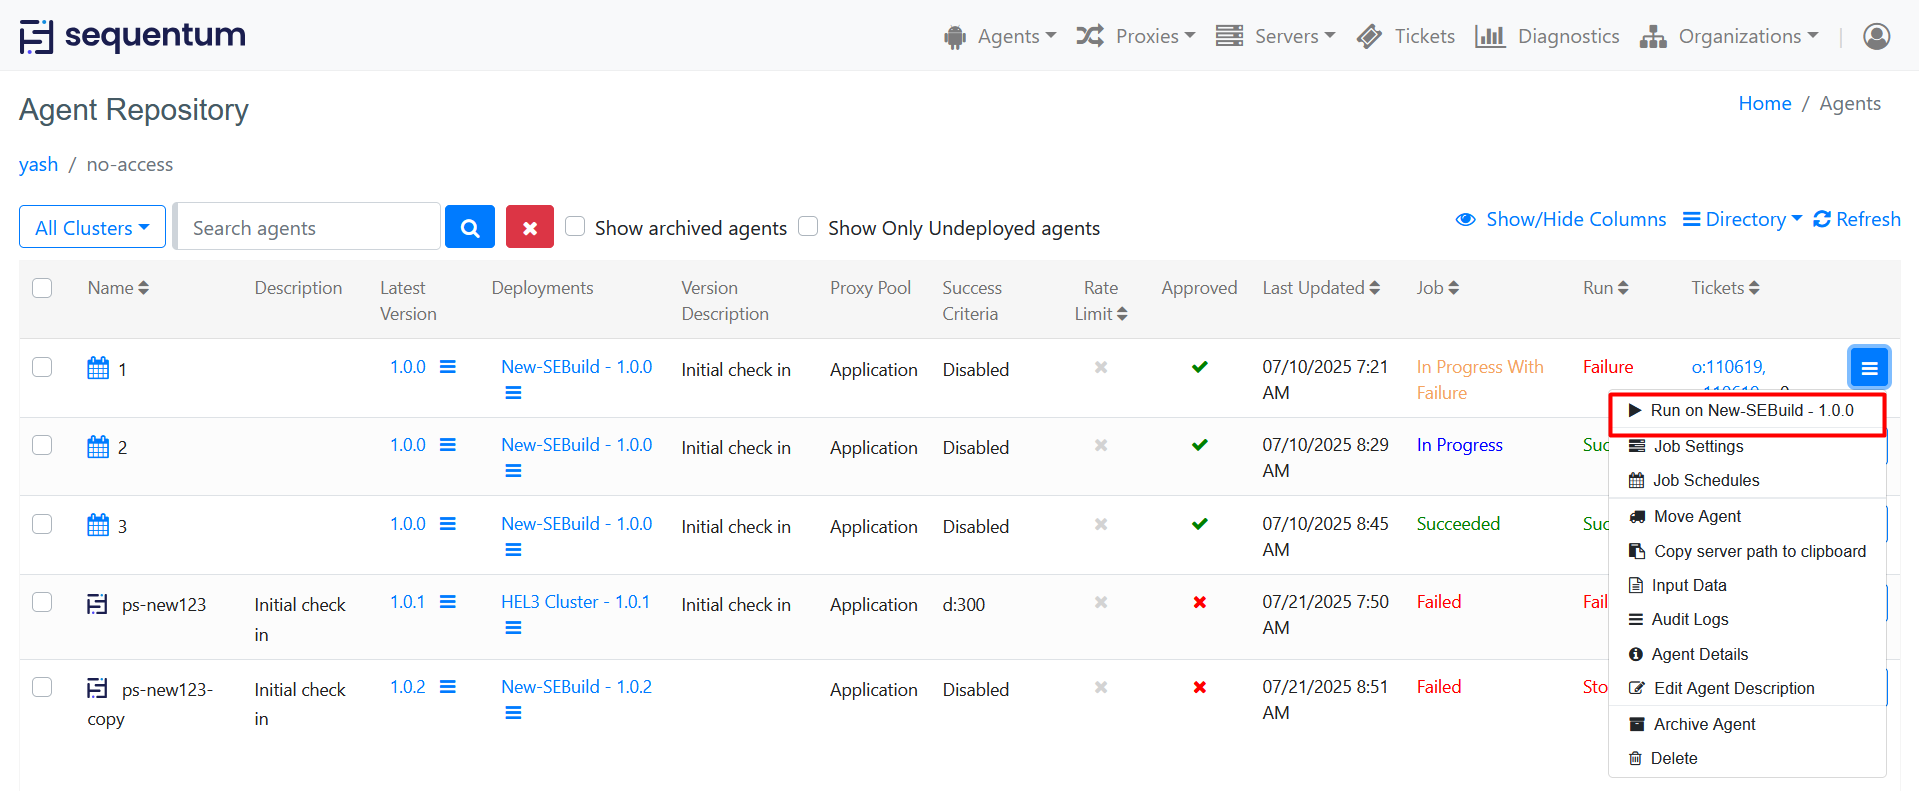
Change the log level to High and click the Run button.
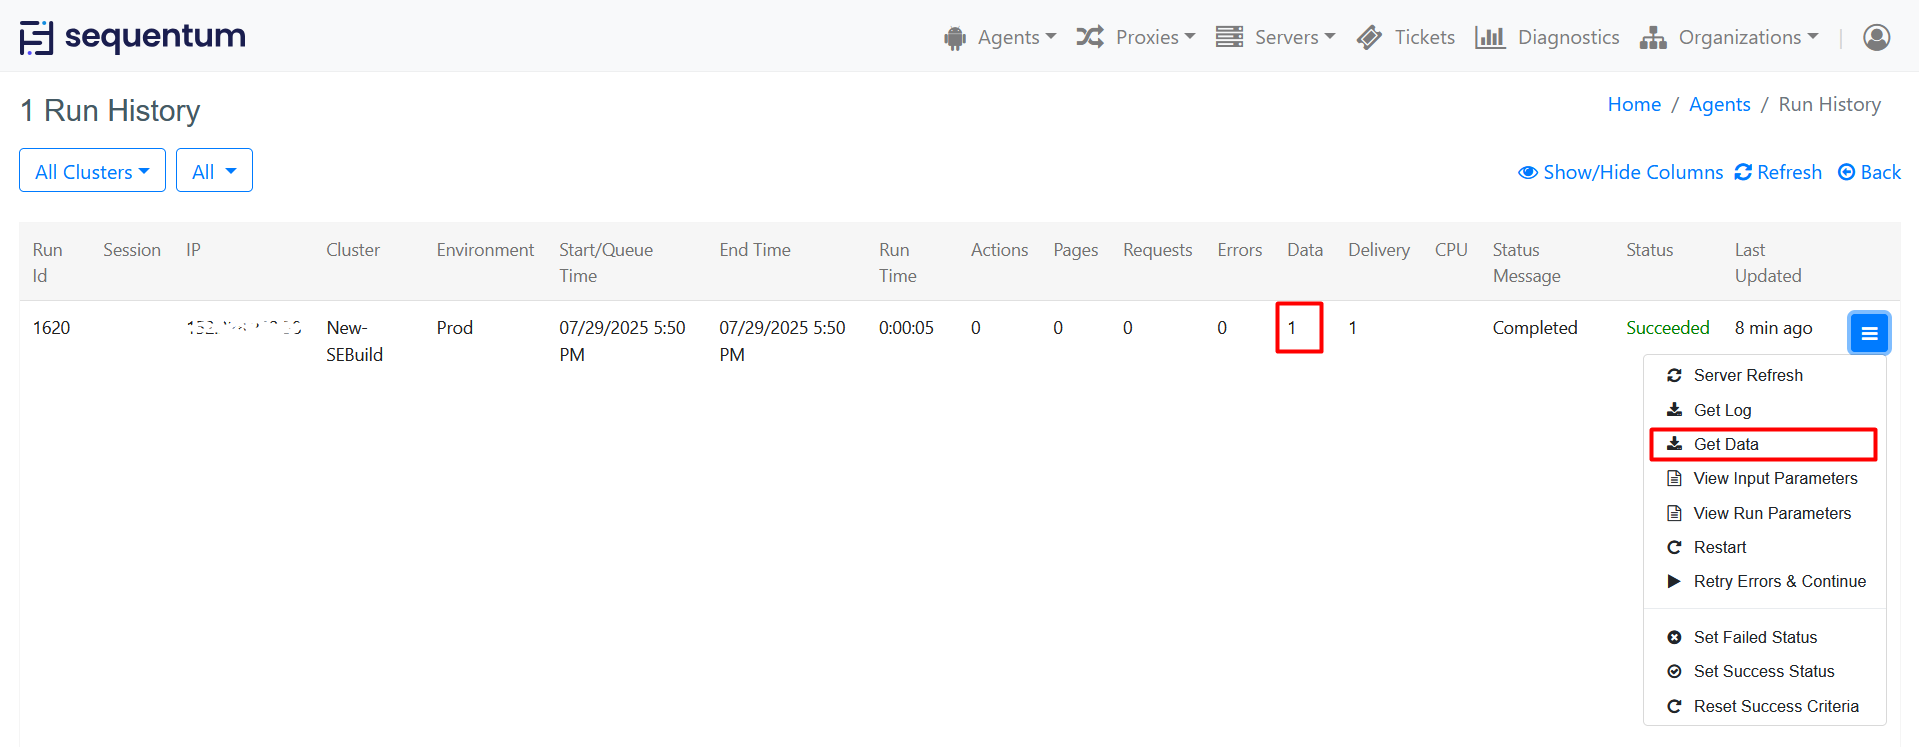
5. For each agent, click on the Running link to navigate to the Run History page. On the Run History page, verify the agent execution by looking at the server IP addresses, Data count, Action counts,Page loads, Execution Status.
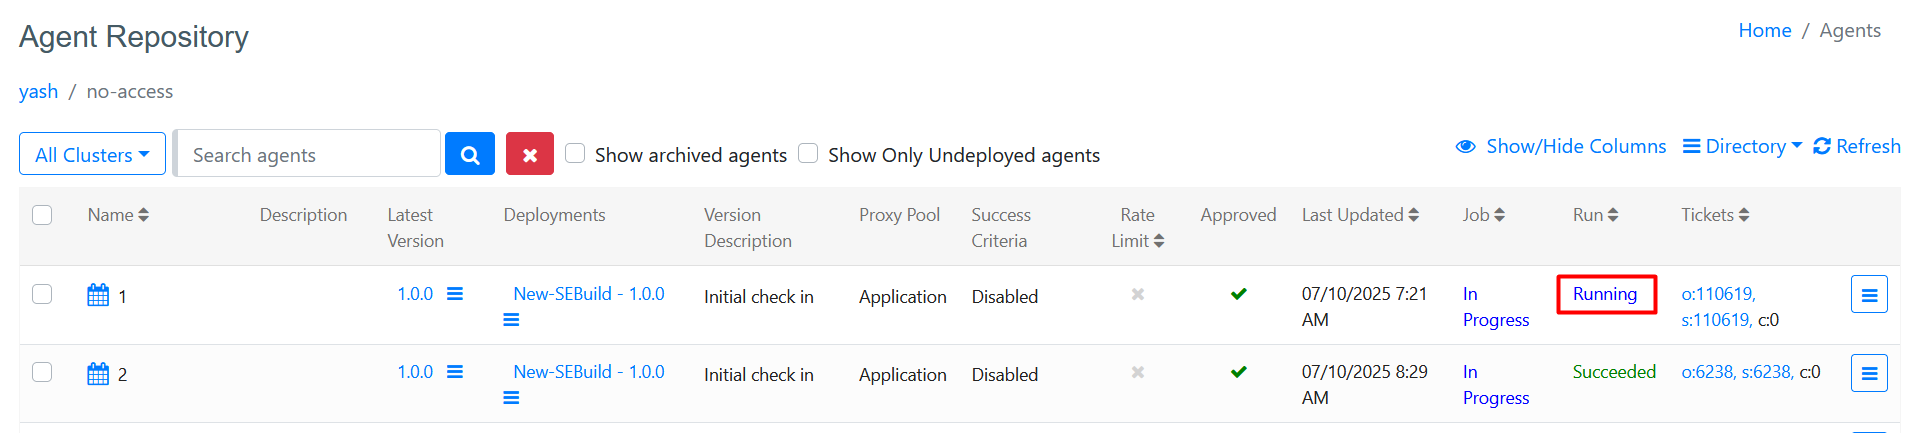

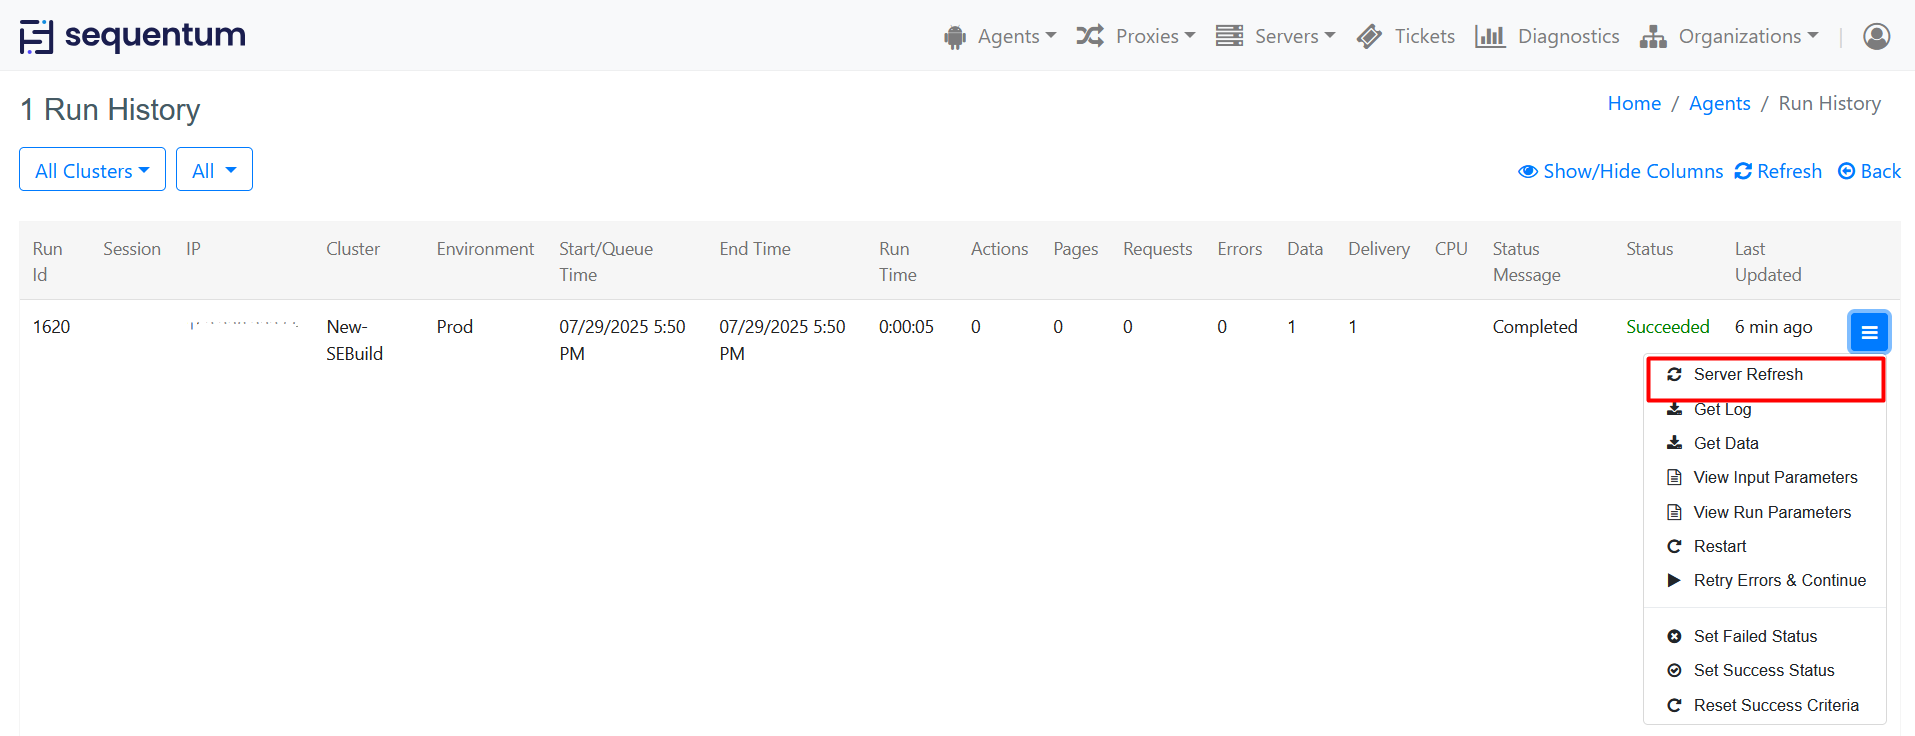
You can click Refresh on the Run History page to see updated progress of each agent, but the ACC will only poll agent status data every one minute, so a refresh will only show updated data if it has been at least a minute since the last refresh. If you want to update status for a particular agent run directly from the Sequentum server, select Server Refresh from the context menu.
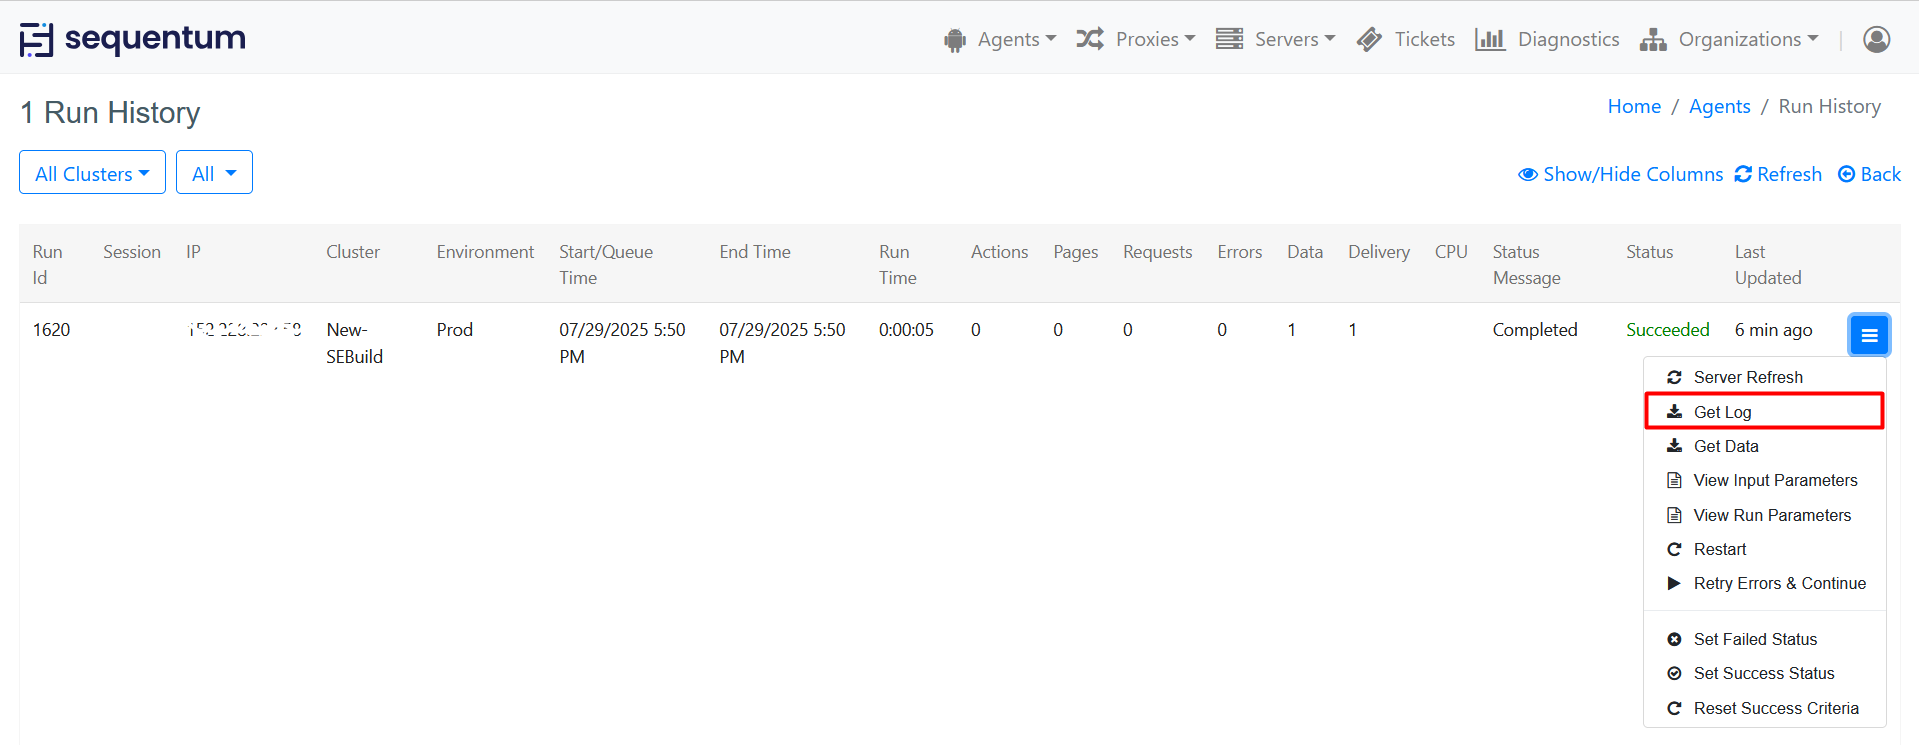
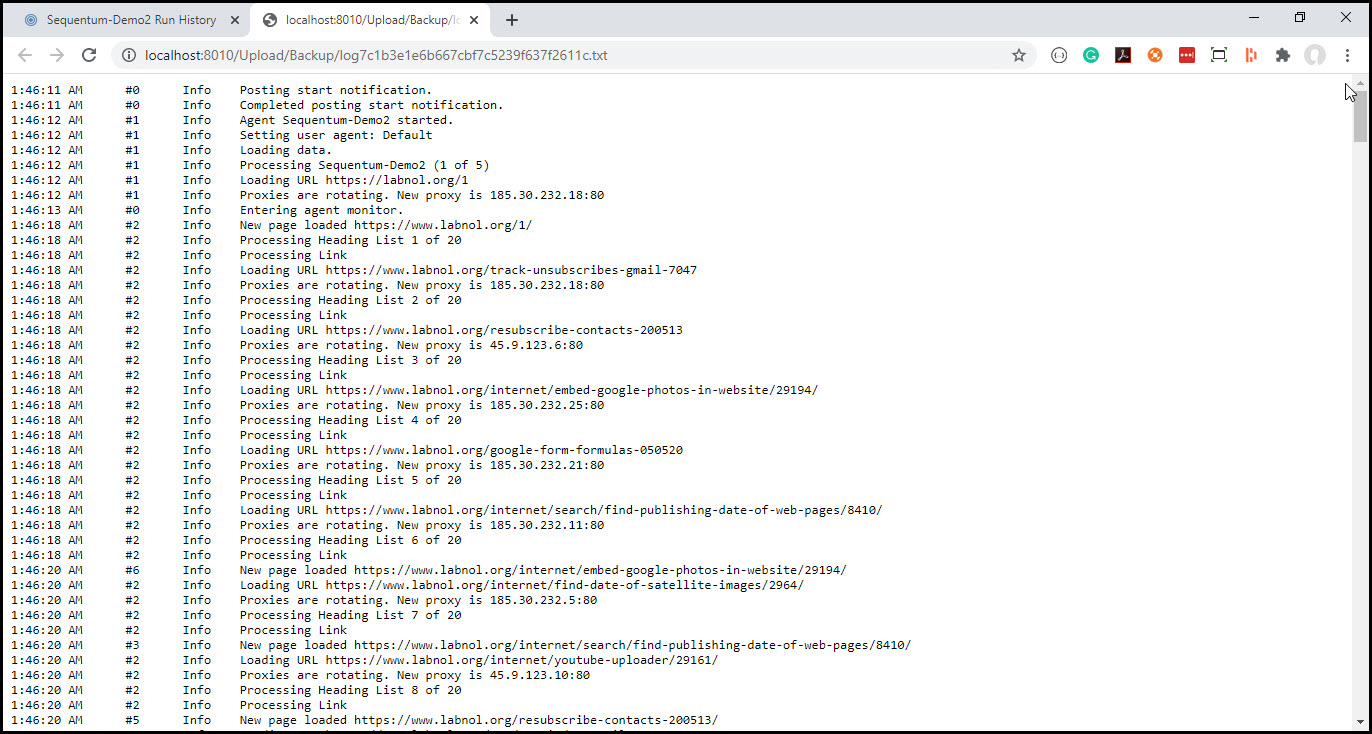
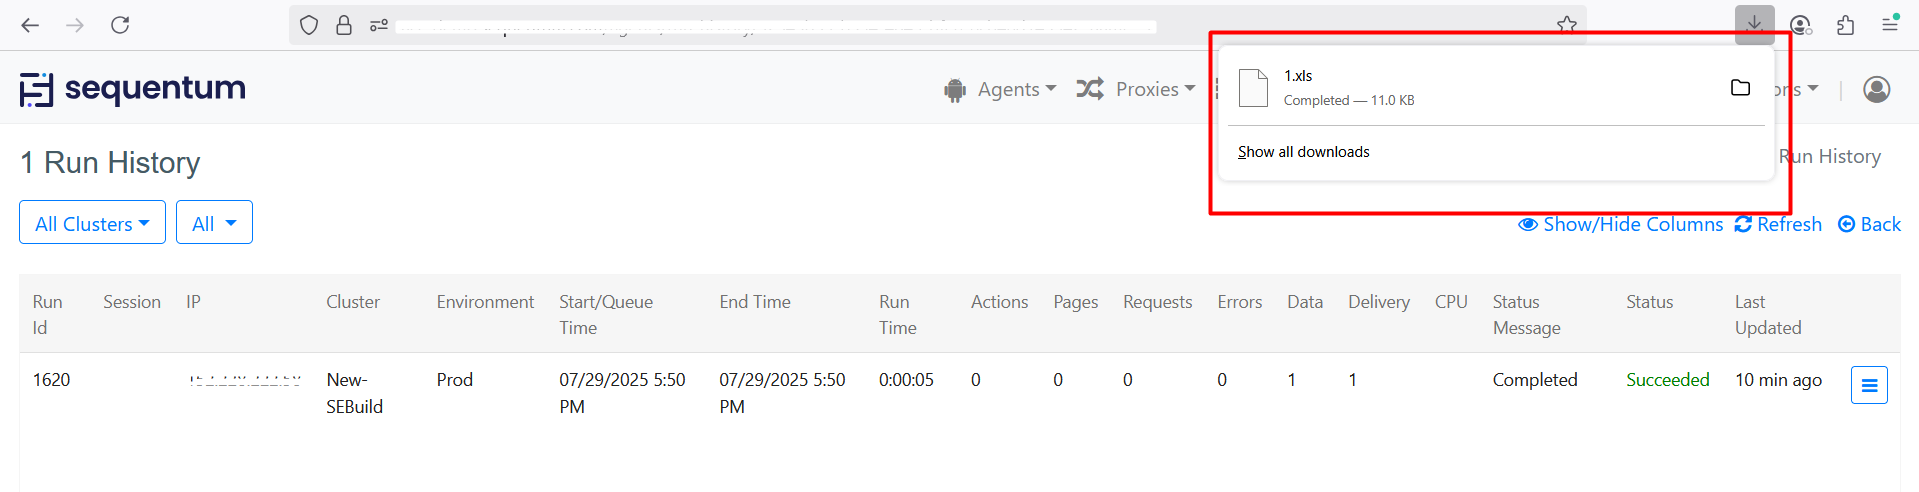
Once the agent runs are completed, open the context menu for each run, and click on Get Log. The log file will automatically get downloaded in the background for you and it will open in the logs file in a new browser tab allowing you to examine the logs without having the need to go to the server and check the logs.
If the agents or servers are configured to keep data backups, the context menu will also contain a Get Data menu which will allow you to download the extracted data in a zip file or in xls/csv format.
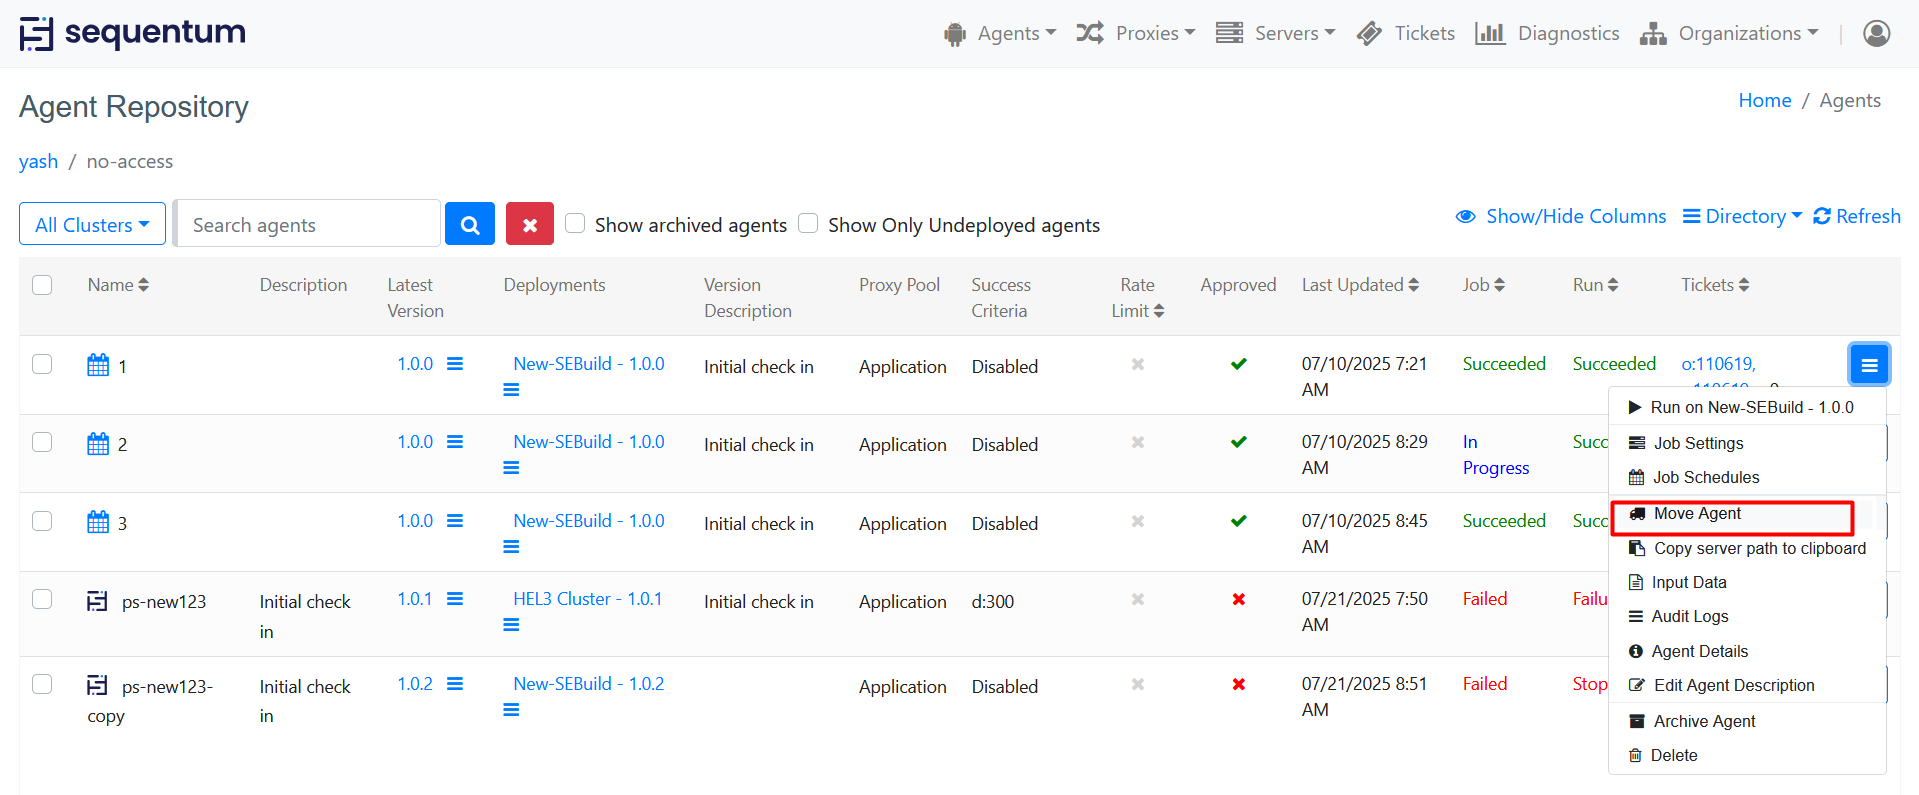
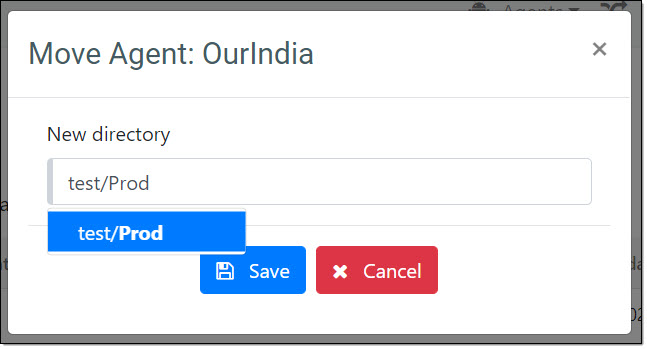
6. We’ll now move one of the agents into production by moving it into the Prod directory. The Prod directory is configured to generate tickets, so a ticket will be generated if the agent fails.
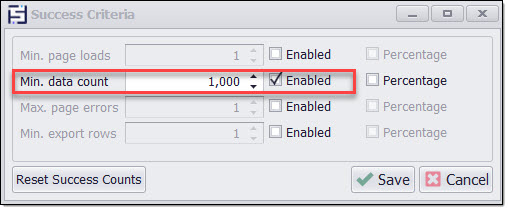
7. We’ll try and force an agent run failure by setting the Success Criteria for the agent to an impossible value.
Edit the agent in the Sequentum Desktop Editor and set the success criteria Min. data count to 1000 (make sure your agent never completes with 1000 data count). Then check-in the agent to the ACC Agent Repository.
Run the agent again and wait for it to fail.
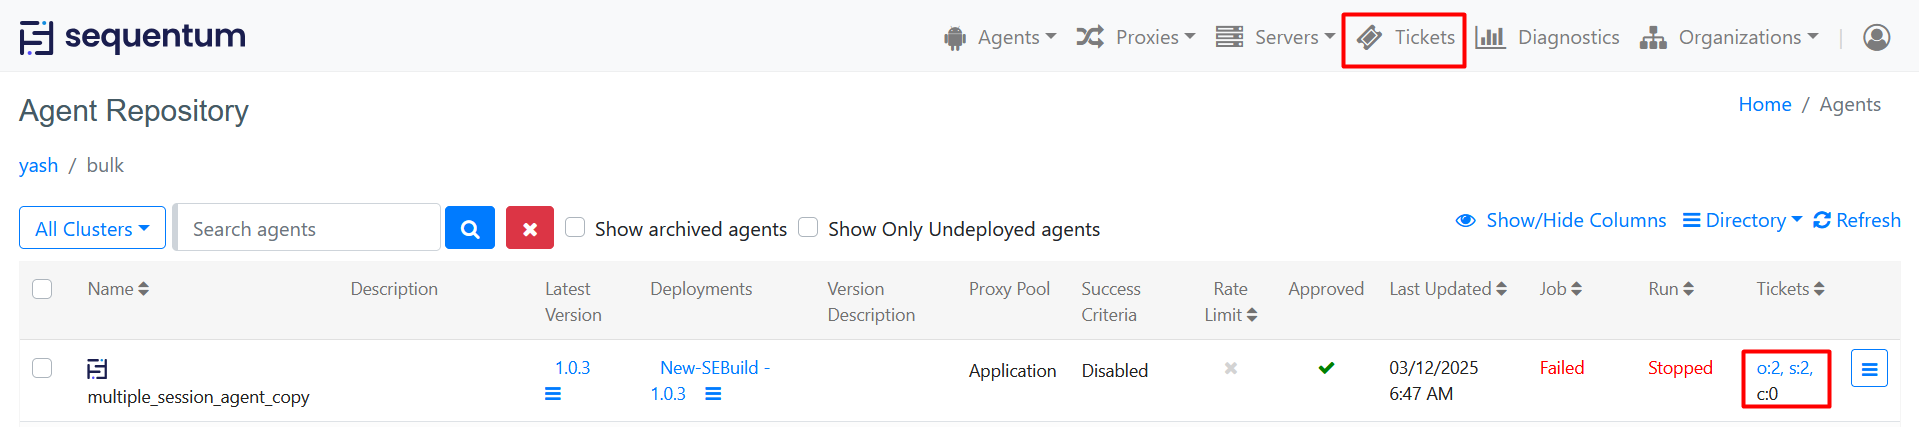
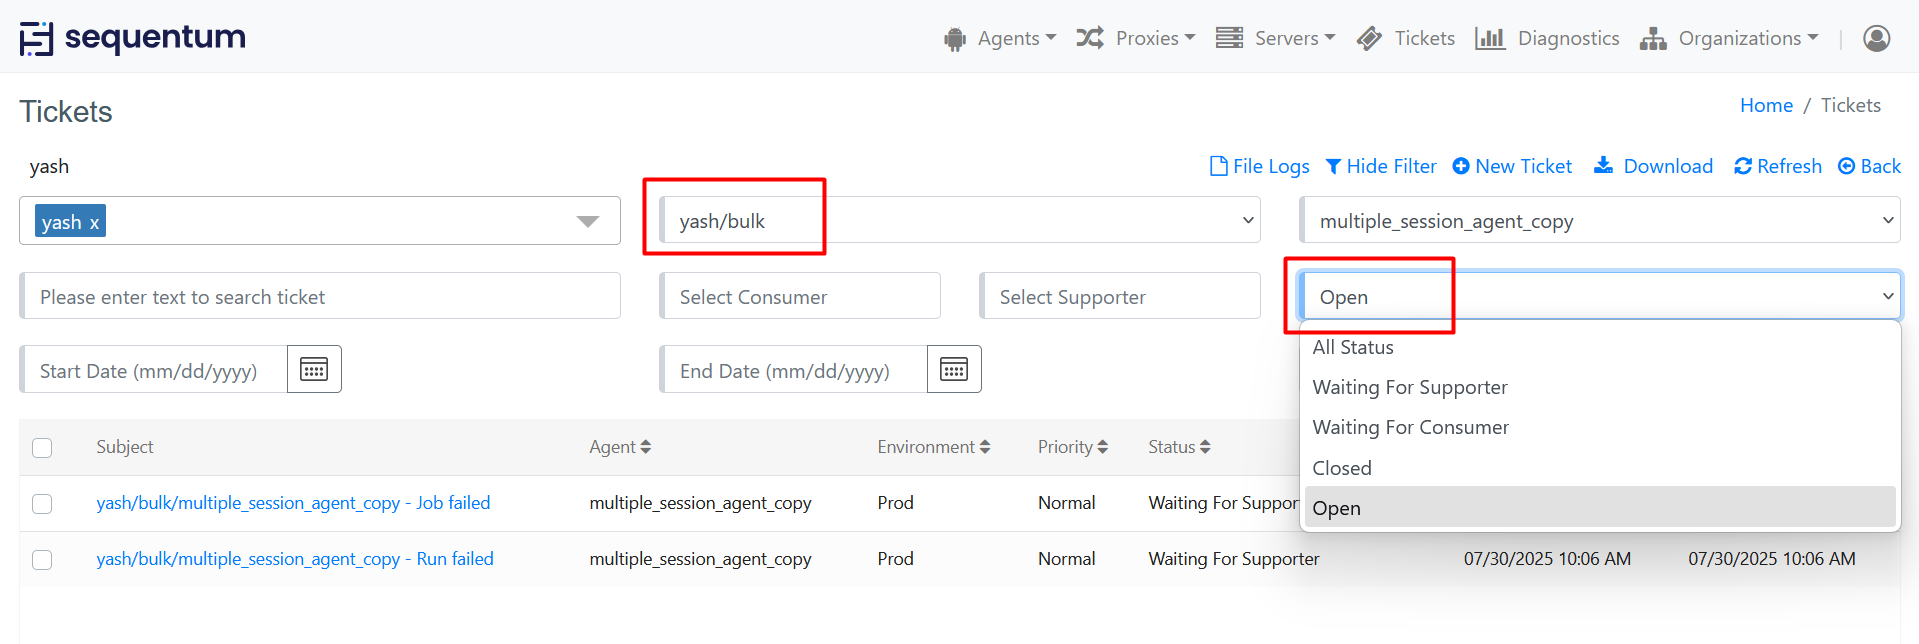
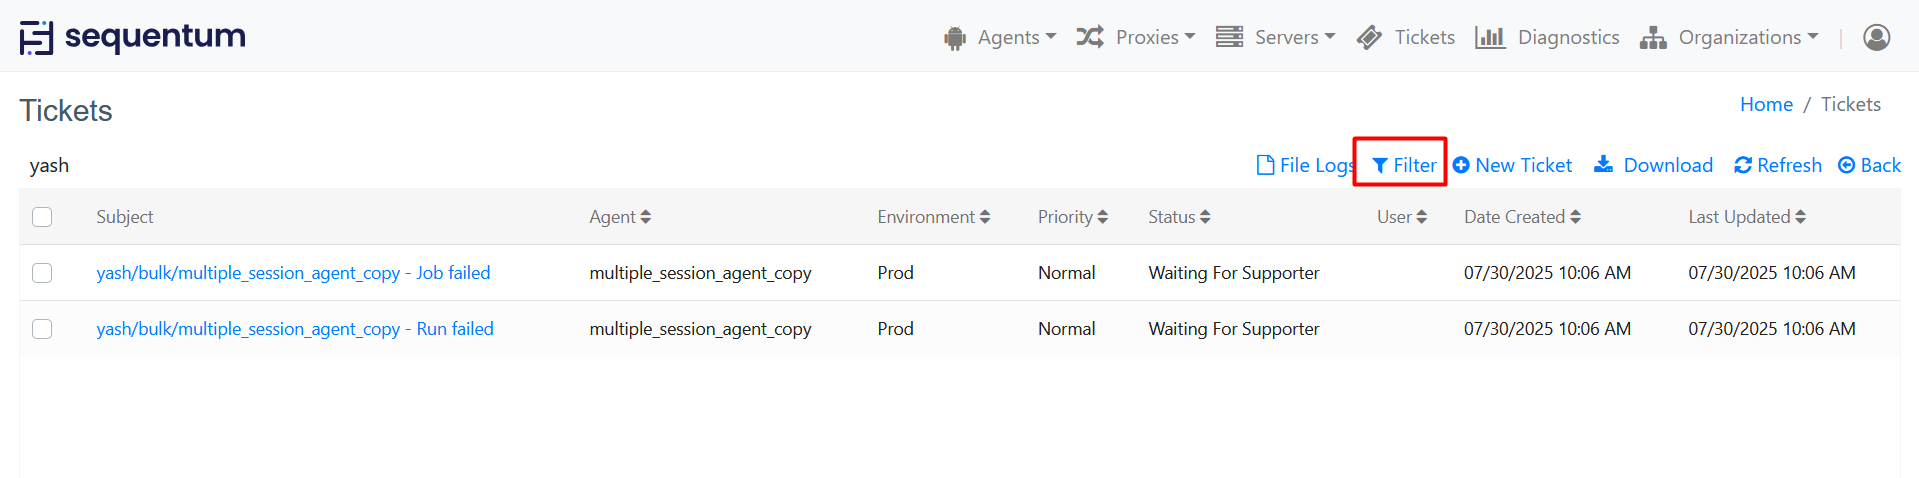
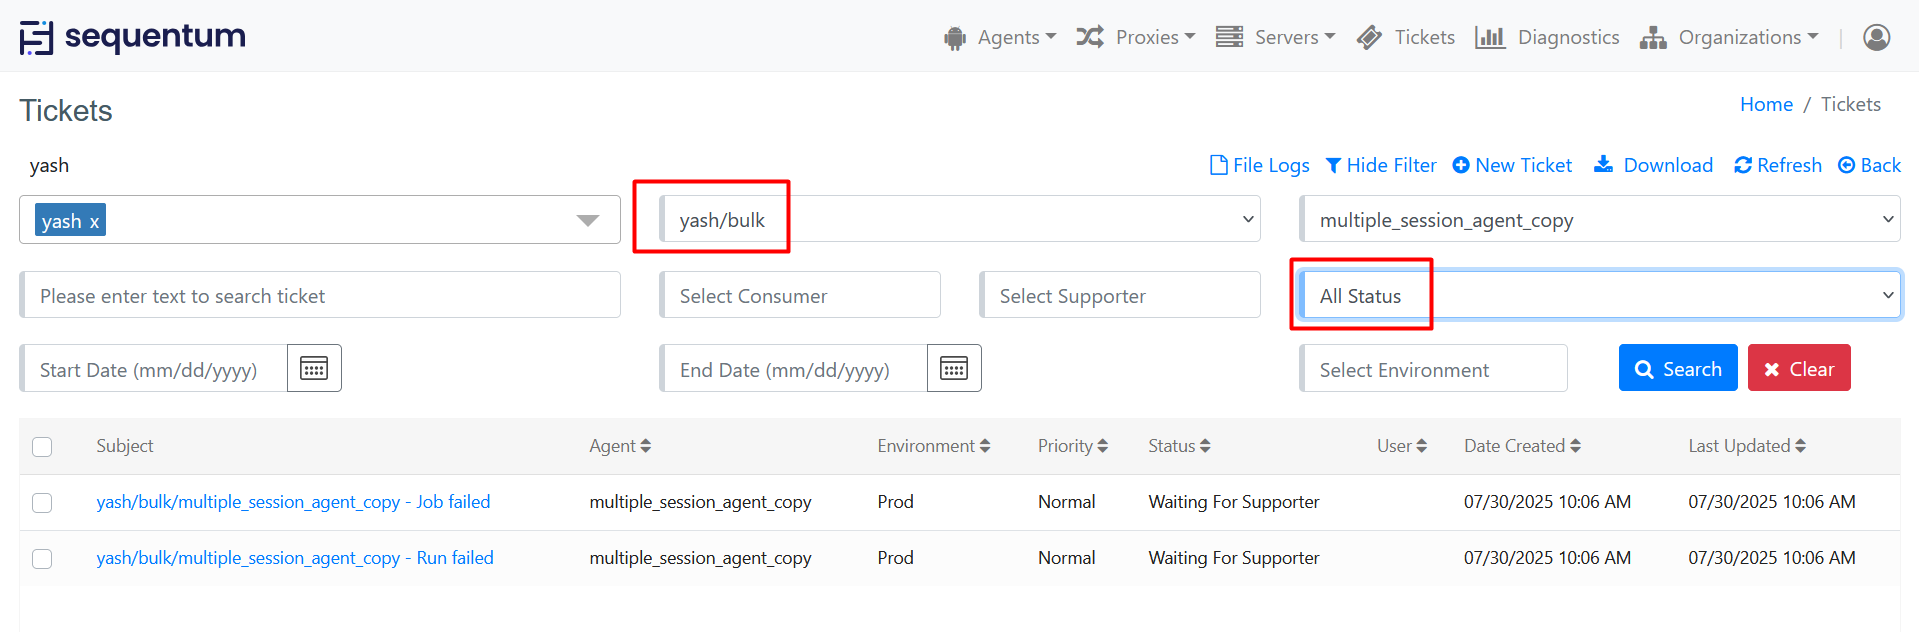
The failure ticket links are now available under the Tickets column and you can directly click on the O:(Open Tickets) or the s: (Tickets waiting for supporter) link and you will be redirected to the Tickets page and the filter option will be selected by default to display all the open tickets or all the tickets waiting for the supporter. You can also open the Ticketing page and click the Filter link and then select the Prod directory and click Search, and you should now see the generated ticket.
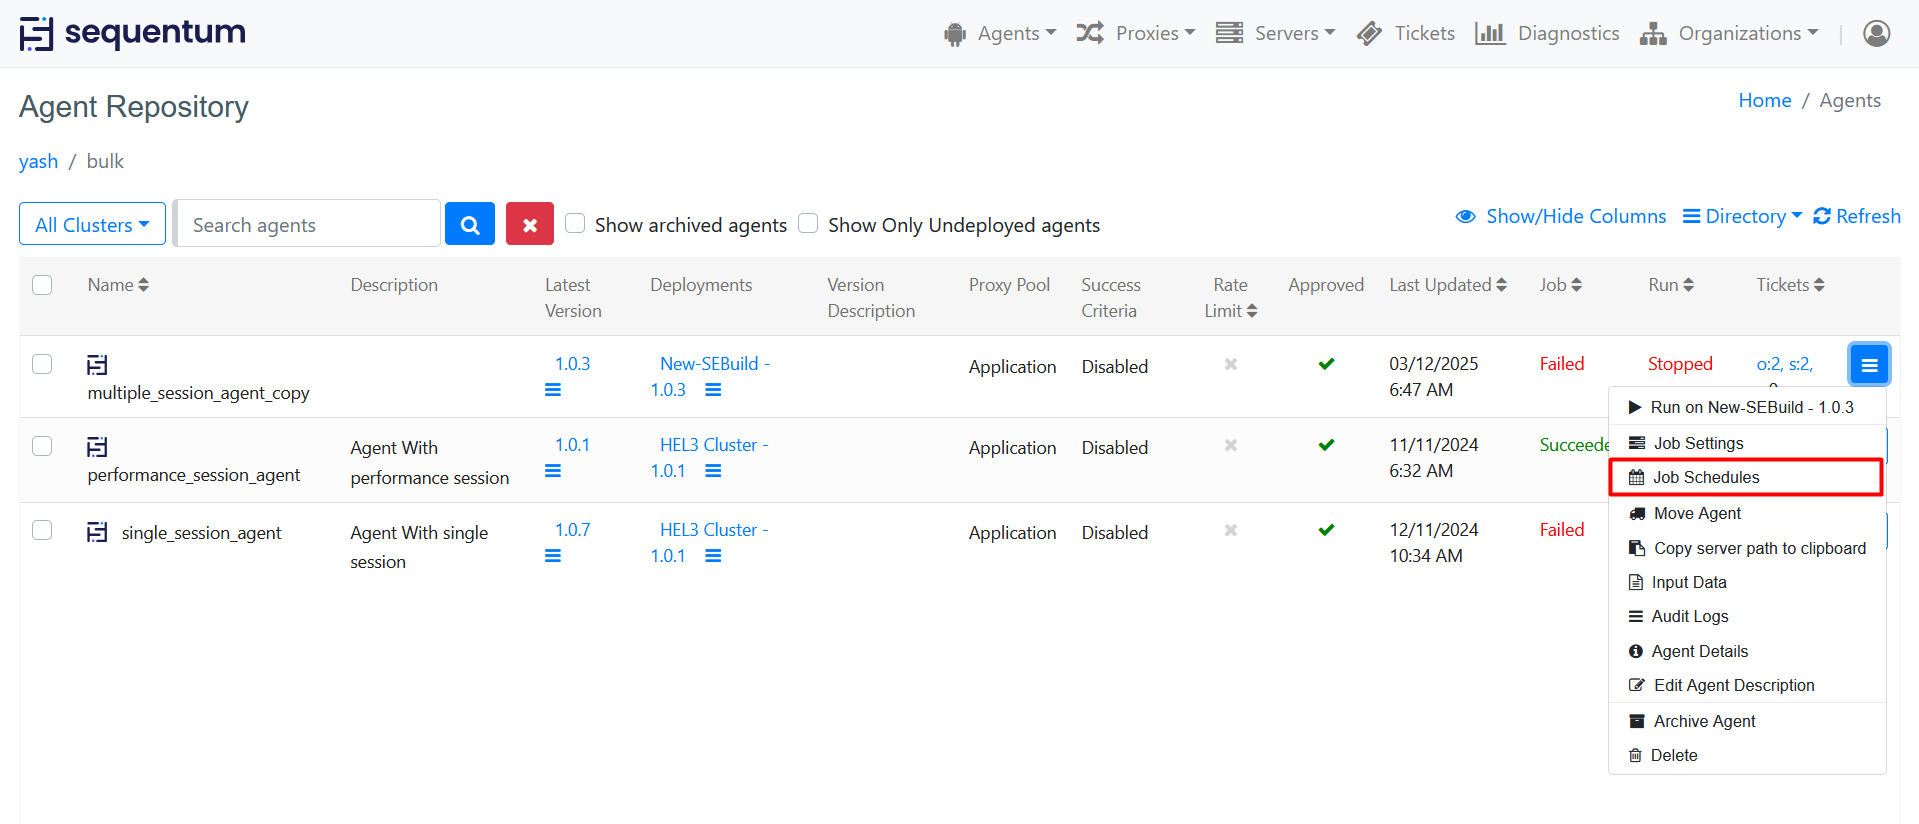
8. We’ll now set up a job schedule to run one of the agents automatically.
Open the agent repository page and select Job Schedules from the agent’s context menu.
Click Add Job Schedule and accept the default values.
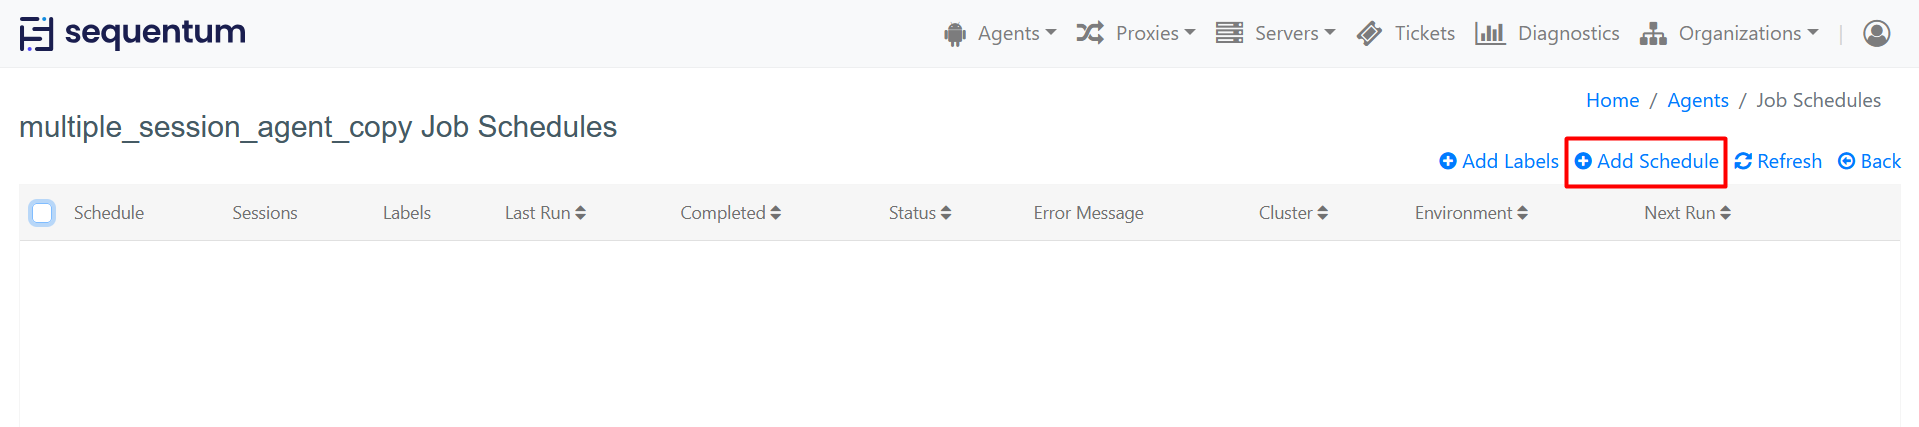
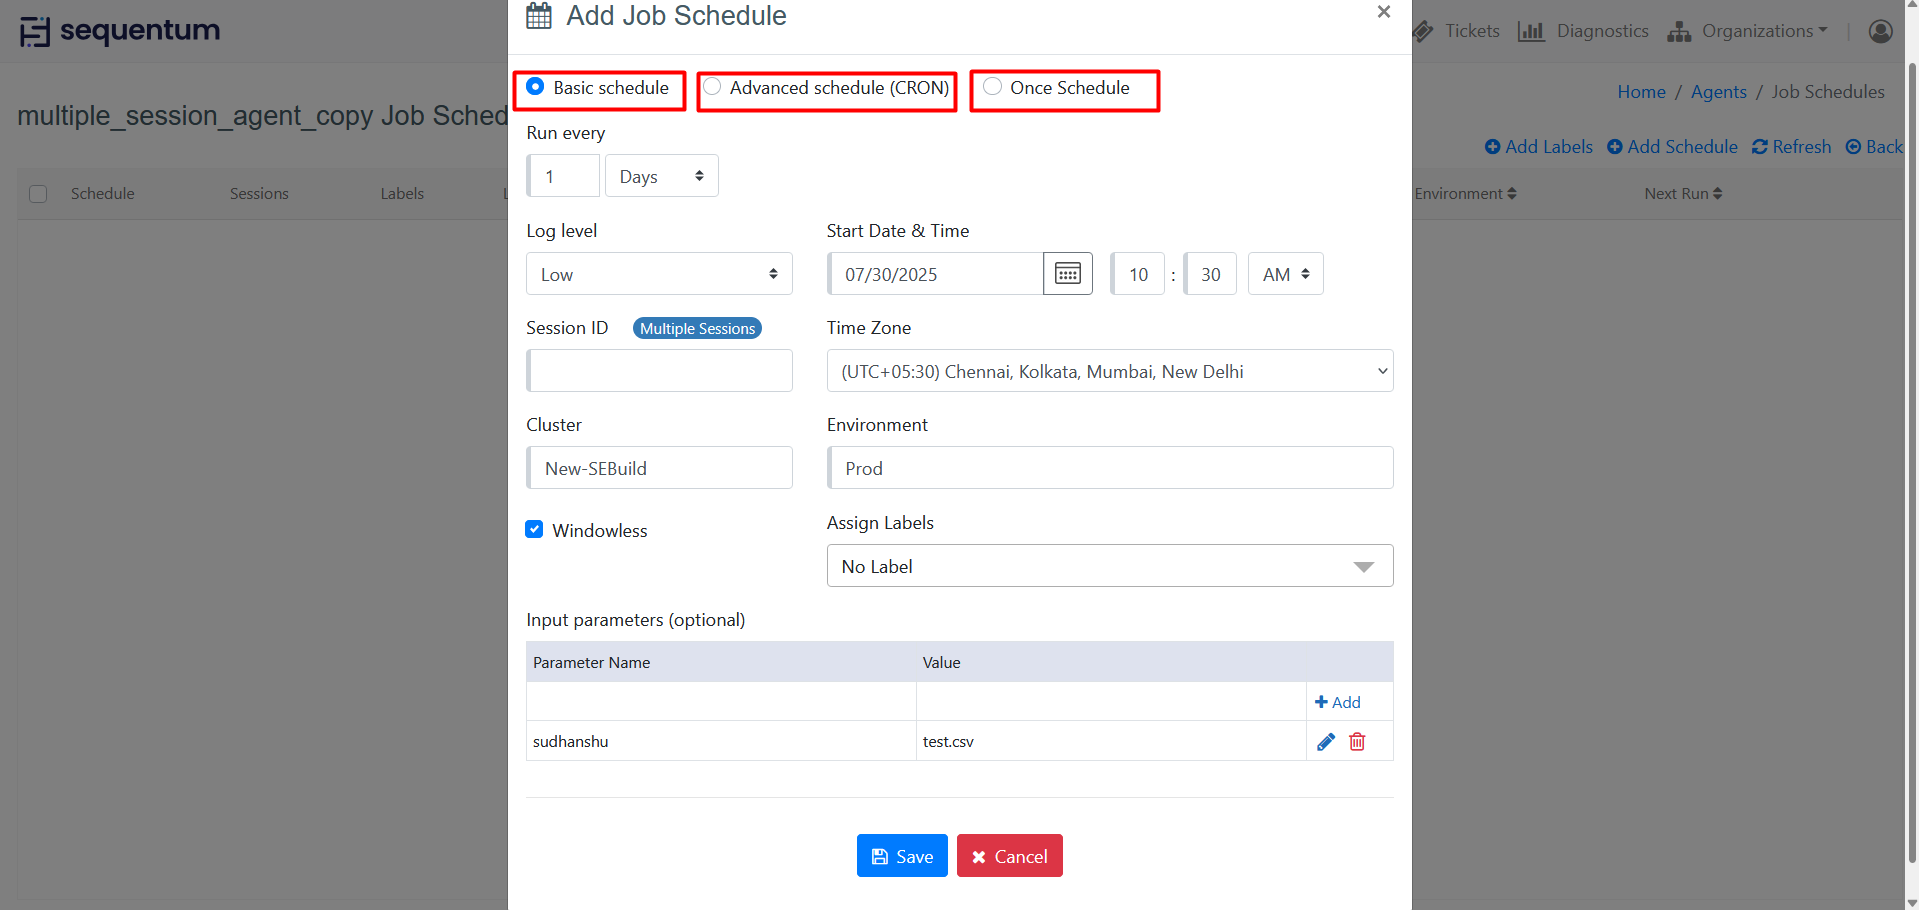
The agent is now scheduled to run once every day.
Updating Agent Control Center
Time to time the Agent Control Center is released with new features and changes to enhance the product experience for the Sequentum Enterprise customers. Follow the steps below to update your already installed Agent Control Center version:
Before updating, we recommend you to first take a back up of your AgentControlCenter database if you have already not configured the backup process for your database.
Run the latest Agent Control Center installer on the server to update the Agent Control Center and the installer will automatically update the ACC on the installed path.
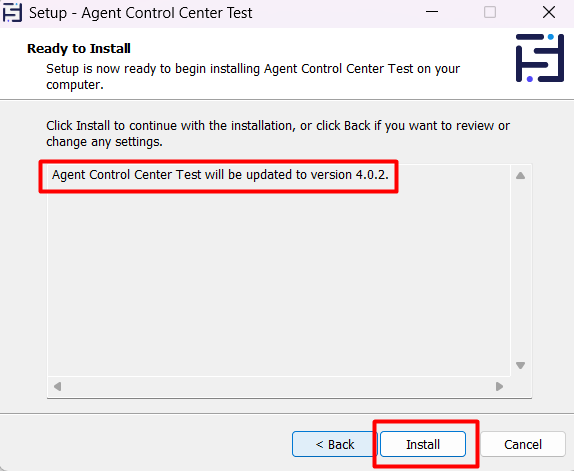
3. Make sure the checkbox Configure Agent Control Center is checked on the Agent Control Center Update Wizard and then click Finish.
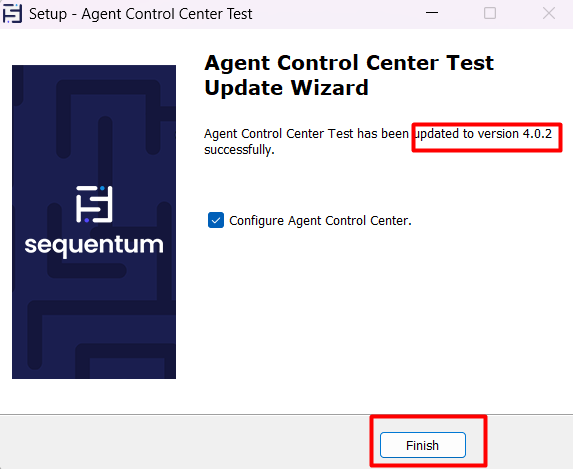
4. The configuration web page will open in your default browser with all configuration parameters pre-populated and the Database Settings set to update the database with the new database changes.
5. Click Save and the config page will run the database update script before you are redirected to the Login page.
Common Installation Issues
The Agent Control Center setup may fail if you don’t follow the exact installation steps provided above and if you do not install the required pre-requisites.
Below are some common installation issues which we often see:
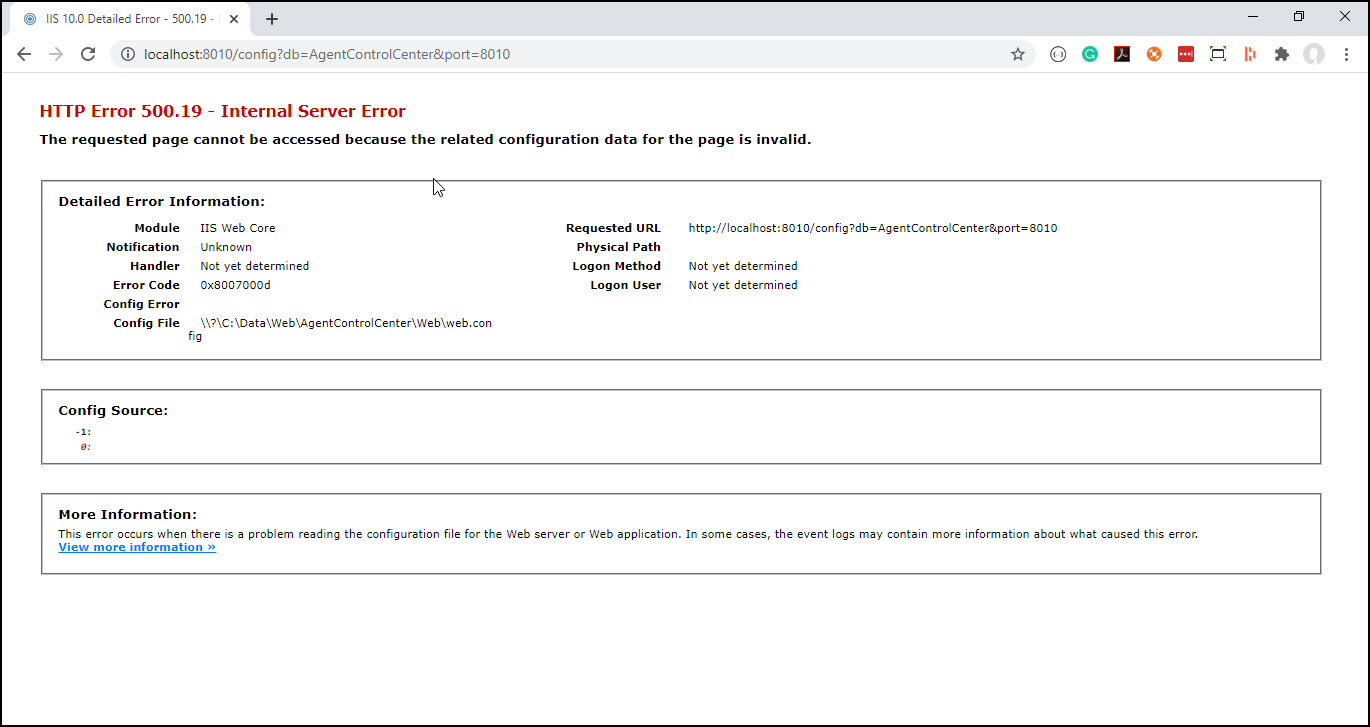
Installing an older version of ACC (2.4.3 or below).
The newer versions of ACC supports .NET Core 3 Hosting Bundle, however, the older versions support .NET Core 2 Hosting Bundle. So if you are installing an older version of ACC you must have .NET Core 2 Hosting Bundle only installed on your system else you will see a below error page when the installation completes and you want to set up your configurations:
In order to resolve the above error, you just need to install .NET Core 2 Hosting Bundle on your ACC installation machine:

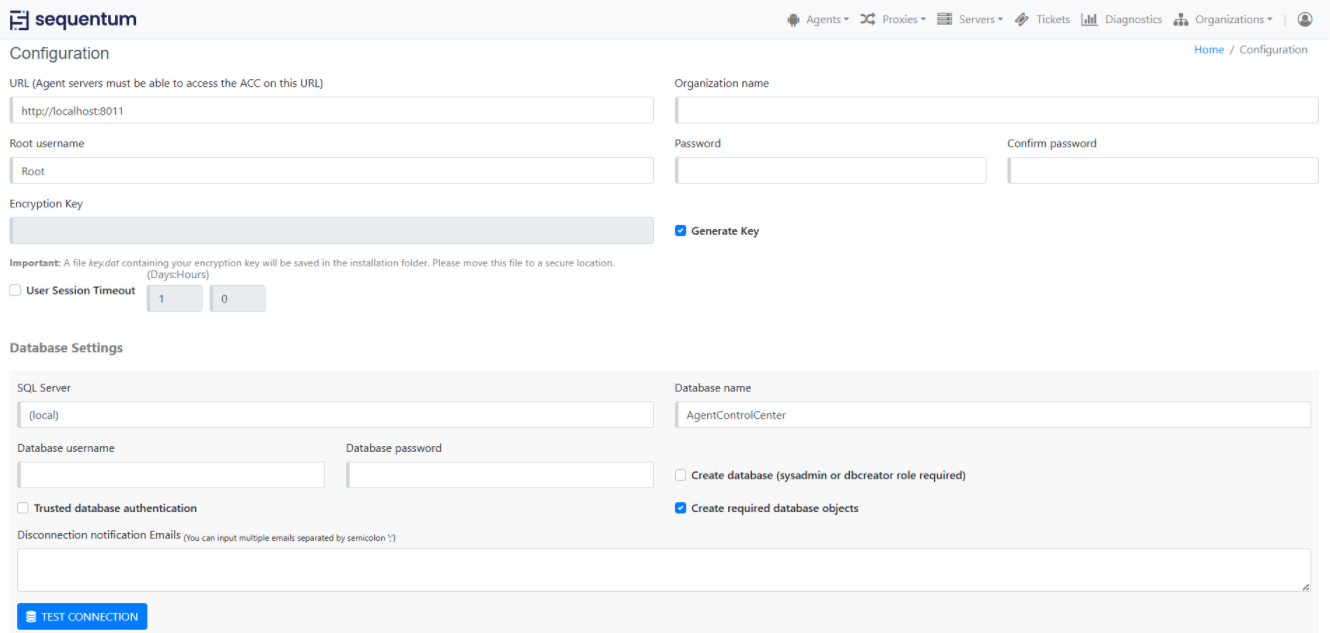
Once the .NET Core 2 Hosting Bundle is installed just refresh the configuration error page and you should be able to see the configuration page:


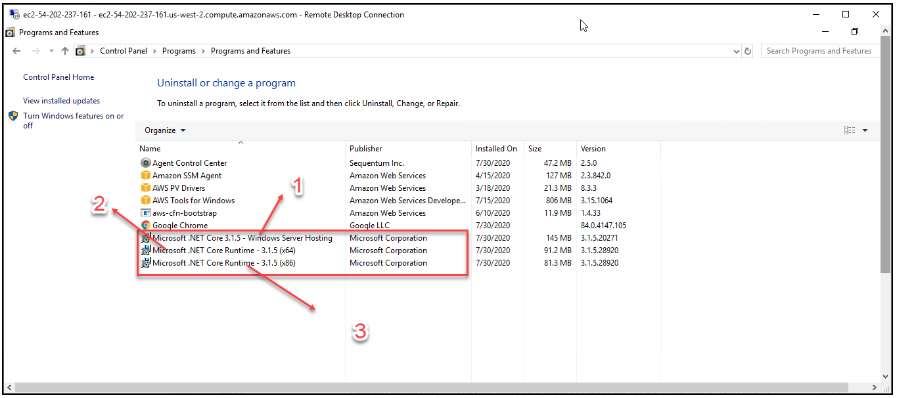
2. If you install .NET Core 3 Hosting Bundle before installing the IIS, you will get the below error page instead of the configuration page when you finish the installation:
In order to resolve this installation problem follow the below steps:
Go to Control Panel>Programs>Programs and Features and uninstall the .Net Core 3 Hosting bundle which must be already installed on your system.
Once you uninstall the hosting bundles please re-install the .NET Core 3 Hosting Bundle again and then restart the server.
And now run the ACC installer again and you should be able to get the configuration page as below once the installation is complete:
3. If you installed the aspnetcore windows-x64 version rather than installing the aspnetcore-windows-hosting-bundle . You will see the below error page when the installation is complete and you want to set up your configurations:

In order to resolve the above error you need to perform the below steps:
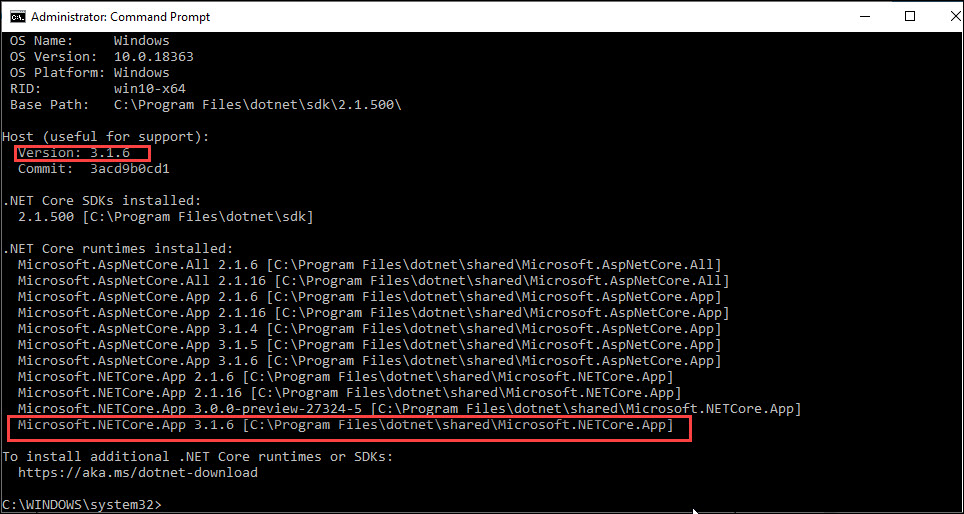
Open windows command prompt and use dotnet --info command to the .Net Core version installed on the system:
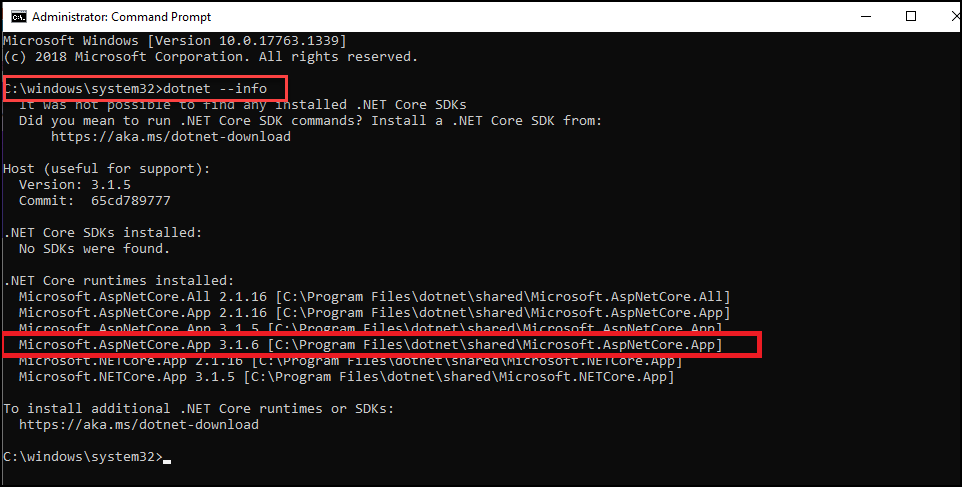
The above image shows that the server is having only the AspNetCore App 3.1.6 app and not the.NETCore-hosting-bundle App 3.1.6. Although the above image shows that the server is having installed with 3.1.5 core-bundle but since the AspNetCore 3.1.6 is a higher version so it is being preferred and used over the.NETCore App 3.1.5 and thus, cause issues with the installation.
To overcome this problem simply install the .NET Core 3.1.6 Hosting Bundle.
Next either reload the Configuration page again or run the ACC installer again and you should be able to get the configuration page as below once the installation is complete:

