
Ticketing System
Ticketing System on ACC Web Portal
The Ticketing System is an issue tracking system for the existing "Sequentum Enterprise" applications. This system, allows users to report any issues or bugs and to request new features and product enhancement. A ticket is a running report on a particular problem/feature/enhancement, its status, and other relevant data. Tickets are commonly created via the Agent Control Center (ACC) web portal or automatically generated via failure jobs or failure runs. Each ticket has a unique reference number, which is used to help the user or staff to quickly locate, add to or communicate the status of the user's issue or request.
The Ticketing System primarily consists of the following three pages:
Ticket List - This page lists all the tickets in the system and can be filtered by status (e.g. "Waiting for Our Reply").
New Ticket - This page allows users to create a new ticket.
Ticket Details - This page displays the detail of the user ticket including user's comments / issue description, any attachment(s) and the ticket status.
Ticket List Page
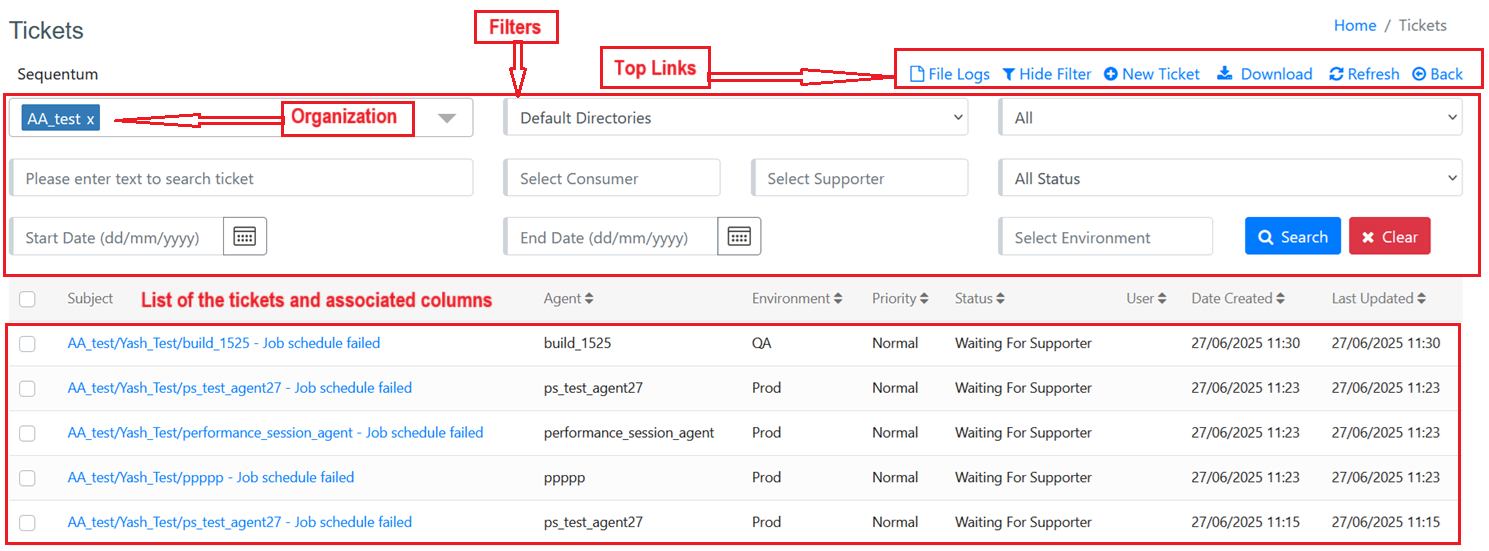
Top Links
File Logs: Displays the Ticket Log files. This page contains File Name, Created and Content. Contents contain the Log Files.
'Filter'/'Hide Filter': This link is used to show/hide the ticket filter field items. By default, the ticket filter area is collapsed (hidden).
New Ticket: This link is used to create a new ticket.
Download: This link allowing users to download the ticket data in .CSV format which they have searched or filtered.
Refresh Link: This link is used to reload the tickets on this page without refreshing the page.
Ticket Filters
To help users find a specific ticket(s), the Ticketing System includes a series of useful ticket filter fields.
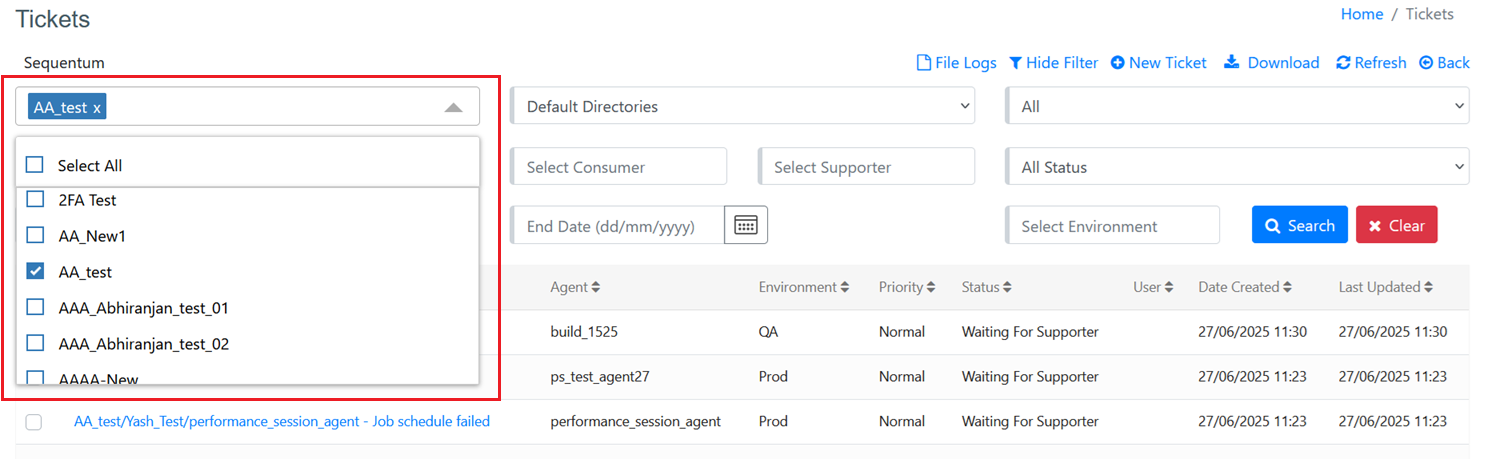
Select Organization: This allows users to select one or multiple organizations. By default it will dislpay the current Organization.
Text Search: Any text entered in the text box is matched against the subjects and description text for all tickets in the Ticketing System and all matches are listed below by subject name. The search text entered is not case sensitive.
Directory: Directory selection criteria will restrict the search results listed to tickets only from the selected directory. Default Directories is a collection of Default Tickets directories and hence display all tickets from these directories. All Directories selection will display tickets from all directories including Default Directories. Please note: All Directories is not a default selection and the Default selection (as part of default filter) is Default Directories.
All: All (agent) selection criteria, will restrict the result list to tickets only from the selected agent. Choosing "All" will display tickets from all agents displayed in the list (from the selected directory).
Status: Selecting a status will limit the search result to include tickets having the selected status only. All Status is the default value which displays tickets having any status. Note: selecting the status 'Open' will include tickets with 'Waiting for supporter' and 'Waiting for consumer' status.
Consumer: Selecting a consumer will restrict the results only to those tickets which have the same consumer. By default, this filter field is blank which means all consumers are selected.
Supporter: Selecting a supporter will restrict the results only to those tickets which have the same supporter. By default, this filter field is blank which means all supporters are selected.
Start Date and End Date: Whenever a new ticket is added into the Ticketing System, it's creation date and time is recorded. If you know the date the ticket was created or a date range for the ticket you are searching for, then filtering by date can be very helpful when trying to find a ticket. Whenever you are typing a date, please ensure that date is entered in proper format. The date format used matches that use the standard local format of the logged-in user.
Select Environment: If a user wants to view tickets related to a specific environment (Prod/Dev/QA) job or run, they can use this filter.
Search Button: Once you have finished setting up your filters, click the Search button to execute the search and the filtered search results will be listed by ticket subject below the ticket filter fields.
Clear Button: The Clear button, clears the details entered for all filter fields and resets them to the default values.
Ticket List Container
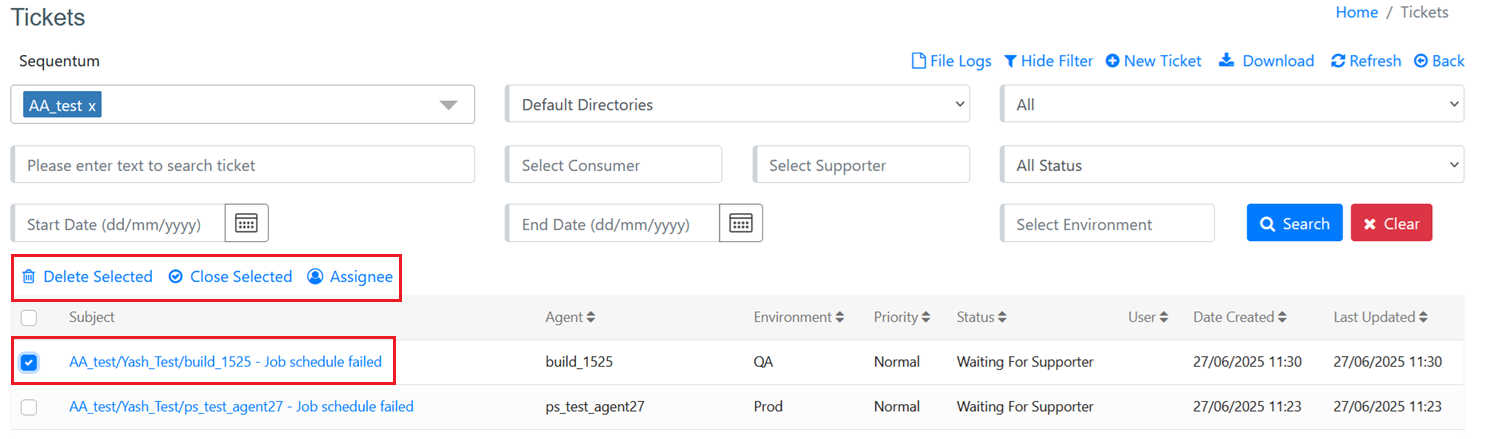
By default, the most recent tickets are displayed first based on their creation time. Each ticket is represented in a row and the subject is a clickable link that takes the user to the Ticket Details page. The action menu shown in the above image is only visible to admin users. The Action menu has three options (i.e. Delete Selected, Close Selected, Assignee). If a ticket is already closed, it will only show the Delete option.
Subject: The subject for all listed tickets is a clickable link that takes users to the Ticket Details page.
Close Selected: This option will only appear once a checkbox against any or all tickets is marked. The action menu 'Close Selected' option sets the ticket status as closed. This action is only available to Admin Users (Supporter Admin, Consumer Admin, Admin or Super Admin) only. A ticket with status set to Closed will not display unless the filter applied includes Closed tickets.
Delete Selected: This option will only appear once a checkbox against any or all tickets is marked. The action menu 'Delete Selected' option deletes a ticket permanently. This is an unrecoverable action.
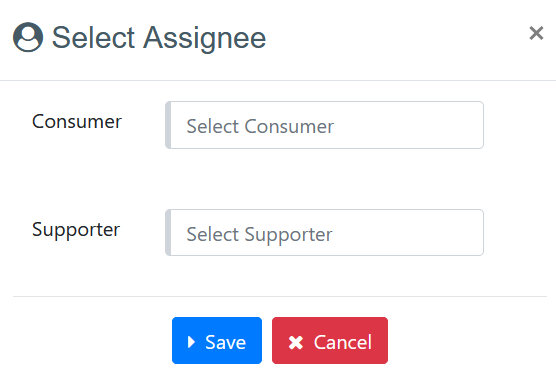
Assignee: To streamline ticket assignment, select multiple tickets using checkboxes and choose an assignee from the dropdown menu. User can assign a single assignee to all selected tickets or assign individually.
New Ticket

All users can create a new ticket. To create a new ticket click the New Ticket link available on the Ticket List page. The link will take you to the page illustrated above. If a directory or agent filter is active, the selected directory/agent will by default be selected on this page. To create a new ticket follow these steps:
Select Directory: Select a directory. Whenever a selected directory is changed, it does three things.
It reloads the agent's list, based on the selected directory.
It tries to populate the Default Consumer text box in the form.
It tries to populate the Default Supporter text box in the form.
Select Agent: You can select one or more agents. If multiple agents are selected, this will generate one ticket per agent. Note: when you click on an agent, the Ticketing System detects it's a directory and will try to populate Default Supporter and Default Consumer (if any) so it may change your previous Supporter and Consumer entries.
Enter Subject: Enter the subject of the ticket. This subject should be brief but describe the purpose of the ticket. This subject is visible on the ticket list page and will be used to identify your tickets in the list.
Select Consumer: If the consumer text is already populated with a suitable consumer user, you can leave it as is, otherwise you can manually select the consumer you want from the consumer list. Typing in the consumer text box filters the available consumers with the entered matching text.
Select Supporter: If the supporter text is already populated with a suitable supporter user, you can leave it as is, otherwise you can manually select the supporter you want from the supporter's list. Typing in the supporter text box filters the available supporters with the entered matching text.
Enter Details: Enter the details about the ticket. Ensure your text includes sufficient detail to explain the need/expectation from this ticket. Whenever necessary, you can format your text. You can also attach links, images, code, agents, etc to the ticket.
Upload Attachments: You can upload any number of attachments with the ticket. The maximum allowed attachment size of each file is 100 MB. To upload attachments, you can drag and drop files or you can click on the upload area to select files from the file system.
Save Button: Click the Save button to create the ticket. Please make sure you have selected at least one agent, entered the subject and the details of the ticket as these three fields are mandatory fields.
Cancel Button: Clicking on the Cancel button simply aborts the ticket creation process and redirects the user to the Ticket List page.
If multiple agents are selected, clicking the Save button will create one ticket per agent and redirect the user to the Ticket List page. If only one agent is selected then the user will be redirected to the ticket detail page of the newly created ticket.
All newly created tickets are assigned with a unique ticket number, you can use this ticket number as a key in conversation with support staff.
By default, all newly created tickets are assigned "Waiting for Supporter" status.
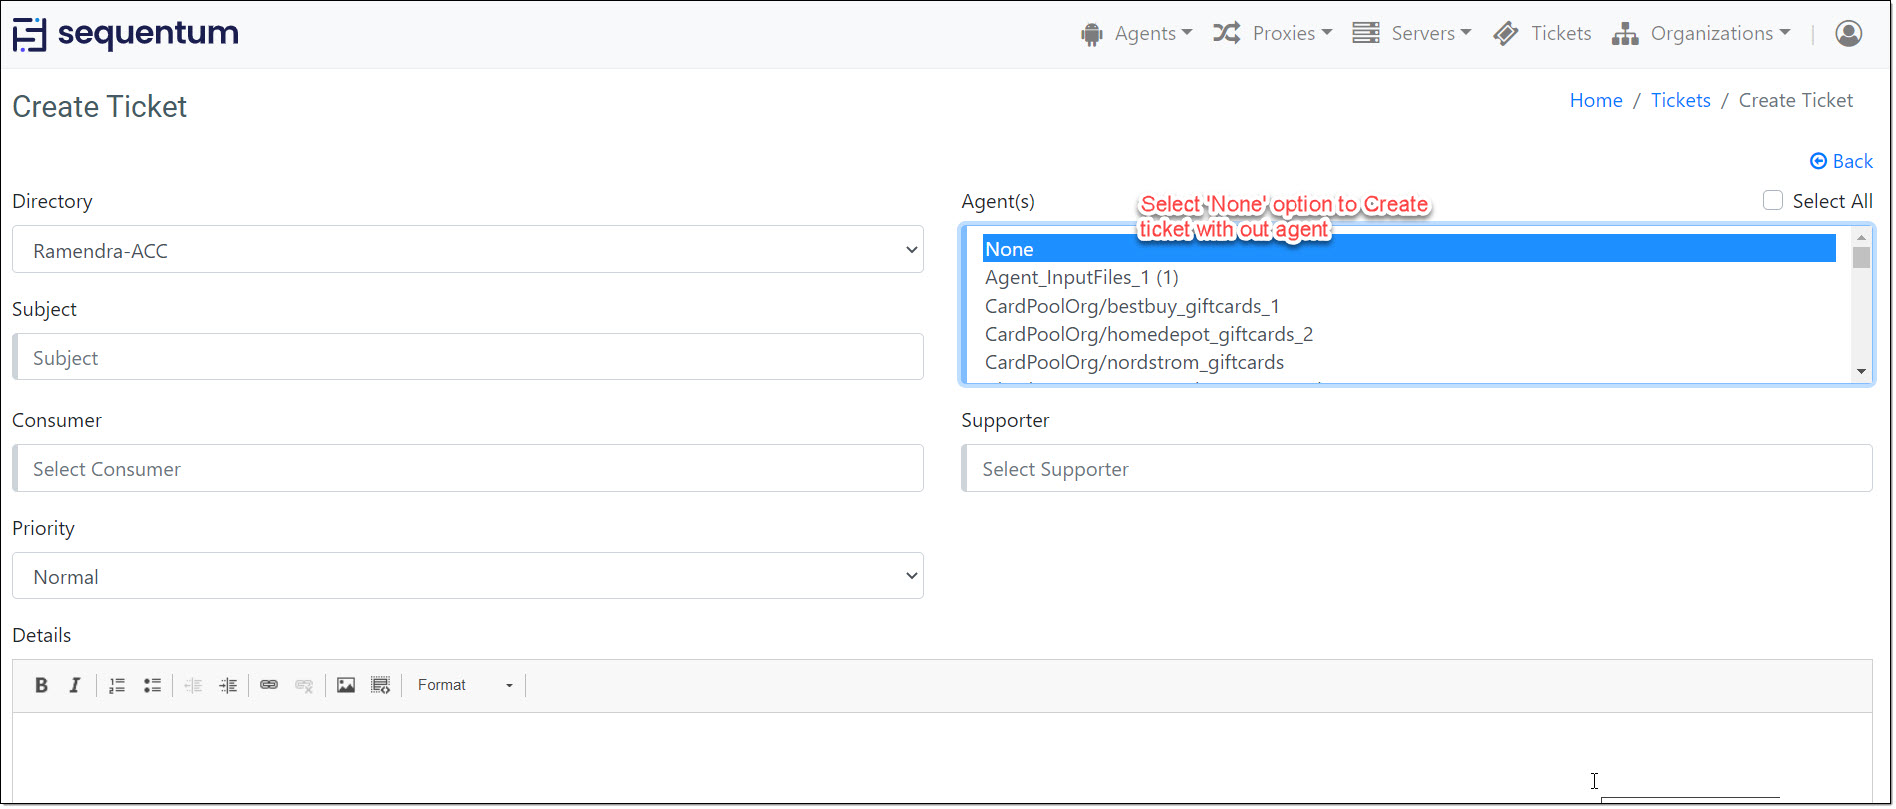
Ticket With None Agent(s)
In case you want to create a ticket that is not related to any specific agent or if you want to submit a ticket for creating a new agent then you should select the None option from Agent(s) list menu.
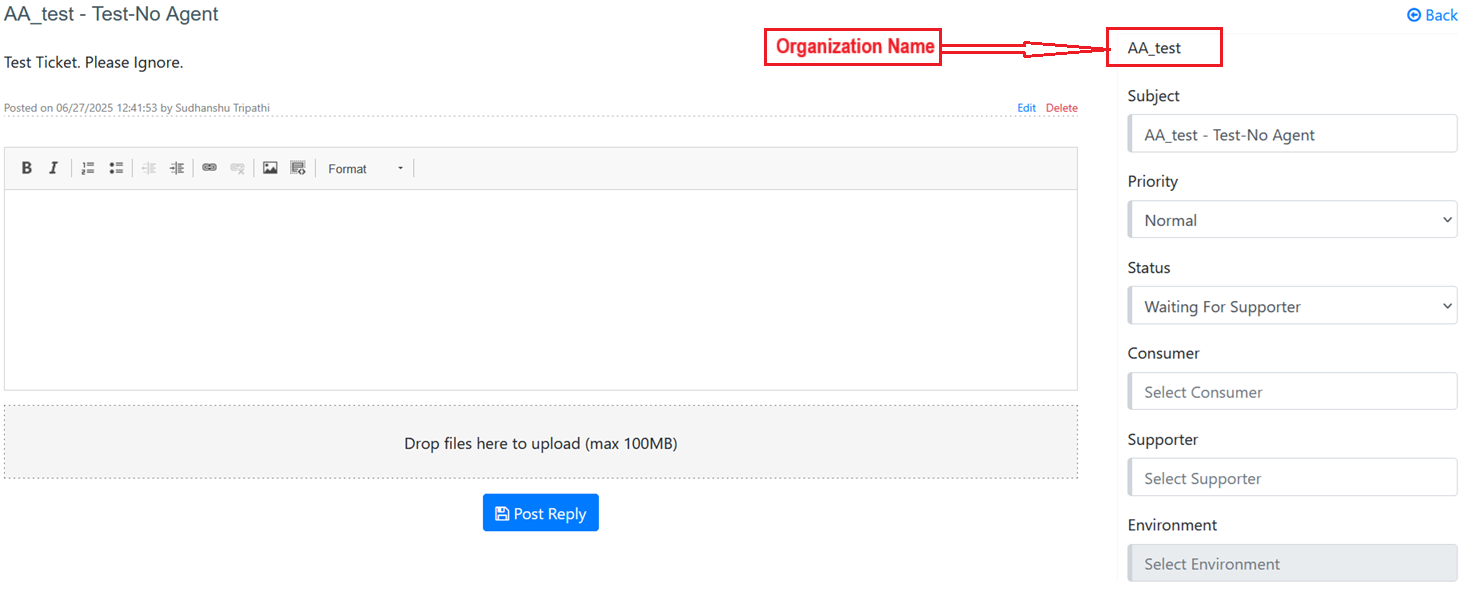
Once the ticket is created with the None agent selection you can navigate to the Ticket Details page where you will see all your ticket details along with the Organization name under which the ticket is submitted.
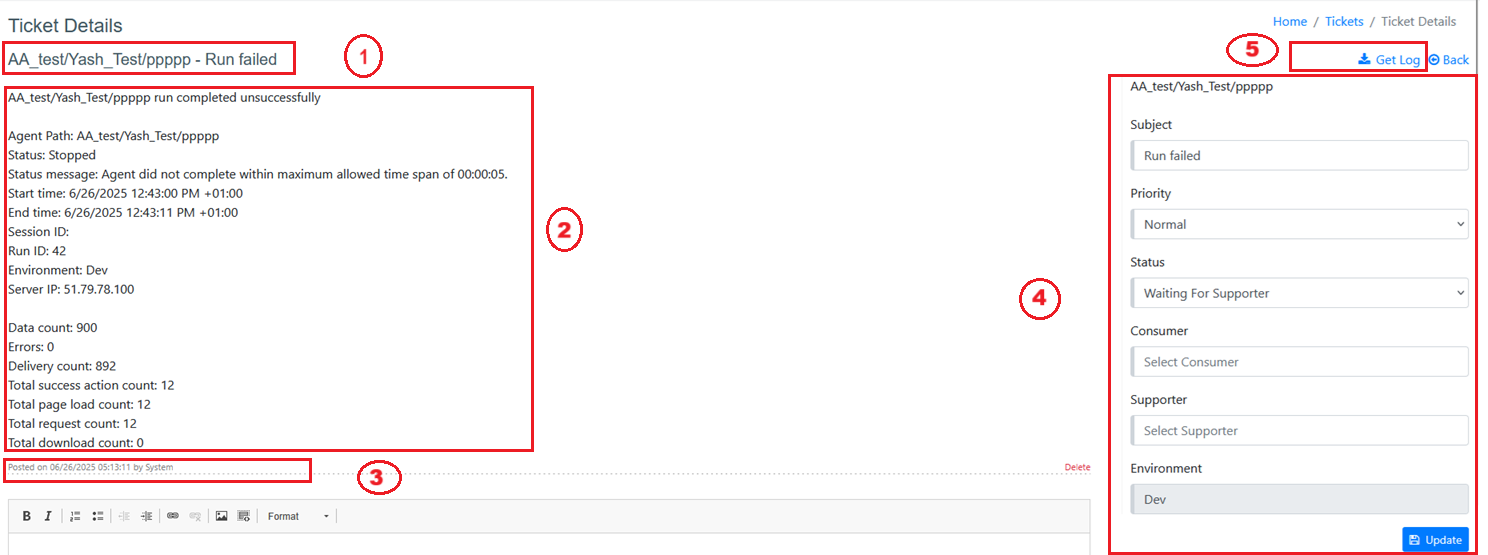
Ticket Details
The Ticket Details page displays all the information about the ticket. You can create/edit/delete new posts on this page. You can also update the ticket, change status, consumer or supporter for the ticket.
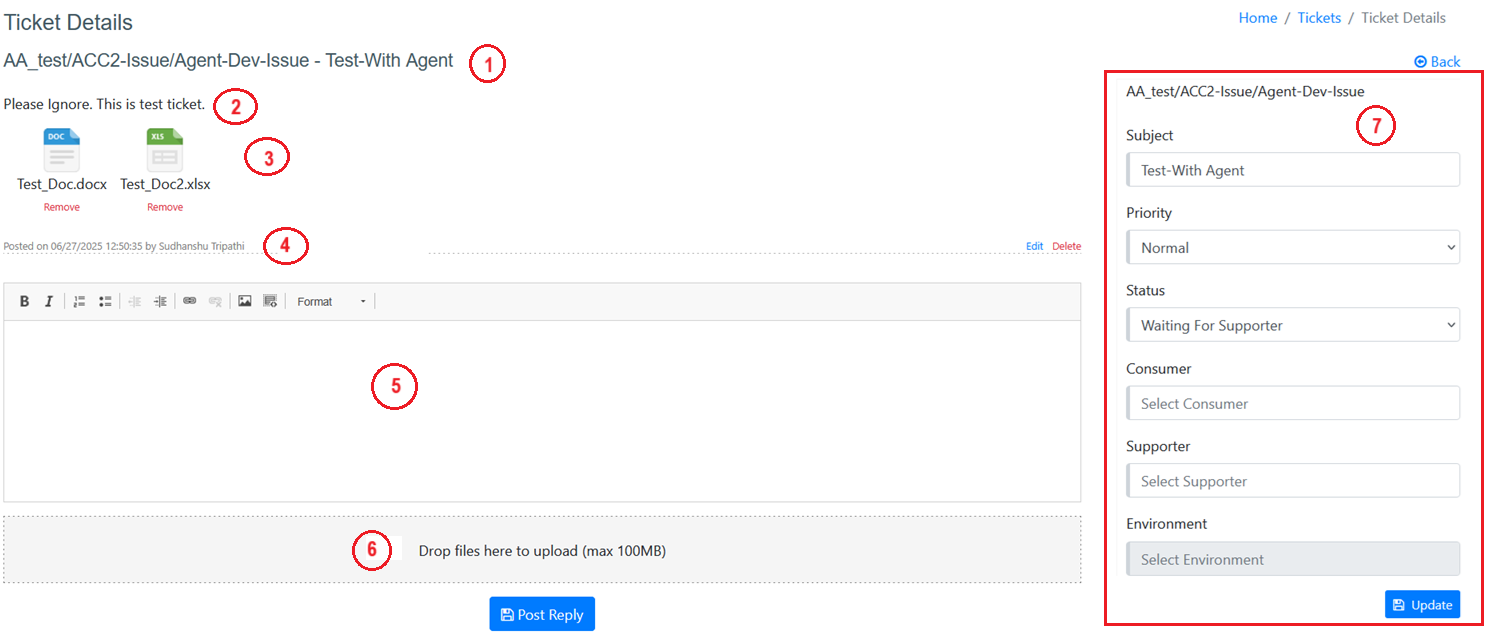
Subject: The subject is displayed as the heading text on this page.
Posts: When a ticket is created, follow up is done in the form of posts on the ticket. These posts must contain some follow up detailed text.
Attachments: Sometimes text is not enough detail and we need to attach some documents or agents with the post.
Note: You can click on the attachments to view its contents. Attachments such as image, PDF, text, DB scripts, etc can be displayed on the browser without downloading it and some files such as zip, CSV, etc are downloaded on the local file system.Post detail: Whenever a post is added, the poster account name, post date and time are recorded on the system and the same is displayed on the UI.
Note: Editing the already posted content updates the date and time accordingly.Text Editor: To create a new post or edit an existing post, this text editor box is utilized. Here users can format and update the text.
File Upload Area: Users can drag and drop files or click on this area to select files from the file system to upload with the post.
Ticket Update Form: On the ticket detail page when you are viewing the ticket detail and want to update the ticket, this form allows users to do so.
Create New Post
To add a new post, you must have a ticket modify access.
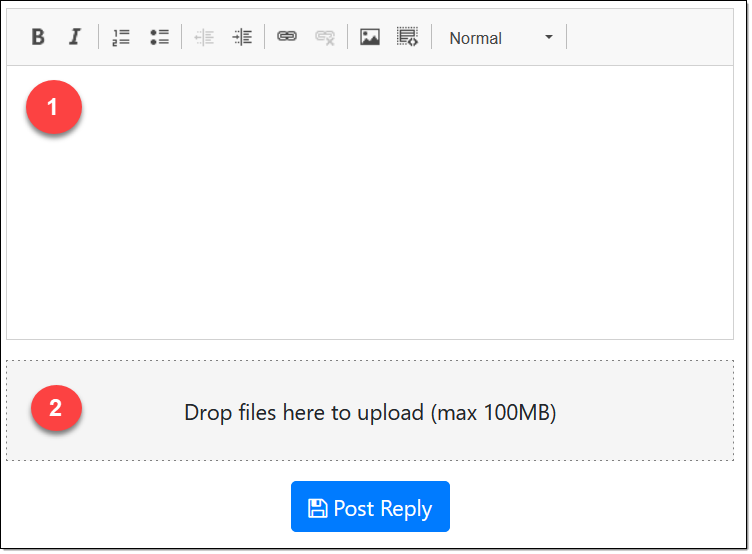
Content: To add a new post you can type text into the text editor. The text editor allows you to format the content.
Attachment: Optionally if you want to include attachment(s) with the post you can drag and drop files or you can browse files by clicking on the image upload area.
You can see the newly added posts on the page after the Post Reply button is clicked. The system sends an alert mail to consumers/supporters with the changed details.
Adding a new post, automatically switches the ticket status from Waiting for Supporter to Waiting for Consumer or vice versa depending on the instigator.
Edit Existing Post
If you want to modify the already posted content, you can click the Edit link available on the post detail row as shown on the below image.
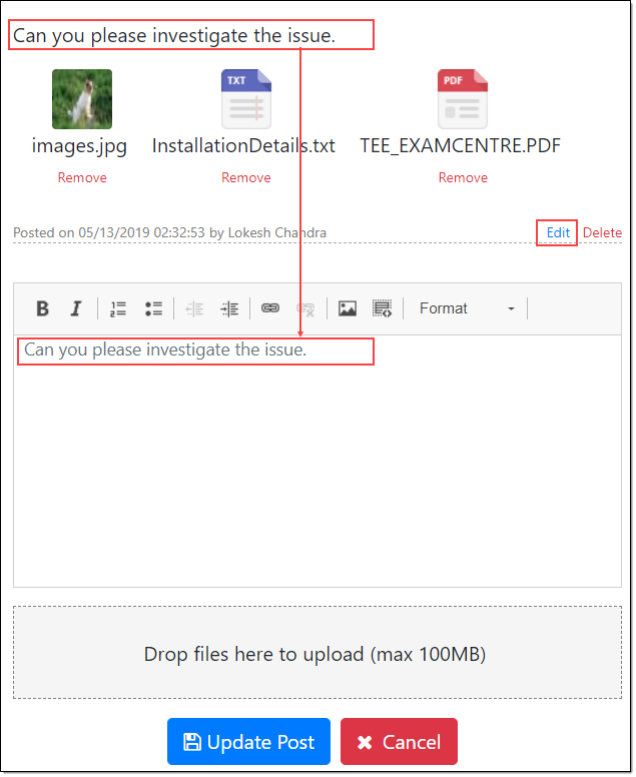
Delete Attachment
To delete a post attachment, simply click on the Remove button of the attachment as shown in the below image. This will permanently delete the attachment.
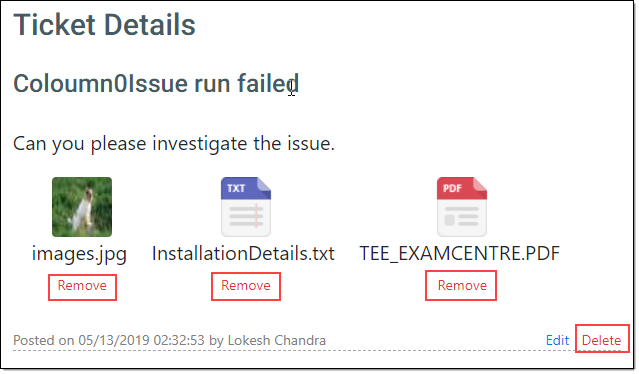
Delete Post
From the ticket detail page you can delete a post by clicking the Delete link. Deleting a post will delete all associated attachments also.
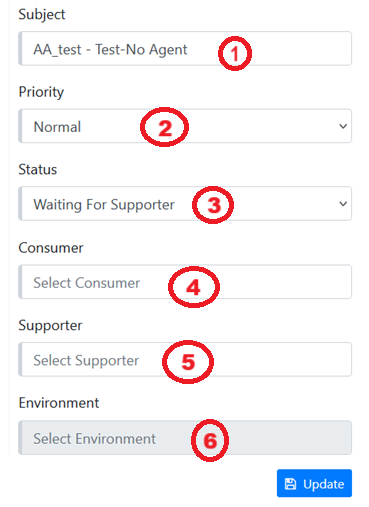
Ticket Update
Tickets can be updated from the Ticket Details page. The Ticket Update form provides options to update the following information with an Update button. You can change/modify one or more of the four available fields and then click on the update button. All modified changes will be saved in the Ticketing System database.
Miscellaneous
System Generated Tickets
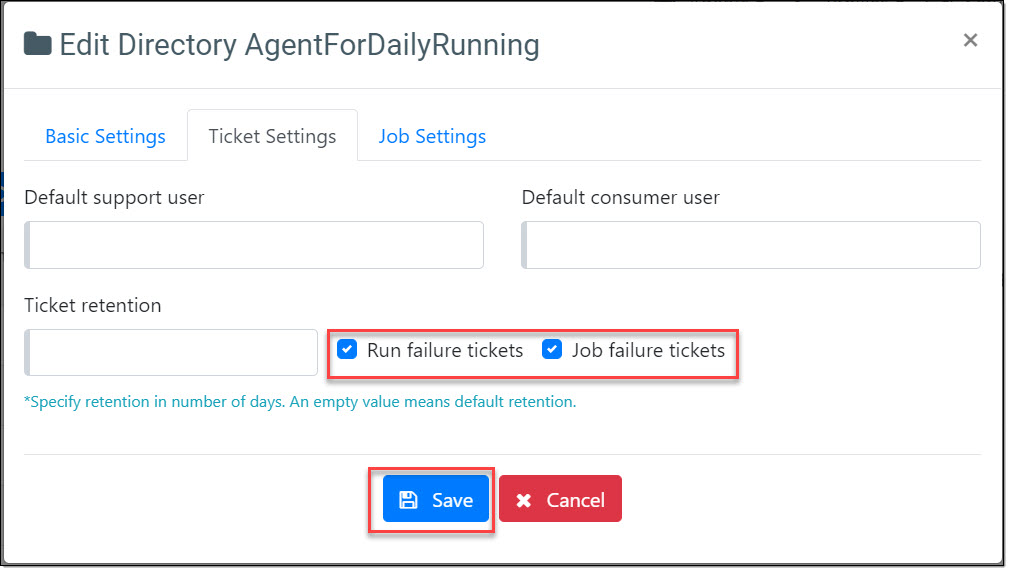
A directory can be configured to generate tickets automatically in the case of a job or run failure. You can set it on the directory. This means, for all agents inside the directory, if a job or a run fails, the system will automatically generate a ticket and set the status to Waiting for Supporter status.
To configure this option
Go to Agents > Repositories page
Locate the directory on which you want to generate tickets automatically in the case of a job or run failure.
Click on the Action Menu of the Directory.
In the populated actions, click on the 'Edit' link.
Mark the checkboxes 'Run failure tickets' and 'Job failure tickets' as per your desired selection.
Click the 'Save' button
Note: A system generated post cannot be edited. However, you can delete system generated posts and also add new posts.
The above setting can be made during directory creation as well.
The Ticket Details page of System Generated Ticket displays all the information about the ticket. You can Add/delete new posts on this page. You can also update the ticket, change status, consumer or supporter for the ticket.
Subject: The subject is displayed as the heading text on this page.
Posts: When a ticket is generated follow up is done in the form of posts on the ticket. These posts must contain some follow up detailed text.
Poster detail: Whenever a post is added, the poster account name - System, post date and time are recorded on the system and the same is displayed on the UI.
Ticket Update Form: On the ticket detail page when you are viewing the ticket detail and want to update the ticket, this form allows users to do so.
Get Log: You will find this option on the ticket details page of the run failed ticket. When you will click on this option, it will open a new tab with log contents of the failed agent run.

Default Directories
This is a collection of 'Default Ticket' directories. A user has a default directory. Users can also be granted access to some other directory via 'Directory Privilege'. In this Directory Privilege, users can be given access in two ways i.e. either by being granted access to the directory or the user group. If a user group is granted access, all users in that group will have ticketing access to the directory and its subdirectories.
To setup Default Directories for a user or a group of users, follow these steps:
Go to Agents > Repositories page.
Locate the directory on which you want to grant 'Default Ticket' privilege.
Click on the Action Menu of the Directory.
In the populated actions, click on the 'Privilege' link.
Select a User or Role.
Mark the checkbox 'Default Tickets' checked.
Click on the 'Save' button
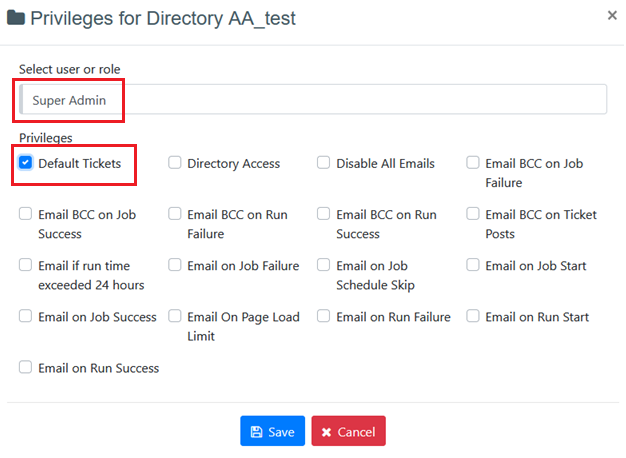
Setting the Directory as Default Ticket means the user or users in the selected group will see all tickets from all Directories marked as Default Ticket, by default (without applying any filter).
Default Supporter & Default Consumer
Default Supporter or Default Consumer can be set/removed for a directory. When it is set, any new ticket created for an agent residing in this directory will populate with the Default Supporter and Default Consumer automatically. If the user wants to override this value with some other supporter or consumer, they are free to change it.
To setup Default Supporter and Default Consumer, follow these steps:
Go to Agents > Repositories page.
Locate the directory on which you want to grant 'Default Ticket' privilege.
Click on the Action Menu of the Directory.
In the populated actions, click on the 'Edit' link.
Select your intended default supporter user and a default consumer user.
Click on the 'Save' button
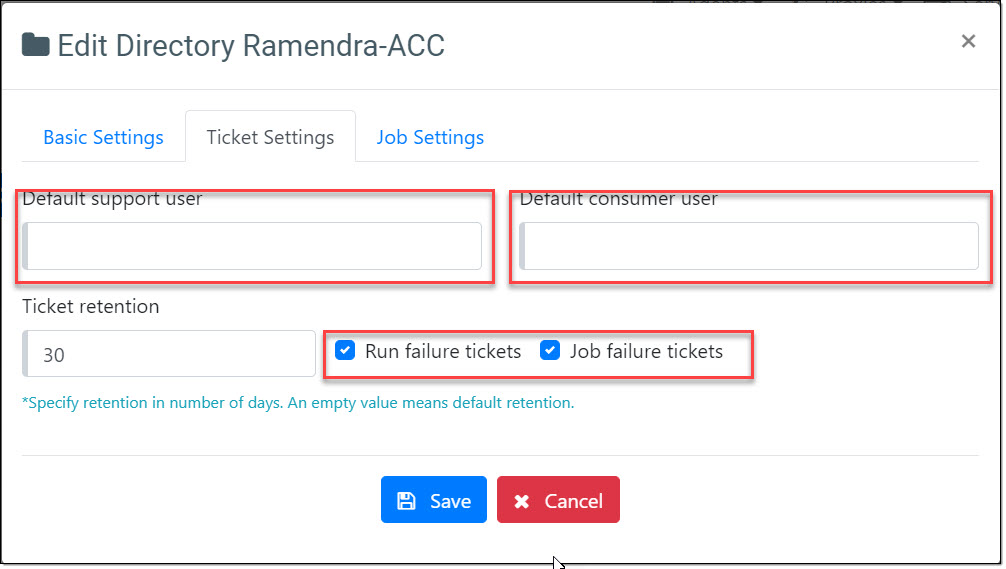
This same configuration can be done during directory creation also.
Users in the Ticketing System
Supporter User: Supporter user is a user who is involved in resolving the ticket problem/requirements.
Consumer User: Consumer user is a user who is involved in reporting the issue or feature.
Supporter Admin: This is a kind of Admin user with special access privileges from the supporter perspective.
Consumer Admin: This is a kind of Admin user with special access privileges from the consumer perspective.
Permissions for users
Only Admin Users (Admin, Super Admin, Supporter Admin, Consumer Admin, Super User) can close a ticket and delete a ticket. Other than these actions, the majority of remaining actions can be performed by all users.
NOTE - The ACC automatically deletes system-generated tickets (both open and closed) after a default retention period of 30 days, which can be configured by users as needed. Deletion occurs strictly on the retention day, ensuring that only eligible tickets are removed. Manually created tickets, whether open or closed, are excluded from deletion and will never be removed. Deleted tickets are permanently removed and cannot be recovered, so users are advised to review all necessary tickets before the retention day.